Last updated: Apr 19, 2026
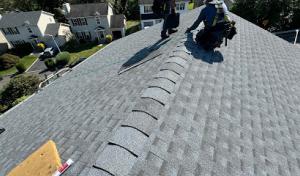
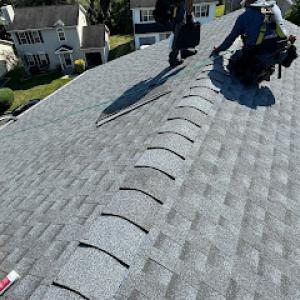
In a town where cold, snowy winters drive freeze-thaw cycles, small flashing gaps or shingle defects can turn into active leaks long before spring arrives. The risk isn't just a single cold snap; repeated freeze-thaw days push water into the tiniest openings and can spall cracked shingles or loosen fasteners. When planning a replacement, the sequence matters: avoid a full tear-off on days when overnight freezing is likely, and schedule to have the roof dry before a deep freeze sets in. If a job starts in late fall and drifts into winter, expect wind-driven snow to complicate staging and debris control on exposed decking. You want a window where temperatures cooperate enough for sealants to cure and for crews to work without stepping up safety risk from ice patches on ladders and scaffolding.
Spring in this area brings heavy rain and the occasional nor'easter that can stall or pause tear-off windows. Moisture control becomes more challenging when the deck is partially exposed or if there is lingering snowmelt in shaded sections. A practical approach is to lock in a tight moisture plan: protect exposed decking with tarps, and ensure underlayment is installed promptly to limit wicking from damp fascia or siding. Rain events can also push crews to reschedule multiple days, so building in flexibility into the timing helps avoid rushed work that could miss flashings or ventilation details. If leak-prone areas show evidence of water intrusion after gradual warming, consider staging the replacement in two phases to keep the interior drier and the project on track without forcing a long, wind-swept exposure period.
Fall is productive for roofing in this coastal corridor, but nor'easters don't respect calendar margins. Shoulder-season weather can interrupt material deliveries, staging space, and crew availability, which compresses the schedule ahead of winter. The approach here is to plan with a built-in contingency for several weather days and to identify a preferred sequence that minimizes vulnerability: initial tear-off of damaged sections or sections with active leaks, followed by a controlled dry-in period for flashing and ventilation work. Early fall wind events can also complicate temporary weather protection on exposed areas, so securing tarps and edge protection ahead of a forecast helps keep the work moving.
If you know a winter or spring teardown is coming, align the project with a plan that prioritizes moisture control and proper flashing integration. In winter, aim for a window with stable overnight lows above freezing and forecasted dry days to complete fastener work and sealant cures. For spring, schedule around multi-day dry spells and understand that back-to-back rain events can push work into the following week; build in a flexible sequence that allows the crew to address flashings and underlayment promptly when moisture is highest. In fall, lock in a completion target before the worst of winter arrives, but stay prepared for a few extra days if a nor'easter interrupts progress. A practical mindset is to treat the seasonal calendar as a dynamic plan that respects both the climate realities and the existing roofing stock in older and coastal-influenced builds alike.
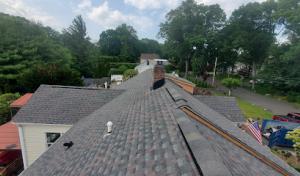
Wind-driven rain and coastal gusts shape how roofs perform here, where a dense mix of shoreline exposure and inland housing stock meet in-town streets. The Long Island Sound environment means you'll deal with more blow-off moisture and faster deterioration on unprotected edges than in many inland CT markets. When a roof faces multiple directions, average performance can hide weak points. Choose assemblies with proven wind resistance and consider edge detailing that holds up to steady salt-tinged air and sudden gusts during nor'easters. The goal is to prevent micro-leaks that sneak through flashing gaps or poorly seated fasteners, turning a small drip into costly interior damage after a heavy rain or snow event.
Wind-resistance considerations may apply for certain roofing systems in Stamford permit review and inspection, making fastening and system selection more important on exposed homes. On windward facades, shingles and panels must be tied into solid deck and fascia with proper nailing patterns and sealant backings that remain effective in salt-laden conditions. Roof edges, valleys, and penetrations demand extra attention; corners and transition points are common failure zones when rain is driven sideways at 40 mph or more. If soffit and venting details are compromised, wind pressure can lift sections or push moisture into the attic. Your choice of roofing material should be paired with a fastening scheme that locks down under gusts, and flashing materials that resist corrosion in coastal air. For those with visible exposure, consider reinforced underlayment or ice-and-water shield in critical zones to minimize wind-driven seepage.
Warm, humid summers in Stamford can intensify attic moisture and ventilation problems, especially when older roof assemblies are replaced without correcting intake and exhaust balance. A hot attic acts like a sponge, pushing humidity downward and across deck seams, potentially leading to mold, deck rot, and compromised insulation. When reroofing, ensure the attic ventilation strategy matches the new roof assembly: adequate soffit intake, ridge or roof vents, and a clear air path from bottom to top. If insulation is aging or sagging, it can trap moisture that would otherwise vent. In coastal climates, condensation can form along rafter tails and near deck joints, especially where historical detailing exists. A thoughtful balance of airflow and vapor management protects the decking and interior spaces long after the installation crews have left.
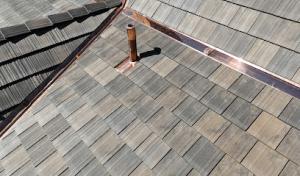
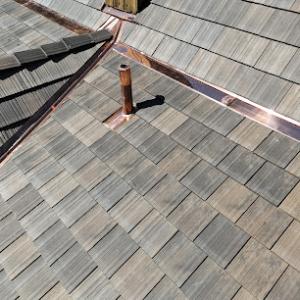
Material selection matters more here than in many inland regions. Some systems tolerate coastal spray and humidity better than others, but none are immune to improper installation. Asphalt shingles with upgraded underlayment can be a practical, value-forward choice for exposure-heavy sites, yet their long-term performance hinges on accurate nailing, solid deck preparation, and proper flashing at chimneys, vents, and skylights. Tile and slate offer durability, but their weight and edge detailing demand precision in fastening and alignment to resist wind uplift. Copper and certain composite options resist salt corrosion and provide long-term resilience in harsh coastal air, but installation integrity remains the deciding factor for performance. In all cases, verify that the chosen system accounts for the local wind profile and seasonal moisture cycles.
The interplay of freeze-thaw winters, spring rain, and fall nor'easters heightens risk of unseen moisture intrusion if ventilation and edge detailing are neglected during replacement. A plan that sequences deck prep, flashing details, and attic ventilation improvements around those seasons reduces the chance of moisture getting trapped during transitions. Each storm cycle tests existing seals; the weakest link tends to reveal itself first-edge fasteners, poorly sealed penetrations, or insufficient venting. Planning how a roof breathes both above and below the deck, with careful attention to wind-prone zones, helps avert slow-mo failures that escalate into expensive repairs after a fierce coastal storm.
Find local contractors experienced in assessing and restoring roofs after hail, wind, and severe weather events.
R&A Remodeling & Roofing
(203) 202-4234 www.randaroofing.com
Avon Ln, Stamford, Connecticut
5.0 from 127 reviews
Gunner Roofing
(866) 262-6005 www.gunnerroofing.com
78 Halloween Blvd, Stamford, Connecticut
4.9 from 591 reviews

Ga Castro Construction
(800) 838-8186 www.gacastroconstructionllc.com
1200 Summer St STE 203, Stamford, Connecticut
5.0 from 66 reviews
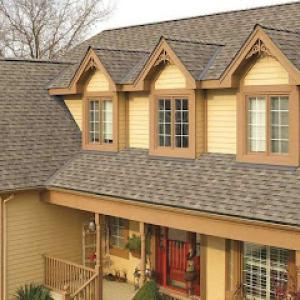
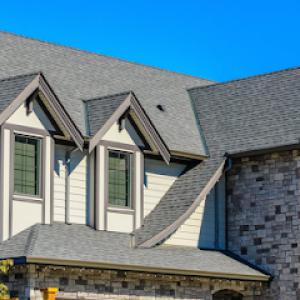
Asphalt shingles are the dominant practical choice in Stamford, reflecting ease of installation, local support, and broad availability. The city does show a notable mix of slate, wood, tile, and copper tied to older and higher-end housing stock, so your replacement can be a step toward preserving or echoing historical character. The coastal exposure from Long Island Sound means roofs face faster wear from salt spray and humidity, especially on the exposed northern and coastal neighborhoods. When choosing materials, consider how a given system will age under freeze-thaw cycles, spring rains, and fall nor'easters, and how it will look as you approach the project with a house that may have inherited architectural cues from earlier eras.
Heavy materials such as slate, clay tile, and concrete tile aren't common everywhere, but they have a strong foothold in Stamford where older homes and architecturally significant houses mark the streets. If the goal is to preserve curb appeal and maintain the visual rhythm of neighboring façades, replacement planning often involves matching existing architecture rather than simply choosing the cheapest system. Slate and concrete tile can offer long service life, but installation requires careful structural assessment and fastener choices to align with the home's geometry and ballast requirements. Clay tile pairs well with Mediterranean-tinged forms or custom brick-and stucco façades, yet it can be sensitive to structural loading and local wind patterns. In a neighborhood with varied massing and rooflines, a heritage-conscious approach helps protect resale value and neighborhood harmony.
Copper roofing remains locally relevant for flashing and architectural details on upscale and historic-style homes, especially where appearance and long service life matter. Copper's patina changes over time, and its malleability makes it a favored choice for complex ridge gratings, dormers, and decorative accents. When copper is used judiciously-on hips, valleys, and ornamental features-it can reduce maintenance on fragile flashings and provide a distinctive, timeless look. On more modern forms, copper is typically reserved for accent work rather than entire roof replacements, unless the design intent is explicitly premium or historically informed.
The timing of a roof replacement in this climate hinges on winter durability and scheduling around three volatile windows: the freeze-thaw season, spring rainfall, and fall storms. The balance is to avoid installing when temperatures are hovering near or below freezing for extended stretches, which can hinder shingle seals and adhesive performance. Spring rains demand careful scheduling to protect interior spaces during tear-off and to allow for proper underlayment drying before humidity spikes. Fall nor'easters introduce wind and moisture risks that can complicate teardown and re-covering windows of opportunity. A practical approach is to target mid-larval seasons-late spring or early fall-when temperatures are moderate, with contingency plans for extended dry spells and pre-wipe-down inspections after heavy precipitation events. In neighborhoods with substantial differences between original roof styles, coordinating the replacement with existing gutters, attic ventilation, and acceptable ladder access reduces chances of reversals or unexpected gaps in performance.
A Stamford roof plan benefits from thinking ahead about snow loads, wind-driven rain, and seasonal humidity. Materials chosen should align with existing massing, neighboring façades, and long-term maintenance expectations. For a house with heritage features, pairing asphalt with selective copper accents or choosing slate or tile to echo the historic look can yield a balanced, durable result. Regardless of material, ensure proper attic ventilation, secure flashing details, and robust underlayment-especially at transitions, valleys, and dormers-to weather the next Nor'easter with confidence.
Flat and low-slope roofing is a meaningful specialty in Stamford, reflecting the city's mix of multifamily buildings, commercial corridors, and residential additions. The combination of coastal exposure, winter snow, and the dense urban fabric means drainage reliability and edge detailing matter more on flat or near-flat sections than on steep roofs. When evaluating an addition or a multifamily complex, inspect not just the flat portion in isolation but how it ties into adjacent pitched roofs and parapets. Look for signs of old ponding, membrane wear, and compromised flashing at transitions to steeper surfaces.
Snow retention and ponding risk matter more on low-slope sections during winter than on steep-slope roofs. In Stamford, several sites contend with marginal drainage, especially where parapets or internal drains become clogged or undersized. Plan for robust fall protection and a maintenance schedule that targets debris removal before spring thaw. Ensure your system uses a proven tapered insulation or a positive drainage path toward scuppers and interior drains. Consider insulation continuity up to the edge to minimize ice dam formation at the interface between flat and pitched sections, and specify a membrane with proven cold-weather performance for wind-driven snow zones.
Mixed rooflines are common in an urban-suburban market like Stamford, so homeowners often need contractors who can handle both main steep-slope roofs and attached low-slope sections. For flat areas, prioritize membranes rated for puncture resistance and ultraviolet exposure, with durable edge detailing to keep fasteners from loosening in freeze-thaw cycles. You will likely encounter a blend of old and new layers where prior repairs created uneven surfaces; plan for mechanical securing where appropriate and ensure seams are heat-wugged or heat-welded to resist winter wind-driven寒. Choose a system that accommodates parapet flashing, vent boots, and any rooftop equipment without creating maintenance headaches later.
Timing roof replacement around Stamford's freeze-thaw winters, spring rain, and fall nor'easters requires a stepwise, weather-aware plan. Schedule flat-work during drier windows in late spring through early fall to maximize cure and adhesion, then align the adjacent steep-slope work to minimize exposed transitions. If an addition sits atop or adjacent to an existing membrane, coordinate the tear-off sequence so that new seams butt cleanly to the old, preserving a continuous barrier. In busy neighborhoods, allow for careful dumpster placement and access routes that avoid disrupting surrounding properties during quarrelsome weather events. Regular inspections in late autumn help confirm flashing integrity before the first snow.
Find specialists in TPO, EPDM, and built-up flat roofing systems for residential and commercial properties.
R&A Remodeling & Roofing
(203) 202-4234 www.randaroofing.com
Avon Ln, Stamford, Connecticut
5.0 from 127 reviews

QNK Roofing Stamford Ct
(203) 883-5033 www.qnkroofing.com
113 Stillwater Ave, Stamford, Connecticut
4.8 from 20 reviews
My Roof Guys
(347) 892-6056 www.myroofguys.com
8 Riverbend Dr, Stamford, Connecticut
5.0 from 8 reviews
R&A Remodeling & Roofing
(203) 202-4234 www.randaroofing.com
Avon Ln, Stamford, Connecticut
5.0 from 127 reviews
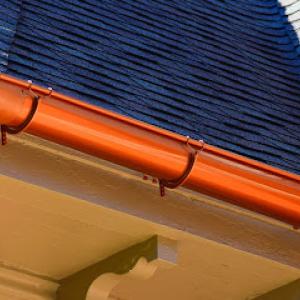
R&A Remodeling & Roofing provides roof repairs, replacements, new roof installations, chimney flashing, chimney caps, gutters, and roof maintenance for homes and businesses across Connecticut. Based in Stamford, we work with asphalt shingles, metal roofing, slate, wood shingles, flat roofing, and rubber roofs. Our team is licensed and insured, with strong experience serving Stamford, Greenwich, Darien, New Canaan, Norwalk, Fairfield, and nearby towns. Contact us for a free estimate.
Gunner Roofing
(866) 262-6005 www.gunnerroofing.com
78 Halloween Blvd, Stamford, Connecticut
4.9 from 591 reviews
Explore unparalleled exterior home solutions with Gunner Roofing in the Eastern region of the US, covering the diverse architecture of New England and the Mid-Atlantic. Our expertise extends to a variety of roofing types, windows, and siding, exclusively offered in the Northeast states of Connecticut, New York, New Jersey, Massachusetts, Pennsylvania, and Rhode Island. We understand the unique architectural nuances and historical importance of homes in this area, ensuring a harmonious blend of aesthetic appeal, functionality, and preservation of architectural integrity. Elevate your home’s presence with Gunner Roofing's dedicated service in the East.

Ga Castro Construction
(800) 838-8186 www.gacastroconstructionllc.com
1200 Summer St STE 203, Stamford, Connecticut
5.0 from 66 reviews
G.A. Castro Construction is a locally owned and operated general contractor based in Stamford and Guilford, Connecticut. We specialize in residential and commercial roofing, siding, gutters, copper work, and full storm restoration services. With years of experience in the construction industry, our team is fully licensed, insured, and committed to delivering high-quality craftsmanship and reliable customer service. Our offices are located at: 1200 Summer St, Unit 203, Stamford, CT 06905 1300 Boston Post Rd, Guilford, CT 06437 We serve clients throughout Fairfield and New Haven counties, helping homeowners and businesses protect and enhance their properties with trusted solutions and expert care.

Casa Bella Exteriors
(475) 619-0393 www.casabellaroofingllc.com
585 Cove Rd, Stamford, Connecticut
4.9 from 120 reviews
Specializing in all of your exterior needs, Roofing, Siding, Gutters and Copper work
Signature Exteriors
(203) 720-6504 www.signatureexteriors.com
425 Fairfield Ave #1A13, Stamford, Connecticut
4.9 from 61 reviews
Since 1951, We’ve Performed 20,000+ Roofing & Siding Projects… BY FAR The Most In Fairfield & Westchester Counties.
K&C Home Services
(203) 280-3662 kchomeservicesllc.com
60 Strawberry Hill Ave Apt 414, Stamford, Connecticut
5.0 from 25 reviews
🏗️ K&C Home Services was built with the commitment to ensure cost-effectiveness and high-quality in every construction project we are hired to work on for the community of Stamford, CT and the surrounding areas. 🔰 Our company was founded under the great values of: • Professionalism • Commitment • Diligence • Cost-Effectiveness 📞 Contact our team today and get a free estimate 📝 for any of the services that we offer. We are more than ready to start working on your projects — our goal is to exceed your expectations and always provide you with the best quality 🛠️. ✅ Contact our professional and reliable company today to save time and money on your upcoming construction project!

QNK Roofing Stamford Ct
(203) 883-5033 www.qnkroofing.com
113 Stillwater Ave, Stamford, Connecticut
4.8 from 20 reviews
QNK Roofing is a family owned roofing company serving stamford ct and the surrounding communities. We specialize in roof leak repair, flat and metal roofing services. Our professional roofers have over six decades of combined experience working with roofs, siding and gutters. We have earned a great reputation thanks to our quality work and attention to detail. We guarantee satisfaction with every job we do and supply references upon request. Our local roofers are dedicated to giving the highest quality craftsmanship and quotes that fit each client’s individual budget. Give us a call if you are in need of residential or commercial roofing services.
North East Interiors & Exteriors
28 Quintard Terrace, Stamford, Connecticut
4.8 from 16 reviews
Building customers for life
US Juarez Roofing
(203) 274-0522 usjuarezroofingllc.com
38 Woods End Rd, Stamford, Connecticut
5.0 from 8 reviews
US Juarez Roofing is a trusted roofing company proudly serving Stamford, Darien, Greenwich, Norwalk, and nearby areas in Connecticut. As an experienced roofing contractor, we provide high-quality roofing services for residential properties, from roof installation and roofing replacement to expert roofing repair. We work with roofing shingles, TPO roofing, EPDM roofing, and durable metal roofing solutions. Our expert team also specializes in gutter installation and siding installation, ensuring complete exterior protection. Fully licensed and insured, we deliver reliable craftsmanship and lasting results. Contact us today for a free quote and learn more about our roofing services near you from a team you can trust!
My Roof Guys
(347) 892-6056 www.myroofguys.com
8 Riverbend Dr, Stamford, Connecticut
5.0 from 8 reviews
We are Roofing Company we operating in all Fairfield County in Connecticut and Westchester County NY. We can repair/replace or build any type of roof, siding, porch, patio, deck, chimney and much more exterior projects. Our goal is perfection and safety.
One Stop 360
101 Seaside Ave, Stamford, Connecticut
4.2 from 53 reviews
At One Stop 360, we've always prided ourselves on 18 years of building a relationship with our clients before ever focusing on the profitability of a project. Surprising our customers with the competitiveness of our project bids, and then delighting them with the superiority of our work, we've set ourselves apart from other handyman and renovation services. Approaching home remodeling and repair from a different angle altogether, it is our highest goal to become your preferred home contractor.

A&S Roofing Company Stamford Connecticut
(203) 717-5802 www.asroofingwestchester.com
20 Summer St Suite 409, Stamford, Connecticut
5.0 from 4 reviews
A&S Roofing Company Stamford Connecticut is a locally established roofing service provider serving residential and commercial properties across Stamford CT. Property owners searching for roofers Stamford and reliable roofing companies Stamford choose our team for consistent workmanship and local expertise. As a professional roofing company Stamford, we handle inspections, installations, and ongoing roofing services for many property types. Customers comparing roofing contractors Stamford rely on our experience and proven service standards. Homeowners and businesses searching for roofing companies near me or roofers near me trust our local presence and dependable results. When searching for a professional roofing company near me in Stamford.
In Stamford, most full roof replacements require a Building Permit through the City Building Department rather than being handled as permit-free maintenance. Before any tear-off or new installation begins, you'll want the contractor to confirm the permit path and gather the needed documents. This isn't a form you can skip, even if the project seems straightforward or framed as cosmetic. The city's process is designed to align with local weather realities, load considerations, and the housing stock mix.
Contractors typically submit project details that cover the roof's scope, the proposed materials, and the sequence of work. Expect a plan that includes deck inspection points, underlayment type, and the rafter or truss support notes. The review isn't only a rubber stamp; it looks for proper underlayment installation, venting strategy, and wind-driven rain precautions suitable for the coastal exposure. Once submitted, the plan sits in queue while the city checks for code compliance and site-specific adjustments.
The job must pass inspections after decking and underlayment are installed and again after final installation. The first inspection verifies that the deck surface is sound and ready for underlayment, with attention to flashing details around chimneys, vents, and skylights. The second inspection confirms that the finished roof meets the approved plan, including correct attachment, a properly installed underlayment system, and flashing integrity. Delays or rework requests typically arise if inspectors find gaps in ventilation, fastening patterns, or material tolerances.
Processing can take about 1-2 weeks in Stamford, so homeowners trying to beat winter weather or a storm-damaged rush should account for permit lead time before tear-off. If a major nor'easter or mid-winter freeze threatens, coordinate with the contractor to block a window for permit actions and inspections. Weather windows matter: inspections may need to be rescheduled if a storm creates unsafe access or uneven footing on the roof. Keep a clear line of communication with both the contractor and the Building Department to minimize hold times.
Ask the contractor for a permit timeline outline and contact person at the Building Department. Confirm what documents will be submitted and when to expect inspection notices. Have a contingency plan for weather-related delays and ensure access routes and on-street parking support the inspection schedule. If repairs involve fire-resistant or moisture-control features, verify that these specifics are reflected in the permit package and inspection criteria. This proactive approach helps keep the project moving through Stamford's permit and inspection workflow.
Stamford's cost range spans from asphalt shingles at 350-900 USD per square up to copper roofing at 2500-7000 USD per square, reflecting the city's unusually broad material mix. That spread means a homeowner can tailor a replacement to fit both performance needs and budget, from solid mid-range shingles to high-end options. The presence of coastal exposure, older homes, and demand for durable finishes all push pricing in notable ways.
Costs in Stamford are pushed upward by demand for premium materials like slate, tile, and copper that are more common here than in many Connecticut cities. If a home has historic or distinctive architectural features, matching the existing look with slate or clay tile can be attractive but expensive. Concrete tile sits between mid and high ranges and offers strong performance in humid summers and Nor'easter winds, while copper provides the longest service life but at a premium.
Project pricing can also rise when labor is extended by permit timing, weather delays, and complex roof geometry on older or higher-end homes extend labor and staging needs. In this area, snow loads and winter freezes drive careful sequencing of materials and crew scheduling, which can lengthen the project window and raise daily crew costs. A steeper pitch or complicated eaves and dormers can add to labor hours, scaffolding, and protective measures.
To plan, list the viable material options for the house (from asphalt to copper), then run two scenarios: one prioritizing cost efficiency with reliable mid-range shingles, and another emphasizing longevity and curb appeal with slate or copper accents. Consider the long-term value, maintenance needs, and how the chosen finish harmonizes with nearby homes and the observed street's architectural character.
Get a clear picture of your project costs upfront - no commitment required.
R&A Remodeling & Roofing
(203) 202-4234 www.randaroofing.com
Avon Ln, Stamford, Connecticut
5.0 from 127 reviews
K&C Home Services
(203) 280-3662 kchomeservicesllc.com
60 Strawberry Hill Ave Apt 414, Stamford, Connecticut
5.0 from 25 reviews
US Juarez Roofing
(203) 274-0522 usjuarezroofingllc.com
38 Woods End Rd, Stamford, Connecticut
5.0 from 8 reviews
In Connecticut, homeowners in this area typically rely on insurance for wind and hail damage rather than routine age-related roof wear. That means a claim may be the primary route to cover sudden damage from storms, fallen branches, or severe winter ice and wind events. If a hailstorm or nor'easter rips shingles or loosens flashing, the claim path becomes the path forward, not a standard maintenance replacement.
Adjusters may ask for detailed roof information, photos, contractor estimates, and the roof's age, which is especially important in Stamford's mix of newer asphalt roofs and older premium systems. Document visible damage from multiple angles, include attic signs like staining or leak traces, and keep an organized file of correspondences. If there are snow-load related concerns, photographs that show ice damming or gutter strain can help justify the damage.
There is no broad state-level insurer withdrawal pattern in Connecticut, but premiums can still be influenced by roof type, roof age, and recent claim history. For example, a newer asphalt roof exposed to repeated storms may still present a clear wind-driven failure, while an older premium system could prompt questions about wear versus sudden damage. Be prepared to distinguish between long-term aging and event-specific harm.
Start with a rapid, thorough assessment after a wind or winter event. If possible, limit further interior exposure by tarping leaks, but avoid unnecessary stair climbs or risky climbs on a snow-covered roof. Call in a reputable local contractor to provide a detailed, dated estimate with clear scope of work and photos to support your claim. Maintain a calm, factual narrative for the insurer, and keep copies of all repair attempts and communications.
Connect with contractors who help homeowners navigate the claims process from damage assessment to final approval.
Ga Castro Construction
(800) 838-8186 www.gacastroconstructionllc.com
1200 Summer St STE 203, Stamford, Connecticut
5.0 from 66 reviews
Stamford faces a distinctive pattern of emergency repairs and storm-related service calls, so when you vet roofers you want to hear specifics about rapid response. Ask for clearly defined response windows, on-site arrival expectations, and a plan for after-hours or weekend calls. A contractor should outline how they triage damage after a nor'easter or heavy rain, including how quickly they can deploy safety measures, tarp services, and temporary staging to prevent further interior exposure. Look for crews with a local rotating roster, so you know they maintain a bench of nearby teams who can mobilize without delay when conditions worsen.
Cleanup is a major local hiring priority, and crews are expected to leave tight suburban lots and established neighborhoods as they found them. During the vetting process, request a written debris plan: daily containment methods, drop-zone management on narrow driveways, and procedures for granular cleanup around landscaping. Check references for post-job cleanliness and proof of disciplined waste management-routed tarps, hauled-off scraps, and vacuuming of dust from gutters and masonry joints. A responsible roofer treats cleanup as part of the contract, not an afterthought.
Chimney-related work is unusually prominent, so a suitable roofer should coordinate flashing with masonry seamlessly. Ask about recent chimney projects, materials used, and how they handle sealant transitions between roof planes and brick or stone. Evaluate their approach to flashing around flues, chimney crowns, and step or counter-flashing that ties into mortar joints. If you have a historical or masonry-heavy home, verify experience with compatible sealants and color-matched flashing to minimize future maintenance.
Consider how the contractor schedules around Stamford's winter freeze-thaw cycles, spring rains, and fall nor'easters. A dependable roofer will present a realistic project timeline that accounts for weather buffers, material acclimation, and safety checks after each major front. Ask for a single point of contact, explicit milestones, and a written plan that covers weather contingency steps, on-site safety, and daily progress updates.