Last updated: Apr 19, 2026
Cold winter snaps followed by milder daytime temperatures produce repeat freeze-thaw cycling on roof edges, flashing joints, and older shingle systems. This pattern stresses the typical mid-century suburban homes common in the area, where many roofs are now on second or third replacement cycles. Decking condition, old flashing, and ventilation upgrades become central when deciding whether to reroof or merely repair. Snow and ice events often leave roofs wet for days, making exposed underlayment, valleys, and chimney intersections particularly vulnerable if repairs or replacement are opened too late in winter. Recognizing these unique dynamics helps set realistic expectations for performance and longevity.
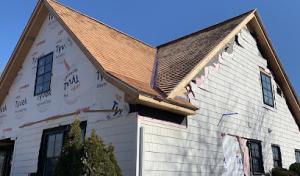
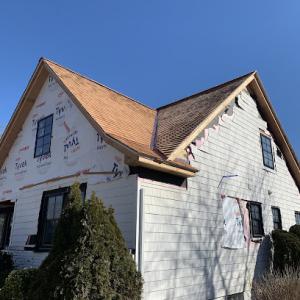
In practice, the first places to watch are the edge details and any joints that carry flashing from the roof to walls. Freeze-thaw cycles push and pull at these seams; flashing that was installed a decade or more ago can develop micro-cracks that let moisture seep in during thaws. Valleys, which carry a heavy load of melted snow, are another high-risk area, especially if the underlying underlayment has seen sun exposure or wear. Chimney intersections-where masonry and metal flashings meet the roof plane-often suffer from repeated ice damming and compromised sealant. On older decks, hidden rot or delamination can exist beneath seemingly sound shingles, silently accelerating damage once moisture moves in.
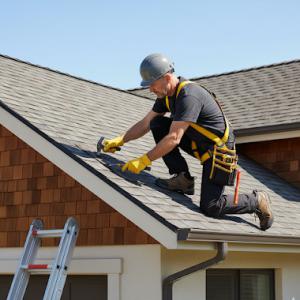
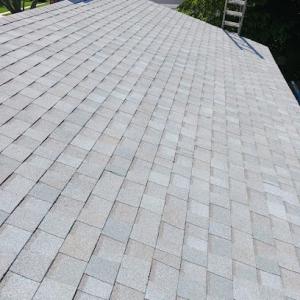
Begin with a winter-to-spring check that prioritizes safety. From a ladder or with a qualified contractor, inspect for soft spots in decking, lifted or curling shingles, and exposed underlayment along eaves and in valleys. After a major thaw, perform a focused review of flashing at chimneys, vents, and skylights, looking for rust, loose fasteners, or lifted edges. If access is limited by ice, schedule inspections as soon as conditions permit, because delays can let moisture penetrate deeper into the roof system. During milder stretches, monitor attic ventilation: confirm soffit and ridge vents are unobstructed and that insulation is not blocking air access, which can create condensation that freezes and expands along the decking and fasteners.
If decking shows signs of widespread rot, or flashing is repeatedly failing despite targeted resealing, a reroof may be the wiser long-term move. In mid-century homes with multiple penetrations, ventilation upgrades often pair well with reroofing because improved airflow reduces condensation and helps drying after storms. If the structure has a fairly solid deck but flashing and sealants are aging, a carefully staged repair can bridge the season, provided that work is completed before the next winter cycle intensifies. The decision hinges on decking integrity, the condition of flashing, and how well the attic breathes.
New Hyde Park roofs benefit from modern underlayment choices that resist moisture penetration during freeze-thaw cycles. Continuous, properly lapped underlayment under shingles or tiles helps channel moisture away from seams and penetrations. Upgrading ventilation becomes essential when older systems bottle up warm, moist air in winter, which then condenses on cold surfaces and freezes. In practice, verify that attic insulation does not crowd the soffit intake and that ridge ventilation is present and unobstructed. For chimney intersections, consider a two-line approach: a primary flashing seal around the masonry, plus secondary metal or sealant protection at the joints where ice tends to form.
If there is no active leakage, schedule a late-summer or early-fall inspection to address wear in the edge zones, flashing joints, and any visible deterioration in shingles or tiles. For roofs that already show advanced edge wear, plan a reroof with improved ventilation and upgraded flashing details. If a full replacement is not immediately feasible, target the most vulnerable penetrations first: chimney flashing, skylights, and vent stacks, using high-quality sealants and corrosion-resistant flashing materials. Always trim back overhanging branches near the roof line to reduce debris accumulation and moisture retention in winter.
Finally, document the age and condition of the decking when evaluating a reroof. A solid deck paired with up-to-date flashing and enhanced ventilation often yields the most reliable performance during brutal winters. In a neighborhood where second and third roof cycles are common, investing in a robust underlayment, clean flashing transitions, and an improved attic air plan pays dividends by delaying the next full reroof and reducing ongoing maintenance fights with the elements.
In New Hyde Park, spring and fall wind events are a bigger scheduling and repair driver than major hurricane rebuilding, with lifted shingles, ridge damage, and flashing leaks showing up after fast-moving regional storms. When a brisk gust sweeps through the avenues and tree-lined blocks, the first signs are often not a full roof collapse but discreet but relentless leaks around chimneys, skylights, and vent stacks. You should treat these as urgent warnings: a small shingle lift or a marginal flashing seam can become a torrent after a quick freeze-thaw cycle. Inspect after every high-w speed event, pay close attention to attic condensation and surprising damp spots below the chimney chase, and act quickly to seal the entry before interior damage compounds.
Homes in neighborhoods where roofs butt up against tall oaks and maples experience more wind-borne debris and branch strikes even when the overall storm seems mild. In these blocks, a stray branch or a loose shingle can punch through protective layers and expose underlayment to moisture. Flashing around roof penetrations-chimneys, vents, and skylights-tends to fail first in freeze-thaw cycles, because water sneaks under poorly seated metal flashing and then expands when temperatures drop. Because massed tree cover concentrates debris and creates micro-damages, a single wind event can produce multiple isolated leaks rather than a single, obvious failure. Your response plan should focus on rapid tarping, controlled leak containment, and a quick assessment of each penetration point after every coastal spray or gust storm.
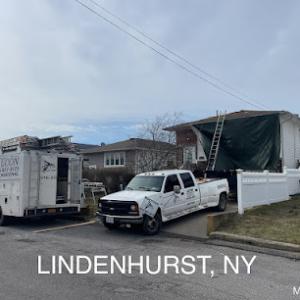
Contractor signal data shows emergency repair and storm damage service are highly prevalent here, matching a market where homeowners often need quick tarping and leak control before a full reroof can be scheduled. This reality means you should anticipate short-notice service calls following a regional storm, especially if branches or shingles were displaced. Treat tarps as a temporary, strategic hold until a full assessment can be completed. Prioritize securing the most vulnerable sections first: the ridge lines where wind shears catch, the valley joints where water can pool, and any flashing seams that show signs of lifting or corrosion. Delays in addressing these spots allow water to track along rafter tails and into soffits, amplifying interior damage during the next freeze-thaw cycle.
Start by mapping high-risk zones on your roof: chimney-and-flashing junctions, skylight perimeters, and the peak ridge lines that catch wind. After a storm, perform a focused exterior inspection from ground level and, if safe, from a ladder with a buddy. Look for lifted shingles, loose flashing, and dark streaks up the walls where water has run. If you find signs of leakage, don't wait for a total roof replacement to begin; call for a rapid tarp solution and a professional evaluation to determine whether resealing, flashing replacement, or more extensive repair is needed. In this market, readiness and fast action limit interior damage and preserve more of the existing roof's life before a full reroof is necessary.
Find local contractors experienced in assessing and restoring roofs after hail, wind, and severe weather events.
Preferred Exterior
(516) 354-7252 www.preferredexterior.com
1998 Hillside Ave., New Hyde Park, New York
5.0 from 50 reviews
Rebuild America-Roofing-Windows & Remodeling
(516) 407-7821 rebuildamericany.com
Serving
4.9 from 34 reviews
Preferred Exterior
(516) 354-7252 www.preferredexterior.com
1998 Hillside Ave., New Hyde Park, New York
5.0 from 50 reviews
We are a family owned and operated establishment specializing in commercial, industrial and residential roofing and siding. We are certified installers of all major manufacturers. We are fully licensed and insured. Our reputation is built on knowledge, craftsmanship and integrity.
TMT Roofing
Serving
5.0 from 69 reviews
Established in 1963, TMT Roofing is your top choice for all commercial and residential roofing needs in Long Island, NY. We specialize in commercial roofing, gutter services, and siding, ensuring our dedicated team provides unparalleled expertise and exceptional customer service. We offer comprehensive roofing solutions, including silicone coatings, EPDM, shingles, and metal roofing. Whether you require a new roof installation or urgent repairs for leaks or damage, we have you covered. Trust TMT Roofing for high-quality materials, expert craftsmanship, and affordable rates—your satisfaction is our top priority.
Alcon Roofing Experts
(516) 807-3975 alconroofingexperts.com
Serving
5.0 from 25 reviews
Roofing, Siding & Gutters
MasterCraft Chimney Sweep & Cleaning
Serving
4.9 from 36 reviews
Chimney Sweep & Repair Services

Delta Roofing Long Island
(516) 689-0889 deltaroofinglongisland.com
Serving
5.0 from 74 reviews
Delta Roofing Long Island is your trusted roofing contractor, serving residential and commercial clients across Long Island, New York. We specialize in metal roofing, roof repairs, cleaning, and maintenance services. Our fully licensed roofing expert team offers quality roof inspections, leak repairs, and complete replacements. Whether it's a new roof installation or a routine checkup, we use premium materials to ensure lasting results. We are proudly serving Long Island and surrounding areas. Contact us today for a free estimate and professional roofing solutions you can trust!
Alb Best Way Construction
(516) 244-0547 roofingalbbestway.com
Serving
5.0 from 75 reviews
ALB BEST WAY HOME IMPROVEMENT is fully licensed, insured, and bonded home improvement and roofing contractor. Specializing in roofing, chimneys, gutters repair, gutters install, gutter cleaning, siding, steps, masonry, skylight, sheetrock and more.
Rebuild America-Roofing-Windows & Remodeling
(516) 407-7821 rebuildamericany.com
Serving
4.9 from 34 reviews
Rebuild America-Roofing-Windows & Remodeling is a roofing contractor in Mineola serving Nassau, Suffolk and Queens, We have 1000s of local referrals. Our roofing company offers residential roofing, residential roof repair, residential roof replacement, residential flat roofing, commercial roofing, siding, gutters, and more. Customers love us because of our comprehensive roof warranties and our affordable roof financing options. We also have industry affiliations and certifications such as GAF Master Elite Factory Trained, Velux Certified Skylight Installer, and many more. If you want to experience how your most trusted Long Island roofing company embraces our motto "Rebuild America-One Home at a Time!", call us now for a free estimate!
Connaghan Construction
(516) 800-4952 www.connaghanconstructionny.com
Serving
4.8 from 26 reviews
Connaghan Construction provides roofing, gutters, siding, masonry, waterproofing, and chimney services in Jericho, Mineola, and surrounding areas of NY.

Foley & Sons Roofing
(332) 895-1121 foleyroofnewyork.com
Serving
5.0 from 52 reviews
Foley & Sons Roofing has built a reputation for dependable work and genuine care for every home and business we serve. Our family-run team understands how important a solid roof is to your peace of mind, which is why we pay close attention to every detail, from the first inspection to the final cleanup. We handle everything from small repairs to full replacements, always explaining your options and making sure you feel comfortable with each decision. When you choose Foley & Sons Roofing, you get friendly service, skilled workmanship, and a team that treats your property like their own.
Supreme Island Roof Repair
(631) 973-6194 supremeislandcorp.com
Serving
4.9 from 36 reviews
With over 25 years of experience serving all of Long Island, we are your local experts when it comes to Roof Repair & Replacement or Installation. Roofing is not our only service we offer to our customers you can count on us for Chimneys, Siding, Gutters and Masonry services too. Get started with your totally Free Estimate by either calling us now or by visiting our website.
Prodigy Contracting
(516) 318-0105 www.prodigycontracting.net
Serving
4.9 from 38 reviews
Prodigy Contracting is a Veteran owned business servicing Long Island, New York since 2005. As a GAF Presidential Master Elite Roofer, we offer our clients exceptional quality and a lifetime warranty. Our siding designs feature innovative looks, with rustic contemporary touches and attention to detail service. We use Drone Technology to provide a 360 degree rendering of your project before and highlight your beautiful results after. We look forward to meeting you. Let us transform your home into you Dream Home

Reliable Seamless Gutters
(347) 416-0771 reliableguttersroofers.com
Serving
4.9 from 94 reviews
Reliable Seamless Gutters is your trusted partner for professional roofing and gutter services that not only enhance the overall aesthetics of your home but also provide essential protection against the most challenging weather elements. Our team consists of highly trained contractors who take pride in their workmanship and go the extra mile to ensure your satisfaction. We specialize in installing quality gutters and roofing systems tailored to your needs. When you choose us, you can expect a thorough consultation to assess your home and discuss the best options. Our meticulous installation ensures every component fits perfectly for optimal effectiveness and durability. Trust us to provide a reliable roofing and gutter system for years.
In New Hyde Park, asphalt shingles are the practical default for most homes, but the local material mix also includes slate, clay tile, concrete tile, wood shakes, and some metal. That mix means replacement planning hinges on structural load, matching, and flashing complexity more than simple tear-off pricing. When planning a reroof, you'll want to verify that the existing deck and framing can carry heavier options-slate and tiles bring extra weight that can force separate inspections or reinforcement. Matching isn't only about color and texture; it's about how the new material interacts with existing penetrations, skylights, and chimneys that are common on the neighborhood's older houses.
Older Nassau County homes frequently show a dense layout of chimneys, skylights, vent stacks, and dormers. On these parcels, heavier materials can trigger scrutiny of deck condition and accessory details during reroofing. A slate or clay tile replacement, for example, may require a reinforced deck, upgraded fasteners, and careful evaluation of eave overhangs. Even if a straight tear-off seems straightforward, the crew should recheck flashing details around complex junctions where chimneys meet roofing planes, as well as around ridge transitions where venting penetrates the roof. In practice, sheet metal step flashing, counter-flashing over masonry, and compatibility with old lead or copper lines often determine whether a heavier option is feasible. The goal is to avoid later leaks by ensuring every transition is properly sealed and reinforced.
New Hyde Park homes often feature multiple chimney and skylight penetrations in close proximity. When reroofing with any non-standard material, pay extra attention to these details. Matching flashing to material type matters: asphalt shingle installations lean on cap shingles and flexible flashing around vent pipes, while clay or concrete tile setups require properly pitched underlayment, rail-supported or ring-fix tile clips, and a robust sealant strategy at all step-flashing junctions. If the project uses slate or tile, ensure that the roof deck has solid substrate and that any old mastic or sealant around penetrations is removed and replaced with appropriate, long-lasting sealants compatible with the chosen material. These steps help prevent micro-movements from freeze-thaw cycles that can damage flashing over time.
Late spring through early fall is the common reroof window for this area because installers can manage shingle sealing, tile handling, and crew productivity more reliably than during winter snow cover or peak summer heat. In the spring, crews can carefully organize tile sheets and slate panels, which reduces breakage and allows for precise setting around chimneys, valleys, and dormers. In the fall, milder temperatures support proper sealant cure times and flashing adhesion. Scheduling in these shoulder seasons minimizes the risk of thermal shock to materials and helps ensure that ice dams and freeze-thaw stress do not compromise newly installed systems early in their service life.
Local contractor signals show chimney work is especially common in this market, aligning with older detached homes that dot the village. Masonry chimney flashing sits at a natural weak point where brick and roof meet, and that area has a knack for letting in moisture after a long winter. Freeze-thaw cycles take a toll on step flashing, counterflashing, and the sealant transitions around these penetrations. When you add extra cap or venting on a chimney, you create more potential for leaks if the flashing isn't integrated cleanly with the new roof surface. In practice, that means every reroof should include careful inspection of the chimney base, crown, and step flashing, not just the visible flashing at the top. If you notice water staining near the chimney's base, or you've had past patchwork from previous winters, expect that area to demand a thorough, purpose-built flashing solution rather than a quick patch.
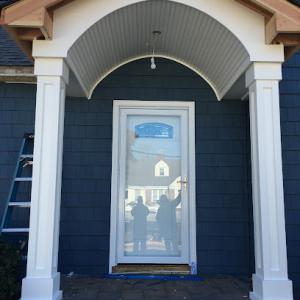
Skylight service is also unusually active locally, suggesting that curb flashing, aging seals, and integration with reroof work are common homeowner concerns here. Skylights bring natural light, but their curb details are a frequent source of leaks when the surrounding flashing isn't properly sized or sealed for the rain and freeze in our climate. Aging seals around skylight units age unevenly after repeated freeze-thaw cycles, and that uneven aging compounds leakage risk as the roof is replaced or repaired. When a reroof is on the books, insist on reviewing the skylight flashing at the curb, the seal around the unit, and the way the new roofing material seats against the skylight flange. A seamless integration-free of gaps, properly mated flanges, and compatible sealant-can save you a month of water intrusion headaches after the first thaw.
Freeze-thaw exposure in western Long Island is hard on step flashing, counterflashing, and sealant transitions around roof penetrations, especially on roofs that have already been patched through multiple winters. Older homes here often combine multiple penetrations-vents, vent pipes, and chimney or skylight collars-into a relatively small roof area. That clustering magnifies stress during cold snaps. The practical takeaway: when planning any overlay or replacement, verify that flashing around each penetration is individually stepped, properly sealed, and integrated with the overall roof ventilation strategy. If a contractor pushes a one-size-fits-all approach, pause and push for targeted detailing that acknowledges the local winter rhythm.
Find contractors experienced in skylight installation, flashing, and leak repairs to bring natural light into your home.
Preferred Exterior
(516) 354-7252 www.preferredexterior.com
1998 Hillside Ave., New Hyde Park, New York
5.0 from 50 reviews

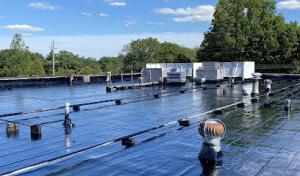
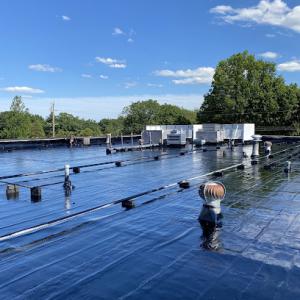
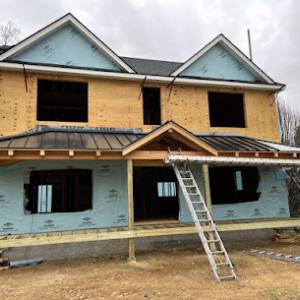
Although pitched roofs dominate, the strong flat-roof signal signals that many homes and mixed-use properties have low-slope sections over rear additions, porches, garages, or small commercial spaces. These areas behave differently in winter and during heavy storms, and their failures often show up first in cold snaps when freeze-thaw cycles gnaw at seams and penetrations. A flat or low-slope roof does not carry water away as efficiently, so standing water, edge pooling, and slow drainage become predictable trouble spots after a heavy season of snow and rain.
These low-slope sections are more vulnerable to standing water, seam wear, and winter drainage issues than the main sloped roof, so homeowners often need a split-scope inspection rather than one material recommendation for the whole property. Look closely at the transitions where the flat portion meets the vertical walls, at any parapet cap seams, and around penetrations like exhaust vents, skylights, or chimney bases. In dense western Nassau neighborhoods, access and staging around attached or closely spaced structures can make low-slope repairs more logistically difficult than the square footage alone suggests. Expect tight working conditions around rear additions or tightly clustered garages, which can complicate material handling, scaffold placement, and waste removal.
Start with a dry day and a careful walk along the flat and low-slope portions. Inspect the edge details where the membrane lags behind flashing, and test for loose or missing edge metal that could allow edge drainage to fail. Note any soft spots in the decking, visible ridges in the membrane, or ridges along fastener lines where water could collect. Pay special attention to penetrations and flashings around vents, plumbing stacks, and HVAC units. If there is a skylight or parapet, check for increased wear around the seals and at the base where the drain lines terminate. Document any signs of water staining inside the shelter or overhangs that align with the flat roof zone.
When addressing repairs, plan for staged work that prioritizes the flat section first, then coordinates with the main roof if necessary. Start by resealing any exposed seams and renewing flashings at transitions to walls and parapets. If standing water remains after rain, you may need to improve drainage by cleaning out internal gutters, adjusting slope where feasible, or adding a secondary drainage path. For longer-term durability, consider upgrading the flat section with a modern low-slope membrane that tolerates freeze-thaw cycles, paired with a robust edge detailing and improved attic ventilation to reduce condensation. In tight spaces, hire skilled crews experienced with closely spaced layouts to minimize disruption and ensure proper staging.
Find specialists in TPO, EPDM, and built-up flat roofing systems for residential and commercial properties.
Typical local pricing ranges run about $350 to $750 per square for asphalt shingles, $600 to $1100 for metal, $900 to $1800 for clay tile, $850 to $1600 for concrete tile, $600 to $1100 for wood shingles or shakes, and $1500 to $3200 for slate. In your area, those numbers reflect not just material but the labor needed to suit suburban homes with occasional skylights and chimneys. The per-square measure is common in bids, so multiplying by 100 still applies for a standard roof.
In this market, costs often rise because many reroofs involve older decking, chimney flashing, skylight integration, and tight suburban access that slows tear-off, delivery, and debris handling. If the roof has multiple penetrations or needs deck repairs, expect bids toward the upper end of the range. Weather-driven demand spikes after wind or leak events can push scheduling and prices up, especially in Nassau County pockets with dense rooflines and limited staging space.
Asphalt shingles remain the most economical path, but freeze-thaw cycles here stress edges and flashings, so careful installation matters more than elsewhere. Metal roofs resist freeze-thaw wear but fetch a higher upfront price. Clay and concrete tiles bring distinctive aesthetics and long life but require a stronger deck and may raise replacement costs when access is tight. Wood shingles react to moisture and gaps in flashing, while slate offers durability but at a premium and with heavier structural needs.
Ask for a staged tear-off plan when access is limited by driveways or fences, and verify contractor experience with chimney flashing and skylight integration. Expect permit-related timing and weather windows to influence both price and start date. Have a clear plan for debris containment and on-site material storage to minimize delays during busy seasons.
Get a clear picture of your project costs upfront - no commitment required.
Rebuild America-Roofing-Windows & Remodeling
(516) 407-7821 rebuildamericany.com
Serving
4.9 from 34 reviews

A full reroof in this village-area setting typically requires a permit, but the exact filing path depends on whether the property sits under the Town of North Hempstead or a village authority serving New Hyde Park. That split matters locally because homeowners need to confirm which building department has authority before work starts rather than assuming one Nassau County-wide process. Clearing this up early avoids delays caused by missing paperwork or conflicting inspections.
In practice, the filing path follows the governing body that oversees the property's address. If the house falls under town jurisdiction, the Town of North Hempstead's building department will handle applications, plan reviews, and the final sign-off. If the property lies within a village boundary, the village building department takes the lead. Since village envelopes can differ from town rules, a simple check of the property's tax bill or a quick call to the village clerk can confirm the correct office. Do not assume a single county process covers every parcel in the area.
Once the correct department is identified, expect a formal permit application, construction documents, and disclosures on flashing details, ventilation requirements, and material specifications. The review will consider how the new roof integrates with existing penetrations like chimneys and skylights, which are common on older homes here. Contractors should plan for plan-check turnaround times and potential addenda requests, especially to satisfy flashing and ventilation standards that address freeze-thaw stress.
Post-installation inspection is required to verify code compliance after the roof is completed. The inspecting authority will focus on flashing integrity, attic ventilation adequacy, and that the chosen materials meet local specifications. Because New Hyde Park structures often feature multiple chimney and skylight penetrations, the inspector will scrutinize those transition details and any flashing corners that could be vulnerable to winter conditions. Contractors need to build municipal sign-off into the project timeline to avoid delays for a re-inspection.
Coordinate early with the installer to align permit submission, plan review cycles, and the post-installation inspection appointment. Clear communication about which department holds authority ensures the project proceeds smoothly through the correct channels, minimizes back-and-forth, and keeps the reroof on schedule for the upcoming freeze-thaw cycles.
New York carriers commonly require detailed photo documentation, scope notes, and material specifications. In this area, many claims involve partial wind damage or leak tracing rather than obvious catastrophic loss, so meticulous records matter. Before moving into repairs, gather dated photos of undisturbed roof areas, the visible damage, and any interior signs of intrusion. Include notes on shingles, flashing, and any penetrations around chimneys or skylights. This documentation helps prevent disputes when the insurer questions the extent or cause of damage, and it clarifies what the replacement scenario actually covers.
Because regional wind and hail claim patterns can affect underwriting and premiums, homeowners should document storm dates, interior leak evidence, and exterior elevations before temporary repairs are made. Take exterior shots from multiple angles, including eaves and ridges, and save timestamps if possible. Inside, photograph ceiling stains, attic condensation, and any mold or moisture pathways traced to roof issues. If a temporary patch is necessary, photograph the repair itself and note the date and location so adjusters can distinguish between weather-driven events and longer-term deterioration.
On older roofs in Nassau County, adjusters may closely review whether damage is sudden storm-related or tied to age, deferred maintenance, or repeated patching from prior winters. Be prepared to explain prior repairs with dates and who performed them, and show any visible patterns such as recurring leaks at flashing joints or around chimney penetrations. In such cases, the claim may hinge on whether the loss is catastrophic or a culmination of wear, which can influence settlement scope. Keep a clear, organized file to support the narrative of what failed and why.
The local market favors contractors who show up fast when leaks appear, because winter freeze-thaw cycles can turn a small drip into widespread damage quickly. In practice, buyers here value a contractor who can stage a prompt temporary fix to stop active leaks, then outline a clear plan for a longer-term replacement if needed.
Long-established, family-owned firms with residential focus are common, and their reputation for responsiveness often carries weight with neighbors. When you call, note how quickly they schedule a visit, whether they prioritize addressing the symptoms of the leak first versus outlining a full replacement scope, and how they communicate next steps.
Cleanup is a major local expectation because lots here are compact and driveways aren't always easy to maneuver around. Ask how the crew handles nail removal, debris containment, and protection for landscaping or vehicles. Reputable teams will spell out a plan for daily cleanup and a final walkthrough to verify nothing is left behind.
You'll see the same family-owned crews in the neighborhood and on familiar streets, so reputation travels fast. Look for references from nearby homes with similar architecture and rooflines. Choose a contractor who arrives on time, communicates clearly, and has a track record of quiet, efficient job sites that respect landscaping and neighbors.
During the inspection, request a precise explanation of the recommended scope, a phased timeline if the job is large, and how they will manage flashing, chimney penetrations, and skylight details common in these houses. A solid plan should balance rapid leak control with a thoughtful, durable repair strategy.