Last updated: Apr 19, 2026
The North Shore setting of Great Neck exposes roofs to cold winter moisture and repeated freeze-thaw cycling, unlike inland areas that stay drier. Snow arrives heavy and settles onto steeper roofs, frosting eaves and valleys with each passing storm. As temperatures swing above and below freezing, water trapped under shingles or flashing freezes and expands, forcing tiny leaks to migrate inward. This is especially true for homes sharing long, tight eaves or complex rooflines where a simple slope becomes a maze of intersections. If your roof has aging underlayment or worn flashing, the risk compounds quickly when the surface repeatedly refreezes and thaws.
Ice damming is a practical concern on older steep-slope homes in this market. Snow tends to refreeze at eaves and around valleys, dormers, and chimney intersections common in the local housing stock. When warm attic air or roof heat melts a thin layer of snow, that water runs toward the colder eaves, refreezes, and can back up under shingles or into seams and joints. In Great Neck, where many houses feature dormer accents and pronounced valleys, the ice dam pattern tends to form along these transitions first. Water may creep behind gutter lines, seep through the soffits, or follow compromised flashing around roof-to-wall connections. If left unchecked, freeze-thaw cycles drive moisture deeper, often showing up as damp spots on ceilings or staining near exterior corners.
Leak calls in this market often center on flashing transitions and moisture backup after winter storms, which aligns with the strong local prevalence of emergency repair services. Pay attention to blinking at chimney and vent terminations, mantle and valley intersections, and where copper or lead flashing meets asphalt or clay tile. A telltale sign is moisture tracking along a vertical seam inside the attic near a dormer or along a wall where the roof line changes direction. Quick responses matter: a prudent homeowner treats suspected flashing failure as urgent, not cosmetic. When a thaw follows a storm, ice dams can suddenly surge, forcing water through even intact shingles if the underlying underlayment has become compromised.
First, create a clear snow removal plan that focuses on keeping eaves free of ice and snow buildup. Use a roof rake from the ground to avoid risky climbs, and target the lower third of the roof where damming is most likely. Inspect and reinforce flashing at common trouble spots-valleys, dormer-to-roof intersections, and chimney flashing-before the peak winter period. Consider upgrading to a more robust ice/water shield in vulnerable eave and valley zones, and ensure attic insulation minimizes warm attic pockets that feed phase-change melt near the roof deck. For immediate concerns after a storm, document affected areas with photos, and prioritize sealing any active leaks at visible flashing or underlayment seams to prevent further interior damage. In this market, a fast, targeted response can stop a small nuisance from becoming a major repair bill.
Great Neck features a substantial mix of attached housing, multifamily buildings, and commercial properties where low-slope roofing is a common specialty. The local market has produced a robust network of flat- and low-slope roofers who understand the unique demands of Long Island shore climate, but this also means a crowded field with varying quality. In this setting, the most relevant details are edge detailing, drainage effectiveness, and membrane integrity. A flat or near-flat roof should never be treated as an afterthought; the balance between proper slope, flashing, and seam connections controls long-term performance more than any single material choice.
Standing water is a persistent issue on low-slope roofs in this area. Even small ponds can feed into membrane seams if drainage is not consistently configured to move water toward scuppers or interior drains. In practice, that means prioritizing roof pitches that promote rapid shedding of water after rain, ensuring bulkheads, valleys, and penetrations are all properly flashed, and verifying that drainage paths remain clear of debris. Regular inspections should focus on membrane seams around roof penetrations, transitions from rooftop equipment, and the perimeter edge detailing where wind-driven water tends to pool first. If drainage feels marginal after a heavy storm, that is a strong sign to recheck the detailing rather than assuming the roof is fine.
Edge detailing matters more here than in purely steep-slope suburbs because flat-roof contractors are unusually prevalent in this market. The edge is where wind-driven rain and meltwater stress the system, so cap flashings, base flashings, and terminations must be designed to resist movement from freeze-thaw cycles. Parapets should have robust parapet collars and proper termination bars, with membranes extended and secured well beyond the edge to prevent wind uplift from compromising the seal. Consider additional edge drains or scupper protection if the roof line runs close to mature trees or dense urban gutters, where debris can quickly back up drainage paths and create ice-prone pockets.
Warm, humid summers followed by cold winters accelerate movement and moisture stress on low-slope assemblies. The thermal cycling can cause seams to open and membranes to become more susceptible to micro-rips. This underlines the need for meticulous seam workmanship, fully adhered or mechanically attached membranes as appropriate to the system, and regular mid-season checks after peak heat and heavy rains. A well-detailed roof plan will include consideration for expansion joints and movement allowances around curbs and penetrations to prevent leaks during temperature swings.
For homeowners and building managers, a practical inspection routine centers on three pillars: drainage effectiveness, seam integrity, and edge condition. After autumn leaf fall and spring thaw cycles, inspect scuppers and internal drains for blockages and confirm that water flows freely away from the roof surface. Examine all vertical penetrations-pipes, exhausts, and vents-for signs of flashing distress or sealant degradation. Finally, document any edge or flashing replacements with the same attention given to interior repairs, since neglect at the perimeter often foreshadows more expensive issues down the line. In this market, proactive maintenance protects the roof's performance across seasons and helps prevent costly damage from freeze-thaw cycles.
Find specialists in TPO, EPDM, and built-up flat roofing systems for residential and commercial properties.


Foley & Sons Roofing
(332) 895-1121 foleyroofnewyork.com
45 N Station Plaza #227, Great Neck, New York
5.0 from 52 reviews
Foley & Sons Roofing has built a reputation for dependable work and genuine care for every home and business we serve. Our family-run team understands how important a solid roof is to your peace of mind, which is why we pay close attention to every detail, from the first inspection to the final cleanup. We handle everything from small repairs to full replacements, always explaining your options and making sure you feel comfortable with each decision. When you choose Foley & Sons Roofing, you get friendly service, skilled workmanship, and a team that treats your property like their own.
Supreme Island Roof Repair
(631) 973-6194 supremeislandcorp.com
Serving
4.9 from 36 reviews
With over 25 years of experience serving all of Long Island, we are your local experts when it comes to Roof Repair & Replacement or Installation. Roofing is not our only service we offer to our customers you can count on us for Chimneys, Siding, Gutters and Masonry services too. Get started with your totally Free Estimate by either calling us now or by visiting our website.

Alb Best Way Construction
(516) 244-0547 roofingalbbestway.com
Serving
5.0 from 75 reviews
ALB BEST WAY HOME IMPROVEMENT is fully licensed, insured, and bonded home improvement and roofing contractor. Specializing in roofing, chimneys, gutters repair, gutters install, gutter cleaning, siding, steps, masonry, skylight, sheetrock and more.

Power Roofing Queens NY
(929) 599-2001 powerroofingnyc.com
Serving
5.0 from 110 reviews
Power Roofing Queens NY is your licensed & insured, family-owned team for roof repair Queens, flat roof, TPO roof, shingle roof upgrades, and same-day emergency roof leak repair. From smart wood-siding installs to seamless rain gutters replacement, we combine top-grade GAF/CertainTeed materials with rapid turn-around and crystal-clear communication. Homeowners and property managers count on our free on-site roof estimates, clean work, and financing guidance to keep projects on budget. Every job is photo-documented, so you get workmanship that lasts through Nor’easters and NYC heat waves. Call today and protect your roof and property with Power that performs.

Clearview Roofing & Construction - Port Washington
(516) 767-2000 clearviewroofs.com
Serving
4.9 from 135 reviews
Clearview Roofing and Construction has been a trusted roofing contractor in Port Washington, NY, since 1961, delivering expert roof repairs, installations, and inspections backed by years of experience. Known for superior craftsmanship, timely project completion, and exceptional customer service, Clearview serves residential and commercial clients with a commitment to quality and care. Whether you're dealing with roof damage or planning a renovation, call (516) 767-2000 today or schedule a free estimate online to work with Port Washington’s most reliable roofing professionals.

Preferred Exterior
(516) 354-7252 www.preferredexterior.com
Serving
5.0 from 50 reviews
We are a family owned and operated establishment specializing in commercial, industrial and residential roofing and siding. We are certified installers of all major manufacturers. We are fully licensed and insured. Our reputation is built on knowledge, craftsmanship and integrity.

Lucky Stars Roofing
(646) 767-6531 www.callluckystars.com
Serving
4.9 from 56 reviews
"Excellence is written in the stars! For over 30 years, Bonardi Construction has been servicing Queens, NY, and the surrounding areas with reliable masonry, asphalt and more. Now, we have this incredible new division to dedicate completely to roofing! Lucky Stars Roofing offers the same longstanding quality, craftsmanship and top-level service. From replacement and repair to installation, you can count on us to leave you starstruck. Our services include: ● Roof replacement & repair ● Waterproofing & leak repair ● Shingle replacement ● Storm-damage repair ● Gutter cleaning, repair & installation ● Skylight repair & sealing ● And more!"
Shamrock Contracting - NY Roofing Experts
(516) 376-8338 shamrockcontractingny.com
Serving
5.0 from 63 reviews
New roofs and roof leaks specialist. Chimney and skylight leak specialist. Guarantee on all work done. Owner on all jobs. Free estimates.

Horse GC
Serving
4.7 from 60 reviews
Horse GC General Construction is fully licensed, insured, and bonded contractor. We’re passionate about delivering exceptional construction work. When you hire us, you’re hiring a team of professionals who are trained and skilled to deliver lasting value to your home.
TOOR CONSTRUCTION - Roofing Services in New York
Serving
4.9 from 87 reviews
We do all kind of construction work some of them include brick steps,Gutter installation,gutter repair,roof installation , roof repair,skylight installation/repair,water proofing,exterior painting,interior painting,stucco contractor, reconstruction, repairing of all kind,brick&block work,custom masonry,backyard,front yard,sidewalk,remove sidewalk violation,paving,parking lots,foundations, flooring,driveway,stone masonry,remodeling,kitchen & Bathroom.

HK Builders: Best Roofing Company in Flushing
(718) 479-8888 hkbuilderscorp.com
Serving
4.8 from 119 reviews
HK Builders corporation is well known name in queens for their guaranteed work. We are a top rated in roofing & siding work. From the first nail to the final creative touches our crew will turn your home into a modern, unique, and comfortable place to live. We proudly offer roofing services and siding installation. Give us a call to Schedule appointment. we provide free estimate.
Great Neck's housing mix supports both standard asphalt re-roofs and premium materials such as slate, clay tile, concrete tile, wood shakes, and metal on higher-end homes. The North Shore environment brings dramatic seasonal shifts, with winter moisture and freeze-thaw cycles that test roof assemblies differently than milder coastal climates. On steeper slopes, performance hinges on edge detail, underlayment choice, and the ability to shed snow and ice efficiently. On low-slope multifamily or commercial roofs, the same concerns apply, but durability and wind resistance often take on additional importance due to longer exposures.
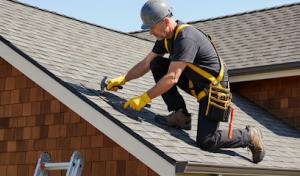
Asphalt shingles remain a practical backbone for many Great Neck homes, offering straightforward installation and a reliable service life when paired with a high-quality underlayment and a well-sealed ridge line. They are well suited to the newer, updated sections of town as well as existing homes undergoing mid-range renovations. For freeze-thaw conditions, the key is proper attic ventilation and a roof deck that stays dry beneath the shingle layer. In dense neighborhoods with close adjacency, careful installation around dormers, chimneys, and skylights minimizes potential ice dam channels and water intrusion.
Where the architectural language favors heavier, more durable surfaces, slate, clay tile, and concrete tile deliver long service life and distinctive curb appeal. These materials are particularly relevant for older, upscale homes with refined rooflines, decorative details, and high visibility. Slate and clay tiles can shed snow more slowly, so emphasis on ridge ventilation, ice barriers at eaves, and accurate valley detailing becomes essential to prevent ice dam leaks. Concrete tiles offer strong performance but may require careful weight considerations and structural checks. Metal roofing on select façades or additions adds durability with a lighter footprint and excellent edge protection.
Wood shakes and decorative rooflines retain a living character in this market that distinguishes Great Neck from neighboring suburbs. When used, they demand meticulous maintenance and regular inspection for surface wear, moisture penetration, and insect risk. In freeze-thaw cycles, shakes can be slower to dry out after storms, making underlayment choice and fastener corrosion resistance particularly important. If choosing wood, a conservative approach favors higher-grade treatments and periodic refinishing to preserve both aesthetics and performance. For homes with ornate timber details, pairing wood with metal flashing and sealed transitions helps mitigate water intrusion at complex corners.
Appearance often drives material choice in this town, but longevity and service life must guide the decision. Heavier systems like slate, clay tile, and concrete tile carry a premium upfront, but their resistance to wind and ice, along with a longer replacement horizon, appeals to the dominant upscale catalog of properties. On standard lots, asphalt remains the accessible, resilient option when the roof is well detailed and maintained. Regardless of material, the envelope matters: proper attic ventilation, robust underlayment, and well-sealed penetrations are foundational in reducing freeze-thaw leaks and ice dam risk across all roof types.
On the North Shore, costs in this section are pushed upward by the local mix of premium roofing materials and complex rooflines on older North Shore homes. Dense village neighborhoods mean tighter access for delivery and staging, which can elevate labor time and cleanup expectations compared to easier suburban lots. Winter moisture, freeze-thaw cycles from the Sound influence not just material choice but installation sequencing, especially when large tear-offs collide with lingering cold snaps.
Asphalt shingles start around 350 to 750 per square, but premium architectural options and complex attic layouts can nudge prices higher in tight lot situations. Metal roofs run roughly 700 to 1,200 per square and can be worthwhile where ice dam risk is high or where you anticipate longer service life. Clay and concrete tiles enter the scene at 900 to 1,600 and 1,000 to 1,800 per square respectively, with higher labor intensity and the need for reinforced decks and careful flashing in older structures. Wood shingles or shakes span roughly 700 to 1,100 per square, while slate begins around 1,200 and can exceed 2,300 per square on premium applications. In Great Neck, expect these ranges to drift upward for complex, multi-plane roofs or homes on steeper pitches.
Demand spikes after winter leak events and spring wind-driven rain can affect scheduling and pricing, especially for emergency dry-ins and full tear-offs. If a leak arrives during the tail end of winter or during a windy March, be prepared for tighter windows and higher mobilization costs. Dense village blocks may also limit staging room, pushing crews to work longer days or arrange multiple partial phases to minimize nuisance to neighbors.
For a practical plan, map critical roof sections before bids-note overhangs, dormers, chimneys, and valley intersections where ice dam formation is most likely. Prioritize high-heat or energy-efficient underlayment for moisture-prone zones. When reviewing quotes, compare not just the square-foot price but also waste disposal, tarp protection, and cleanup rigor-these line items can materially affect final out-of-pocket cost in tight neighborhoods, where dust and debris must be managed with care for neighboring homes. In a sentence: in Great Neck, careful project management and quality detailing pay off in reduced leak risk and longer roof life. In Great Neck.
Get a clear picture of your project costs upfront - no commitment required.

Foley & Sons Roofing
(332) 895-1121 foleyroofnewyork.com
45 N Station Plaza #227, Great Neck, New York
5.0 from 52 reviews
You'll quickly notice that roofing work here isn't a single, clean process. Village-level administration sits on top of Nassau County regulations, so permit handling can feel fragmented compared to towns with a single authority. Before a nail is driven, understand that a typical full roof replacement in this area will require a Nassau County permit, plus the village checks that live on top of it. Missing or mismatched paperwork can stall work, create scheduling headaches, and complicate inspections. The practical takeaway is to line up a clear sequence: confirm what your village requires, secure the county permit, and coordinate the inspections with both bodies so you're not chasing signatures mid-project.
During installation, inspections verify venting arrangements, trim details, and adherence to energy and safety codes. In a place with mixed housing stock-steep-slope estate homes nearby and low-slope multifamily or commercial roofs-inspectors expect precise ventilation, flashing, and drainage details to withstand freeze-thaw cycles and winter moisture exposure from Long Island Sound influences. Plan for at least one mid-project check and a final inspection after completion. If something isn't right, the typical outcome is a demand for fixes or adjustments, which can push back your schedule and risk additional delays when permit counters require re-approval.
Finished paperwork isn't just bureaucratic drudgery; it's a lasting signal to lenders, insurers, and future buyers that the roof was legally completed and properly vented. In this market, unfinished or unclear permit closures can raise questions during resale or financing, creating stubborn holds at closing or even affecting appraisals. The prudent approach is to track all filings, affidavits, and inspection notes until the final sign-off is posted. If a variance or corrective action was requested, address it promptly and keep copies of every document. A clean permit history helps protect your investment once the job is done and the roof is covered for the long haul.
On the North Shore, weather patterns push claims toward wind-driven rain, winter storm damage, and persistent leaks rather than hail hotspots seen elsewhere. In Great Neck, the mix of dense village-by-village permitting and a variety of roof styles means leaks can travel along joints and hidden channels before showing on interior ceilings. The consequence is often slow, invasive water intrusion that damages insulation, ceilings, and wood members if not addressed promptly.
New York insurers generally expect photo evidence, roof age, and policy information before approving storm-related roofing work, so documentation at first discovery is critical. Take clear exterior shots after a storm, focusing on visible gaps, flashing, and any sagging sections. Inside, photograph stains, visible mold, and attic conditions that reveal moisture penetration. Keep a running file of correspondences with the insurer and any notes from conversations with an agent or adjuster.
Because many local contractors advertise storm and claims support, homeowners here are likely to encounter help with adjuster visits, scope review, and depreciation questions. A contractor who understands the area's typical roof constructions-from steep-slope estate roofs to low-slope multifamily systems-can translate a loss into a practical repair plan. Coordinate any inspection window with the adjuster, and ensure the proposed scope accounts for freeze-thaw cycles that stress underlayment and flashing.
Before scheduling work, photograph coverage edges, wind-driven uplift points, and valley areas where ice damming commonly starts. Document roof age and any prior repairs. If a claim is in progress, request a written depreciation schedule and track all changes in scope as the project progresses. This careful record-keeping helps avoid surprises when the settlement reaches the kitchen table.
Connect with contractors who help homeowners navigate the claims process from damage assessment to final approval.
Foley & Sons Roofing
(332) 895-1121 foleyroofnewyork.com
45 N Station Plaza #227, Great Neck, New York
5.0 from 52 reviews
You want a roofer who treats quick response and cleanup as essential parts of service, especially during active weather when leak containment is a top priority. In this market, the first 24 hours after a leak is reported can determine whether interior damage is contained or escalates. Look for teams that promise on-site evaluation within 24 hours and have a plan for rapid tarp and debris containment if conditions worsen. The usual scoping should include a clear outline of the immediate steps to stop water intrusion and protect siding, interiors, and landscaping.
Chimney work is unusually common among contractors serving this area, so verify that the crew has explicit experience with roof-and-chimney interfaces. Assess how they manage flashing, crown, and counter-flashing details where the chimney meets the roof, as improper workmanship tends to translate into recurring leaks through freeze-thaw cycles. Ask for project examples or photos of past chimney-adjacent jobs, and request references from homeowners who faced winter moisture challenges.
Long-standing, family-owned firms are a visible part of the local market, and that lineage often translates into steadier warranties and follow-through. When evaluating warranties, confirm how service calls are handled after installation, who performs warranty work, and whether the same crew will be available for follow-up visits. A contractor with a consistent local presence can provide easier communication, clearer scheduling, and more predictable accountability during and after harsh weather.
Your comparison should focus on responsiveness, clarity of the scope, and detail about site protection and cleanup. Ensure the proposal addresses winter considerations, such as ice dam risk and proper insulation, plus the means for safeguarding gutters and landscaping during the job. Finally, verify that the contractor's crew size and equipment align with the roof's complexity, whether a steep slope, a low-slope commercial roof, or a multi-family setting is involved.