Roofing in New York, NY
Last updated: Feb 28, 2026
Here in New York, a roof has to weather more than weather. From winter snow and freeze-thaw cycles that threaten ice dams, to hot, humid summers that test underlayment and ventilation, to strong city winds that can lift flashing, our roofs live in a high-demand environment. Add salt air along the waterfront, construction debris, and the daily grind of the urbanscape, and you've got a practical case for smart maintenance and materials chosen to last. You're not just protecting a home here—you're guarding against daily exposure, noise, and the energy costs that come with a well-sealed roof.
This page is written for homeowners who want practical, trustworthy guidance they can act on. The advice is tailored to New York conditions and backed by local resources—from code requirements and permit tips to reliable supplier and contractor references you can trust.
Here's a quick preview of what you'll discover on roofs.fyi New York:
- How our local climate influences seasonal maintenance and inspection timing
- Materials that perform well in NYC's climate and skyline styles
- Popular roof styles and what they mean for durability and curb appeal in New York
- Typical roofing costs in the New York area and ways to budget smartly
- Permits, codes, and local regulations you'll want to know
- Common problems seen here (ice dams, wind-driven leaks, flashing failures) and practical fixes
- Simple maintenance and repair tips you can do safely
- Guidance on when a repair makes sense or when replacement is the smarter choice
- When it's best to hire a licensed professional for safety and quality
All of this is grounded in New York-specific conditions and supported by local resources, so you'll have a realistic plan you can trust in your neighborhood—whether you're in a century-old brownstone, a modern high-rise condo, or a row of urban townhouses.
With that foundation, let's dive into how New York's climate shapes the choices you make about materials and maintenance.
Local Climate & Its Impact on Roofs
Seasonal Snapshot
New York City sits in a climate that blends cold winters with hot, humid summers. Snow and ice are common in the winter, while summer heat and heavy rainfall test roof systems. The urban environment also amplifies heat and weather exposure. Expect rapid temperature swings, freeze-thaw cycles, and frequent wind-driven gusts that affect roof performance.
Winter Challenges You'll See
- Ice dams and ice buildup at the eaves due to melting and refreezing cycles.
- Heavy snow loads on flat or low-slope roofs, stressing membranes and flashings.
- Freeze-thaw damage that can crack flashing, coatings, and cementitious substrates.
- Wind-driven snow and blowing debris that can damage edges, vents, and satellite fixtures.
- Increased moisture intrusion risk if drainage is blocked or gutters are clogged.
Summer & Rainy-Season Considerations
- Heat exposure accelerates aging of asphalt shingles and reduces underneath ventilation efficiency.
- Intensive rainfall and high humidity can push roof decks and membranes toward leak pathways if seals fail.
- Urban pollutants and acid rain can accelerate granule loss on asphalt shingles and degrade coatings on metal, clay, or slate roofs.
Material & System Choices for NYC
- Asphalt shingles: common and affordable; pair with quality underlayment and sealed flashing to manage ice and wind.
- Flat or low-slope roofs (common on townhouses and commercial-adjacent homes): EPDM, TPO, or built-up roofs with well-sealed joints and proper drainage. Ensure internal or scupper drainage is designed to prevent ponding.
- Metal roofs: durable, excellent for shedding snow, but require precise installation to resist wind uplift and condensation.
- Slate and clay: very long-lasting but heavy; require adequate supporting structure and careful, moisture-controlled installation—often found on higher-end or historically preserved homes.
- Roof decks and planters: common in NYC; require robust waterproofing, proper slope, and drainage to prevent water pooling and root intrusion.
Design & Drainage Essentials
- Slope matters: flat roofs should have a minimum drainage slope to avoid ponding and moisture buildup.
- Drainage components: internal drains, scuppers, downspouts, and overflow paths must direct water away from foundations and living spaces.
- Flashings and penetrations: ensure chimney, vent, skylight, and satellite dish penetrations are well-sealed; wind uplift is a major concern in coastal storms.
Maintenance You Should Do
- Regular inspections after storms and winter thaw cycles.
- Clean gutters and downspouts to prevent ice dams and standing water.
- Inspect flashing around vents, chimneys, and skylights; reseal as needed.
- Look for signs of curling, missing, or delaminated shingles, and inspect seals on flat-roof membranes.
Practical, Step-by-Step Guidance
1. After a major snow or ice event, check for ice dams and water backup along eaves.
2. In spring, inspect for ponding and membrane wear on flat roofs; test drainage paths.
3. Biannual checks: inspect all flashings, penetrations, and vent seals; verify gutter integrity.
4. Before heavy storm season, schedule a professional roof inspection to assess wind uplift risks and membrane condition.
Warnings & Official Resources
- Ice dams and wind uplift are common local risks that can cause sudden leaks and structural stress. Regular maintenance helps reduce chances of failure.
- Always follow local building codes and permit requirements for roof work. See official guidance from the New York City Department of Buildings (DOB) for roofing and permitting:
- For weather-related planning and alerts, monitor the National Weather Service in New York City:
- NOAA provides climate outlooks and regional data that can inform roof durability planning:
- NYC Emergency Management offers storm preparedness tips and resources:
Recommended Roofing Materials for New York

- Why they work in New York: Accessibility, broad color options, and straightforward installation make them the practical go-to for many homes.
- Best options: Architectural (laminated) shingles in 30-year or 40- to 50-year classes for better durability and wind resistance.
- Climate notes: Ice dam risk means you'll want a quality ice and water shield along eaves and in valleys, plus proper attic ventilation.
- Pros: Affordable upfront cost, easy to repair, widely available.
- Cons: Lifespan generally shorter than metal or slate; performance depends on installation quality and ventilation.
- Installation considerations:
1) Use a high-quality synthetic underlayment rated for cold temperatures.
2) Install ice/water shield at eaves and around penetrations.
3) Ensure continuous attic ventilation (soffit and ridge vents) to reduce heat buildup and ice damming.
- Maintenance: Inspect for curling, cupping, or missing tabs after heavy storms; keep gutters clear.

- Why they work in New York: Excellent longevity, strong wind performance, and great snow shedding in heavier snowfall areas.
- Best options: Standing-seam steel or aluminum with a factory-applied coating; choose a thicker gauge for harsh winters.
- Climate notes: Reflective coatings can help energy efficiency; consider a color with good albedo to reduce attic heat gain in summer.
- Pros: Long lifespan, low maintenance, excellent durability against wind and hail.
- Cons: Higher upfront cost; can be noisier in rain without proper insulation or decking; installation requires a skilled roofer.
- Installation considerations:
1) Ensure a solid deck and proper fasteners for NY wind loads.
2) Use a waterproof underlayment and adequately sealed seams.
3) Consider a snow retention solution if you're in areas with heavy snowfall.
- Maintenance: Periodic inspection of seams and fasteners; clean debris that can trap moisture.

- Why they work in New York: Historic homes and long-term value; slate can last over a century with proper care.
- Best options: Natural slate for authenticity or synthetic slate for lighter weight and lower cost.
- Climate notes: Highly durable, but very heavy and brittle; installation requires structural assessment.
- Pros: Very long life, striking curb appeal, excellent fire resistance.
- Cons: Very costly; requires structural reinforcement; potential for fracture if walked on.
- Installation considerations:
1) Get a structural engineer to confirm roof support for slate weight.
2) Use experienced slate installers to minimize breakage.
3) Plan for higher initial cost and long-range value.
- Maintenance: Inspect for cracked or loose slates after storms; replace promptly to prevent leaks.

- Why they work in New York: Durable and fire-resistant; distinctive look for certain architectural styles.
- Best options: Concrete often more economical than clay; both require a strong structure.
- Climate notes: Heavyweight; ice dam protection and proper underlayment are essential.
- Pros: Longevity, excellent waterproofing when installed correctly.
- Cons: Very heavy; higher installation cost; fragile on impact.
- Installation considerations:
1) Confirm roof framing can handle weight with a structural engineer.
2) Use reinforced underlayment and proper drainage details to manage snow melt.
3) Avoid steep pitches where tiles can crack.
- Maintenance: Check for broken tiles after storms; clear debris from gutters and valleys.
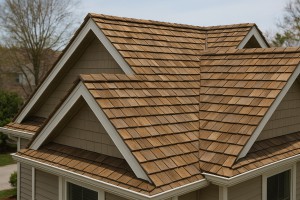
- Why they work in New York: Rustic charm and good insulation value when properly maintained.
- Best options: Pressure-treated or fire-treated shakes for residential use in many NY neighborhoods.
- Climate notes: Wood requires regular maintenance to prevent decay in humid months.
- Pros: Natural beauty, good insulation, relatively lightweight compared with tile or slate.
- Cons: Higher maintenance; susceptibility to rot and insect damage; fire risk if untreated.
- Installation considerations:
1) Install with proper underlayment and ventilation to manage moisture.
2) Use fire-rated coatings where required by code.
3) Schedule periodic inspections for rot, cracks, and loose fasteners.
- Maintenance: Seal or stain every few years; trim back vegetation to reduce moisture exposure.

- Why they work in New York: Ideal for flat or low-slope sections on townhouses, garages, and additions common in dense neighborhoods.
- Best options: EPDM for durability; TPO as a lighter, energy-efficient choice.
- Climate notes: UV exposure handled with reflective coatings; ensure proper drainage to avoid ponding.
- Pros: Excellent waterproofing; cost-effective for flat roofs; flexible in cold weather.
- Cons: Not suitable for steeply pitched roofs; flashing details are crucial.
- Installation considerations:
1) Ensure a clean, dry substrate and seamless seams.
2) Use quality flashing at penetrations and edges.
3) Insulate beneath the membrane to improve energy efficiency.
- Maintenance: Inspect for seam separation, punctures, and pooled water; keep edges clean of debris.

- Why they work in New York: High-end look with lighter weight and easier installation than natural slate or wood.
- Best options: Fiber-reinforced or polymer shingles that mimic slate or shake.
- Climate notes: Resilient in freeze-thaw cycles; typically offer good wind resistance.
- Pros: Lower weight, lower maintenance, easier on budgets than natural materials.
- Cons: Aesthetics may vary; some high-end options can be pricey.
- Installation considerations:
1) Ensure compatibility with existing flashing and deck.
2) Follow manufacturer's guidelines for underlayment and ventilation.
- Maintenance: Regular inspections for curling or loss of granules; clean gutters to prevent backup.
Choosing the right material for a New York roof comes down to structure, climate, and budget. Prioritize underlayment quality, proper ventilation, and wind and snow considerations to maximize performance in the New York climate.
Popular Roof Styles & Architectural Trends in New York
Urban flat and low-slope roofs
Flat roofs are a hallmark of many NYC row houses, brownstones, and multi-family buildings. They maximize usable roof space for HVAC equipment, rooftop decks, or garden installations, which is why you'll see a lot of single-ply membranes here.
- Common materials: EPDM rubber, TPO, modified bitumen, and PVC membranes. These options balance durability with relatively straightforward maintenance.
- Why homeowners choose them: easier access for maintenance, cost-efficient upfront, and flexible layouts for parapets and terraces.
- Practical maintenance tips:
- Inspect seams, flashing, and edge details at least twice a year and after major storms.
- Keep drainage paths clear; ensure scuppers and internal drains aren't clogged.
- Schedule professional inspections after extreme weather or noticeable ponding.
- Verify proper insulation and a continuous vapor barrier to reduce heat loss in winter and heat gain in summer.
Steps to keep a flat roof in good shape:
1) Do a seasonal walk-around to spot blisters, cracks, or pooled water.
2) Clean gutters, scuppers, and counter-flashings of debris.
3) Re-seal or replace worn flashing when you see edge lifting.
4) Plan a professional check every 3–5 years for membrane integrity.
Traditional pitched roofs in historic districts
Historic neighborhoods still showcase pitched roofs with characterful textures and lines. Slate, architectural asphalt shingles, and cedar shakes are common choices, reflecting long-standing NYC architectural language.
- Materials and look: natural slate for authenticity and longevity; architectural asphalt shingles for cost-conscious upgrades; cedar shakes for warmth and texture.
- Considerations: weight is a critical factor (slate and certain shakes require structural review); ventilation and underlayment matter for long-term performance; color and profile contribute to neighborhood aesthetics and zoning interpretations.
- Maintenance notes: moss and debris removal in damp periods; replace damaged shingles promptly; inspect flashing around chimneys, dormers, and skylights.
- Practical tip: in historic districts, work with a roofer experienced in match-your-era materials to preserve the home's architectural integrity.
Metal roofs, especially standing-seam systems, are popular on modern townhouses and renovated brownstones. They deliver longevity, fire resistance, and sleek urban style.
- Benefits: exceptional hail and wind resistance, lightweight compared with slate, quick installation, and wide color options.
- Materials: aluminum, galvalume, and copper (copper patinas nicely with aging brick).
- Key considerations: verify structural support for the metal's weight, confirm color and profile choices suit the building's aesthetic, and account for potential noise without adequate decking and insulation.
- Quick-start tips: check local guidelines for historic districts; ensure proper attic ventilation and a solid underlayment to manage condensation.
Green roofs and rooftop spaces
Green roofs are a growing trend in NYC for insulation, stormwater management, and urban heat island mitigation.
- What you gain: cooler indoor summers, extended roof life, and potential tax or incentive credits.
- What you'll need: a structural assessment to handle added load, a waterproofing membrane, soil medium, and plant choices suited to weight limits.
- Maintenance basics: irrigation system checks, weed management, seasonal fertilization, and periodic inspection of drainage layers.
Dormers, skylights, and roof geometry
Many NYC homes use dormers to create usable attic space and bring daylight to top floors.
- Dormer styles: gable, shed, eyebrow, and hipped dormers each bring a different look and interior volume.
- Practical points: a dormer adds load and requires careful framing, flashing, and ventilation planning; skylights should be energy-rated and properly flashed to prevent leaks.
- Benefit to homeowners: more habitable space, improved ventilation, and a distinct architectural silhouette.
Ventilation, insulation, and climate-specific considerations
New York's hot summers and cold winters demand well-planned roof assemblies.
- Insulation targets: aim for high R-values across the attic and roof deck to reduce heat flow and moisture issues.
- Ventilation: ridge or soffit vents, plus optional mechanical exhausts in high-moisture spaces, help maintain a dry roof system.
- Condensation control: a continuous vapor barrier and proper drainage reduce mold risk and preserve structural integrity.
Safety, codes, and maintenance considerations in NYC
Local codes emphasize fall protection, proper guardrails, and parapet integrity, especially on flat roofs with rooftop decks.
- Always plan work around city permit requirements and property line restrictions.
- Use fall-arrest systems and guardrails when working near edges.
- Schedule regular professional inspections to stay ahead of leaks, wind uplift, and flashing failures.
Average Roofing Costs in New York
Typical cost ranges by material
- Asphalt shingles: $5–$9 per sq ft installed, about $500–$900 per square. In New York City, expect higher end of the range for tall or hard-to-reach homes.
- Metal roofing (standing seam, steel, aluminum): $7–$12 per sq ft installed, roughly $700–$1,200 per square. Premium metals (copper, zinc) can push higher.
- Slate roofing: $1,000–$2,500 per square. NYC projects tend to land on the higher end due to removal of old materials, complexity, and city permit requirements.
- Cedar shakes/shingles: $450–$800 per square.
- Flat roofs (EPDM, TPO, modified bitumen): $350–$650 per square for basic installs; premium membranes or additional insulation can rise to $700–$900 per square.
NYC-specific considerations
- Access and height: Scaffolding, street closures, and elevator or freight-access needs push labor time and rental costs higher.
- Permits and city requirements: NYC permit fees, sidewalk protection, waste disposal, and inspections add to overall cost.
- Abatement and hazards: If the home has lead paint or asbestos, remediation adds a sizable one-time expense.
- Weather and schedule: NYC winters and tight work windows can extend timelines and impact pricing.
- Borough and building type: Townhouses, brownstones, or high-rise conversions each carry unique access and code considerations that affect price.
Step-by-step budgeting
1. Gather 3–5 written bids from licensed New York roofers to compare price and scope.
2. Define the full scope: removal of old roofing, underlayment, flashing, ventilation, insulation upgrades, and debris disposal.
3. Confirm inclusions: scaffolding, dumpster rental, permit fees, city taxes, and any required inspections.
4. Review warranties: material and workmanship coverage, and expected lifespan for the chosen system.
5. Select materials with an eye to long-term value rather than the lowest upfront price.
6. Build in a contingency: budget 10–15% extra for unforeseen decking repairs or flashing fixes.
Quick reference: common townhouse/row home scenarios
- Standard asphalt re-roof on a mid-century row home: estimate on the lower to mid-range for NYC, around $6,000–$12,000 per 1,000 sq ft of roof surface.
- Taller brownstone or corner property with complex geometry: costs tend to rise to the mid-to-upper end of the asphalt range or beyond if a premium underlayment, superior flashing, or specialty vents are used.
- Flat roof with membrane: expect $4–$7 per sq ft for basic EPDM/TPO, with higher prices for reflective or insulated systems.
What drives the price most
- Roof type and materials chosen
- Roof pitch, height, and ease of access
- Existing decking condition and need for structural repairs
- Flashing, drip edge, ventilation, and insulation upgrades
- Removal, disposal, and debris management
- Permits, inspections, and any required roof-to-wall detailing due to building codes
Local considerations that affect value
- Neighborhood expectations: many NYC homeowners prioritize longevity and low maintenance in a dense city setting.
- Aesthetics and curb appeal: certain materials (like slate or metal) can enhance historical character or modernize a facade, influencing resale value.
- Contractor availability: skilled local roofers with experience navigating city codes often command a premium, but can deliver smoother permit routing and fewer delays.
Practical budgeting tips
- Focus on a balanced package: durable underlayment, proper attic ventilation, and a quality flashing system often save more over time than chasing the cheapest upfront option.
- Ask about financing or phased work if the budget is tight, especially for larger or multi-story projects.
- Schedule work in favorable weather windows to avoid price spikes caused by seasonal demand.
Permits & Local Regulations
Do I need a permit to roof in NYC?
- In most NYC roof replacement projects, a permit from the Department of Buildings (DOB) is required. This covers safety, fire resistance, and structural integrity.
- Some small cosmetic repairs may be exempt, but if you're removing or replacing decking, changing the roof slope, adding dormers, skylights, or reconfiguring ventilation, you'll almost certainly need a permit.
- When in doubt, file anyway. Getting a permit early helps avoid fines, stop-work orders, or rework later.
Historic and landmark considerations
- If your property is in a historic district or is a designated NYC landmark, exterior changes (including roofing materials, color, or appearance) may need approval from the Landmarks Preservation Commission (LPC) in addition to a DOB permit.
- Even common roofing upgrades can trigger LPC review if they affect the exterior look. Plan for an extra review step if you're in a historic area.
Condo, co-op, or multi-family buildings
- Multi-unit buildings often require approvals from the building's board or management in addition to DOB permitting.
- For condo or co-op units, check with the building's bylaws and management about any required internal approvals, access rules, and shared-area considerations before starting.
- Your permit should reflect shared roof work accurately, and contractors may need to share access and safety details with the building's superintendent.
Licensed professionals and safety
- NYC DOB requires properly licensed professionals for most roofing work. Hire a licensed contractor who carries liability and workers' compensation insurance.
- For any work involving asbestos or lead paint (common in older roofs), you'll need specialized abatement with proper permits and certified workers.
What the permit process typically looks like
1) Confirm permit requirements with the NYC DOB (or your local borough office).
2) Decide whether you need an LPC review (historic/landmark areas) and a board approval (condos/co-ops).
3) Hire a licensed contractor who will prepare the necessary plans and documents.
4) Gather required documents: property info, existing roof plans, proposed roofing details, energy code compliance, and any historical or board approvals.
5) Submit the permit package through DOB Now (Build) or the applicable portal for residential roofing projects.
6) Respond to any plan-review comments from the DOB. Provide revised plans if requested.
7) Pay permit and inspection fees; once approved, post the permit on-site and keep copies readily accessible.
8) Schedule required inspections through the DOB. Typical milestones include intermediate checks and a final inspection.
9) Address any issues identified during inspections to achieve final sign-off.
10) If regulations change or a significant change is requested (e.g., different materials, slope, or ventilation), be prepared for additional reviews.
Documentation to keep on hand
- DOB permit and plan approval letters
- Copies of all contracts and material specs
- Historic or LPC approvals (if applicable)
- Co-op/condo approvals if required
- Asbestos/lead abatement certificates (if applicable)
- Insurance certificates for your contractor
Practical site and code considerations
- Fire resistance and wind-resistance requirements must be met for NYC buildings; ensure chosen roofing materials and underlayment are approved for your roof type and local wind zones.
- If your project involves scaffolding or sidewalk protection, you may need a separate sidewalk-use permit from the Department of Transportation.
- Noise, debris disposal, and work-hour restrictions may apply—coordinate with your contractor to minimize neighborhood disruption.
- Keep a copy of all permits and inspections with your home records; you may need them for insurance, resale, or future renovations.
Special notes for older homes
- Roofs installed decades ago may require updated underlayment or ventilation strategies to meet current energy codes and fire-safety standards. Budget for potential upgrades beyond just the roofing material.
Final reminder
- Regulations evolve. Always verify current requirements with the NYC Department of Buildings and, if relevant, the Landmarks Preservation Commission and your building management.
Common Roofing Problems in New York & Solutions
Ice Dams and Meltwater
Ice dams form when heat escaping from the attic melts snow on the roof, which refreezes at the edges and creates blocking ice. In New York winters, this is a frequent culprit of interior leaks and gutter damage.
- Causes to watch for:
- Poor attic insulation and air leaks
- Inadequate soffit and ridge ventilation
- Clogged gutters that trap meltwater
- How to fix and prevent:
- Upgrade attic insulation to a healthy level (aim for a well-sealed attic with proper R-value) and seal gaps around penetrations.
- Improve ventilation: ensure a balance of soffit intake and ridge or turbine exhaust vents.
- Keep gutters clear and flush out downspouts; remove icicles from ground level with a roof rake (never climb onto a frozen roof).
- If dams form, use a heat cable only as a last resort and have it installed by a pro. Address the underlying insulation/ventilation first.
Wind Damage
Strong NYC winds can lift shingles, loosen flashing, and expose fasteners. This is common after storms or in high-rise exposures where wind funnels around corners.
- Signs to look for:
- Curled or missing shingles
- Lifted drip edge or flashing around chimneys, vents, and valleys
- Exposed nails or dark streaks along roof lines
- Solution steps:
- Conduct a professional inspection after severe winds; re-secure loose shingles and replace damaged ones with matching material.
- Reflash around penetrations and reseal with compatible sealants; check chimney and vent flashing for gaps.
- Trim nearby branches and ensure proper roof-to-wall detailing to reduce future wind uplift.
Hail Damage
New York storms can bring hail that bruises or punctures shingles and metal flashing.
- How to identify:
- Bruises, pocking, or granule loss on asphalt shingles
- Dented metal components like flashing, vents, or HVAC curbs
- What to do:
- Have a roofing professional assess the extent of damage; many hail hits are cosmetic, but enough damage can shorten life and cause leaks.
- If necessary, replace damaged shingles and flashing to restore watertightness. Consider upgrading to impact-resistant shingles if your area sees frequent hail.
Aging Shingles & Shingle Failure
Most asphalt roofs last 15–25 years; in NYC, exposure, temperature swings, and pollution can accelerate aging.
- Symptoms:
- Curling, cupping, or cracking shingles
- Significant granule shedding in gutters
- recurrent leaks not tied to a single flash point
- Best solution:
- Plan a roof replacement when damage is widespread or the roof is near end of life; patching marginal areas is often a temporary fix.
- Use a roof with a longer-lasting warranty and compatible underlayment for NYC conditions.
Flashing, Valleys, and Chimney Leaks
Leaks often originate at flashing around chimneys, vents, and where valleys meet the deck.
- Common issues:
- Damaged or missing metal flashing
- Deteriorated chimney crown or cracked mortar
- Improperly sealed transitions between roof planes
- Remedies:
- Replace or reseal flashing with corrosion-resistant metal; ensure proper overlap and nail placement.
- Repair chimney crown and tuckpoint as needed; seal gaps with a flexible, weather-proof sealant.
- Relevel valley coverage and ensure proper drainage to prevent pooling.
Gutter and Downspout Blockages
Clogged or sagging gutters cause standing water, leading to ice dams and fascia rot.
- Quick checks:
- Look for ice buildup, sagging sections, and loose hangers
- Inspect for debris like leaves, seed pods, or nests
- Fixes:
- Clean gutters regularly; install guards if appropriate.
- Re-secure or replace damaged hangers and ensure proper slope toward downspouts.
- Redirect water away from the foundation with properly placed extensions.
Ventilation and Attic Moisture
Poor attic ventilation leads to condensation, mold, and accelerated roof deck deterioration.
- What to do:
- Add or repair intake vents (soffits) and exhaust vents (ridge or gable vents) to create a continuous flow.
- Seal air leaks from the living space into the attic and insulate to reduce heat transfer.
- Consider a professional attic air-quality and moisture assessment to tailor a solution.
Snow Load and Roof Sag
Heavy snowfall in winter adds weight that older structures may struggle to support, risking sagging or leaks.
- Early warning signs:
- Visible sagging or dipping along rafters or ridges
- Ceiling stains following heavy snowfall
- Approach:
- Safely remove accumulated snow from the roof with a roof rake from the ground.
- If you notice sag, contact a structural professional and a roofer to assess both roof framing and membrane integrity.
Maintenance & Repair Tips for New York
Seasonal Maintenance
New York's climate cycles demand proactive roof care to withstand snow, ice, wind, and heavy rain. Schedule regular checks after major storms, keep gutters clear, and monitor attic ventilation to prevent heat buildup that can damage decking and shingles.
- Inspect the roof surface for loose shingles, curling edges, or exposed underlayment, especially after winter.
- Clear leaves and debris from gutters and downspouts to maintain drainage.
- Trim overhanging branches that could rub or break during a wind storm.
Ice Dams & Snow Management
Ice dams are a frequent winter issue in New York. They force meltwater under shingles and can lead to interior leaks. Prevent by reducing heat loss and keeping drainage clear.
1) Improve attic insulation (target R-38 or higher where code allows) and seal air leaks.
2) Ensure soffit vents and ridge vents provide continuous airflow to keep the roof cold above the dam line.
3) Gently remove snow from the roof with a plastic roof rake from the ground; never climb onto a snow-covered roof.
4) Keep gutters clear and, if needed, install heated cables per manufacturer instructions and code requirements.
Gutter & Drainage Care
- Clean gutters twice a year and after heavy storms; ensure downspouts discharge water at least 5–6 feet from the foundation.
- Inspect for loose hangers, rust, or leaks; repair promptly to prevent sagging and overflowing.
- Consider gutter guards only after evaluating your tree situation; they can reduce debris but may require occasional maintenance.
Common NY Roof Issues
- Ice dams, wind uplift, and flashing failures around vents and chimneys.
- Asphalt shingles showing granule loss from wind and sun exposure.
- Frost lines or condensation in attic spaces indicating ventilation or insulation gaps.
Quick Inspection Routine
1) After storms, do a ground-level exterior inspection for lifted shingles, damaged flashing, or visible gaps.
2) Inside, check ceilings and upper walls for damp spots near exterior walls or attic spaces.
3) In spring and fall, review attic insulation and ventilation paths; add insulation or adjust vents as needed.
Repair Steps (Temporary Fixes and Permanent Repairs)
- Small leaks at flashing or vent boots:
1) Dry the area thoroughly; remove any cracked sealant.
2) Re-seal with high-quality roofing sealant or self-adhesive flashing tape; re-cover with compatible flashing if needed.
3) Monitor for a day; if leakage continues, plan a professional repair.
- Missing or damaged shingles:
1) Lift adjacent shingles carefully and slide in a new one under the existing row.
2) Nail and seal with roofing cement or recommended sealant; ensure alignment to preserve wind resistance.
When to Hire a Pro & Permits
- For high-rise or complex roof shapes, pervasive water intrusion, or extensive flashing work, hire a licensed roofer.
- NYC ordinances may require permits for certain roof work; verify with the local building department or your HOA before starting.
Safety First
- Avoid working on a wet or icy roof; use a sturdy ladder and fall protection.
- Have a helper, wear non-slip boots, and keep tools secured.
- If you're unsure about flashing, ventilation, or structural integrity, call a pro.
When to Repair vs. Replace
Signs repair is enough
- Leaks are localized around flashings, vents, or chimneys, not widespread across the roof.
- A few damaged or missing shingles or limited curling/blistering in a small area.
- No sagging of the roof deck and attic shows no major moisture intrusion.
- A licensed roofer confirms the issue is patchable and within the existing warranty scope.
- Repairs would fix the problem for a reasonable cost and preserve most of the roof's remaining life.
When replacement is the better option
- Leaks occur in many areas or keep returning after multiple repairs.
- Large sections show missing material, severe cracking, widespread curling, or extensive delamination.
- The roof deck sags, soft spots appear, or there's visible structural moisture.
- The roof is near or past its expected lifespan (see rough lifespans below), and continued repairs won't yield long-term reliability.
- You're looking for energy efficiency gains or to upgrade to a more durable system with a longer warranty.
NYC-specific considerations
- Building ownership model: In 1- to 4-unit homes you own the roof, but in co-ops and many condos the board and residents oversee major roof work and budgeting.
- Access and logistics: NYC roofs often require scaffolding, street permits, and careful coordination to minimize disruption to neighbors.
- Permits and codes: Replacement work typically requires a permit and adherence to NYC fire, wind, and waterproofing standards. Proper drainage and safety railings matter on every job.
- Proximity and liability: Temporary tarps, debris containment, and neighbor considerations are part of the process; ensure your contractor carries adequate insurance.
- Warranties and workmanship: Consider both manufacturer warranties and a workmanship warranty. In dense urban settings, a robust warranty can save future headaches.
Material lifespans (rough ranges relevant to NYC conditions)
- Asphalt shingles: 15–30 years
- Built-up/BUR flat roofs: 15–30 years
- EPDM rubber: 20–30 years
- TPO: 15–20+ years
- Metal roofing: 40–70 years
- Slate: 75–100+ years
Practical 5-step decision guide
1) Do a careful, safe inspection of accessible areas or hire a licensed roofer for a written assessment.
2) List all problem spots and note moisture signs, leaks, and attic humidity.
3) Get 2–3 detailed quotes for repairs and for full replacement; compare labor, materials, disposal, and permits.
4) Check warranties, expected lifespan, and whether replacing now saves future maintenance or energy costs.
5) Consider HOA/coop requirements, financing options, and scheduling around NYC weather.
When to Hire a Professional
- Any active leak or dripping inside your home is a signal to call a pro right away.
- Missing, curling, blistering, or buckling shingles; damaged flashing around chimneys, vents, and skylights; or sagging roof sections require professional assessment.
- Ponding water on a flat roof, unusual bulges, or noticeable structural deflection should not be treated as DIY fixes.
Post-storm or hail damage
- Strong storms or hail can create hidden damage that undermines long-term performance.
- If you hear rain inside after a storm, or see granules in gutters and downspouts, contact a roofer to inspect and document damage for insurance.
- In NYC, storm-related damage often involves condo/co-op rules and permit requirements, so a local pro who understands those processes is valuable.
Aging roof or recurring problems
- If your roof is 15–20+ years old (depending on materials) and shows repeated leaks or moss/algae growth that keeps recurring, professional replacement or major repair is prudent.
- Ice damming, wind uplift, or failed underlayment on older assemblies typically calls for a full assessment to prevent future failures.
- A professional can determine if flashing, underlayment, or ventilation upgrades are needed to extend life.
Planning work on a co-op, condo, or historic building
- In NYC, condo and co-op boards often require licensed contractors, insurance proof, and board-approved specifications.
- Historic districts or landmarked properties may need approvals from the Landmarks Preservation Commission before any roof work begins.
- If you rent or share a building roof, coordinate with the building management and hire a pro who understands the permitting and inspection steps.
NYC-specific considerations
- Permits and code: Most roof work in New York City requires a permit from the Department of Buildings. A reputable local roofer should obtain the permit and ensure inspections are completed.
- Safety and scaffolding: NYC projects routinely require scaffolding, guardrails, and fall-protection plans. Expect a contractor to publish a site safety plan and keep the job site compliant.
- Insurance and licensing: Hire a contractor with active workers' comp and liability insurance; ask for certificates of insurance and verify with the insurer.
- Lead paint and asbestos: For pre-1978 buildings, expect potential lead paint concerns. A licensed pro will follow proper containment and cleanup procedures and coordinate any required abatement.
- Energy and drainage: Flat NYC roofs benefit from proper drainage details and roof assemblies that meet local energy code requirements. A pro can advise on membrane choices, insulation, and drainage improvements.
How to evaluate a roofing contractor (NYC-focused)
- Credentials and coverage
- Verify license status (if applicable in your borough), proof of general liability and workers' comp, and current business address.
- Confirm DOB/NYC permit readiness and willingness to pull permits when needed.
- Experience and references
- Prior NYC projects similar in size, scope, and roof type; request recent client references and check them.
- Written scope and warranty
- Get a detailed written estimate with material type, square footage, time frame, cleanup, and warranty terms (both workmanship and manufacturer warranties).
- Insurance, safety, and site management
- Request a site safety plan, fall protection measures, scaffold details, and daily cleanup commitments.
- Contract specifics
- Payment schedule aligned with milestones; avoid large upfront deposits. Read lien waivers and warranty transfer language.
- Red flags to watch for
- No NYC permit willingness, vague scope, pressure tactics, unusually low bids, or contractors unable to provide verifiable references or insurance certificates.
Quick decision path (step-by-step)
1) Note the symptoms (leak, ice dam, hail impact, sagging).
2) Gather basic building details and photos for the contractor.
3) Check insurance and license status; confirm DOB permit requirements.
4) Obtain 3 written bids with comparable scope.
5) Check references and published project photos; verify warranties.
6) Decide and sign a detailed contract before work begins.
Putting A Lid On It: Roof Maintenance, Repair, and Replacement in New York
New York's weather throws a full deck of elements at a roof: heavy snow, ice dams, scorching sun, driving rain, and wind-driven debris. Regular attention keeps a roof resilient, stops small problems from turning into big emergencies, and helps your energy bills stay reasonable. A well cared-for roof is a quiet, dependable ally in a city that never stops.
The urban environment adds its own twists—pigeons, branches pressed against skylights, and varied roof types from shingles to metal to flat rubber membranes. A practical, steady maintenance routine protects your home's shell, preserves value, and lets you focus on the things you love most about living here.
Seasonal care and quick checks
- Gutter and downspout care: clear leaves and debris in spring and fall so water flows freely.
- After storms: inspect for loose or damaged shingles, flashing gaps around chimneys or vents, and any lifted edges.
- Attic health: ensure insulation isn't compacted and vents aren't blocked; good ventilation prevents ice dams and heat buildup.
- Tree trimming: keep branches away from the roof to reduce debris and damage from wind.
- Ice dam awareness: in winter, remove excess snow from edges with safe methods and ensure proper drainage to prevent leaks.
- Surface cleanliness: remove moss or algae growth with gentle methods; avoid harsh cleaners that can damage materials.
Materials, aging, and replacement considerations
- Asphalt shingles: common and affordable, typically 15–30 years depending on quality and climate exposure.
- Metal: durable and long-lasting (often 40–70 years) but may require preventive flashing checks.
- Slate or tile: very long-lasting but expensive and heavier; installation quality and roof structure matter.
- Flat roofing (EPDM, TPO): common on many NYC commercial or mixed-use roofs; evaluate membrane condition and edge seams.
In New York, roof life is influenced by heat cycles, freeze-thaw, wind, and maintenance history. Choose materials aligned with your home's architecture, attic ventilation, and energy goals. A good installation with proper underlayment and flashing sets the stage for longevity.
When to call a professional—and what to expect
- Visible sagging, widespread curling, widespread leaks, or recurring patches.
- Missing flashing around chimneys, vents, or skylights.
- Ponding water on flat sections or multiple leaks after a storm.
Qualified roofers can confirm material suitability, provide warranty details, and help navigate permits and local codes. Always verify licensing, insurance, and references before work begins.
A warm, practical note to end on
You're part of a neighborhood of homeowners who care for their roofs and protect their homes. With a steady eye, regular upkeep, and trusted local pros when needed, you can enjoy a durable, beautiful roof for many seasons to come—and sleep a little easier knowing your home is ready for whatever New York weather brings.