Last updated: Apr 19, 2026
In this Piedmont climate, hot-season afternoon thunderstorms push wind-driven rain that can expose flashing, ridge lines, and the edges of shingles. A single downpour can reveal hidden weaknesses in roofs that looked fine after a quick inspection. If you've seen shingles lifting at the edges, dark streaks running from vents, or damp spots inside ceilings after a storm, treat it as a flashing and edge issue first, not just a cosmetic one. The goal is to stop the leak at its source before interior damage compounds or attic mold forms. Time matters: the longer water sits, the deeper the damage can go, especially on older in-town homes with aging flashings and flatter roof profiles.
Active leaks signal an immediate repair plan. Start by placing a bucket under the drip and protecting insulation from further saturation. If you can safely access the roof, apply temporary tarps or heavy-duty plastic over the affected area, focusing on tying it off to solid points so wind can't whip it loose. Prioritize drum-tight tarps over the most vulnerable zones-valleys, penetrations, and along ridge caps. In Hillsborough, storm windows of opportunity for emergency repair crews surge after thunderstorm events; if you can secure the area quickly, you reduce interior damage and simplify later documentation for the claim. Do not delay a professional assessment once a leak is evident, because even a small leak can expand in the Piedmont's humidity and heat.
Storm damage and insurance-claim work are top priorities after a major thunderstorm here. Start collecting evidence immediately: timestamped photos from multiple angles, dated notes of when you first noticed the leak, and a list of affected rooms and contents. Keep records of any temporary repairs you perform and receipts for materials, even if the repair is only to slow further damage. If the attic shows daylight at the roof plane, note the exact location rather than describing it vaguely. A written summary of the storm event-when it happened, what you observed, and any wind directions you noticed-helps a claims adjuster understand the scope quickly. Your goal is to present a clear, coherent narrative that links the visible damage to the storm event, rather than relying on memory.
Late-summer tropical systems reaching inland can create claim spikes in Hillsborough even without direct coastal landfall, tightening contractor schedules and delaying non-emergency replacements. The moment a storm passes, you'll feel pressure to line up crews, materials, and inspections. Act quickly on initial assessments; even if you are not ready to commit to a full replacement, arrange for a documented roof-health check and a written repair plan. Start by engaging a reputable local contractor who understands the local roof types and the common failure points-edge flashing, ridge caps, and shingle tabs. A proactive assessment helps you differentiate between a temporary fix and a long-term solution, reducing the risk of storm damage recurring while awaiting a full replacement.
Remember that, due to the local housing mix, a fast subscriber to emergency repairs can shield your home from cascading water damage. Prioritize securing vulnerable entry points and ensuring you have a reliable path for water to exit from the attic or ceiling plane. The goal is to establish a solid containment strategy that buys you time to coordinate a thorough inspection, evaluate options, and file a complete insurance package without compromising interior spaces. In short, act decisively on leaks, document everything meticulously, and align with a contractor who can manage storms' seasonal waves without leaving you exposed to further weather events.
In Hillsborough, cost awareness starts with the material you choose and the local weather pattern. The humid Piedmont climate means fast-moving storms can stress roofs quickly, and after a major storm, expenses can spike as Orange County and Triangle-area crews shift toward emergency and insurance work first. Use these local ranges per square as a practical baseline when planning repairs or a full replacement.
For asphalt shingles, you can expect to pay between 350 and 650 dollars per square. Metal roofing sits higher, running roughly 600 to 1100 dollars per square. In a storm-heavy year, careful scheduling matters: crews may be diverted to urgent leak repairs and insurance-driven work, which can push project timelines and, occasionally, prices upward. If you have an older roof with brittle underlayment, the shingle replacement could uncover decking issues that require quick, methodical decisions to prevent moisture problems.
Clay tile typically lands in the 1000 to 1800 dollars per square range, while concrete tile runs about 900 to 1600 dollars per square. Clay and concrete tiles resist moisture well but can be heavier and harder to install, especially on older framing or in homes that have had limited retrofits. In historic neighborhoods, decking or sheathing repairs are more common when tear-off reveals moisture-trapped plywood or damaged decking behind the tiles. This can add to both cost and installation time but is essential to prevent future leaks.
Wood shingles or shakes generally cost 700 to 1100 dollars per square. Synthetic or composite shingles offer a lower-to-mid range option, about 550 to 1000 dollars per square, with good wind resistance and lighter weight. In quick-repair scenarios after storms, synthetic options sometimes provide faster installation and a more predictable price point, which helps when insurance timelines press for expedited work.
Older homes in and around historic parts of town often present decking and sheathing considerations that newer subdivisions do not. If moisture has been able to sit in the attic or framing during a long rainy spell, you may discover rot or mold after a tear-off. Addressing decking repair early in the project protects the new roof system and helps maintain attic ventilation efficiency in the humid climate.
In practice, expect a phased approach after a major storm: assess and document a leak, select a material, confirm local cost ranges, and budget for potential decking work if the tear-off reveals compromised sheathing. This approach keeps you aligned with the city's storm-response realities and helps you protect your home without surprises when the next round of storms hits.

1st Gen Roofing
(919) 691-7450 1stgenroofingllc.com
Hillsborough, North Carolina
5.0 from 49 reviews
1st Gen Roofing & Restoration is a trusted local roofing contractor specializing in roof replacements, storm damage repairs, and insurance roofing claims. We provide free roof inspections and work directly with insurance carriers to help homeowners get the coverage they deserve after hail or wind damage. Our experienced team installs asphalt shingle and standing seam metal roofing using high-quality materials and proven workmanship. From the initial inspection to final installation, we handle the entire process with clear communication, honest estimates, and reliable timelines.
Chief Roofing
(919) 732-5028 www.chiefroofinginc.com
510 Cornerstone Ct, Hillsborough, North Carolina
4.8 from 227 reviews
When you need roofing services near me in Hillsborough, NC, Chief Roofing is your go-to team. With 150+ years of combined experience, we offer roofing repair near me, roofing replacement near me, roof installation near me, roof leak repair near me, and full-service commercial roofers near me. We also handle gutter installation, repair, and replacement near me, rot wood and fascia repair/replacement near me, soffit repair near me, and roof renovation services near me. Every project uses top-quality materials and includes a 10-year workmanship warranty. Contact us today!
Boxer Roofing
(919) 730-1735 boxerroofing.com
Serving
5.0 from 38 reviews
Boxer Roofing established in 1973, located in Durham, N.C., serves the Raleigh, Durham, Chapel Hill and surrounding communities. We specialize in roof replacement for residential dwellings and have earned an Accredited Membership with the Better Business Bureau, A+ Rating. All installations are warranted. Specializing in roof replacements, roof repair, wood rot, attic ventilation and gutter installation. Certified roofing contractor for GAF and Certainteed.
A+ Roofing Cleaning & More
(919) 428-9792 aplusguttercleaningandmore.com
Serving
4.9 from 97 reviews
A+ is the family owned business to call for your roofing needs. Our quality of work exceeds what larger companies can provide. Over 15 years in the business makes us the experts in this field. Professional materials used on all roofing projects. We can also replace, repair and clean your gutters!
Pro Built Co Roofing & Construction
Serving
4.9 from 122 reviews
As a leading general contractor, we specialize in comprehensive roofing, remodeling, and interior construction. Our multi-faceted team is dedicated to delivering superior craftsmanship and personalized solutions on every project. We pride ourselves on attention to detail, a seamless customer experience, and a commitment to excellence that ensures durable and beautiful results designed to last.
Lozano Roofing
Serving
5.0 from 12 reviews
Roofing Company Located in Hillsborough NC, Providing Metal, TPO, And Shingle Roofing services in the Triad for over 30 Years. For Any Inquiries or Free Roof Estimate Give Us a Call.

Baird Roofing & Restoration
(336) 464-7663 bairdroofingllc.com
Serving
5.0 from 42 reviews
Baird Roofing & Restoration, LLC offers a wide range of residential and commercial roofing services in the Raleigh, NC area. We can install an attractive, energy-efficient roof on your new construction home or replace the worn-out roof on your retail store. If your roof was damaged during a storm, our roofing contractor can help you file an insurance claim and repair the damage. You can count on us to repair or replace your faulty roof ASAP to help minimize water damage to your structure. Call 336-464-7663 now to get started on your new roof installation or roof replacement. We'll be glad to give you a free estimate.
CH Construction & Roofing
(336) 560-9596 chconstructionroofing.com
Serving
5.0 from 52 reviews
CH Construction & Roofing stands as one of the #1 choice for all your roofing needs in Hillsborough, NC and nearby areas. With over 19 years of industry experience, we guarantee exceptional workmanship right from the start. As a locally owned and operated business, we prioritize honesty, integrity, and superior customer service, ensuring your home improvement projects are handled with utmost care. Specializing in a wide range of roofing services for both residential and commercial properties, including Shingle, Metal, Flat, and TPO roofing, we also offer roof repair, replacement, gutters, and siding services in areas from Raleigh to Durham to Chapel Hill and 30 miles radius from Hillsborough NC,.

Carolina Home Specialists
(336) 742-0492 carolinahomespecialists.com
Serving
4.9 from 73 reviews
Carolina Home Specialists is your trusted roofing and exterior home services contractor serving Durham, NC and surrounding areas. We offer roofing, siding, gutters, windows, door, and exterior home services using premium materials backed by industry-leading warranties. As a certified GAF installer, we provide full lifetime warranties on roofing, plus double lifetime transferable warranties on siding and lifetime protection on windows. Our team delivers expert installations with a no-stress, transparent process. We’re proud to add value for life to every home we service. Call us today to schedule your free consultation with a team that puts your home first!
Carolina United Roofing & Construction
(919) 260-3803 www.carolinaunitedroofing.com
Serving
5.0 from 192 reviews
SPECIALTIES Carolina United Roofing & Construction is a locally owned and operated roofing and construction company. Serving the Triangle and surrounding areas with over 30 years experience. Specializing in Insurance restoration work, we offer a variety of roofing and construction services such as: Residential Roofing, Commercial Roofing, Gutter, and siding services.
Storm Guard Roofing & Construction Durham Chapel Hill
(919) 372-3983 www.stormguardrc.com
Serving
5.0 from 334 reviews
When you need a contractor who specializes in roofing, windows, siding, gutters, and painting in Durham, NC, turn to a local professional for assistance. Whether you need a roofer to fix or replace your old or leaky roof, want new windows to improve your heating bill, or just want new siding to update your home’s look, you can count on Storm Guard for excellent service.
JC Solutions
(919) 283-1772 jcsolutionsnc.com
Serving
5.0 from 64 reviews
With over 15 years of industry experience, JC Solutions is your go-to Chapel Hill roofing contractor for all your residential and commercial roofing needs since 2021. Our team of highly-skilled professionals provides various services, including repair, replacement, and installation, utilizing only the finest quality materials. Whether you need a standard repair, gutter installation, protection with our Klean Gutter Guards, or a completely new roof, JC Solutions delivers exceptional craftsmanship and attention to detail, ensuring a beautiful and functional roof that will last for years.
For a full roof replacement, a building permit is typically required, and the review is handled through the local building department serving the town. The process hinges on verifying the scope of work, site access, and compliance with wind, fire, and drainage requirements common to residential roofing in this area. Your contractor should initiate the permit application and coordinate the submission of all necessary plans and materials lists. Because this is a jurisdiction with a straightforward permit path but clear expectations, it pays to have the paperwork started early when storm-related damage is involved.
Permit processing in this county generally runs about 1-2 weeks once the application is complete. In practice, that timeline can tighten during peak demand periods in spring and fall, when storm response and re-roofing rushes are most active. Homeowners should plan around these windows and talk with the contractor about lining up material deliveries and crew access to avoid delays. If you are coordinating around weather windows or insurance timelines, build in a buffer for permit review so the crew can stay on schedule without risking weather-related setbacks.
Inspections are typically staged rather than done in a single visit. The first inspection generally targets decking and underlayment installation, confirming proper nailing patterns, ventilation, and moisture barriers. The final inspection confirms completion, flashings, sealing details, and overall workmanship. In Hillsborough, it is essential to confirm with the contractor that inspection timing is coordinating with the inspection schedule rather than assuming the crew can close everything in one trip. After decking and underlayment pass inspection, the contractor will proceed with roof covering installation and any required flashing details, then schedule the final inspection once all components are complete.
Choose a contractor who understands the local permit office expectations and has a clear plan for sequencing inspections. Ask for a written timetable that lays out when decking is installed, when underlayment is laid, when the roof covering goes down, and when final flashing and ventilation checks occur. With Piedmont thunderstorm patterns, coordination between weather windows and inspection timing matters: ensure the crew pre-checks each stage with a quick walk-through before the inspector arrives. Keep copies of all permit-related documents, including approvals and inspection notices, in a centralized place in case weather or insurance agents need to review them quickly.
Spring and fall are usually the best replacement windows in Hillsborough because summer heat, humidity, and frequent thunderstorms make staging and dry-in more difficult. For a homeowner, that means coordinating a window of dry, moderate temperatures to minimize the risk of shingles blowing off or underlayment not sealing properly. When planning, aim for a stretch with multiple consecutive dry days and lower afternoon humidity. Early in spring or mid-fall tends to offer the gentlest weather patterns, which helps crews complete a thorough tear-off, install new underlayment, and seal shingles without the pressure of looming storms or heat-induced materials handling issues. In these seasons, you'll also notice fewer temporary curfews from neighborhood noise complaints, which can speed up inspections and approvals after work begins.
Late summer and early fall overlap with inland hurricane impacts and heavy rain risk in this part of North Carolina, so project calendars can become less predictable even when temperatures are suitable. The humidity stays high, and afternoon storms are common, which can interrupt staging, delivery of materials, and the dry-in process. If a summer rain event nears, consider pre-ordering materials and confirming access to tarps, temporary shelter, and quick-drying sealants. Acknowledge that longer project timelines may occur, with crews needing to pause work during a downpour and resume once roofs are dry. This is the period where emergency leak-detection readiness matters more than ever-having a plan to tarp exposed areas quickly helps protect interior spaces.
Winter in Hillsborough is milder than mountain counties, but rain and cold snaps can still slow tear-off, underlayment installation, and shingle sealing. Cold temperatures affect shingle adhesion and certain sealants, so scheduling with the forecast for the coldest stretches is prudent. If a winter storm rolls through, it's often best to pause work and wait for a safe window with dry conditions and workable temperatures. Even short bursts of rain can compromise the integrity of a fresh roof deck, so anticipate shorter daily targets and a couple of contingency days built into the plan. For homes with older in-town roofs, winter work requires extra attention to attic ventilation and moisture control so that interior spaces stay comfortable during the process.
In all seasons, readiness matters. Have materials staged in a secure, shaded area to protect from sudden storms, and confirm when the roof will be boarded, felted, and shingled to minimize exposure time. Storm-driven water intrusion is a common concern after Piedmont thunderstorms, so align projects with anticipated dry spells and plan for rapid response if a weather system changes course. A proactive approach to scheduling, weather monitoring, and temporary protections helps ensure a smoother, safer, and more predictable roofs replacement cycle for a Hillsborough home.
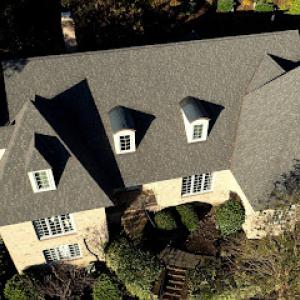
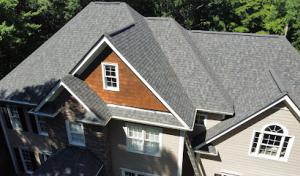
Asphalt shingles are a dominant choice in Hillsborough because they fit the area's broad mix of established neighborhoods and newer residential development at the lowest entry cost. The practical advantage is straightforward: widespread availability means quick replacements after a storm and a broad pool of local crews who know how these roofs behave on older structures with varied rafters and attic ventilation. For homes facing humid Piedmont thunderstorms, you want a shingle that breathes with the attic and seals well against driving rain. Look for shingles with good wind resistance for high-velocity gusts common in late-spring storms, and ask installers about the underlayment and ventilation strategy that pairs with your roof deck. In a storm, the goal is rapid leak control and a return to normal shelter quickly, so choose a shingle line with a solid track record for durability in local climates and a nearby supply chain for fast replacements.
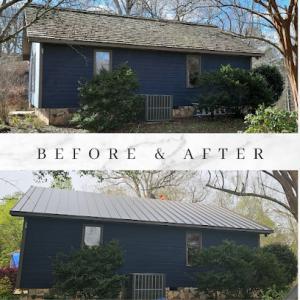
Metal roofing has meaningful local contractor support and is especially relevant for homeowners prioritizing long service life and faster rain shedding during frequent thunderstorms. In Hillsborough, metal options often bring improved hail resistance and a lighter installation footprint on older structures, with fast shedding easing interior moisture management after a storm. The installation tends to be more exacting regarding roof pitch, edge detailing, and panel fastening, so ensure the chosen contractor can handle existing skylights, vents, and dormers without compromising waterproofing. If you expect rapid turnarounds after a storm, metal can reduce time spent on temporary tarps and follow-up repairs, provided the system is paired with proper flashing and robust sealants around penetrations. Consider color choices and coating thickness to maximize heat reflection during muggy Piedmont summers, which helps prolong finish life in this climate.
Tile and synthetic/composite options exist in the market but are more specialized in Hillsborough, so homeowners considering them should expect a narrower pool of experienced installers than for asphalt or metal. Clay and concrete tiles bring distinctive curb appeal and long life when properly installed, but weight, roof structure compatibility, and attic clearance matter more here. Synthetic shingles mimic the look of natural tiles with lighter weight and often easier installation, though installer familiarity remains key. If choosing these materials, verify the contractor's experience on mid-sized suburban homes and on roofs with mixed planes, penetrations, and older decking. In any case, plan for precise flashing around chimneys, vents, and skylights to ensure reliable performance during the region's thunderstorm season.
The most popular roofing material in the US. Find pros who install, repair, and replace asphalt shingles.
1st Gen Roofing
(919) 691-7450 1stgenroofingllc.com
Hillsborough, North Carolina
5.0 from 49 reviews

Chief Roofing
(919) 732-5028 www.chiefroofinginc.com
510 Cornerstone Ct, Hillsborough, North Carolina
4.8 from 227 reviews
Hail, wind, and heavy storm activity in the Hillsborough area contribute to a meaningful roof-claim environment, so insurers commonly expect thorough photo documentation of conditions before and during repairs. When a storm hits, take clear wide shots of the entire roof from the ground with a good zoom, then close-ups of any dimples, lifted granules, or flashing gaps. Photograph interior ceilings and attic spaces to capture potential leaks, staining, or condensation. Keep a dated log of weather events and any immediate protective steps you take, such as tarping or temporary containment, so the claim file has a consistent timeline.
Adjusters in this market may ask for contractor verification of materials and workmanship, making detailed estimates and install records especially useful for Hillsborough homeowners. Request a written, itemized scope from the contractor that aligns with the roof's material type and style, plus a note about any existing attic ventilation or decking concerns observed during replacement. Have the contractor provide a material takeoff, install notes, and warranty details. If possible, secure a written confirmation of any structural or decking repairs that were needed beyond surface shingles, along with photos tied to specific line items.
Some carriers have tightened coverage ranges in parts of North Carolina, so Hillsborough homeowners should review deductibles, depreciation terms, and roof-age limitations before storm season rather than after damage occurs. Before trouble arises, collect policy highlights that affect claim timing, depreciation holdbacks, and recovery of ancillary components (underlayment, flashing, vent stacks). When a claim is filed, reference the policy sections that relate to hail and wind exclusions, then work with the adjuster to confirm whether these items qualify under storm damage coverage or require separate endorsements. Having a clear understanding of these terms helps keep the claims process focused and reduces back-and-forth during repairs.
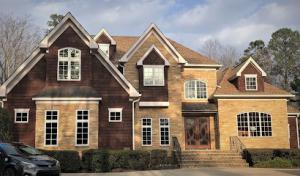
Skylights are a popular feature in many homes with older roofs and newer subdivisions alike, but they also attract attention from storm-driven rains. The last decade has shown that skylight flashing and leaks often become a homeowner's first encounter after a Piedmont thunderstorm, not a distant worry. If a wind-driven squall rattles a vent or loosens flashing, the consequence can escalate quickly from a drip to interior damage.
Wind-driven rain from Piedmont thunderstorms can expose weaknesses at skylights, chimneys, and wall intersections faster than broad field shingle wear alone. You may notice staining along the ceiling, musty smells after a storm, or damp patches that appear hours later. Addressing these early is vital, because latent moisture can undermine insulation and promote mold in attic spaces.
Because many local contractors also advertise chimney-related work, Hillsborough homeowners should pay close attention to transition details where masonry meets roofing. Poorly sealed terminations at brick or block chimneys can mirror the same failure patterns seen at skylight edges. Look for step flashing that overlaps counter-flashing and for any mortar joints that look loose or cracked.
When you plan repairs, insist on a clear plan for leak tracing that includes shingle surface, flashing, and penetration boxes. Ask for documentation of where water tests were performed and how failure points were identified. In fast-moving storms, contractors may respond quickly, but you deserve a thorough approach that covers possible skylight pan leaks and chimney intersections together.
In the aftermath of a storm, keep a simple notebook of dates, what leaked, and where. Photograph flashing details, sealants, and any exterior flashing that shows separation. This record helps with insurance discussions and supports timely, targeted repairs that prevent repeated intrusion through the same penetration point.
If a leak seems minor, treat it cautiously and avoid delaying a professional assessment, because small failures can grow after a Piedmont storm, especially at skylight junctions.
Find contractors experienced in skylight installation, flashing, and leak repairs to bring natural light into your home.
1st Gen Roofing
(919) 691-7450 1stgenroofingllc.com
Hillsborough, North Carolina
5.0 from 49 reviews
Chief Roofing
(919) 732-5028 www.chiefroofinginc.com
510 Cornerstone Ct, Hillsborough, North Carolina
4.8 from 227 reviews
After Piedmont thunderstorms, homeowners expect a fast response that includes debris removal and temporary tarping if needed. In this market, a contractor's ability to show up, assess damage on the first visit, and outline immediate steps matters as much as the repair itself. If a crew can stage a response quickly and keep neighbors informed, that trust translates into smoother insurance documentation and fewer callbacks during the follow-up process.
Local, established firms are a common sight, and that familiarity pays off when storm season hits. Homeowners value contractors who can be reached for post-storm inspections or callbacks after inspections. The advantage is straightforward: a familiar team tends to understand the neighborhood's typical roof lines, trees, and recurring wear, reducing miscommunication and speeding up the path from assessment to repair.
In practice, the market leans toward practical re-roofing solutions that deliver solid protection quickly. Affordable options that get the roof watertight and structurally sound are prioritized over highly specialized luxury features. This means looking for durable, proven materials and a contractor who can coordinate cleanup, disposal, and necessary third-party inspections without delay.
Warranty talk appears, but it's not as prevalent as the promise of emergency response and timely re-roofing. Homeowners should verify what the installer actually backs versus what the manufacturer offers. Ask for written confirmation of coverage on labor, flashing, and workmanship, and note who handles follow-up questions after installation and during inspection callbacks. This clarity saves frustration when the first major storm after a repair hits.
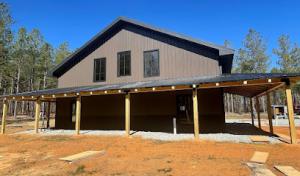
Flat-roof specialization exists in the local market but is secondary to steep-slope residential re-roofing, so this is a relevant niche rather than the dominant roof type. The terrain and older urban layouts mean you'll still encounter transitions between flat or low-slope sections and the main pitched areas. Understanding how these pieces fit together helps you plan better and avoid surprises after storms.
On low-slope sections in this area, frequent summer downpours stress drainage and seam integrity more than in drier inland markets. Keep an eye on the parapet edges, scuppers, and drains, especially where gutters meet low roofs or porch coverings. After heavy rain, inspect for puddling near transitions and look for any signs of water creeping toward the interior around seams and mechanical flashings. A proactive plan helps prevent leaks before wind-driven rain spikes in storms.
Homeowners with porches, additions, or mixed-slope rooflines should make sure the contractor scopes low-slope transitions separately from the main shingle field. These joints are where most leak trouble starts, because water can find paths under flashing, through fasteners, or at mismatched substrates. Ask the contractor to detail the type of sealant, the flashing metal, and the substrate compatibility for each transition. Ensure the low-slope portion has a dedicated drainage assessment, a leak-test plan, and clear criteria for when a transition repair requires internal inspection or temporary weatherproofing during work.
After a Piedmont thunderstorm, perform a targeted walk-through around the house to check for telltale signs of trouble: lifted edge metal at transitions, dark stains along seams, or damp insulation in attic access hatches near low-slope sections. In Hillsborough, where rainfall is sporadic but intense, small penetrations can become larger issues quickly if left unaddressed. Document any concerns with dates and photos, then share them with the contractor to prioritize seasonal maintenance.
Choose materials and sealants rated for low-slope performance and compatible with existing shingles or metal flashed areas. For porches and sunrooms, consider cap flashing that extends onto the main roof field to create a continuous barrier. A focus on high-quality flashing, proper slope design, and compatible underlayment helps ensure that low-slope portions perform reliably through the next round of storms.
Find specialists in TPO, EPDM, and built-up flat roofing systems for residential and commercial properties.
Carolina Professional Roofing
(919) 296-5157 carolinaprofessionalroofing.net
Serving
4.9 from 65 reviews