Last updated: Apr 19, 2026
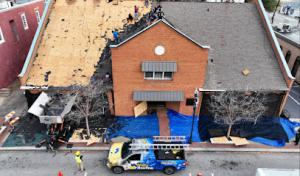
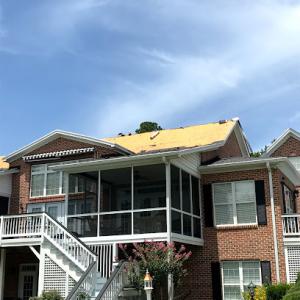
South Carolina's Midlands storms slam roofs with summer deluges and wind-driven rain, and those threats aren't just about shingles popping up for a quick patch. In Irmo, a stubborn leak can evolve from a small, visible wound to saturated insulation and ceiling staining in a matter of hours. The local contractor signal mix reflects that reality: emergency repair crews, storm-damage specialists, and rapid insurance claims are the most active segments after a thunderstorm, so you'll notice a flurry of options right when you need them most. Because South Carolina insurers have been tightening roof underwriting in storm-prone zones, a timely, well-documented response protects both your roof and your coverage. Delays can complicate claims or lead to partial denials when the damage is older than it appears.
As soon as the weather clears, start building a clear, locally relevant storm file. Take fresh, clearly dated photos from ground level and the attic. Capture wind rows along eaves, lifted shingles, flashing gaps, and any interior signs of water intrusion-ceiling dents, stained drywall, and wet insulation behind accessible attic hatches. Record the exact time the storm hit and any pilot damage you notice right away (hollow-sounding shingles, granule loss, or visible nails). If you have a sneak peek into the attic, note any attic ventilation changes or moisture buildup, since Richland County reroof workflows often tie ventilation checks to replacements. Keep a running log of exterior changes you observe in the days following the storm: lifted shingles, peeled sealant, or displaced chimney and vent boots. These records make a faster, smoother case when you file an insurance claim and speak with a contractor.
Contact your insurer promptly after the storm-ideally within 24 to 48 hours if you suspect roof damage. Many adjusters in this area expect rapid documentation, and delays can affect the processing timeline or the scope of coverage. If a contractor arrives offering immediate emergency repairs, assess the scope carefully: a tarp or temporary fix is prudent to prevent interior damage, but confirm the plan in writing and with your insurer before committing to permanent work. Choose a storm-focused contractor who is familiar with this market's expectations: quick response, clear photo-based claim support, and a documented work plan that includes attic checks and ventilation assessment. If you anticipate a denial or partial coverage due to age or prior conditions, your documentation will be critical to negotiating an adequate settlement and ensuring any necessary upgrades are considered.
Prepare for a rapid cycle: assess, document, contact, and coordinate. Share your storm file with both insurer and contractor, and request a scope of work that prioritizes weatherproofing and attic ventilation as part of any replacement plan. In Irmo's climate, fast attention to attic ventilation during a replacement is not just a best practice-it's a leverage point for coverage and long-term performance. Keep close track of all communications, dates, and promised follow-ups, because timing often dictates how smoothly a claim advances and how effectively your roof is restored against the next storm.
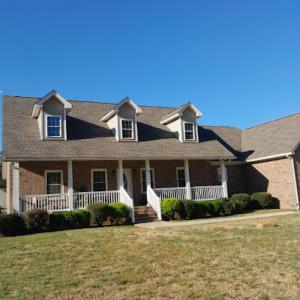
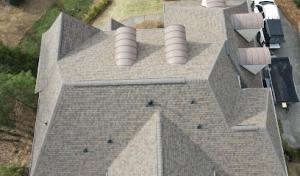
Asphalt shingles dominate replacements because they fit the area's common residential roof forms and price expectations. In the local heat and humidity, they deliver straightforward performance for many roof lines found on nearby subdivisions. A practical approach is to select a high-quality architectural shingle with UV resistance and good saturation, then pair with proper attic ventilation to slow aging from summer sun and moisture. When choosing profiles, stick to standard pitches and unembellished layouts to keep installation predictable and reduce the risk of premature failures due to heat cycling. Routine inspections after the peak storm season will help catch wear from hail, wind-driven debris, or algae growth that thrives in humid summers.
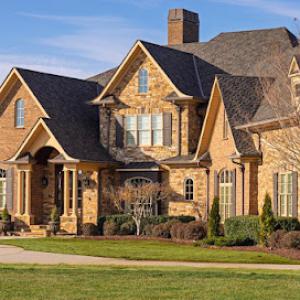
Metal roofing has a strong local presence and is often considered by homeowners looking for better performance during heavy rain events and lower maintenance from repeated storm cycles. In Irmo's storm-prone climate, metal can shed water efficiently and resist wind uplift well, especially on steeper or more modern roof lines. The trade-off to consider is installation complexity and compatibility with the home's structural framing, since some attics or ceiling heights may require reinforcement to accommodate panels, fasteners, or insulation runs without compromising attic ventilation. If choosing metal, a standing-seam system with a corrosion-resistant finish tends to hold up best under humidity and temperature swings, while color choices can be aligned to reflect heat and minimize interior gains.
Tile, wood, and synthetic options appear in the local material mix, but heavier systems can raise structural and installation complexity on homes not originally framed for them. Clay or concrete tile delivers a distinct, long-lasting look and exceptional weather resistance, but requires a sturdy substructure and careful fastening to withstand wind in storm cycles. Wood shingles or shakes offer traditional curb appeal and good insulation properties, yet they demand proactive maintenance in humid summers to prevent rot and insects. Synthetic options can mimic the appearance of natural materials while reducing weight and sometimes improving impact resistance, but they still depend on proper substrate ventilation and rainwater management. Before selecting any heavy system, verify the roof's framing capacity and consider staged upgrades to balance structure, ventilation, and future access for maintenance.
Across all material choices, attic ventilation aligns closely with performance in this climate. An effective combination of soffit intake and ridge or turbine exhaust helps manage summer heat buildup and reduces moisture-related issues during humid periods. For any upgrade or replacement, plan to coordinate roof decking, underlayment, and venting to support a long service life. The goal is to minimize heat retention in the attic, deter condensation on humid days, and extend the life of the chosen roofing material while preserving interior comfort.
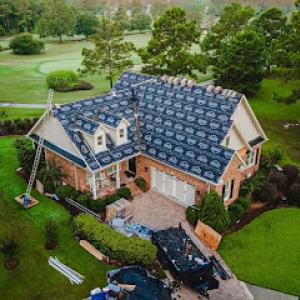
When you're planning a reroof after a thunderstorm surge, think in squares rather than full roofing sheets. In this market, asphalt shingles run roughly 300 to 550 per square, metal 600 to 1100, clay tile 900 to 1500, concrete tile 800 to 1400, wood shingles or shakes 500 to 900, and synthetic or composite shingles 400 to 700. Those ranges reflect Irmo's mix of storm-damaged homes and the Columbia-area demand for tear-offs, temporary tarps, and crew mobilizations. A typical residential roof in need of replacement during a busy post-storm window will often push toward the higher end of these ranges, especially if multiple layers must be torn off or if an expedited timeline is required.
Thunderstorm season here can create a lightning-fast spike in material shortages and labor availability. Your reroof cost climbs not only with the size of the roof but with how quickly a crew is needed and how many neighboring homes are competing for the same tear-off and install slots. Irmo projects frequently involve rapid deck or flashing repairs, and crews may need to tarp and secure the site while rain events pass, adding days and labor to the job. If damage extends into the attic or involves ventilation checks, the scope grows even when the visible roof surface looks similar to a non-storm replacement.
Local conditions around Lake Murray mean humidity and attic moisture patterns influence long-term performance. A reroof in Irmo often includes evaluating attic ventilation, potential insulation upgrades, and addressing any duct or vent needs raised by the roof's new angle or shading. These items add to the square footage accounted for in the overall price and can turn a straightforward shingle swap into a coordinated attic and roof-perimeter refresh. The result is a more durable, storm-ready system that better handles the Midlands humidity and radiant heat from late-summer skies.
After a storm, precise documentation helps keep the project on track. Take clear photos of exterior hail or shingle damage, flashing, and vent areas before work begins, and document any attic signs of moisture or weak insulation. A contractor who understands the local market will outline scope creep risks-such as needed underlayment upgrades or flashing realignments-that commonly arise in Richland County reroofs. Expect the plan to show not just replacement materials by square but also any added ventilation or insulation changes that local conditions and the attic layout warrant. This ensures the job presents a durable, code-conscious solution rather than a quick cosmetic fix.
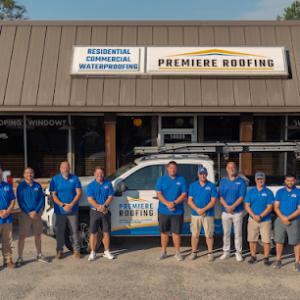
Premiere Roofing
10029 Broad River Rd, Irmo, South Carolina
4.9 from 785 reviews
Since 2008, we at Premiere Roofing have been proudly repairing and installing roofs in the greater Columbia, South Carolina area. We are a family owned, fully licensed roofing company that demands excellence from our employees and seek to consistently exceed our customers’ expectations through unparalleled service. Our goal is to provide top-quality roofing and home improvement services to residents in our great state of South Carolina. We don't want our customers to neglect their home’s needs due to budget restraints. Consequently, we ensure our services are affordable, without lacking in quality. At Premiere Roofing, we hold the distinction of being one of the best roofing companies in Columbia SC and surrounding areas.
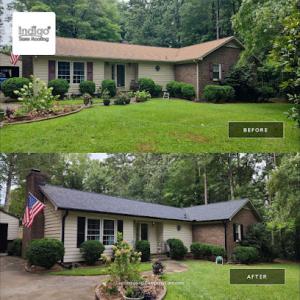
Indigo State Roofing
(803) 868-7663 www.indigostateroofing.com
7620B N Woodrow St, Irmo, South Carolina
4.9 from 129 reviews
Discover top-tier roofing services with Indigo State Roofing, your premier roofing contractor in Irmo, SC! As the leading roofing company in Irmo, SC we are deeply ingrained in the South Carolina community, prioritizing excellence and fairness in all we do. Our fully licensed, insured, and bonded team specializes in roof replacement and exterior restoration, delivering unmatched quality and reliability. Experience the future of roofing inspections with our FAA licensed drone pilot and Hasselblad camera technology, ensuring precise, detailed assessments with unrivaled accuracy. If you are looking for the best roofing company in Irmo, SC then visit our website now. The best Decision you'll ever make!

Rennison Roofing & Exteriors
(803) 728-6686 rennisonroofing.com
7126 Broad River Rd, Irmo, South Carolina
4.8 from 160 reviews
Rennison Roofing and Exteriors is a local Irmo, South Carolina family-owned business. Operating around the Midlands for over 15 years, we know what the exterior of your home is exposed to and live in with you every day. We believe a home is where the heart is, and should be a place where you and yours feel safe. With prompt, honest service you can expect any Rennison job to be completed with the high level of quality needed to ensure your home is protected.
CMS Roofing
(803) 732-5558 www.cmsofsc.com
530 Vision Ct, Irmo, South Carolina
4.7 from 312 reviews
Welcome to CMS Roofing! As a fully licensed and insured commercial and residential roofing contractor, we have been serving South Carolina with the highest quality workmanship for gutter installation, metal fabrication, roof repairs and new roof installations for decades.

Crest Roofing & Construction
Irmo, SC
4.8 from 32 reviews
Crest Roofing & Construction is a locally owned company serving SC, NC, GA, and TN. We provide reliable residential roofing and construction services with a focus on quality, honesty, and craftsmanship. From roofing to renovations, our team is here to help improve and protect your property. Services include roof repairs, replacements, storm damage restoration, insurance claim support, home additions, and so much more. Contact us for expert service and complimentary estimates you can count on at a competitive rate. Our Services Include: Residential Roofing Roof Repairs & Replacements Storm Damage Restoration Insurance Claim Support Deck Construction Home Additions General Construction
Burgin Services
(803) 798-0063 www.burginroofing.com
Serving
4.9 from 247 reviews
Burgin Services is a trusted roofing company proudly serving Chapin, Lexington, Blythewood, Newberry, Camden, Sumter, Winnsboro, Rock Hill, Greenville, Florence, Orangeburg, and Aiken. Founded over 20 years ago at a kitchen table after the owner’s military service, the company was built with one clear goal: put the customer first. With hands-on experience from working at a national roofing company, Burgin Services delivers residential, commercial, multifamily, and church roofing with honest communication, quality materials, and dependable workmanship. Every roof is handled with care, integrity, and a commitment to long-term protection.

Modern Roofing
(803) 839-0355 modernroofingusa.com
Serving
4.9 from 475 reviews
Modern Roofing is a full-service roofing contractor renowned for delivering quality residential roofing solutions across the Midlands. With over 10 years of industry experience, we specialize in insurance claims, using best-in-class materials and up-to-date installation methods. Our rigorously trained team is trusted by homeowners and building professionals, ensuring top-quality service from the first to the final inspection. Committed to providing exceptional value, we focus on ensuring the safety and comfort of your home through our expert care.
Stormgrade
(803) 847-4126 stormgraderoof.com
Serving
4.8 from 35 reviews
Stormgrade Roofing, a trusted roofing contractor in Columbia, South Carolina, specializes in roofing, siding, and gutter installation and repairs. We are a certified GAF Master Elite Roofing contractor, a distinction held by only 2% of roofers in the nation, demonstrating our dedication to excellence. With years of experience and an unwavering commitment to superior craftsmanship, we offer a wide range of services to enhance the beauty, protection, and functionality of your home's exterior.
Grier Roofing
(877) 398-4526 grier-roofing-llc.localo.site
Serving
4.7 from 83 reviews
Grier Roofing is your trusted partner for all roofing needs in Colombia, SC, offering top-quality services to ensure your home or business is protected. With years of experience, our skilled team specializes in roof installations, repairs, and maintenance. We pride ourselves on using durable materials and delivering exceptional craftsmanship, ensuring your roof withstands the elements and enhances your property's value. Whether you need a simple repair or a complete roof replacement, Grier Roofing provides reliable solutions tailored to your specific requirements. Committed to customer satisfaction, we guarantee timely service and competitive pricing. Trust Grier Roofing for peace of mind and lasting roof performance.
Integrity Roofing Claim Services
(803) 743-5253 www.integrityrcs.com
Serving
4.7 from 43 reviews
Roofing contractors
Palmetto Builders Roofing Siding & Gutters
(803) 203-4695 palmettoroofingllc.com
Serving
5.0 from 6 reviews
Serving the entire State of South Carolina. We offer 10&15 Year Workmanship warranty with the installation of GAF "System Plus" Limited Lifetime Warranty. 15 years unlimited wind warranty. 25 year Alge warranty. 50 year Product warranty. Only 5% of all roofing companies nationwide are able to offer this warranty. Also comes with one time transferable warranty. The best warranty in the roofing industry hands down. Call for a no obligation quote today. Initial roof inspections performed at no cost.
Roof & Restoration Experts
(803) 953-0311 www.roofandrestorationexperts.com
Serving
5.0 from 110 reviews
We are your local roofing and restoration experts. We specialize in roofing, gutters, siding, other general contracting needs. We are your #1 insurance claims experts. Don’t let your insurance company believe you should settle for less. Let us deal with your insurance company to restore your property back to its original condition We are R.A.R.E.
A full reroof in Irmo typically requires a permit through the Richland County Building Department, with either the contractor or homeowner handling the application. In practice, most homeowners coordinate through the contractor to ensure the paperwork aligns with the project timeline, but knowing who will file helps avoid delays when storm season hits. The permit review looks at structural integrity, ventilation, and attic insulation needs in addition to the shingles themselves. Because Richland County codes emphasize safety and energy efficiency, the application often triggers checks beyond a simple shingle replacement, especially after a severe storm when structural concerns can surface.
The inspection flow commonly includes a deck or structural inspection before concealment and a final inspection after completion. That means once the new roof deck and any required supports are in place, the county inspector will want to verify everything before the roofing underlayment or shingles are fully installed. Expect a later final inspection to confirm all components meet current wind and installation standards. If any venting or attic insulation updates are needed, those steps must be completed and re-inspected before the project can be deemed complete. Planning for these inspections in the project schedule helps prevent hold-ups that linger after a storm-damaged roof.
Some Irmo reroof projects trigger code-compliant ventilation and attic insulation corrections, making permit review more than a simple shingle swap. Inland Midlands thunderstorms and lake-area humidity stress attic air management, so many projects require upgrading soffit, ridge vents, or baffles to meet current standards. If the attic is not adequately vented, or insulation has settled or degraded, expect the permit review to flag these items and request corrective work. Contractors familiar with Richland County expectations can anticipate these requirements, streamlining the process and reducing the risk of rework. In practice, addressing attic ventilation and insulation early-ideally as part of the reroof plan-helps ensure the permit is issued smoothly and the final inspection passes without additional delays.
Rising homeowners insurance premiums in South Carolina are reshaping how reroofs get tackled in this area, especially for homes with aging asphalt shingles. In Irmo, the clock on replacement often ticks differently when insurers scrutinize the age and condition of the roof before renewals or deductible decisions. Even if a storm hasn't plainly damaged the surface, the actuarial math behind a policy renewal can push decision-makers toward accelerated timelines or more conservative coverage on older roofs. That means the timing of a roof replacement isn't just about rain or hail; it's about the optics of age and risk that insurers weigh year to year.
When a claim surfaces, adjuster site visits are common in this market. The outcome can hinge on how clearly the roof's condition is presented and documented. In practice, this means a claim packet that tells the story beyond a single wind gust or a visible crack. An adjuster will look for signs of aging that correlate to the policy's risk assessment: worn granules, curling shingles, algae or moss that mask underlying issues, and attic moisture indicators. For a homeowner, the impression left by the roof's overall health matters as much as any visible storm damage. The goal is to show that the roof has deteriorated with time and that replacement will prevent future water intrusion and interior damage.
Because insurer attitudes toward older roofs can affect renewals and claim outcomes, condition documentation becomes a practical tool even before any loss occurs. Maintain a dated photo record that captures the roof from multiple angles, the chimney, valleys, and penetrations. Include a simple written note about visible wear, shingle granule loss in gutters, and any attic signs of moisture or daylight near flashing. After a storm, organize a timeline that notes the precise date of the event, duration, and any immediate interior effects. A clear contractor scope showing the proposed mitigation and replacement plan helps the adjuster see a proactive, long-term risk-management approach rather than a patchwork repair.
A proactive homeowner keeps the roof's aging narrative consistent and measurable. Regular inspections focusing on ventilation and attic updates-already tied to Richland County reroof considerations-create a stronger case when insurance matters arise. If the roof is approaching or has surpassed its expected lifespan, assemble a straightforward, date-stamped photo log and a concise contractor scope that outlines replacement versus repair choices. When the storm season approaches, this documentation becomes part of a ready-to-submit package that can influence not just claim outcomes but renewal decisions as well. In practice, clear evidence of age-related condition helps reduce guesswork for both homeowner and insurer during the renewal cycle.
Connect with contractors who help homeowners navigate the claims process from damage assessment to final approval.

Indigo State Roofing
(803) 868-7663 www.indigostateroofing.com
7620B N Woodrow St, Irmo, South Carolina
4.9 from 129 reviews

Rennison Roofing & Exteriors
(803) 728-6686 rennisonroofing.com
7126 Broad River Rd, Irmo, South Carolina
4.8 from 160 reviews
Spring and fall are the favored reroof windows in Irmo. Those seasons avoid the worst heat and humidity that can complicate installation conditions, while still giving enough daylight and cooler evenings to keep crews on track. If a leak or wind damage occurs in late winter, targeting a spring start can align with milder weather and calmer site conditions, helping roofers complete tear-off and dry-in before the humidity climbs again. Plan a fall start if you want to finish before holiday traffic and the lingering sleet of late autumn, but be mindful that autumn weather can shift quickly.
Peak-summer work in Irmo has to account for frequent thunderstorms that can interrupt tear-off and dry-in schedules. Thunderstorm fronts commonly roll through Midlands afternoons, so builders often build buffer days into a summer project and prefer starting early in the week. If a storm rolls in, expect temporary delays and a push to protect exposed decking with tarps and fast-drying underlayment. Heavy heat also affects material handling and crew fatigue, so schedule realistic milestones and ensure crews stay hydrated and safe.
Autumn can still bring variable rainfall and thunderstorm delays in the Midlands, so scheduling too late in the season can compress project timelines. You want a window with enough dry days to complete roof decking, underlayment, and shingle application without rushing. If a late-season storm threatens a project, discuss with the contractor the option to pause and re-start rather than risk compromised installation. A proactive communication plan helps keep everyone aligned as seasonal weather shifts happen.
In this hot, humid pattern, roof systems that already have marginal ventilation are more likely to show accelerated aging and may be flagged during reroof planning. You'll notice faster shingle curl, quicker granule loss, and more attic heat that bleeds into living spaces. The combination of inland Midlands thunderstorms and stacked humidity can push gradual wear into visible failures sooner than expected. If your attic feels warm or your soffit venting seems blocked, address it before a storm season forces a hasty decision.
Wind-driven summer storms in the Midlands commonly expose weak points at ridges, flashing transitions, and older shingle fields before they produce obvious interior damage. Even a few seconds of high gusts can peel shingles at the edges or lift compromised flashing, sending water toward joints you can't see from the ground. After a storm, look for lifted shingles, creased tabs, or dark streaks along valleys and around chimney-to-roof interfaces. Repairs started late tend to compound downstream leaks and interior staining.
Because Richland County reroof inspections may involve deck review, hidden sheathing issues are an important local risk when leaks have been recurring through multiple storm seasons. Soft spots, loose or warped decking, and hidden fastener corrosion can sit beneath layers of ceiling material, masking the true damage. If leaks recurred after each storm, expect the assessment to probe underlayment and deck integrity as part of a solid repair plan, not a quick fix.
Find contractors experienced in skylight installation, flashing, and leak repairs to bring natural light into your home.
Roof & Restoration Experts
(803) 953-0311 www.roofandrestorationexperts.com
Serving
5.0 from 110 reviews