Last updated: Apr 19, 2026
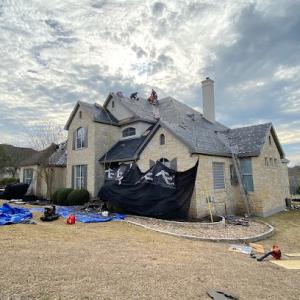
Spring hail and wind drive a unique claim environment in this area. After major storm cells sweep through the north side of the Austin metro, roofs are scrutinized: insurer photo documentation, emergency tarping, and rapid contractor availability all tighten the timeline. The result is a race to document damage, schedule inspections, and start replacements before the next storm season. If a claim isn't staged quickly, you risk longer waits, higher scheduling pressure, and potential gaps in coverage if a roof is exposed to repeating hail events.
When a big cell rolls through, expect contractor scheduling compression across the queue. Even though plan reviews might normally run 1-2 weeks, storm-driven surge can push replacement timelines into the several-week range. That compression isn't just an inconvenience; it can affect attic insulation, ventilation, and interior moisture control if a roof remains open or tarped during peak heat. In this climate, hot summer afternoons can halt progress, forcing crews to pause and resume, which extends overall project calendars. Plan for the need to adjust timelines upward during the immediate weeks after a major hail event.
A common sticking point is the insurer's photo documentation and the way adjusters frame claims after hail. A thorough, timely intake with clear, dated photos-both exterior and attic if visible-can streamline the claim review and remove ambiguities about what was damaged versus what was preexisting. Take wide shots of the entire roof, closeups of impacted shingles or metal panels, and notes on any interior signs of leaking. If leaks are suspected, capture unaffected areas as well to demonstrate the extent and limit disagreements about the scope of replacement. In this environment, a precise, organized packet can mean faster approvals and fewer back-and-forth requests.
First, arrange a prompt, professional roof inspection within 72 hours of a hail event, prioritizing daylight hours for the most accurate assessments. Request a detailed damage map from the contractor, highlighting the expected scope and color-matching considerations so the insurer's adjuster can reference a clear baseline. Maintain a log of all communications with the insurer, including dates, names, and what was discussed. If an emergency roof tarping is in place, photograph the tarp and the surrounding site to document the interim protection and any wind-driven movement that could affect claim credibility. As soon as you have an approved claim, secure a callback window with the preferred contractor to minimize idle days, and confirm a realistic replacement sequence that accounts for potential hot-weather interruptions.
Because summers are extremely hot and afternoon storms can interrupt work, many replacements are pushed into spring and fall unless storm damage compels faster action. This pattern means you should treat the first warm spell after a storm as a hard deadline to begin, not a suggestion. If your property suffered hail damage, initiate the process promptly, even if the calendar seems uncomfortably full for contractors. Early scheduling minimizes the risk of weather-induced delays and helps ensure your roof is restored before the next round of seasonal heat and storms. Stay proactive, stay organized, and keep the claim moving with clear, consistent documentation and timely contractor coordination.
Best Build Exteriors
(512) 877-2378 www.bestbuildexteriors.com
541 Jess Maynard Trail, Leander, Texas
5.0 from 103 reviews
Locally owned and operated roofing and exterior contractor proficient in insurance claims and proper roofing, siding, window and rain gutter system installation processes and techniques.
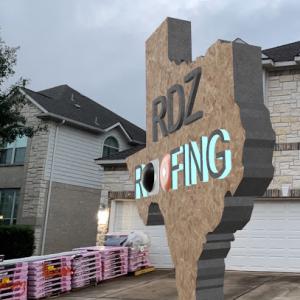
RDZ Roofing
601 County Glen St, Leander, Texas
5.0 from 74 reviews
Family owned and operated. We take care of our customers. Free upgrade from 3 tab to dimensional. We have very competitive prices. Lifetime workmanship warranty. "Do it right. Do it light." Let RDZ make it easy.
Fur Sure Roofing
(512) 962-0287 fursureroofing.com
1905 Lazy Grv Bnd, Leander, Texas
5.0 from 55 reviews
At Fur Sure Roofing, we're not just roofers. We're your neighbors, your friends, and fellow animal lovers. We understand the trust you place in us when you invite us to work on your home, and we don't take that lightly. At Fur Sure Roofing, we build more than just roofs – we build relationships and strengthen our community. When you choose us, you're not just getting a superior roofing service, you're making a difference.
Silver Creek Exterior & Construction
461 Silver Creek Dr, Leander, Texas
4.9 from 70 reviews
Serving Williamson County and the greater Austin area, we are your premier local roofing company specializing in comprehensive exterior solutions. Our expert team provides top-tier roofing services, from new installations and full roof replacements to skilled roof repair for storm and hail damage. We also handle a wide range of other crucial exterior work to protect and enhance your home's curb appeal. This includes professional gutter cleaning and seamless gutter installation, precise window replacements to boost energy efficiency, and high-quality exterior painting that revitalizes your property. Whether you're in Round Rock, Cedar Park, Leander, Georgetown, Hutto, or Pflugerville, our commitment is to deliver exceptional craftsmanship.
Greater Austin Roofers of Leander
(512) 790-9348 www.greateraustinroofers.com
706 Leander Dr E7, Leander, Texas
5.0 from 42 reviews
At Greater Austin Roofers of Leander, we are proud of our many years of experience. Our company has been providing excellent roofing services to our customers for more than 30 years. We install, replace, and repair roofs on both commercial and residential properties in Leander TX and surrounding areas. We can also work with your insurer. Your roof project will be more affordable. We are also bonded – we will protect your property. Spanish-speaking staff are now available to assist you in our communications. Call us now for your FREE estimate!
Noble Roofing
(737) 231-4839 nobleroofingtexas.com
136 Housefinch Loop, Leander, Texas
5.0 from 40 reviews
Utilizing the best roofing practices for your Austin Texas home, making sure that your home has the best roof possible. This Roofing company does not play around when it comes to customer happiness. From insurance roofing to out of pocket roofing, we do it all. You're search for an Austin Roofing Contractor has come to an end here
Life Roofing & Construction
(512) 365-0770 www.liferoofing.com
3021 Wedgescale Pass, Leander, Texas
4.9 from 111 reviews
Life Roofing is committed to a proven process and quality products for every job from residential to commercial to multi-family. We proudly serve the greater Austin, DFW, San Antonio, and Central Texas areas. Life Roofing is a fourth-generation roofing family, and we still hold true to our original beliefs and values that were established in 1919, when our great grandfather founded his first roofing company. As a family-owned business, we pride ourselves on our ability to exceed all expectations when it comes to your roof.

Anderson Roofing & Construction
(512) 200-7663 andersonroofingtexas.com
2503 Claudia Dr, Leander, Texas
4.9 from 71 reviews
Anderson Roofing is locally owned - we live in Cedar Park. Chris worked for 10 years as an installer and then as a salesperson. He knows his craft and trains our workers well. Beth was an office manger for Consumer Reports and medical non-profits. Our crew members all have 10 years as installers. Some of our sales people were even installers.
Preferred Elite Construction
(512) 260-7074 preferredeliteconstruction.com
10824 E Crystal Falls Pkwy Suite 506, Leander, Texas
4.9 from 48 reviews
Your Local Roofer in Central Texas Preferred Elite Construction has proudly served Leander, Cedar Park, Round Rock, and surrounding Central Texas communities for nearly 10 years. We specialize in roof replacements, roof repairs, gutters, and storm damage inspections with reliable service and quality workmanship. Realtors and homeowners trust us for fast, dependable roofing solutions that make selling or protecting a home easier. Backed by our mascot Duke the Duck, we combine hometown pride with expert craftsmanship to deliver stress-free roofing you can count on. Call today for a free, no-obligation roof inspection!
JPG Roofing & Restoration
(737) 291-9799 www.roofingbyjpg.com
402 Apache Trail, Leander, Texas
4.9 from 45 reviews
Looking for reliable roofing in Leander or Cedar Park? JPG Roofing & Restoration specializes in shingle and metal roof replacements, roof repairs, gutter installations, and storm damage restoration. As local hail damage experts, we help homeowners navigate the roof insurance claim process with ease. Whether you need a full roof replacement, quick leak repair, or professional gutter services, our experienced team delivers quality craftsmanship with honest, timely service. We’re proud to serve Central Texas with free roof inspections, expert advice, and long-lasting roofing solutions. Call now to schedule your inspection or get help with your storm damage insurance claim. JPG Roofing & Restoration – Your local roofing company you can trust.
Best Roof In Town
(512) 825-0090 www.bestroofintown.com
2621 Longhorn Ranch Ct, Leander, Texas
4.9 from 58 reviews
Best Roof in Town is a premiere roofing company and top rated of the Leander TX Roofing Companies and in the Greater Austin Area. Best Roof Town is a leader in Leander TX Roofing Companies specializing in Residential and Commercial roofing for over 10 years! Our Team of Roofing Experts are knowledgeable and always looking out for the best interest of our clients. We offer a Turn-Key Roofing Experiences from start to finish! Serving Cedar park , Round Rock and Austin Texas .
RoofCrafters
(737) 383-1652 www.roofcrafters.com
610 Horizon Park Blvd, Leander, Texas
4.8 from 63 reviews
RoofCrafters, Inc. is a trusted exterior remodeling contractor serving Austin since 1980. As a third-generation, family-owned company, we bring decades of experience, innovative products, and efficient installation methods to every project. Whether you need roofing, siding, or full exterior updates, we’re here to deliver reliable results and educate homeowners along the way. Choose RoofCrafters for modern solutions and time-tested craftsmanship.
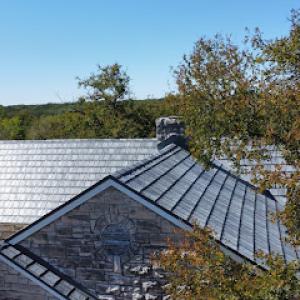
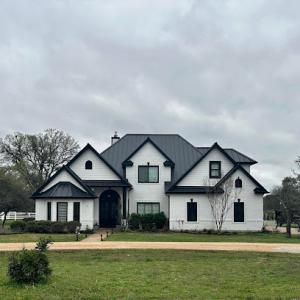
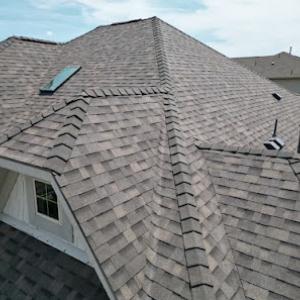
Leander's roofscape blends affordable, quick-install options with higher-end, heat-tasting materials. The dominant mix- asphalt shingles, metal, clay tile, concrete tile, wood shakes, and synthetic/composite products-reflects both newer subdivisions and Hill Country influence on curb appeal. In this climate, UV exposure and long, hot summers drive aging patterns: granule loss on asphalt, thermal cycling that tightens and relaxes sealants, and gradual fatigue in flashing. When planning a roof replacement, look at how these aging processes show up in your area's sun exposure, attic ventilation, and the color you've chosen. A lighter finish on metal or tile can help with heat reflection, but color and profile still matter for appearance and neighborhood harmony.
Asphalt shingles remain common for their balance of cost and performance, but heat and UV at scale can shorten their life, especially on roofs with shallow pitches or limited attic ventilation. Metal roofs are a frequent upgrade discussion here because they handle hail better and shed heat efficiently, though they require proper underlayment and fascia details to prevent thermal bridging and edge condensation. Clay tile and concrete tile bring a classic, durable look and excel in heat resistance; however, they're heavier and require a solid structural assessment and careful attic-to-roofline ventilation planning to avoid heat build-up and moisture issues. Wood shakes offer texture and character but demand attention to sealants and potential fire considerations in high-fire-risk periods. Synthetic or composite shingles aim to mimic natural materials with enhanced impact resistance and lower maintenance, often valuable for homeowners seeking a consistent appearance without the weight or weather sensitivity of real tile or wood.
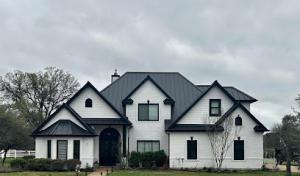
Begin with a plain-language evaluation of your home's structure, sun exposure, and the roof's pitch. If you already know you sit under heavy sun, consider a tile or metal profile that resists heat-induced curl and edge wear. In neighborhoods where appearance matters, choose profiles and colors that align with the surrounding homes while still offering the performance you need against hail and heat. For a Leander home with mixed textures, a layered approach can deliver both durability and curb appeal: a resilient, reflective metal or a concrete tile with a staggered profile to break up wind uplift, paired with a compatible underlayment and ventilation plan. Pay attention to flashing, fasteners, and sealant age, since these components govern how well the roof keeps out moisture during storm season.
After a hail event or a long season of sun, inspect for scuffed granules, loose fasteners, or cracked tiles, and prioritize prompt repairs to avoid accelerated damage. Tile systems benefit from staggered, properly integrated joints that reduce stress concentrations during thermal cycling. Metal roofs should be checked for denting and fastener wear, with an emphasis on sealing at valleys, hips, and rooftop seams. Synthetic shingles can offer uniform performance, but verify that color stability remains intact after sun exposure. In all cases, maintain adequate attic ventilation to minimize heat buildup, which compounds aging and reduces the effective life of any roof type chosen.
Spring hail events along the Austin metro fringe tighten labor markets and push scheduling farther out, and Leander sees this tension in every neighborhood with steep pitches and complex rooflines. When hail swells claims activity, contractors juggle dozens of estimates at once, which can widen price swings and extend project timelines. Homeowners should expect not just higher material costs in peak demand, but also tighter windows for tear-off and reinstallation due to limited crew availability and local storm response priorities.
Material choices vary widely in this market, and the city's housing stock skews toward roofs with intersecting planes, hips, valleys, and attached garage sections. Those features raise tear-off and installation complexity compared with simple gable layouts, meaning the same square of roof can soak up more labor hours and protective measures. Asphalt shingles remain the baseline at roughly 400-700 USD per square, but the premium end expands quickly as lines creep into metal, concrete tile, or clay tile installations. Clay tile is typically priced in the 900-1900 USD per square range, reflecting both weight considerations and the need for precise underlayment and detailing around hips and valleys. Metal roofing sits in the mid-to-upper tier, roughly 700-1400 USD per square, while concrete tile often lands between 900 and 1500 USD per square. Wood shingles or shakes and synthetic/composite products fill the middle-to-upper tiers, with synthetic options offering a balance of performance and ease of installation in homes facing long-term sun exposure and strong afternoon heat.
Storm-driven demand shapes not only prices, but also the timing of replacements. After a hail event, scheduling can stretch by weeks as crews move between flooded claim sites and high-priority repairs, and some roofers may adjust timelines to accommodate insurance documentation workflows. If your home has multiple penetrations, skylights, or a complex valley pattern, expect both longer tear-off durations and larger waste loads that influence disposal fees and dumpster or site-protection costs. Conversely, a straightforward, single-framed gable with uniform shingles may still command competitive pricing during a calm season, but can spike when the next round of hail claims hits.
Understanding the price bands helps homeowners compare bids without sacrificing critical quality. Note that the starting range for asphalt is a practical proxy for basic jobs, while premium tiles bring not only higher material costs but also structural considerations and longer installation times. In Leander, the difference between a standard re-shingle and a full replacement with integrated underlayment, flashing updates, and valley renovations can approach or exceed several hundred dollars per square depending on roof complexity and the chosen material. When insurance-adjusted replacements are involved, ensure that the bid includes tear-off, disposal, underlayment, flashing, and vent or solar penetrations, since omitting these line items can hide meaningful cost shifts once work begins.
To plan effectively, gather three bids that explicitly itemize tear-off, disposal, and underlayment costs, then compare not just the sticker price but the schedule, crew accessibility, and warranty terms. If spring storms loom in the forecast, build flexibility into the project timeline and confirm the contractor's ability to prioritize inspections and claim documentation while protecting critical roof areas against weather during the interim.
Get a clear picture of your project costs upfront - no commitment required.
Silver Creek Exterior & Construction
461 Silver Creek Dr, Leander, Texas
4.9 from 70 reviews
Greater Austin Roofers of Leander
(512) 790-9348 www.greateraustinroofers.com
706 Leander Dr E7, Leander, Texas
5.0 from 42 reviews
When replacing a roof here, a full replacement usually requires a building permit rather than a no-paperwork swap. The permitting process is a baseline safety and code check to ensure neighbor-friendly drainage, venting, and structural considerations are addressed before work begins. A licensed contractor often handles the submittal, but it's essential for you to understand the timeline and what the city expects for a smooth review. Expect that plan review is a recognized step in the process, and that the project cannot proceed beyond tearing off an old roof until a permit is issued.
The local submittal typically includes plan details that address ventilation and the condition of the roof deck. This matters especially if older decking or attic airflow issues are uncovered during tear-off. Have documentation ready on attic ventilation strategy, including intake and exhaust details, and any known decking concerns or repairs anticipated during replacement. If a roof requires added vents, baffles, or ridge vents, include those specifications in the plans. Clear depiction of underlayment choices and fastener methods is helpful, as inspectors look for continuity and proper sealing around eaves, penetrations, and valleys.
Inspections commonly occur at the underlayment or installation stage and again at final completion. That mid-point check helps verify that the chosen underlayment, nail patterns, and flashing details align with code expectations before shingle installation progresses too far. Plan review often takes 1-2 weeks, depending on workload and weather. Weather gaps can extend the review period, so coordinate with your contractor to avoid idle time. It's prudent to anticipate potential questions about ventilation balance, decking condition, or a need for minor fixes identified during the tear-off, which can influence the schedule.
Keep all permits, plan sheets, and inspection notices centralized for easy access. If the tear-off reveals decking that's suspect or compromised, be prepared for possible retrofit requirements or updated plan notes. Your contractor should schedule the inspections with enough lead time to accommodate weather delays and any additional testing that might be requested by the inspector. Communicate any changes in roofing materials, ventilation strategy, or deck repairs promptly to the permit office to prevent misalignment between the field work and the approved plan.
At final completion, ensure the inspector signs off on the installation, confirming that ventilation, underlayment, deck condition, and flashing systems meet the approved plan. Once clearance is posted, keep the final documents with the roof's warranty information and contractor details. This record helps with future inspections, potential insurance documentation, and any warranty claims tied to the replacement.
Leander's long, blistering hot season makes attic heat buildup a more pressing roof-life issue than winter ice threats. When attic temperatures soar, shingles bake from both the outside sun and radiant ceiling heat, which can accelerate aging and reduce the effectiveness of underlayment and flashing. You'll notice the effects most on homes with limited attic insulation or obstructed airflow, where hot air becomes trapped and accelerates shingle drying and curl. Prioritize a robust attic ventilation plan that moves heat out of the space before it saturates the roof deck. If a vented attic isn't delivering, an energy audit or a quick air-sealing sweep can pay off with longer shingle life and steadier indoor temperatures.
The permit review focus on ventilation is especially relevant in this market because poor airflow can shorten shingle life and worsen summer cooling strain. In practice, that means giving attention to soffit intake, ridge or power vents, and attic hatch sealing. Don't overlook baffles or dead air spaces that trap air near some roof decks. Even simple fixes-correcting bent baffles, adding a few square feet of intake, or improving attic insulation-can shift the balance from heat-soaked decking to cooler, drier conditions. A well-ventilated attic reduces heat transfer to the living space, which helps air conditioning work more efficiently and keeps shingles from warping under extreme sun.
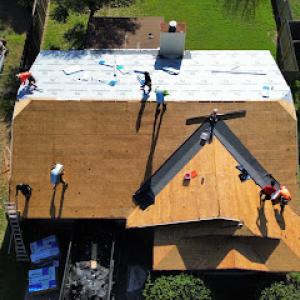
Summer installation logistics in this market are affected by extreme roof-surface temperatures and pop-up afternoon storms, which can change crew start times and same-day dry-in planning. On hot afternoons, crews may push interior tasks earlier and shift roof work to cooler windows, which can impact material handling and sequencing. If a storm looms, expect crews to pause for safety and weather checks, then resume quickly once conditions ease. Communicate a clear plan for tarp protection and temporary weather barriers to avoid sun-related material damage and to keep the deck dry for fast, reliable dry-in. Stay flexible with scheduling, and confirm contingency steps for sudden heat or lightning alerts.
Your neighborhood has a mix of tile and metal roofs that demands careful, profile-matching repairs. When a section must be replaced, the goal is to preserve the original look by sourcing panels or tiles that match the existing profile and color. This means confirming exact tile shapes, rib patterns, and color blends before ordering replacements, and planning the patch to align with the surrounding field of shingles or metal panels. In practice, this often requires working with suppliers who keep stock for Leander-wide homes or can source close matches promptly.
Leaks in Leander frequently trace to flashing transitions or penetrations, especially around skylights. Skylights are a meaningful local specialty signal in the contractor market, so leak diagnosis extends beyond field shingles to flashing details around valleys, chimney or vent stacks, step flashing at transitions to tile or metal, and the sealants used at skylight bases. Start with a careful water test that mirrors typical spring patterns, then inspect for compromised sealant, improper flashing overlaps, or misfit flashings that may have shifted after hail or high winds.
As newer and upgraded homes spread through Leander, homeowners increasingly need contractors who can work across standard shingle systems and premium roof details rather than only basic re-roofing. Plan repairs with attention to ridge caps, metal seam transitions, and tile edge trims to avoid a mismatched appearance after substitution. When a repair involves metal or tile features, verify panel gauges, coating types, and the intended finish to minimize color drift or texture mismatch over time. Communication with the homeowner about these finish characteristics helps ensure the repair blends seamlessly with the remaining roof surface.
Find contractors experienced in skylight installation, flashing, and leak repairs to bring natural light into your home.
Greater Austin Roofers of Leander
(512) 790-9348 www.greateraustinroofers.com
706 Leander Dr E7, Leander, Texas
5.0 from 42 reviews
Best Roof In Town
(512) 825-0090 www.bestroofintown.com
2621 Longhorn Ranch Ct, Leander, Texas
4.9 from 58 reviews
RoofCrafters
(737) 383-1652 www.roofcrafters.com
610 Horizon Park Blvd, Leander, Texas
4.8 from 63 reviews
This fast-growing suburb sits on the northwestern edge of the Austin metro, where Central Texas heat and spring hail shape how roof losses are treated by insurers. In this high-claim environment, adjusters tend to demand meticulous documentation to substantiate every hail impact and wind-related failure. Homeowners should expect a tighter paperwork bar, with a stronger emphasis on chain-of-custody for photos and repair timelines. A single hail storm can trigger a cascade of follow-up requests, so the moment weather moves through the area, prepare to assemble a complete file rather than relying on memory.
After damaging weather sweeps through, the insurer's focus shifts to a detailed chronology: exact dates of observed damage, date-stamped photos from multiple angles, and a clear sequence of events from impact to replacement. Replacement timelines become part of the conversation, not afterthoughts. Without readily available, organized evidence, the claim can stall or encounter extra scrutiny. That means keeping a dated record of all communications, invoices, and interim repairs, if any, is not just helpful-it's essential for a smooth path to resolution.
Rapid market changes following major Texas storm seasons can alter deductible expectations, claim scrutiny, and policy terms for homeowners shopping coverage or renewing. The landscape can move quickly, making it prudent to review coverages in light of recent storms and insurer practices. Being proactive about understanding how a given provider handles hail-damage claims-especially in a high-claim area-helps prevent surprises when renewal or replacement decisions loom.