Last updated: Apr 19, 2026
Manor sits in the Central Texas hail and wind corridor, so spring storm activity drives roof damage inspections, claim filings, and contractor scheduling surges. When a hailstorm sweeps through, the window to capture damage is narrow. Delays can turn a manageable patch into a full replacement queue, and the heat that follows-summer days baking exposed shingles-can complicate what should be a straightforward repair. Understanding the rhythm of storms, claims, and contractor availability helps you avoid a last-minute scramble when the next round hits.
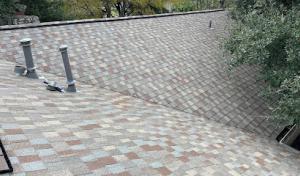
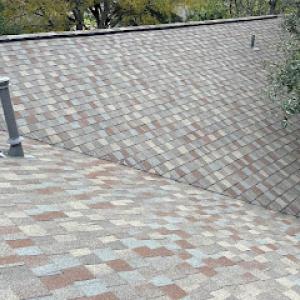
In this market, many Manor roof replacements are triggered by weather events rather than aging shingles alone. After a big storm, set aside time to do a careful walkaround with a flashlight, especially along eaves, ridges, and the skylight areas where hail can leave the most impact. Look for dented or bruised shingles, lifted tabs, granule loss, and any curling or blistering on the surface. Take clear photos from multiple angles, including close-ups of damaged areas and wider shots that show the overall roof line. If you have attic access, check from the inside for signs of water intrusion or daylight leaking through rafters-these details strengthen a claim. Keep a dated log of each storm, the time you first noticed damage, and how long it took for the issue to appear after hail. The sooner you document, the stronger your documentation will be when an adjuster reviews the claim.
The surge in storm-related work in Manor means that claims can move quickly once a storm ends, but delays in filing can complicate scheduling and approvals. If you suspect significant impact, contact your insurer promptly and report the event, then follow up with the key details you've collected. Equally important is coordinating with a reputable local contractor early in the process. A contractor who understands the area's typical shingle types and underlying roof assemblies can help you interpret what the adjuster will want to see, and which components may need temporary protection if a repair cannot be completed immediately. Opening lines of communication between you, your insurer, and your contractor reduces miscommunications and keeps the restoration on track.
Because summer heat follows spring storm season in this area, delayed repairs can leave damaged shingles and exposed roof components baking under intense UV before crews are available. If the initial assessment confirms damage that warrants replacement or substantial repair, prioritize scheduling as soon as practicable. Shortening the exposure window protects roofing decks, underlayment, and flashing from sun damage, and it also minimizes the risk of secondary leaks developing in the interim. When heat becomes a factor, a contractor may propose protective measures such as temporary coverings or careful sequencing of removal and installation to keep crews safe and work progressing efficiently.
A proactive homeowner keeps a storm-season readiness plan. Maintain an up-to-date photos archive, a current contact list for the insurer and a trusted local roofing contractor, and a binder of the claim correspondence. After a hail event, set reminders to follow up on claim status, demand timely adjuster visits, and confirm that the replacement scope aligns with the actual damage observed on the roof. In this corridor, the confluence of weather intensity, claim activity, and contractor availability defines the repair timeline-so acting fast and staying organized is the best defense against being caught in the next surge.
Spring and fall are the cleanest windows for a roof replacement in this area. Spring lets you dodge the peak heat of summer while still staying ahead of the late-year rain that can complicate a job. Fall mirrors that balance, offering cooler days and a more predictable rhythm before the winter fronts arrive. In Manor, choosing a spring start means crews can work through milder mornings and save the hottest afternoons for interior tasks or interior work when possible. If work runs into late fall, you gain the benefit of cooler temps but risk a few rainy days sneaking in after the peak storm season. The key is to line up a start when morning temperatures are comfortable and afternoon heat isn't aggressively punishing exposed roofs.
Summer roof work here is influenced by high heat and strong sun, which can stress materials and slow productivity on exposed roofs. Asphalt shingles and metal, common in the area, respond differently under these conditions: shingles may become slick and brittle when heat is extreme, while metal can overheat and expand, slightly complicating panel alignment. If a summer project is unavoidable, plan for early starts and midday thins of activity, turning to interior tasks or temporary protective measures when the sun is at its zenith. Proactive steps include ensuring shade or temporary coverings for the work area, maintaining hydration and break schedules for crews, and coordinating material deliveries for cooler morning windows. In practice, you want to avoid rolling a full-tilt replacement on the hottest days, especially on steeper sections that demand careful footing and increased safety checks.
Occasional winter fronts in this area can impact material handling and scheduling even though winters are generally mild. Cold snaps can stiffen sealants and complicate nail gun performance, while rain or light sleet can create slick decking that slows progress. If a winter window is chosen, factor in extra travel time for crews and a contingency plan for days when precipitation renders the roof unsafe to work on. The upside is that milder winter spells often come with quiet days and less demand, which can help with material staging and coordinating inspections. The aim is to preserve a predictable sequence: delivery, staging, underlayment, and shingle or panel installation without gaps that invite leaks.
Because storm cycles can arrive suddenly, a practical approach is to build in realistic buffers for weather delays. You will benefit from a pre-season checklist that includes securing attic protection, confirming tarping for exposed sections, and ensuring drainage paths on the ground stay clear. When hail or wind events occur, documentation and timely inspections become essential to avoid backlogs. In Manor, keeping open lines of communication with the roofing crew and the insurance-adjacent process helps maintain momentum while weather patterns shift. The right schedule remains flexible, prioritizing safer conditions and minimizing exposure to prolonged heat, cold snaps, or disruptive downpours.
Get a clear picture of your project costs upfront - no commitment required.
Reyes Roofing Contractor
(512) 563-7420 reyesroofingcontractor.us
16603 Wells Rd #2, Manor, Texas
5.0 from 45 reviews

River City Roofing
(737) 931-1133 roofrivercity.com
203 W Murray Ave Unit 6, Manor, Texas
4.9 from 42 reviews
Reyes Roofing Contractor
(512) 563-7420 reyesroofingcontractor.us
16603 Wells Rd #2, Manor, Texas
5.0 from 45 reviews
Since 1999, Reyes Roofing Contractor has been providing dependable roofing and exterior improvement services across the Manor, TX area. As a BBB-accredited and insured company, we serve residential and commercial clients within an 80-mile radius. With over 35 years of experience, we specialize in roofing installation, repair, and maintenance for all types of roofs. We also offer siding installation, interior and exterior painting, gutter maintenance, installation and repair, as well as durable fence construction and restoration. Free estimates are available for all roofing and exterior projects across the region!
River City Roofing
(737) 931-1133 roofrivercity.com
203 W Murray Ave Unit 6, Manor, Texas
4.9 from 42 reviews
At River City Roofing, we're a trusted roofing contractor serving Manor, Texas, with expertise in both residential and commercial roofing. Our team is dedicated to providing high-quality roofing solutions tailored to meet the unique needs of your home or business. Whether you need roof repairs, replacements, or new installations, we use top-grade materials and the latest techniques to ensure your roof stands the test of time. We're committed to delivering exceptional service, from the initial consultation to the final inspection. Choose us for reliable, efficient, and affordable roofing services in Manor, Texas."
Austin Southwest Roofing
(512) 926-3039 www.aswroofing.com
11500 Aus Tex Acrs Ln, Manor, Texas
4.7 from 45 reviews
Austin Southwest Roofing has been providing roofing services to Austin, DFW and San Antonio since 1978. Our experience gives us the knowledge to get the job done right the first time. As a preferred vendor for most major insurance providers and a platinum contractor for Owens Corning, we are able to provide the you: - The best results in the quickest time frame. - The highest quality materials. - And the best warranties. We specialize in residential and commercial roofing and will work with your insurance company to get you the best deal when it comes to repairing or replacing your roof.

R&L Roofing Specialties
(512) 550-4486 rlroofingtx.com
2221 E Howard Ln, Manor, Texas
4.7 from 27 reviews
Looking for the Best roofing company in Austin? If your roof has seen better days, turn to R&L Roofing Specialties We offer roof repairs and roof replacements for tile roofs, shingle roofs, and seamless metal roofs, that will give your home in Austin, TX or any of the surrounding areas. Whether you need a roof installation, a reroof or a roof repair service, we can help. With 35+ years of experience and thousands of customers served, we don’t just sell roofs, we make them. We do commercial roofs, like the Texas State History Museum and over 50 buildings on the University of Texas Austin. We serve Austin, Round rock, Georgetown, Leander, Lakeway, Bee caves, Dripping springs, buda & kyle
Taylor Roofing Solutions
(512) 488-3620 taylorroofingsolutions.com
Manor, Texas
5.0 from 3 reviews
Taylor Roofing Solutions is your qualified residential and commercial roofing contractor for Taylor, TX and surrounding areas! While we definitely do traditional asphalt shingle roofs, we also do metal roofs, flat roofs, wood shingle roofs and tile shingle roofs. No matter your roofing repair or roof replacement needs, Taylor Roofing Solutions will have you covered.. As an experience roofing company we know the process to remove your existing roof, and replace it with whatever new roofing materials you choose! Call us today to setup a free quote at your home. And we can work with your insurance company as well!

Elgin Roofing Solutions
(512) 843-8737 elginroofingsolutions.com
Manor, Texas
5.0 from 1 review
Elgin Roofing Solutions is your best choice for Residential or Commercial Roof replacement or roof repairs in Elgin, TX. We offer roof replacement for just about every kind of roof - asphalt shingle roofing, tile shingle roofing, flat roofing, wood shingle roofing. We also do gutter installation and replacement. We can help you with every step of your roof replacement. Elgin Roofing Solutions also works directly with your insurance company to reduce the hassle. If you live in Elgin, TX and need your roof replaced or repaired, give us a call. We offer free quotes on all our roof and gutter services!
Abby Construction
(832) 764-4090 abbyconstructioncorp.com
Serving
4.9 from 17 reviews
Abby Construction is a trusted expert in protecting homes and businesses through quality roofing, siding, gutters, and window installations. Our skilled team combines craftsmanship and innovative solutions to ensure every project is completed on time and with care. We offer free inspections, support with insurance claims, and even provide free gutters with roof replacements. Working closely with clients, we focus on safeguarding what matters most—their home—starting with a strong, reliable roof. Building dreams, one roof at a time.
Roof It Pros
Serving
5.0 from 72 reviews
Roof It Pros is your reliable local roofing company based in Austin, TX, providing professional roof repair, roof replacement, and new roof installation for both residential and commercial properties. Our skilled team handles asphalt shingles, metal, tile, and flat roofing systems, and specializes in storm damage restoration, roof leak repairs, and roof inspections. We also offer seamless gutter installation, clogged gutter cleaning, and downspout solutions to protect your home. Committed to precision, affordability, and long-lasting results, we proudly serve Austin, Pflugerville, Round Rock, Hutto, Georgetown, Cedar Park, Leander, Manor, Bee Cave, and nearby areas. Contact us today to schedule your free estimate—we’re here to help!
JP Exteriors
(512) 960-3191 jpexteriorstx.com
Serving
4.9 from 551 reviews
JP Exteriors is proud to be one of the premier exterior remodelers in Austin, operating in Central Texas for over 30 years. Our expert workforce is dedicated to providing you with seamless and transparent service execution for your window installation, exterior siding, roofing installation and replacement, deck installation, and patio cover needs. We use only top-of-the-line products such as James Hardie Siding, Simonton Windows, Andersen Windows, and Sherwin-Williams Exterior Paints.

Risner Roofing
(512) 210-1122 www.risnerroofing.com
Serving
5.0 from 84 reviews
Risner Roofing is a Professional Roof Replacement Company in Austin. Get Quality services for Roof Replacement, Storm Damage Roof Repair, and New Roof Construction.
Kahlo Construction
(512) 428-4719 kahloconstruction.com
Serving
4.9 from 34 reviews
We are a company that are trying to re define quality in the Home Improvement industry. We are experience and reliable company.

Tarrant Roofing
(512) 401-3345 tarrantroofing.com
Serving
4.9 from 162 reviews
Roofing Company in Austin, Texas - Tarrant Roofing is a Austin based Roofing Company with a A+ Rating with the BBB. We proudly serve the Austin area including Pflugerville, Round Rock, Brushy Creek, Shady Hollow, Wells Branch, Leander, Lakeway, Georgetown, Hutto, Temple, and more! From the smallest project, to the installation of a new commercial roof, we provide the same dedication and quality on every job. Using only the best materials, we guarantee a prompt and proper installation. We stand behind our products and services with industry leading results. We provide fast appointments and free roof inspections to everyone. Austin, we want to be your best residential and commercial roofing company and we are excited to serve you!
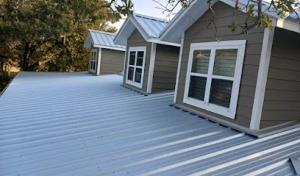
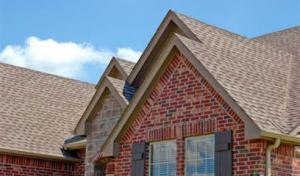
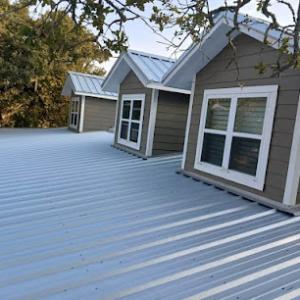
In Manor, asphalt shingles hold steady as the practical, go-to choice for most neighborhoods. The suburban mix, from modest bungalows to newer subdivisions with visible tile and metal upgrades, keeps asphalt in steady demand because it balances affordability with reliable performance. While metal, clay tile, and concrete tile are active local categories, they tend to appear in specific lots and upgrades rather than as a universal standard. This mix means choosing a roof isn't just about a single material but about how a home's structure and style meld with a predictable service life after weather events.
The hot Texas summers push UV exposure and heat gain into the spotlight when selecting a roof. Asphalt shingles UV resistance and color choices influence longevity in the sun-drenched months, while metal and tile options bring different benefits under the same pressures. Hail is a real consideration in this climate, especially during fast-moving spring storm cycles; the ability of a roof to shed impact damage and be repaired quickly matters for keeping interiors protected and minimizing disruption. Concrete and clay tiles offer substantial hail resistance and a longer potential service life in exposed sun, but their weight and installation details require a structural assessment. In contrast, metal roofs can provide swift repair timelines after a storm, with the added value of fire resistance and wind performance when properly installed. Each material presents a distinct balance of durability, maintenance needs, and long-term upkeep in the heat- and storm-driven rhythms of the area.
Tile and metal upgrades respond to a market that increasingly expects a mix of aesthetics and resilience in a fast-growing suburban setting. Your home's structure, roof deck, and existing eave details influence whether upgrading to clay or concrete tile or switching to metal is feasible or advantageous. In many subdivisions, the roof pitch, attic ventilation, and overhangs determine how well a heavier tile option will perform without compromising structural integrity. For a homeowner weighing replacement options, it's prudent to consider the neighborhood's prevailing roof lines and materials, ensuring any upgrade aligns with curb appeal and resale context while delivering improved weather resistance. In practice, a mixed approach often works well: maintain a solid asphalt base where cost and alignment with the home's silhouette matter, and reserve tile or metal for homes with compatible framing and a desire for enhanced storm resilience and upgrade aesthetics.
In this area, asphalt shingles sit in a practical middle ground, with local cost ranges running from about $350 to $550 per square. If your home upgrades to metal, expect roughly $700 to $1000 per square. Heavier systems like clay tile run $1100 to $1800 per square, concrete tile $800 to $1200 per square, wood shingles or shakes $520 to $900 per square, and slate can push $1800 to $3000 per square. These figures reflect typical installation labor, tear-off, and basic underlayment for a standard re-roof, not including unusual structural work or premium underlayment options.
Manor sees spring hail and wind events drive sharp spikes in demand and tighter scheduling windows. When a major hail storm hits, contractors in the Austin eastern edge corridor often book out weeks or months, and pricing pressure shows up not only in the roof price but in tear-off and temporary protection labor as crews juggle multiple replacements. If your project is triggered by storm damage, you can expect a leaner window for the initial assessment and a compressed timeline for material delivery and teardown, especially for heavier systems like clay tile, concrete tile, or slate. Planning ahead, when possible, can help mitigate some of the rush costs and delays.
A straightforward re-roof in a newer subdivision tends to be quicker and cheaper per square, particularly with asphalt shingles. Heavier systems require more labor, more time, and often some structural considerations, which is why clay tile, concrete tile, wood, or slate show a higher per-square range. If your home mixes in upgraded features-tile or metal on a newer home versus a pure asphalt rebuild-the final price can shift accordingly because crews must manage weight, ventilation needs, and potential additional tear-off depth. In practice, expect the cost delta to reflect both the material itself and the extra labor that those heavier systems require.
When hail and wind damage leads to an insurance-driven replacement, meticulous documentation matters. Photograph damaged roof surfaces from multiple angles, catalog missing granules, dented fasteners, and compromised flashing. Keep receipts for any temporary protection you install and for any temporary repairs your roofing contractor performs to prevent further damage. Request a detailed, itemized estimate from the contractor, then compare it with the insurance adjuster's scope. If there's a mismatch, ask questions early and keep notes. For storm-driven projects, knowing your material choice and associated per-square costs helps you navigate negotiations and approvals more confidently, whether you opt for asphalt, metal, or a heavier tile option.
Don't let upfront costs delay a critical repair - these contractors offer payment plans to fit your budget.
Reyes Roofing Contractor
(512) 563-7420 reyesroofingcontractor.us
16603 Wells Rd #2, Manor, Texas
5.0 from 45 reviews


A roofing permit is typically required for a full roof replacement, and the application is handled through the City of Manor Building Department. In practice, that means you'll be coordinating with the city's online portal to start the process, upload the needed paperwork, and track where your permit stands. Expect to provide documents tied to licensing and standard roofing practices before the city gives final clearance. If the permit isn't pulled before work begins, you risk not only potential fines but delays when you try to pull the final inspection and pass the project off as compliant.
Manor's permitting workflow is centered on the online portal, so you'll want to set aside time to get familiar with it early. A responsible contractor will usually initiate the submission, but you as the homeowner should verify that all required items-license numbers, proof of insurance for the crew, and a project plan that reflects typical Manor practices-are included. Missing documents or inconsistent details can stall the review, or trigger requests for revisions that push the timeline into busy storm seasons.
Inspections in Manor commonly occur at stages such as rough-in or underlayment and again for final approval. That means the city will expect to see the roof deck, underlayment, and moisture barriers in place and properly installed before they sign off on rough-in. The final inspection confirms that flashing, venting, and shingle or tile installation meet code and that all work aligns with the approved plan. Build the schedule with the understanding that city signoffs are a real milestone, not just a box to check after the contractor finishes. If inspections fail on the first try, you'll need to address the noted issues promptly to avoid material delays in securing final clearance.
Manor homeowners operate in a high-claim Central Texas environment where hail and wind losses push insurers to scrutinize roof age, prior repairs, and storm timelines. When a storm hits, the clock matters: the longer the gap between damage and reporting, the more questions insurers may raise about causation and existing weaknesses. Build a rapid documentation habit: date-stamped photos of shingles, gutters, and underlayment, plus a simple timeline that maps when damage occurred, when you first noticed it, and when work started. This isn't just about receipts; it's about proving the house's condition and the storm's actual effects.
Adjusters in this region often verify shingle condition and underlayment quality before settlement. That makes photo records and contractor scope documentation especially important. Do not rely on memory or a single before-photo; capture a clear, wide shot of the roof deck from multiple angles, close-ups of granule loss, and any felt or underlayment visible at vulnerable eaves. Ask your contractor to provide a detailed scope that notes existing deficiencies, age, and any prior repairs. If an adjuster challenges a claim, a prepared packet with permit-ready diagrams and a concise narrative can prevent delays and escalations.
Recent underwriting tightening in parts of Texas affects roofing decisions in Manor because some carriers are scrutinizing older roofs and prior claim history more closely, even though pullbacks are not uniform across all insurers. Think through the long view: a roof with documented storm impact and a credible repair history may fare better if underwriting questions arise. Communicate proactively with your insurer and choose a contractor who can deliver precise assessments, durable materials, and transparent documentation to support a timely, accurate settlement.
Repeated hail and wind exposure turns minor shingle bruising or lifted tabs into larger replacement decisions once the next storm cycle arrives. In this area, a single event may not look catastrophic, but the cumulative effect weakens the surface and speeds deterioration of granules, fabric, and adhesive seals. A close look after every big storm helps you separate cosmetic damage from areas that truly need attention before leaks begin. In practice, inspecting along ridge lines, near vents, and at the transitions between roof planes reveals where wind-driven impacts have already compromised edge protection.
Long, hot Texas summers bake exposed components and accelerate wear on lower-grade systems. The heat hastens aging of underlayment and shingle granules, which in turn reduces UV protection and water-shedding performance. This climate effect can shorten the useful life of entry- to mid-grade roofs compared with milder regions. Pay attention to curling edges, accelerated granule loss, and visible mat showing through worn surfaces. When combined with prior storm damage, heat exposure often compounds deterioration and raises the risk of accelerated panel delamination or tab separation.
Because many local jobs are re-roofs rather than first-time installs, workmanship issues commonly show up around underlayment transitions, flashing details, and cleanup after tear-off. Poorly sealed penetrations where vent stacks or skylights meet shingles can become recurrent leak paths. Improperly set ridge vent and valley flashing can trap moisture or allow wind-driven water intrusion during heavy storms. Look for mismatched sealant lines, gaps at step-flashings, and loose or torn bits of underlayment near eaves and chimneys.
Given the local mix of asphalt, metal, and tile upgrades, a targeted inspection after storms should verify that lifted tabs were re-secured properly and that flashing remains watertight. Trim back overhanging branches that could damage the roof in high winds, and check gutter debris quickly after strong showers to prevent water from backing up under the edge. Prioritize fixing exposed vulnerabilities now to reduce the probability of larger, more costly failures during the next storm cycle.
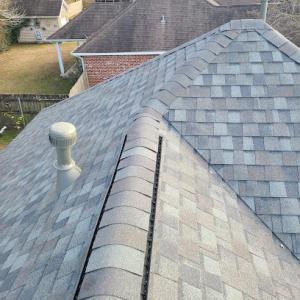
Although pitched roofs dominate, the contractor signal mix shows meaningful local demand for flat or low-slope roof work. Skylight-related roofing work is also active, making penetrations and transition flashing a real local service category rather than a rare add-on. These repair types matter in this area because storm-driven leak calls often involve vulnerable roof features and low-slope sections that fail differently from standard field shingles.
Begin with a careful inspection of low-slope areas and any feature transitions around skylights, chimneys, and vents. Look for crushed or blistered underlayment, ponding water, and seam gaps where flashing has shifted from its original position. Pay attention to edge details where low-slope runs meet higher slope sections; that junction is a common leak point after hail or strong winds. In a storm-following weeks, a temporary protective measure can be applied if a slow drip is visible but a full repair isn't immediately possible.
Low-slope repairs often center on upgrading or resealing flat sections, re-lapping seams, and replacing compromised membrane laps. Transition flashing around skylights and roof penetrations should be checked for torn mastic, loose fasteners, and corrosion at metal corners. If a skylight curb shows signs of movement or flashing failure, address it promptly to prevent water entry across the entire elevation. For larger penetrations, consider reinforced flashing or a dedicated curb boot to restore a watertight path.
Skylights tend to be a frequent call after hail events. Ensure step flashing at skylight perimeters is continuous and properly folded against the curb. Check for puncture marks on the surrounding deck and verify that sealant joints are intact but not degraded. Replacement of cracked vinyl or rubber membranes around skylight bases should be planned as a focused, discreet repair rather than a full roof overhaul.
Document all observed penetrations and low-slope concerns with timestamped photos, especially around skylight curb areas. When coordinating repairs, keep a tight line of communication about the extent of work, required materials, and expected dry-out time. If storm-related damage is suspected, frame notes around potential insurance considerations and the sequence of repairs to ensure clarity for both the homeowner and the contractor.
Find specialists in TPO, EPDM, and built-up flat roofing systems for residential and commercial properties.