Last updated: Apr 19, 2026
Springville's weather pattern combines spring hailstorms and windy fronts with cold snowy winters, so roofs here often see both impact damage and freeze-thaw stress in the same year. That means shingles, underlayment, and flashing endure repeated cycles of hard hits, rapid cooling, and then re-warming as days swing from sun to 20s and back. The result is a higher-than-average chance of cracked granules, damaged seals, and hairline fractures that quietly worsen over the season. If you live in a steep-slope home with asphalt or synthetic shingles, you should treat every hail event as a potential trigger for accelerated aging and early leaks.
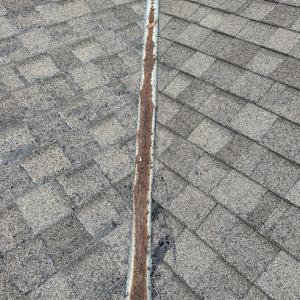
After a hailstorm or a windy front, walk the roof edge with a flashlight during daylight. Look for missing granules, gouges in the shingles, or dark, damp areas along the seams where moisture may have penetrated. Freeze-thaw cycles are sneaky: water that has seeped into tiny cracks freezes, expands, and enlarges those gaps. That can push moisture into the roofing system, even when a storm seems minor. Shingle tab edges that appear lifted or curled are a red flag. In the attic, check for sudden spikes in humidity or small drips near vents and flashing. When you notice any of these, you need a professional inspection promptly before hidden damage compounds.
The city endures hot sunny summers after winter wear, and that strong UV exposure accelerates visible aging on asphalt-based roof systems. Asphalt shingles become brittle with cold snaps and then crack more easily under spring hail impact. After the last snow melts, the glare and heat can make existing micro-cracks open more quickly, allowing moisture to work its way inward. A roof that looks worn but intact after winter may not hold up a full season if it hasn't shed outstanding hail or freeze-thaw damage. Treat any suspicious wear as a sign to verify the integrity of the roof cover, underlayment, and drainage plan.
Replacement timing in Springville is typically favored from late spring through early fall because winter temperatures and snow can interfere with roofing work and underlayment performance. Planning projects in this window reduces the risk of weather-induced delays and ensures full suitability of the roof deck for long-term protection. If a major hail event lands late in spring, prioritize an inspection to map safety margins and decide whether a spot repair now or a full replacement is the wiser path for the coming year. Delaying a needed upgrade into winter tends to invite more rapid deterioration from freeze-thaw cycles that can compromise the whole system.
Start with a professional inspection that focuses on hail damage and freeze-thaw stress, not just cosmetic issues. Have the roofer test for moisture in the attic and verify flashing around chimneys, vents, and skylights. If repairs are recommended, ask about upgrading to a more resilient underlayment and choosing materials that perform well under freeze-thaw conditions and UV exposure. Consider shade and airflow improvements in the attic to mitigate heat buildup that worsens aging. Finally, establish a regular post-storm check routine so you catch early signs before minor issues become costly repairs.
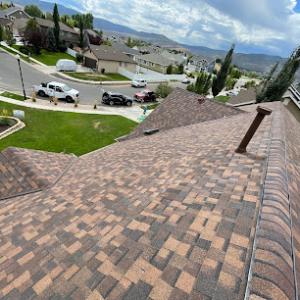
In this high-desert basin at the base of the Wasatch front, roofs face a unique mix: hot high-elevation sun in summer, deep winter snow, and spring hail that can ding exposed surfaces. That means a roof isn't chosen on heat resistance alone; it has to survive repeated freeze-thaw cycles and the weight of snow without compromising the underlying structure. In practice, that translates to prioritizing panels and assemblies that shed water efficiently, resist hail impacts, and tolerate cold snaps without becoming brittle or developing leaks at nail lines and penetrations. For steep-slope homes with limited overhangs, attic and ventilation strategy matters just as much as material selection, because trapped heat or moisture accelerates ice damming and shingle degradation during rapid thaw cycles.
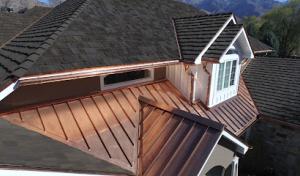
The local market centers on several core options: asphalt shingles, metal roofing, clay tile, concrete tile, wood shingles or shakes, and synthetic or composite shingles. Asphalt shingles remain common because they're accessible, easier to replace piece by piece, and perform well with proper attic ventilation and underlayment. Metal roofs bring outstanding hail resistance when installed with solid fasteners and appropriate coatings, and they excel at shedding snow from steep pitches. Clay and concrete tiles carry a distinct curb appeal and good longevity, but their performance hinges on a solid deck and competent rafter spacing to handle weight and freeze-thaw stress. Wood shingles or shakes offer classic character but require careful maintenance to prevent rot and ice-related issues on slopes that trap moisture. Synthetic or composite shingles provide a compromise: more impact resistance than typical asphalt, with varied aesthetics and often good durability under freeze-thaw cycling.
Hail damage risk is highest on exposed slopes and at higher elevations, so initial impact resistance matters alongside UV stability. For clay and concrete tiles, impact resistance can vary by profile and thickness; if you lean toward these, ensure a proven installation that allows for proper expansion and contraction to resist cracks during cold snaps. Metal roofs, when installed with O-ring fasteners and sealed seams, offer excellent hail performance and wind resilience, but leave careful attention to edge detailing and chimney/vent connections to prevent ice ingress in severe winters. Asphalt shingles with certain granule densities and warranty-backed underlayments can withstand freeze-thaw cycles, provided the roof deck is dry and well-ventilated. In homes with wood shingles or shakes, consider applications with synthetic underlayment beneath to minimize water penetration during thaw periods and to reduce splitting from sun exposure.
Steep-slope housing common in the area benefits from systems that maximize wind uplift resistance and snow shedding. Look for underlayment choices rated for low-temperature performance and compatibility with the chosen roofing material. Fastener patterns should be matched to slope, shingle type, and roof deck condition so that cycles of expansion and contraction don't loosen nails or create micro-leaks. In regions with frequent freeze-thaw, layered membranes or synthetic underlayments beneath the main roof surface can provide a backup barrier against moisture infiltration during rapid temperature swings.
Regular inspections after winter storms and spring hail events help catch bruising, broken tiles, or loose fasteners before leaks form. On clay or concrete tile, watch for hollow-sounding tiles or cracking that might indicate replacement needs in areas where freeze-thaw stress concentrates. Metal roofs benefit from checks of sealant lines and panel seams to prevent ice damming at edges and penetrations. Asphalt and synthetic shingles should be evaluated for granule loss and edge lift, especially after hail season and heavy snow. A well-chosen material, paired with proper ventilation and a solid underlayment, can deliver reliable performance through Springville's signature annual cycle.
Typical Springville pricing runs about 350 to 700 USD per square for asphalt shingles. This material remains the most common starting point for steep-slope roofs in town, especially on mid-20th-century bungalows and newer homes alike. When hail and wind events spike, crews often see tighter scheduling and price pressure, since asphalt jobs are typically quicker to install but can spike in demand after a major storm. In practice, a homeowner should expect weather-driven delays to push timelines into the shoulder seasons, which can affect overall cost through higher crew availability and material timing considerations.
Metal is a popular upgrade option in the area for long-term durability against hail and freeze-thaw cycles. Pricing typically runs from 700 to 1200 USD per square. In wetter springs and windy stretches following storms, metal installations may face more stringent inspection and detailing needs around penetrations and snow load points, which can influence the final quote. If the roof slope is steep, special equipment and fall protection become standard parts of the estimate, nudging labor hours higher than a basic shingle replacement.
Clay tile brings a distinct look and excellent hail resistance, but it also comes with a higher price tag. Expect 900 to 1800 USD per square. In Springville, the transition from a harsh winter to a hail-oriented spring can stress older clay installs, making retrofit or replacement decisions more common after repeated freeze-thaw cycles. Scheduling for tile work tends to be more sensitive to dry, calm weather windows; storms can push projects toward late spring or early fall if crews encounter breaks or brittle tiles.
Concrete tile sits between clay and cheaper shingle options in terms of cost, typically 700 to 1500 USD per square. It offers robust hail performance and solid durability against freeze-thaw. The same storm-driven demand spikes apply here: after hail events, crews may flood the market with requests, compressing availability and potentially affecting project start times. Concrete tile installations benefit from accurate substrate assessment because of heavier tile weights, which can influence overall cost when structural adjustments are needed.
Wood shingles or shakes run about 800 to 1600 USD per square. In this climate, wood can be a appealing aesthetic choice, but it requires careful maintenance to resist spring hail damage and the freeze-thaw cycle. After particularly harsh winters, some homes see accelerated granule loss on adjacent shingles, which can lead to faster wear. Scheduling can be tight following storms, since specialty crews are in high demand for installations that honor proper attic ventilation and drip edge details to handle spring moisture.
Synthetic or composite shingles typically range from 500 to 900 USD per square. They offer a practical balance of hail resistance and cost, with quicker installation compared to heavier tiles. In Springville, storm-driven demand spikes can affect pricing and availability for synthetic installers as well, especially when hail results in nearby emergency repairs creating downstream demand for reroofs. Cold-season limitations translate into a shorter, more intense window for full replacements, so coordinating a start date in late spring through early fall is common to maximize labor efficiency.
When planning, consider that cold-season limitations in Springville can compress more full replacements into the late spring through early fall window, which can influence labor availability and project timing. If a hail event hits in late winter or early spring, it's typical to see a surge in inquiries, but crews may still push some projects to later in the season when daily temperatures are more predictable and roofers can safely manage ice and snow risk on rakes and eaves. Budget for possible delays and calendar shifts, and be prepared for a few weeks of variance between material choice and actual start date.
VP Roofing
(801) 430-9437 www.vproofing.com
687 N 2000 W unit 8 9, Springville, Utah
4.8 from 151 reviews
VP Roofing is a trusted local contractor offering complete exterior home solutions including roof replacement, roof repair, new gutters, vinyl siding, and energy-efficient windows throughout Provo, Salt Lake, and neighboring Utah Valley communities. Our friendly team specializes in fixing storm damage, hail damage, wind damage, and worn-out roofs for both homeowners and businesses. We take pride in our attention to detail and personal approach on every project—from thorough roof inspections, careful installation, and complete cleanup. With budget-friendly pricing and a responsive team that treats your home like our own, VP Roofing handles all your exterior improvement needs with the quality workmanship and service you deserve.
The Roof Guys
(801) 201-8042 theroofguysutah.com
79 W 900 N Suite C, Springville, Utah
4.8 from 57 reviews
The Roof Guys is a family-owned and operated roofing contractor serving all of Utah County. The Roof Guys has two decades of experience installing metal, shingle, and membrane roofing in the Utah Valley area. Whether you are a homeowner, a small business owner, or the CEO of Utah's next big tech company, they can take care of all of your roofing needs. From roof repairs, roof replacements, and new construction, they're your guys! They offer free roofing inspections and quotes with every visit!

Kyco Services
(801) 794-3822 kycoservices.com
2090 W 500 N #6, Springville, Utah
4.4 from 65 reviews
KYCO provides expert roofing, exterior, drywall, paint, and dumpster services to homeowners and builders throughout Utah and the Boise area. We deliver quality craftsmanship, dependable service, and a hassle-free experience from start to finish. Whether it's new construction or home improvement, KYCO is here to help you build better.
The Eagle Roofing
(801) 471-4593 theeagleroofingllc.com
331 W 950 N, Springville, Utah
4.3 from 4 reviews
Welcome to The Eagle Roofing Premium roofing services for your business or commercial building. We are experts in commercial and residential roofing and can solve the unique and complex roofing requirements for these types of buildings. We have the experience and resources to fix any roof-related problems your commercial space may have and overcome the challenges that the job brings. We always seek perfection in what we do because we believe you deserve nothing less than the best.
Mountain West Roofing & Construction
Serving
5.0 from 32 reviews
Replace your old roof in no time If your roof is beyond repair, Mountain West Roofing and Construction can see that it's replaced safely and quickly. We provide home roof replacement services in the Payson, UT area. You can count on us to upgrade your home with a brand-new roof that will stand the test of time.
Provo Roofer
(801) 742-7855 rooferprovout.com
Serving
4.8 from 19 reviews
Roofing Contractor. We take care of our clients. Roof repairs and roof replacements. Don't wait too long we will be happy to give you a free estimate. If in doubt call us out. Okay that was really dumb but not as dumb as not getting your small leak repaired or looked at. We have seem many small leaks turn to huge property loss all because someone hoped it would go away. We hate to tell you but they never go away they only get worse. We are fast friendly and want to make sure you are safe and keep a roof over your head, a roof that keeps you dry. We work all cities in Utah County, but mostly try to stay close to home in Provo. Thanks for checking us our. Your friends at Provo Roofer.
Evolve Construction UT
(800) 222-4100 www.evolveconstruction.com
Serving
5.0 from 29 reviews
Best Inter-State Roofing Company! If you’re looking to get top-notch roofing services for your property, then you’ve got to hear about Evolve Construction.

PowerHouse Roofing
(801) 874-9083 www.powerhouseroofing.com
Serving
5.0 from 59 reviews
PowerHouse Roofing delivers quality craftsmanship and reliable protection for your home or business. As experienced roofing contractors, we understand the importance of a strong, dependable roof. We serve both residential and commercial clients, ensuring every project is completed with expertise and attention to detail. Discover the PowerHouse difference and safeguard your property with a roof you can trust.
Raptor Roofing
(801) 318-3896 www.xraptorroofing.com
Serving
4.7 from 79 reviews
Raptor Roofing is a local, family-owned company that takes pride in our craft. We do our best to provide high quality, fast, and affordable options to all of our clients and love what we do. From residential, insurance work, commercial, new builds, and repairs... we do it all!
Signature Roofing Utah
(801) 420-1911 www.signatureroofingutah.com
Serving
5.0 from 62 reviews
Roofing in Northern Utah
Peak Roofing & Construction
(615) 925-9190 peakroofingandco.com
Serving
5.0 from 30 reviews
Peak Roofing and Construction is Utah County's expert for durable roofing and exterior solutions. Known for excellence, our skilled team ensures your home's longevity with top-quality materials and meticulous craftsmanship. Trust us to exceed expectations and safeguard your investment. Visit our website for unparalleled service.
When planning a full reroof, the process in Springville follows a permit-first approach. Unlike some minor maintenance tasks that can slide by without formal oversight, a complete roof replacement is treated as a project that requires permitting. The city's practice reflects the high-sun, deep-freeze, and spring-hail cycle that stresses steep-slope roofs around here. Expect the permit to be tied to the overall project scope rather than a stand-alone, casual replacement. This means your planning should start with a clear, codified plan for materials, fasteners, and workmanship, so the permit review can proceed smoothly.
The reroof permit is issued after a submittal package lands on the desk of the building department. That package typically includes a detailed project scope, the exact roofing materials to be installed, and evidence that the chosen contractor holds the proper licensing for residential roofing in this jurisdiction. Having all documentation aligned-specifically naming the product lines, shingle or panel types, underlayment, ventilation strategy, and nailing patterns-helps avoid delays. Because Springville roofs must withstand hot sun, winter freeze-thaw cycles, and spring hail, the city looks closely at material compatibility with local climate and the contractor's demonstrated expertise.
Inspection visits are a two-step process. First, an underlayment and venting check is conducted to confirm the roof stack is correctly planned for moisture management and attic ventilation. This is particularly important here, where improper underlayment or insufficient venting can exacerbate freeze-thaw problems and hail-induced moisture intrusion. The second visit is the final inspection, where inspectors verify that the installed roof matches the approved scope and that workmanship complies with applicable codes, wind uplift requirements, and roofing durability standards suited to this environment. Expect scheduling to align with key milestones: after the underlayment is installed and before shingles go on, and then after the final surface is complete.
Coordinate with a licensed contractor who can provide a thorough scope and material list early in the planning window. Prepare to submit the permit package with precise material choices and documented ventilation plans, including attic baffles if applicable. Keep the contractor's license information readily available for city records, and be prepared to respond quickly to any requests for clarifications during review. After permit approval, schedule inspections promptly and coordinate access for the inspectors, ensuring the attic and roof line are accessible for the underlayment check and the final assessment.
With the unique Springville climate in mind, the permit and inspection process ties directly to long-term roof performance against sun exposure, snow loads, and hail impact. Completing the required steps not only fulfills code obligations but also supports a durable reroof that stands up to the local seasonal cycle.
Springville sits at the base of the Wasatch front, where the combination of hot high-elevation sun, heavy winter snow, and spring hail creates a demanding cycle for steep-slope roofs. That pattern means roofs endure rapid freeze-thaw damage, rapid sun exposure, and hail impact in a relatively short window each year. Insurance activity around hail and wind events is notably higher here than in many parts of the state, so every severe storm carries a heightened likelihood of a claim, even for roofs that look mostly intact from the ground.
After a major weather event, insurers in this market routinely ask for thorough documentation before approving replacement-related claims. Detailed roof-condition photos that show both the overall roof line and close-ups of damaged shingles, flashing, and vents are essential. Records of prior repairs help establish the history of the roof, including what was done, when, and by whom. If hail or wind caused unseen or hidden damage, the paperwork should reflect that, since adjusters will be looking for evidence that the damage is storm-related and not a preexisting condition.
Gather a complete set of photos taken from multiple angles, both on the ground with a telephoto lens and from a safe roof vantage if possible. Photograph functional components such as the ventilation system, eave lines, and ridge cap, as well as any granule loss, bruising, or cracking on shingles. Maintain a repair log with dates, contractors, and the scope of work, even for minor fixes, so the record shows continuous care. If there has been prior damage, include repair receipts and confirmations of warranty or coverage where relevant. These records should be organized and ready to present to the adjuster to support the claim.
In this market, the process often includes an adjuster visit followed by written estimates for replacement. The adjuster will evaluate the roof's condition, corroborate the storm-related damage, and compare it against the policy's terms. Written estimates from licensed local contractors are commonly requested to establish a clear cost framework for potential replacement. Being prepared with your documentation and having a verified, itemized estimate on hand can speed the process and reduce back-and-forth.
Connect with contractors who help homeowners navigate the claims process from damage assessment to final approval.

VP Roofing
(801) 430-9437 www.vproofing.com
687 N 2000 W unit 8 9, Springville, Utah
4.8 from 151 reviews
Kyco Services
(801) 794-3822 kycoservices.com
2090 W 500 N #6, Springville, Utah
4.4 from 65 reviews
When the Wasatch front flushes with winter snow and temperatures swing above and below freezing, tear-offs and installations can grind to a halt even if leaks are already dripping inside. Steep-slope roofs heat up quickly in bright sun, then plunge into freezing cold at night, causing ice dam pressure and shingle damage that complicates crews' access and safety. Plan for weather windows that shrink on short notice, and expect pushbacks when wind-driven snow piles onto ladders and gutters. When a leak is urgent, prioritize securing the interior first, but be prepared for a temporary hold if the roof must wait for a safer window.
Underlayment performance shifts in cold air and high-elevation sun here, so a full replacement can't always proceed as if it were a mild-season job. Temporary stabilization may be part of the repair sequence-think rapid tarps, sealants, and drip-edge reinforcement-to keep interior damage at bay while weather clears. These steps are not Band-Aids but deliberate measures to control water ingress until dry, workable days return. If a repair plan includes underlayment, expect checks for frost-affected seams and the need to re-seal once temperatures stabilize.
The local market has a strong presence of quick-response contractors who gear up for post-storm leaks and urgent shingle or panel damage. When a sudden storm hits, a rapid leak-control visit can buy you critical time. If you're faced with persistent drips after a thaw or a fresh hail hit, contact a contractor who can assess whether you need immediate temporary protection followed by a planned, safer replacement when conditions permit.
When you can't wait, these contractors offer fast response times to stop leaks and prevent further damage.
VP Roofing
(801) 430-9437 www.vproofing.com
687 N 2000 W unit 8 9, Springville, Utah
4.8 from 151 reviews

Although most Springville roofing projects are steep-slope reroofs, local contractor signals show a steady niche for flat or low-slope roof work. If you have a garage, porch, or porch-overhang with a tar-and-gravel, built-up, or rubber membrane system, treat it as its own project. Start with a clear assessment of surface aging, edge detailing, and transitions to steeper roofs. In practice, expect more frequent edge maintenance, membrane seam checks, and drainage path verification on these surfaces than on the single-ply membrane you'd find in a desert climate elsewhere.
Skylight repair appears as a smaller but real specialty in town, which matters because flashing details are vulnerable during freeze-thaw and storm cycles. In spring, look for condensation between panes, cracked glazing, and worn flashing at the curb or curbless skylight. When a leak is observed around a skylight, focus on the flashing, the curb, and any sealant lines between the skylight and roofing. For older units, replacing the skylight itself can be necessary, but often a precise reseal and reflash will stop the leak without a full unit change.
The freeze-thaw cycle sees edges and penetrations as the weak points. On low-slope sections, sealant joints can crack and seam tapes may lift after winters with heavy moisture. On skylights, flashing corners and drip edges tend to fail first, especially where roof planes meet the skylight or where old sealants were used. Regular inspection after heavy snows or sudden warm-ups helps catch micro-leaks before they become noticeable drips.
For these repairs, expect a service-call to diagnose and outline a targeted fix rather than a full replacement. Bring attention to prior patchwork or temporary fixes, and ask the contractor to document flashing condition, seam integrity, and drainage behavior. A typical sequence includes interior leak tracing, exterior flashing and sealant review, and a concrete plan for the next seasonal cycle.
If multiple low-slope sections show standing moisture after storms, or skylight leaks persist after resealing and flashing work, a professional assessment is warranted. Local techs are experienced with the specific vibration of spring hail and freeze-thaw cycles, so a timely call often prevents more extensive water intrusion and damage to underlayment or insulation.
Find specialists in TPO, EPDM, and built-up flat roofing systems for residential and commercial properties.