Last updated: Apr 19, 2026
Mount Vernon operates under a cool, wet climate, with most rainfall concentrated in fall and winter. Moisture exposure is the central roofing concern here, driving decisions about material selection, flashing details, ventilation, and drainage. The frequent drizzle and persistent dampness can slow adhesion, set-in stains, and challenge shingle warranties if installation drags through wet periods. This is not about resisting heat or hail storms; it's about keeping every layer dry long enough to seal and ventilate properly.
Local replacement scheduling commonly shifts to late spring through early fall to avoid prolonged wet installation conditions. That means aiming for a window when the odds of a multi-day, soaking rain spell are lower and drying days are more predictable. In Mount Vernon, that translates to planning projects to begin after the late-wall transition of spring and finishing before the leaves drop in autumn. If a project must push into shoulder seasons, the calendar becomes a tighter coordination between weather forecasts and crew availability, not a casual schedule.
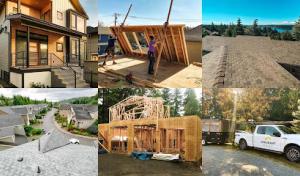
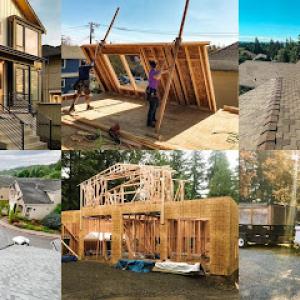
Spring and fall still bring recurring showers, so even shoulder-season projects need tighter staging and dry-in planning than in drier Washington markets. A contractor should treat a Mount Vernon project as a rain-managed operation: securing temporary weather protection, prioritizing roofing sections with the highest moisture risk first, and sequencing steps to avoid leaving exposed decking during wet nights. Expect more frequent contingency days and a readiness to pause work if several days of rain stack up. The goal is to finish each stage with all components protected and a clear dry-in, not just a bare skeleton exposed to a drizzle that never fully dries.
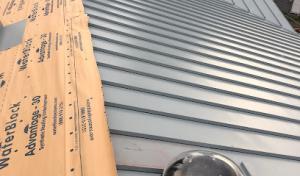
Dry-in planning begins with materials handling. In wet climates, shingles or metal panels should be staged under cover and off the roof until the crew is ready to install in a single committed window. Flashing and underlayment must be laid in conditions where the base and deck stay dry enough to seal properly. Ventilation components should be paired with a controlled install sequence so attic space remains ventilated during and after installation. The roof deck needs a dry surface for anything meant to fuse or adhere; if the forecast shows a day or two of sun, that becomes a preferred dry-in interval. If a dry-in window slips, the plan should shift toward securing everything that can be protected and postponing the rest to prevent moisture from getting trapped under new layers.
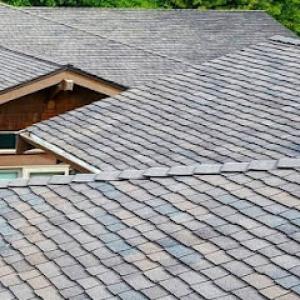
In this climate, flashing must be extra meticulous around valleys, chimneys, skylights, and vent penetrations because moisture can track along small gaps and cause hidden leaks. Ventilation plays a decisive role in preventing condensation within the attic space, especially under a newly installed roof where warm air may escape during damp, cool periods. Good drainage is essential to avoid pooling water that can back up under edge flashing during extended wet spells. The installation crew should verify that gutters and downspouts are clear before any lift or nail work begins, and that roof-to-wall transitions maintain a continuous seal as seasons shift from wet to drier months.
A clear, written plan with a realistic forecast helps. Confirm the sequence of work, the dry-in milestone, and contingency days in the schedule. Ask about how the crew protects interior walls and attic spaces during wet breaks, and how they will handle sections that must stay dry while adjacent areas are prepped. The project should avoid leaving exposed decking during forecasted wet stretches, with a defined pause strategy and a return plan that minimizes exposure risk.
Avoid treating a Mount Vernon roof like one designed for drier regions. Do not rush through underlayment or flashing in the name of finishing ahead of the rain clock. Do not neglect temporary weather protection for open sections or expect a dry roof despite a damp forecast. And finally, do not overlook the importance of coordinating ventilation and drainage improvements in the same cycle as the reroof, since any moisture management enhancements will pay dividends through the first full wet season after installation.
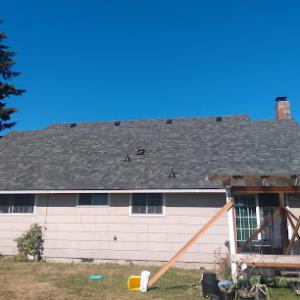
Winter in Mount Vernon brings frequent rain and wind, which compounds wear at flashing transitions around chimneys, vent stacks, and roof-to-wall joints. In this climate, those metal seams corrode, caulk dries and cracks, and fasteners loosen from ongoing moisture cycling. If flashing isn't properly integrated with the surrounding deck or siding, you get slow leaks that travel unseen before staining appears. The practical move is to treat every flashing joint as a potential failure point: test for soft spots, tap for loose nails, and verify that step flashing meets the siding line with clean, continuous metal, not a patchwork of sealant. After storms, walk the highest risk areas from a safe point and look for mineral granule loss near vent boots or rust on bare metal edges. If you see darkened corners or damp rafters near a chimney or vent, address it now rather than later-a small drip-free repair today saves a much bigger repair later.
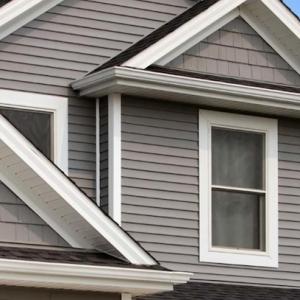
The local climate turns poor ventilation into a slow leak route. In a home that breathes through soffit intakes and ridge vents, clogged or damaged vents create condensation and attic moisture that can accelerate rusted metal flashings and warped decking. Check soffit and attic air pathways in late fall and after heavy downpours; ensure baffles stay in place so that air moves freely above the insulation. Drainage details matter just as much: clogged gutters and downspouts can back up water to eaves and fascia, where it can wick into vulnerable joints. In Mount Vernon's wet season, you should see water shed cleanly off the roof edge and into the downspout, not pool at the fascia. Test drainage during a heavy rain event if safe to do so, watching for standing water at low-slope sections or around transitions to walls. If water sits near a wall flash or at a header, take corrective steps immediately-painted or sealant-cracked surfaces are a red flag for upcoming leaks.
Moderate local insurance claim activity tends to map to wind-driven and heavy-rain events rather than hail or wildfire losses. That trend reflects how these storms stress roof edges, vent seals, and flashing connections more than impact damage. Use that signal to sharpen your maintenance window: during the dry stretch between wet seasons, perform a focused audit of all edge details, flashing seams, and any known trouble spots from past leaks. If a wind event tears loose a boot or lifts an edge of metal, respond fast-loose fasteners, torn sealant, or displaced flashing in these conditions can cascade into significant interior damage before the next inspection cycle. Your goal is to close gaps before a season of storms hits, not after.
Find local contractors experienced in assessing and restoring roofs after hail, wind, and severe weather events.
Peaks Northwest Roofing 🐐
(360) 333-8463 www.peaksnw.com
1110 E Hickox Rd, Mount Vernon, Washington
4.8 from 85 reviews

Allen Roofing Construction & Remodel
(360) 529-3802 www.allenroofing.com
Serving
4.9 from 136 reviews
Peaks Northwest Roofing 🐐
(360) 333-8463 www.peaksnw.com
1110 E Hickox Rd, Mount Vernon, Washington
4.8 from 85 reviews
Licensed - Bonded - Insured - Certified. We are a PABCO Preferred PRO and Malarkey Emerald Premium Certified Roofing Contractor. Multiple time winner of the "President's Club" roofing award, we have over 30 years of experience serving Skagit, Whatcom, Island, San Juan and Snohomish with pride. We offer free estimates and Lifetime Warranty Roof systems. Asphalt composition and metal roofing experts. Financing options available!
A & G Roofing
(360) 842-6892 agroofingcontractor.com
Mount Vernon, Washington
5.0 from 12 reviews
With A&G Roofing, you can rest assured you are working with a roofing company you can trust. From roof installation to leak repairs, we are the experts in Mount Vernon, WA. We have over 25 years of experience, and always strive to exceed our customers' expectations. Whether it's installing a new roof or fixing an old one, our duty is to ensure that the structure over your head does its job. For more information, including free quotes, contact us today!
JVA Roofing
1927 S 17th St, Mount Vernon, Washington
4.6 from 14 reviews
New constructions installations, Roof replacement, Asphalt shingles, TPO, PVC membrane, Metal roof, Vinyl decking, Fascia boards replacement, All kinds of roofing repair, Skylights replacement, siding repair
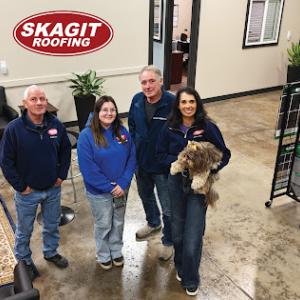
Skagit Roofing
(360) 428-1900 skagitroofing.com
3927 Old Hwy 99 S, Mount Vernon, Washington
5.0 from 7 reviews
Award-winning Roofing contractors specializing in roof replacement and new roof installation. Professional Grade with over 3 decades of experience. Voted "Best of the Best" Roofing Company in Skagit County in 2025, 2024, 2023 and 2022. See all of our 5-star reviews! Now Serving the communities in Skagit-, Island-, Whatcom- and North Snohomish counties. Contact us for a FREE, No Obligation quote from our friendly estimator.
Ideal Roofing
(360) 755-3377 idealroofingwa.com
Serving
5.0 from 17 reviews
Ideal Roofing is a family owned company with over 15 years of roofing experience. No job is too big or too small. We pride ourselves in customer service and making sure getting your new roof is as painless as possible. We specialize in residential and commercial roofing. We install composition shingles, metal roofing, TPO, and even DaVinci Roofing products. Making your roof beautiful and functional again is our top priority.
Allen Roofing Construction & Remodel
(360) 529-3802 www.allenroofing.com
Serving
4.9 from 136 reviews
Allen Roofing Construction and Remodel is a trusted roofing contractor serving Stanwood, WA, and nearby communities. With years of experience, we provide reliable roofing solutions built for the Pacific Northwest climate. As one of the established roofing companies in the area, we specialize in roof repair, new roof installation, reroofing, and remodeling services for residential and commercial properties. Our company's roofing approach focuses on durable materials, skilled craftsmanship, and attention to detail on every project. Locally based in Stanwood, we understand regional weather conditions and building standards, allowing us to deliver roofing services customers can trust for long-term protection and peace of mind.
Endurant Roof
(206) 714-0121 www.endurantroof.com
Serving
5.0 from 89 reviews
Welcome to Endurant Roof, your trusted roofing experts, specializing in both commercial and residential services. As a licensed and bonded small business, we pride ourselves on delivering exceptional craftsmanship and outstanding communication. Our team of dedicated professionals is committed to quality, ensuring each project, big or small, meets the highest standards. Whether you need a durable new roof for your business or a stunning upgrade for your home, Endurant Roof is here to transform your vision into reality. Experience the perfect blend of reliability, skill, and customer-focused service with us. Contact Endurant Roof today for your roofing needs!
AJC Roofing & Construction
Serving
5.0 from 9 reviews
AJC Roofing specializes in many types of residential and commercial roofing throughout Skagit, Whatcom, Island, and Snohomish county. Senior Discount and Military Discount available 10-year craftsmanship warranty on all roofs 30-year warranty on materials with lifetime available also.
Arrowhead Roof Cleaning
(360) 387-8740 www.arrowheadroofcleaning.com
Serving
4.8 from 22 reviews
Arrowhead Roof Cleaning is Skagit Valley’s Most Trusted General Contractor for Exterior Restoration and Construction services. Our certified professionals can repair your roof, clean your driveway, install new gutters and more. We are local, dependable, and honest!
Skagit Roofing
(360) 329-9918 www.skagitroofing.net
Serving
4.9 from 149 reviews
Skagit Roofing in Bow, WA delivers customized roofing solutions using top-rated products like Malarkey, Pabco, Certainteed, and IKO. With over 7,000 homes roofed, their highly trained staff and certified crews take pride in offering beautiful, long-lasting roofs tailored to each client's needs. They listen closely to customers, providing aesthetic, cost-effective solutions with free estimates, transparent pricing, and projects completed on time and on budget.
Orlando's Pro Roofing & Gutters
(425) 397-1985 orlandosproroofing.com
Serving
5.0 from 114 reviews
At Orlando’s Pro Roofing, we’re more than just roofers — we’re a trusted, family-owned company proudly serving Arlington, Marysville, Camano, Mount Vernon, Stanwood WA and surroundings. With over 15 years of hands-on experience, we specialize in residential and commercial roofing, offering full roof replacements, repairs, maintenance and gutter installations, What truly sets us apart is our personalized approach: Orlando and Lidia personally oversee each project to ensure quality workmanship, clear communication, and complete customer satisfaction from start to finish. Orlando’s Pro Roofing is here to protect your home with integrity, reliability, and top-tier service.
Axis Roof & Gutter
(360) 653-7663 www.axisroofandgutter.com
Serving
4.9 from 767 reviews
We are a full service roofing company, from removal of existing roofing and replacing, to minor and major roof repairs. Roof cleaning and treatments are a popular service that is provided as well. Full gutter service, from repairs to replacements, extruded to custom fit on site. Attic insulation and attic baffles, as well as full siding replacement and repair. Axis Roof and Gutter is a highly decorated, affordable roofing company that takes our customers satisfaction as a top priority. With very little company employee turnover, we are able to achieve that. Our full office staff is looking forward to hearing from you. Casey G - President
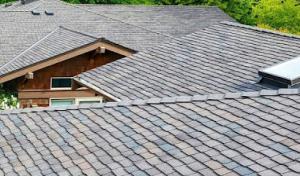
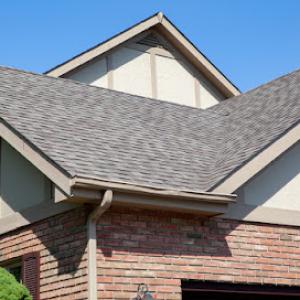
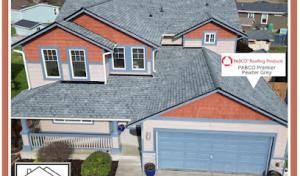
In Mount Vernon, moisture shapes every roofing decision, from material selection to flashing details. Asphalt shingles and metal roofing are the practical backbone of most homes, aligning with the local contractor base and the city's wet-weather performance needs. A homeowner considering a reroof or new installation should weigh how each system handles repeated exposure to rain, wind-driven moisture, and the damp air that lingers through the fall and winter.
Asphalt shingles deliver reliable performance in a climate where rain is the constant companion. When installed with modern underlayment and proper ventilation, they shed water efficiently and keep humidity from wicking into attic spaces. Look for a high-quality asphalt product with good granule adhesion and a gypsum or fiberglass backing designed for damp conditions. Metal roofing, on the other hand, resists standing water and can offer superior longevity when fastened with through-fastened or concealed-fastener systems that prevent leak paths at seams. In wet cycles, metal's low thermal mass can also help manage condensation if the attic is well-ventilated and the decking is dry before installation.
Cedar shakes bring a distinct look and a more natural feel to the neighborhood streets, but they carry added moisture-management demands in a damp climate. Wood products expand and contract with rain and humidity, so proper fastener spacing, a solid roof deck, and continuous ventilation are essential. If cedar shakes are on the shortlist, plan for a thorough moisture-control strategy, including an effective underlayment and regular inspections for rot or warping. Cedar can perform very well when paired with a drainage-friendly pitch and an integrated drip edge, but neglecting moisture management can shorten its service life in a rainy, coastal-influenced environment.
Clay tile and slate appear in the market and can offer impressive durability, yet their higher installed cost must be weighed against Mount Vernon's rain exposure and structural considerations. Both materials perform well when there is adequate roof slope, a solid substrate, and precise flashing details to handle wind-driven spray. However, their weight, installation sensitivity to moisture-bearing conditions, and the need for skilled craft exposure to moisture during work mean that builder availability and site preparation become critical factors. For homes with limited attic ventilation or marginal roof structure, premium systems may require upfront reinforcement or specialized installation approaches to maintain a long-lived, moisture-resilient roof.
Regardless of material, the details matter most in moisture-rich settings. Proper ice and water shield at eaves and penetrations, continuous ventilation to reduce condensation, and well-sealed flashing around chimneys, skylights, and vent pipes are essential. In damp weather, a roof that breathes-combining a solid deck with effective soffit and ridge ventilation-helps prevent moisture buildup in the attic and prolongs roof life. The goal is to keep water moving away from the interior, with a drainage path that never backs up under heavy rainfall.
In Mount Vernon, the weather pattern makes moisture management the biggest cost lever. Asphalt shingles sit in the low end of the spectrum at about 350 to 650 USD per square installed, but the real value comes from detailing, flashing, and proper drainage to handle the Skagit Valley's wet-season exposure. Metal roofing commands 700 to 1200 USD per square, often chosen when durability and curb appeal must stand up to long gray stretches and salty coastal drafts. Clay tile and slate bring higher upfront costs-clay tile runs roughly 900 to 1800 USD per square, slate 1000 to 1800 USD per square-partly because you're paying for water-shedding performance and long-term resistance to moisture-lift, freeze-thaw cycles, and wind-driven rain. Synthetic or composite shingles sit around 450 to 900 USD per square, offering a moisture-friendly option with quicker installation and often lighter weight. Cedar shakes, while attractive in older neighborhoods, range from 550 to 1100 USD per square, with maintenance costs rising where moss and moisture cling to the surface. You'll see certain valleys between these bands when the crew needs extra underlayment, upgraded ventilation, or enhanced flashing around chimneys and vents to prevent slow leaks.
Because the dry window is short and late spring through early fall is when you're most likely to find scheduling capacity, demand concentrates in those months. That pressure can lift material rates for faster starts or for crews juggling multiple projects. If you time a reroof to avoid the peak sprint, you may still face higher labor fees if the contractor has a packed calendar, but you'll reduce risk of weather-related delays that drag out the project and complicate material handling. You'll also want to plan for longer lead times on certain materials when moisture seals and underlayment sequences require precise acclimation, especially for heavier options like slate or tile.
Roof size directly affects total cost, but there's more to the math here. Larger galiots with complex hip-and-valley configurations demand more flashing, more ridge venting, and more careful moisture detailing, which pushes per-square costs upward regardless of the chosen material. In a wet climate, the underlayment selection-synthetic, peel-and-stick, or traditional felt-can swing the price and the leak protection in the first winter. Expect higher costs when you add continuous ridge ventilation and upgraded drip edge to funnel water away from fascia boards, helping seal out the season-long dampness.
Soft costs climb with the project's value. Higher-end materials or larger reroofs push soft costs beyond labor and materials, especially when you're balancing aesthetics with long-term moisture defense. Even without discussing permits, the overall value you place on a durable, moisture-resilient system will reflect in the final bid through contingencies for ventilation upgrades, flashing enhancements, and waste management. In Mount Vernon, choosing a system with robust moisture control tends to offset potential rework costs later, echoing value in the long lifecycle of the roof.
Get a clear picture of your project costs upfront - no commitment required.
Peaks Northwest Roofing 🐐
(360) 333-8463 www.peaksnw.com
1110 E Hickox Rd, Mount Vernon, Washington
4.8 from 85 reviews
Skagit Roofing
(360) 428-1900 skagitroofing.com
3927 Old Hwy 99 S, Mount Vernon, Washington
5.0 from 7 reviews
For most residential reroofs in this area, a building permit is required rather than treating reroofing as a no-permit maintenance item. The local authority expects you to pull your permit before work begins, and skipping that step can invite trouble with code enforcement and delay your project if a inspector or neighbor flags it. Given the persistent wet-season exposure, the city treats reroofing as a structural and safety-critical task, not a quick cosmetic upgrade. Ensuring the permit is pulled in advance helps set the right scope for materials, ventilation details, and drainage provisions that this climate demands.
The local process includes plan review before work proceeds, which can affect project lead times depending on department workload and project size. Plan reviewers will look for how the roof system integrates with existing flashing, gutters, and venting, as moisture control is a top priority in the Skagit Valley. Larger jobs or roofs with complex penetrations may extend review times, so you should anticipate a longer calendar than a standard cosmetic reroof. Having a clear set of plans and a well-drawn drainage and ventilation plan can streamline approvals and reduce hold-ups during the wet season.
Field inspections are typically required at underlayment or ventilation stages and again at final, with attention to flashing, ventilation, and drainage details. The underlayment inspection checks that the moisture barrier is correctly installed to withstand persistent rain, while the ventilation stage verifies that attic and roof space airflow won't trap humidity. The final inspection confirms all penetrations, hips, ridges, and flashings are properly sealed and that drainage paths move water away from the structure without pooling. In this climate, proper flashing around chimneys, skylights, and dormers is essential to prevent slow leaks that can migrate after every heavy rain.
Communicate clearly with your contractor about permit status and required inspections, and keep a dedicated inspection calendar. If you miss an inspection window, you risk rescheduling delays that can stretch into the next storm season. Build your project around anticipated weather windows but plan for inevitable wet spells, coordinating ventilation and flashing details in the design phase so inspections pass with fewer corrections. A methodical approach not only keeps the project on time but also reduces the risk of moisture issues once the new roof is in place.
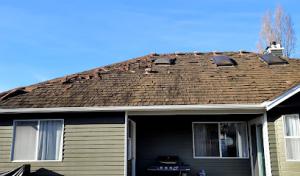
In this climate, roofs endure long, wet seasons with steady rainfall and gusty winds that push moisture toward flashing and joints. This isn't about dramatic storms as much as persistent exposure: damp decking, moss growth, and accelerated wear around penetrations. A roof here must hold up under continuous moisture management, with careful attention to ventilation, drainage, and the integrity of seals. If a roof looks good after a storm but shows soft spots or lifted edges after a heavy rain, that damage may have a longer tail than you expect.
Local carriers commonly ask for documentation of the current roof condition and any prior damage when processing claims. Keeping a clear history-photos from different seasons, notes on previous repairs, and a simple wall-to-roof punch list-makes the process smoother. If a claim involves wind or heavy rain, expect the adjuster to verify whether flashing, underlayment, and drip edges remained sound through the last season. The goal from the insurer's side is to separate true catastrophic loss from wear that accumulates over years of moisture exposure.
Adjusters in the market may closely review workmanship and warranty terms, and some carriers may narrow coverage on older roofs or certain premium materials. Targeted inspections can focus on how shingles overlap, how valleys are flashed, and whether ventilation matches the roof's needs. If a repair or replacement uses special materials, ensure the warranty is explicit about wind resistance, moisture protection, and coverage duration. A robust, properly documented installation becomes your strongest defense when a claim is evaluated years after work is done.
Reroof timing matters to minimize moisture intrusion during the project. Plan for windows where dry spells align with the schedule, and prepare for contingencies if weather stalls work. The safer approach is to prioritize sequencing that keeps interior spaces protected and avoids midseason rain delays that can complicate warranty validity and claim outcomes. Being proactive about scheduling around the wet season reduces the chance of post-project moisture issues triggering claim reviews.
Connect with contractors who help homeowners navigate the claims process from damage assessment to final approval.
Peaks Northwest Roofing 🐐
(360) 333-8463 www.peaksnw.com
1110 E Hickox Rd, Mount Vernon, Washington
4.8 from 85 reviews
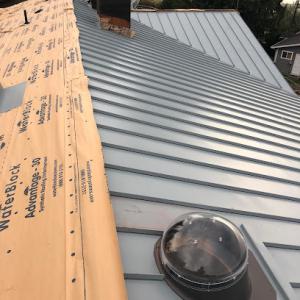
Skylight work in this climate hinges on reliable perimeter flashing and robust seal at curbs. Where repeated wetting rides along the edges, ensure the flashing integrates with the roof deck and underlayment in a continuous, slope-friendly transition. Use compatible sealants and flashings that tolerate long-term exposure to damp air and frequent rain. Pay special attention to the skylight curb flashing, counter-flashing, and any sidewall flashing against siding or trim, because a small misstep here can become a recurring source of moisture just as seasons turn moist again.
Even though pitched roofs predominate, flat and low-slope details show up in additions, accessory structures, and occasional remodels. Drainage-focused detailing matters most here: ensure proper slope toward the drain, proper continuity of underlayment, and secure edge details that resist wind-driven moisture. In these sites, transitions between low-slope sections and surrounding pitched surfaces demand careful clamping of seams and robust edge flashing to prevent water birds' nests of leaks during the valley and parapet phases of a wet season.
Inspection emphasizes underlayment, ventilation, flashing, and drainage. Verify that low-slope transitions flow toward drains or scuppers without standing water, and that skylight penetrations receive continuous, properly sealed protection through all layers. When assessing a roof with skylights, inspect curb integrity, boot flashings, and the junctions where flashing meets the skylight frame; in damp weather, any hairline gap or misfit becomes immediately problematic. In this market, careful attention to these details reduces later moisture-driven concerns.
Find specialists in TPO, EPDM, and built-up flat roofing systems for residential and commercial properties.
JVA Roofing
1927 S 17th St, Mount Vernon, Washington
4.6 from 14 reviews