Last updated: Apr 19, 2026
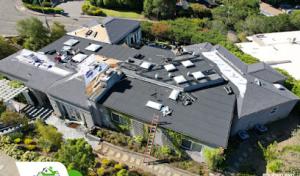
Pleasant Hill's dry months are the window most homeowners rely on for a reroof. The normal sequence is to complete tear-off and underlayment installation during dry weather, then finish with shingles, tiles, or metal once the subsurface is protected. This local pattern minimizes rain exposure that can soak exposed decking, saturate insulation, and complicate flashing details. Choosing to align the project with the dry season reduces the chance of moisture intrusion into roof decks and attics and helps trades stay on schedule. The aim is to avoid a rain-driven scramble when crews are already juggling daylight, material deliveries, and ventilation setup.
For a predictable schedule, plan around the late spring to early fall stretch, when long dry spells are most common and weekend weather is more forgiving. In practice, you want a block of stable weather-ideally multiple consecutive dry weeks-so the crew can complete tear-off, lay new underlayment, and install final roofing without backtracking due to a lingering rain event. If a storm system pushes through in late fall, it can stall progress and leave exposed decking mid-work, increasing risk to sheathing and attic spaces. A practical goal is to start only when a reliable stretch of at least 7-10 days of dry weather is forecast, with a little extra buffer for interior work, scaffold setup, and material staging.
Winter storms and heavy rainfall are a local scheduling risk that can interrupt open-roof work and increase the chance of moisture intrusion into roof decks and attics. Storms may arrive with little warning and can bring rapid changes in wind and temperature, which affect sealants and flashing installation. If the project begins too close to the first expected rain event, crews may need to tarp exposed areas or temporarily halt work, creating a domino effect on neighborhood noise and driveway access. To mitigate this, set a realistic plan with your contractor that reserves built-in contingencies-short, flexible buffer days, a dry-weather backup date, and prioritized sequencing for weather-tendable tasks.
Spring and fall in the East Bay can still bring variable weather, so homeowners often face tighter scheduling and more stop-start progress outside the core dry season. In practice, this means you should expect brief rain events that pause stripping, reduce use of ladders, or slow brittle membrane installation. To cope, organize crews to cover critical steps-like securing underlayment and flashings-as soon as possible after a dry spell, and avoid leaving exposed decking unattended overnight. A tight, well-communicated schedule helps prevent moisture from creeping into attic vent paths or eaves, especially in older homes with mixed roof lines or skylights.
If the home has clay or concrete tile, or a low-slope section, the dry-season window becomes especially important. Tile roofs require careful handling to prevent breakage during tear-off, and underlayment choices for low-slope areas are sensitive to moisture exposure. For homes with skylights or ventilation shafts, plan for precise flashing and sealing during the dry spell so that subsequent rain won't compromise the seal at transitions. In mixed materials, sequence the installation so that metal or reinforced underlayment is laid first where possible, then finish with the surface material, ensuring all penetrations are fully guarded against rain during construction.
Start conversations with a local contractor early in the dry season and request a staged timeline that prioritizes tearing-off and underlayment in the initial phase. Confirm that material deliveries are aligned with the schedule to avoid long holds with partially completed work. Ensure access to the roof is clear, with a staging area for dry materials and a policy for securing loose items during wind events. Finally, set up clear communication channels so you receive real-time updates if weather shifts, allowing you to adjust plan B without losing momentum.

Pleasant Hill Roofing Replacement
(925) 885-4436 pleasanthillroofingreplacement.xyz
438 Odin Dr, Pleasant Hill, California
5.0 from 10 reviews
CedarForestMax Roofing is your premier destination for all roofing needs in Pleasant Hill. Situated at 438 Odin Dr, this trusted roofing supply store offers a wide selection of high-quality materials to professionals and DIY enthusiasts alike. Whether you're undertaking a new construction project or repairing an existing roof, you'll find everything from shingles and tiles to underlayment and flashing. With a focus on durability and performance, CedarForestMax Roofing ensures your projects are built to last, providing peace of mind with every purchase.
Dynasty Roofing
(925) 944-9404 dynastyroofinginc.com
3330 Vincent Rd, Pleasant Hill, California
4.6 from 18 reviews
We specialize in residential re-roofing and gutter installations. We offer a tremendous price for an excellent roof and that is what makes us the East Bay's largest residential roofing company. All roofs are permitted and inspected by inspectors. We have also are recommended by Manufacturers who have seen our work. David Flatt started the business on his own over 30 years ago. Since then we have done over 10,000 roofs in Contra Costa County. Referrals make us what we are today and we appreciate each and every one. We have an outstanding record with the CSLB and have done the friends and family of roofing inspectors who like our work. We offer a 10 year warranty on all workmanship and do free estimates.
Green Group Roofing
(925) 203-5696 greengrouproof.com
Serving
4.9 from 49 reviews
The time has come – you’ve finally decided to make changes to enhance your home. Now you need a qualified California Bay Area contractor and remodeler to make your dreams a reality. Green Group Roofing will work alongside you to bring your renovation plans alive while staying on budget and on time. We offer design-inspired solutions to create spaces that fit your style and daily living needs. Boasting a stellar reputation with repeat customers, we are 100% committed to our clients’ home remodeling projects. We are a full-service remodeling company specializing in new construction, room additions, garage conversions (ADU), kitchen remodeling, bathroom renovations, swimming pools, patio covers, and more!
Paragon Roofing
(925) 678-5745 www.paragonroofco.com
Serving
4.9 from 38 reviews
Paragon Roofing in Concord, CA, is your trusted roofing contractor for all your residential and commercial needs. Specializing in new roof construction, replacement, repairs, and maintenance, we offer expert services for shingle, tile, and flat roofs. Our skilled team provides skylight and gutter installation, custom designs, and innovative solutions. As Owens Corning and GAF certified professionals, we deliver top-quality artisan roofing with a focus on classic and inventive styles. Choose Paragon Roofing for exceptional craftsmanship and reliable roofing services.
Acker Roofing
(925) 891-3331 ackerroofing.com
Serving
4.9 from 142 reviews
Acker Roofing stands as the premier choice in Contra Costa, CA and its neighboring regions, delivering unmatched roofing services tailored for both residential and commercial needs. Whether you're seeking swift emergency roof repair, comprehensive roof replacement, or specialized solutions for a roof leak, we're your go-to experts in Contra Costa.Our legacy stems from years of dedicated service, ensuring local property owners benefit from the very best in residential roofing, commercial roofing, and gutter service.

GBR Roofing
(925) 438-7076 www.gbrroof.com
Serving
4.9 from 18 reviews
GBR Roofing is a leading roofing contractor specializing in roof replacement in Concord, CA, and serving Alameda, Contra Costa, and San Francisco counties. We provide expert roof installation, complete roof replacement, and detailed roof inspections for residential and commercial properties. Our licensed team uses premium materials and proven techniques to deliver lasting protection, energy efficiency, and peace of mind. From your initial consultation to the final walkthrough, we focus on transparent communication and tailored solutions that fit your needs. Whether you’re replacing an aging roof or installing a new system, GBR Roofing is here to protect your investment. Contact us today for a free estimate and experience the GBR difference.
American Cool Construction
(925) 326-1828 americancoolconstruction.com
Serving
5.0 from 6 reviews
Highly rated and trusted roofing company in Concord, CA. We strive to deliver top quality roofing materials and workmanship. G.A.F Master Elite roofing company offering residential and commercial roof replacement and roof repair services as ell as siding, insulation, and exterior paint. Satisfaction guaranteed. We are proud members of the Google Guaranteed program. We also offer convenient financing options as well as generous seasonal discounts for your needed roofing project. Ask about our roofing discounts. We treat you and your home with respect and will provide you with an honest and hassle-free quote/estimate. Affordable roofing services at the highest quality.
Equinox Roofing
(800) 880-6020 equinox-roofing.com
Serving
5.0 from 135 reviews
Equinox Roofing is the leading roofing company in Walnut Creek, CA servicing San Francisco, San Jose, Walnut Creek, and nearby areas. Our roofing company offers residential roofing, commercial roofing, roof repair, asphalt shingle roofing, and many more. Customers love us because of our comprehensive roof warranties and affordable roof financing options. We also have industry affiliations and certifications such as Owens Corning, Poly Glass, and CertainTeed. If you want to experience how your most trusted San Francisco roofing company embraces our motto “Building value”, call us now for a free estimate!

Symplify Roofing
(510) 288-6171 symplifyroofing.com
Serving
4.9 from 56 reviews
Symplify Roofing is your trusted roofing contractor based in Walnut Creek, proudly serving residential and commercial clients throughout the entire Bay Area. As an Owens Corning Platinum Contractor, we provide exceptional roofing services backed by industry-leading warranties—a 50-year material warranty and a 25-year labor warranty—for unmatched peace of mind. When searching for “roofing near me,” Bay Area residents and businesses rely on our expert team for professional workmanship, lasting quality, and reliable results. Whether you need commercial roofing or residential roofing solutions, choose Symplify Roofing, your trusted Bay Area roofing contractor, and experience excellence, integrity, and quality you can depend on.

Golden Grove Roofing & Construction
(925) 272-8248 goldengroveco.com
Serving
5.0 from 28 reviews
Licensed Roofing and General Contracting Company
LB Harbors Roofing
Serving
5.0 from 9 reviews
Commercial & Residential roofing contractor in the Bay Area for your roofing needs. We also work on gutter cleaning, new gutter installation, gutter guards. Habló Espanol.
Cosmic Renovation & Roofing
(877) 653-9899 cosmicrenovation.com
Serving
4.4 from 28 reviews
Cosmic Renovation & Roofing strives to break the mold when it comes to residential style, comfort and energy efficiency. We deliver money-saving replacement windows, solar roofing products and synthetic turf lawns that protect the environment without compromising the look of your property. We select the best products from the industry’s leading manufacturers. Our design team and technicians stay informed about the latest building innovations and continuously sharpen their skills with continuing education. The results are superior quality, improved function and your peace of mind.
The wet winter period in this area makes active leaks, flashing failures, and underlayment weaknesses most visible during storm cycles rather than during the dry summer. When rain comes in earnest, shingles may shed water poorly, flashing around chimneys and vents can loosen, and underlayment can begin to fail where it has already aged. In Pleasant Hill, that means a roof can look "okay" on a sunny afternoon but reveal a cascade of trouble once a weather system moves in. The pattern is predictable: interiors stay dry until a heavy downpour hits, then suddenly a ceiling drip or wall stain appears that wasn't there a week earlier. This is not a one-off nuisance-these are warning signals that require immediate attention to prevent broader damage.
During each storm, focus on the high-risk spots: flashing at roof edges, around dormers, skylights, and exhaust vents; valleys where two roof planes meet; and the transitions between different roof materials, especially in low-slope sections that trap water. Look for damp patches on ceilings that track along rafters, interior stains near chimneys, and misaligned shingles or loose tabs that lift with wind-driven rain. If a leak shows up mid-winter, it is not just a gentle nuisance-it signals that the roof system is no longer containing the elements as designed. Do not delay addressing these failures; weather patterns in this region can turn a small breach into widespread water intrusion in a single storm.
Because rain can delay full replacement work, temporary protection and rapid leak response are especially relevant when failures appear mid-winter. Place sturdy tarps or roof jackets over the most exposed areas when a storm is approaching or during a lull in heavy rain. Secure edges and avoid creating additional punctures by using proper fasteners and seam tape rated for outdoor use. Keep gutters and downspouts clear so water can shed away from the roof deck rather than pooling near the eaves. If a leak progresses, minimize interior exposure by diverting water away from the affected area with rolled towels or buckets, but do not rely on makeshift fixes for more than a day or two. Arrange prompt assessment from a qualified contractor to identify whether flashing needs resealing, underlayment reinforcement, or a targeted repair that can hold through the next front.
Local homeowners often need roof condition photos and contractor documentation immediately after rain events because insurance carriers may request detailed evidence tied to the timing of damage. After a significant storm, photograph the affected roof areas from multiple angles, including close-ups of flashing, seals around vents, and any visible water intrusion on ceilings or walls inside. Record the date and time of the storm, and note how long the leak persisted and which rooms were affected. If a contractor is called, ensure a written assessment outlines the suspected failure points, recommended temporary protection, and a clear plan for permanent repair. This documentation can streamline communication with insurers and help secure the necessary support to address the leak before the next storm cycle hits.
Find local contractors experienced in assessing and restoring roofs after hail, wind, and severe weather events.

Pleasant Hill Roofing Replacement
(925) 885-4436 pleasanthillroofingreplacement.xyz
438 Odin Dr, Pleasant Hill, California
5.0 from 10 reviews


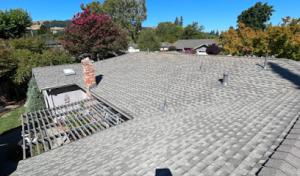
Clay and concrete tile are dominant in this area, giving homes a distinctive profile on streets lined with mature yards and Mediterranean-inspired aesthetics. That popularity means broken tiles, slipped pieces, and aging underlayment show up more often than in markets that rely primarily on shingles. The visible field can look solid while the waterproofing layer beneath it has already started to fail, especially where tiles have settled or shifted over years of weathering. When a tile roof is inspected after a storm or a heatwave, expect a closer look at cracked surfaces, loose fasteners, and any signs of granule loss around hips and ridges. A local nuance is that the camera-ready appearance of the tile can mask deeper issues that only a careful hand-and-eye assessment will reveal.
Many East Bay homes with tile roofs require evaluation of the waterproofing layer beneath the tile field. The underlayment in these roofs can age out well before the tiles themselves show obvious wear, and repeated cycles of sun and rain can erode the membrane's ability to shed water efficiently. In practice, this means a thorough inspection should go beyond tile replacement. Look for weakened or blistered underlayment, gaps at penetrations, and potential trapezoid-shaped failures around skylines and vents. Because tiles can shield the underlying system, a professional evaluation needs to confirm that the underlayment and flashing are still doing their job even if the top layer appears intact.
Tile roof work in Pleasant Hill can be more specialized because matching profile, color, and accessory pieces matters on established residential neighborhoods where partial repairs are visible. When a section of tile needs replacement, it is not enough to source any tile with a similar color. The exact curvature, edge trim, and ridge cap profile must align with the home's existing roof to avoid a patchy look that stands out on a uniform streetscape. Local crews understand that color fades and glaze variations accumulate over years; matching glaze, texture, and edging requires careful sourcing and sometimes fabricating custom saddle tiles or valley pieces to maintain the roof's cohesive appearance. Expect a careful, detail-oriented approach that prioritizes seamless integration with neighboring roofs and the home's overall silhouette.
The dry-season window before winter rain is the preferred time for roof work. In Pleasant Hill, scheduling around long dry periods helps ensure that tile work, underlayment replacement, and flashing upgrades can cure and settle before the first winter storms. This timing reduces the risk of wind-driven leaks during the installation and gives a clear period for any waterproofing repairs to set. A practical approach is to align tile repairs or replacements with a forecast that promises several consecutive dry days, followed by a short, manageable rainy spell for tests. In neighborhoods with mixed ages and styles, coordinating with neighbors can also help preserve the street's consistent look while the work is underway.
Find contractors who specialize in clay and concrete tile roofs, known for their durability and curb appeal.
In this market, homeowners commonly choose among asphalt shingles, metal, clay tile, concrete tile, wood shingles or shakes, and slate, giving a wider material spread than many suburban cities. That variety isn't just about a stylistic choice-it reflects the evolving mix of tract homes, custom builds, and remodels that define the area. When selecting a material, consider how your home's current roof cues-whether it already carries a heavy tile system, a standard shingle roof, or a bold architectural statement-will influence compatibility, weight, and the ease of substitutions or retrofit. The local inventory supports both traditional and alternative looks, so you can align performance with the home's character without feeling boxed into one route.
Hot summer heat in inland Contra Costa County accelerates aging for some roofing products and can heighten sensitivity to installation details. Clay and concrete tiles tolerate heat well but require exacting underlayment and roof deck preparation to avoid cracks or premature wear from expansion and contraction. Asphalt shingles handle heat reasonably but may shed granules more quickly in intense sun if ventilation is compromised. Metal roofs generally perform well in heat and resist fading, yet improper coating or panel spacing can invite expansion-related issues over time. For wood shingles or shakes, consider fire risk, UV exposure, and potential distortion in high heat; these tend to require meticulous maintenance and more frequent inspections. Slate delivers longevity but demands a precisely prepared roof structure to support its weight and a careful installation rhythm to prevent micro-cracks in the heat. The key is to match material resilience to your roof's exposure, ventilation, and the local tendency toward dry-season aging.
The local mix of tract homes, custom homes, and remodels means material choice is often driven by whether the home already carries a heavy tile system, a standard shingle roof, or a visible architectural style that limits easy substitutions. For homes with a tile heritage, staying with tile-whether clay or concrete-tends to preserve curb appeal and performance continuity, while hybrid approaches can be explored for those seeking lighter or more cost-conscious options. If the style favors a flatter, modern line, asphalt or metal can provide a clean look with strong resistance to heat and hail. In remodels where the roof changes the silhouette, striking a balance between color, texture, and weight is essential to maintain street credibility and structural safety.
Because the dry season supports more predictable installation conditions, prioritize a replacement window that avoids late-winter rains or early-season storms. Heavier tile systems demand precise staging and longer curing or sealing intervals, so plan for a longer lead time with suppliers and your contractor, especially if choosing concrete or clay tiles. If a home already features a heavy tile system, maintaining compatibility with underlayment and flashing details becomes even more critical to prevent leaks after the first winter rains. For mixed housing stock, coordinate with neighbors about trends and color palettes to preserve neighborhood harmony while ensuring your roof meets modern performance expectations.
The most popular roofing material in the US. Find pros who install, repair, and replace asphalt shingles.
In Pleasant Hill, cost planning should rely on the provided per-square ranges, but local totals can move significantly based on whether the home has asphalt shingles, heavy tile, metal, wood shakes, or slate. The dry-season window that many homeowners target for re-roofing often translates to tighter crews and higher demand, which can lift material and labor prices as you approach late summer. Knowing your roof type up front helps you forecast the right ballpark and avoids sticker shock when bids land.
Tile and slate projects in this area often carry higher labor and handling complexity than standard shingle tear-offs because of weight, breakage risk, and accessory matching. Clay and concrete tiles, in particular, demand careful sequencing, proper underlayment, and precise flashing to weather the winter rains. Slate presents its own challenges, with specialized fasteners and fragile long-lead pieces. If your home features heavy tile or slate, expect costs to skew toward the higher end of the ranges, and plan for additional contingency funds for breakage during removal and reinstallation.
Scheduling pressure before the winter rainy season can affect pricing and contractor availability locally, especially for homeowners trying to complete re-roofing during the preferred dry window. If bids are secured late, you may see premium labor charges or limited crew options, which can elongate the project timeline and tighten scheduling at the worst times. To mitigate surprises, align decisions with a clear target timeline and have a backup plan for weather-related delays. The more you can consolidate materials, scaffold access, and accessory matching ahead of time, the smoother the window will feel and the less you'll pay in rush charges.
Material choice remains the biggest driver of total cost in Pleasant Hill. Asphalt shingles stay the most affordable option for a quick refresh, while metal offers durability with a different install footprint. Clay and concrete tiles bring substantial weight and require structural consideration, potentially increasing both labor and hidden costs. Wood shingles/shakes carry a unique aesthetic but variable weather performance and faster aging, which can influence long-term maintenance expectations. Slate, if present, is the premium path with the steepest upfront investment but excellent longevity. Each type shapes not just the price per square but the scope of required preparation, underlayment, and flashing details.
Finally, plan for local weather contingencies and seasonal constraints. Even within the same neighborhood, elevation, roof pitch, and tree cover can alter how quickly crews can mobilize and how much protection your yard needs during tear-off. A well-timed bid, with a clearly identified scope and a materials plan that anticipates future weather events, tends to path-cost more predictably through Pleasant Hill's distinctive climate and housing stock.
Don't let upfront costs delay a critical repair - these contractors offer payment plans to fit your budget.
Citywide Roofing & Remodeling
(888) 933-5939 www.citywide-remodeling.com
Serving
4.8 from 70 reviews
A full roof replacement in Pleasant Hill typically requires a permit through the City of Pleasant Hill Building Department. The licensed contractor generally submits the plans and pays the permit fee as part of the re-roof process in this city. During a re-roof, the permit intake is treated as part of the project timeline, so planning ahead with your contractor helps avoid delays. In practice, your contractor coordinates the submittal of the project details, including any attic ventilation changes or underlayment upgrades, and ensures everything aligns with local code expectations. Understanding this process helps you anticipate when trades need access to your attic, bathroom ceilings, or upper eaves for venting and flashing work without surprises.
Pleasant Hill inspections occur during and after the work, with attention to underlayment, ventilation, and fastening, and final sign-off is required before the project is closed. Expect at least one in-progress review to confirm decking integrity, flashing around chimneys and walls, and the continuity of underlayment. Inspectors also look for proper roof-ventilation balance, including soffit and ridge vent functioning, to maintain indoor comfort and energy efficiency. Fastener patterns must meet wind uplift requirements for the East Bay climate, particularly on steeper slopes and tile or metal roof sections. A clean, accessible attic space helps the inspector verify attic insulation and deck integrity from above.
Coordinate your preferred access times with the contractor to minimize disruption, especially in tight urban lots common to older Pleasant Hill neighborhoods. Keep a current copy of the permit on-site and ensure any requested changes are documented and approved by the Building Department. Communicate potential weather gaps that could affect grout or sealant curing if you're installing tiles or metal on slope transitions. Finally, plan for the final inspection and sign-off by confirming that all temporary protections are removed, debris is cleared, and any warranty paperwork is provided after the project closes.
California's evolving insurance market touches Pleasant Hill homeowners in notable ways. Even outside the highest-risk foothill zones, wildfire-driven underwriting pressure can influence roof-related coverage decisions. That means carriers may scrutinize roof condition more closely during renewals or when you file a claim, making preparedness and documentation more impactful than in the past.
When a claim is possible or a renewal is upcoming, carriers may ask for roof age records, recent photos, and contractor estimates. Having clear, dated documentation shows a proactive approach to roof health and can smooth discussions with insurers. If the roof has been updated or repaired before, keep records of work orders, warranties, and material specifications ready to share.
Insurers' availability and premium behavior can vary during peak risk periods in California. In Pleasant Hill, that often aligns with seasonal shifts and the approach of winter rain. Being prepared with up-to-date roof information before those periods begins to matter. A well-documented roof history can help lock in more stable coverage windows when markets tighten.
Maintain a simple file with recent photos, a log of roof age estimates, and any professional assessments. If a claim becomes likely, contact your provider early to understand what documentation they will require. In practice, you'll reduce last-minute stress by aligning your records with the dry-season window, ensuring the home is ready for winter rain and insurance review cycles without surprises.
Connect with contractors who help homeowners navigate the claims process from damage assessment to final approval.
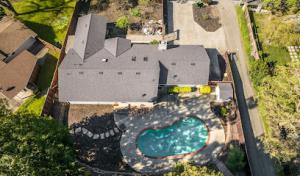
In this climate, skylight leaks and curb failures are a recurring service need for Pleasant Hill homeowners. The combination of Mediterranean seasonal use, mixed roof types, and transitions between pitched roofs and lower-slope additions means leak points often show up where a main roof meets a patio, garage, or new sunroom. Expect specialized attention to flashing, sealants, and curb conformity to match the adjacent roof lines.
When planning work, pay attention to skylight flashing and the curb itself. Leaks frequently track along the flashing legs, around fasteners, or where the curb sits on top of a parapet or low-slope surface. Transitions between a steep main roof and a flat or low-slope section are common trouble spots; those junctions require detail-focused integration so water doesn't find the seam during the first winter rain. Low-slope sections demand careful membrane detailing or high-quality rolled roofing to prevent edge leaks at eaves and parapets.
First, evaluate skylight installation for proper integration with the roof pitch and surrounding flashing. Confirm the skylight curb is solid, level, and flashed with compatible sealant at the top edge. Inspect the field-applied flashing around the skylight and ensure seams are watertight with overlapping channels directed to channel water away from the curb. Next, survey transitions between pitched roofs and lower-slope areas. Look for gaps, improper step flashing, or mismatched materials at the transition, and verify valley and parapet details shed water as intended. Finally, check any newer additions or patios that sit on low-slope sections for membrane wear, edge adhesion, and fastener corrosion.
Choose flashing and sealants rated for both roof types and California weather cycles. In Pleasant Hill, the emphasis is on durable curb integration and reliable transition details that endure winter rains. Favor teams experienced with flat-roof specialization and skylight work, since local demand shows these are common maintenance and replacement focus areas. When scheduling work, align skylight and low-slope repairs to complete before the first heavy rains, reducing the risk of cascading leaks during the season.
Find contractors experienced in skylight installation, flashing, and leak repairs to bring natural light into your home.
Pleasant Hill Roofing Replacement
(925) 885-4436 pleasanthillroofingreplacement.xyz
438 Odin Dr, Pleasant Hill, California
5.0 from 10 reviews

In this market, homeowners commonly hire for re-roofing with a quick response and cleanup included, focusing on residential homes and affordability. The pool of local contractors tends to emphasize reliable turnaround during the dry-season window, so you're not left exposed to winter rain. Look for teams that clearly advertise prompt start dates, thorough debris removal, and front-loaded communication about scheduling and weather contingencies.
The strongest option pairs solid warranty coverage with a manufacturer-certified position. That combination matters more than a low bid, because long-term protection can save stress and money when weather flips suddenly. Ask for the exact terms: who handles the warranty, what's covered, and how claims are processed. In this market, many reputable outfits publish their warranty details and have manufacturer-backed credentials that translate into reliable performance over time.
A practical choice is a roofer who routinely manages city submissions and final sign-off, minimizing delays that could derail the dry-season schedule. Verify that the contractor has a documented process for permitting coordination (even if you're told it's straightforward) and a clear plan for inspections after installation. You want certainty that the project won't stall mid-progress because of administrative holdups.
Choose a crew that provides a concrete installation window, a pre-installation walkthrough, and a post-installation cleanup that leaves no nails or debris behind. Ask who will be on-site, how daily progress updates are delivered, and who handles any incidental repairs that might arise during the project. A locally grounded contractor will treat these steps as routine, not optional.