Last updated: Apr 19, 2026
In Hercules, the wet-season rhythm hits hardest from November through March. Those months bring the mild, persistent rains that turn even small roof drips into urgent problems if ignored. The highest disruption and leak exposure typically occur during this period, so you need a plan that treats every leak risk as a potential cascade. If you navigate fall through early spring with a leak-first mindset, you'll save your attic, your walls, and your wallet from storm-season surprises.
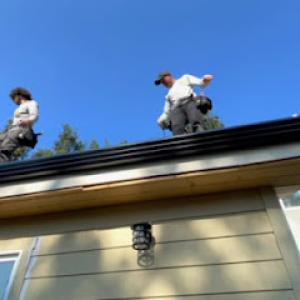
Roofing work in Hercules commonly concentrates from late spring through early fall because winter rains can delay tear-off, dry-in, and inspection timing. If you're planning a replacement or major repair, aim to complete the heavy lifting before the first real cold fronts arrive. Scheduling later spring starts gives crews a better chance to finish before the next wet spell, reducing the chance of weather-driven delays that push you into the heart of the rainy season with a half-done job and exposed decking.
Spring coastal winds and moisture in the Hercules area put extra stress on flashing, roof edges, and transitions before the dry season fully sets in. Those winds tug at chimney closures, skylight collars, rake edges, and valley penetrations. A rushed spring installation can leave you with marginal seals just as storms intensify. Prioritize robust flashing detail and secure edge metal during the shoulder months, so you're not playing catch-up when a windy system rolls in from the Bay.
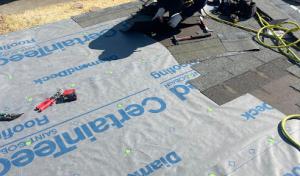
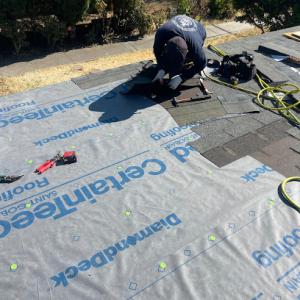
If a tear-off is needed, the decision window hinges on ground and roof moisture risk. Dry-in timing matters because a late dry-in can leave roof decks exposed during a lull in the dry season, creating vulnerability to sudden showers. When the forecast shows a stretch of dry days, commit to a careful sequence: remove, inspect, repair decking as needed, install underlayment with proper overlap, and cap with a weatherproof roof cover before any rain risk re-emerges. Delays in dry-in cost you both time and resilience, especially with the Bay-front moisture in play.
Start by inspecting around penetrations and transitions as the wet season approaches. Look for loose flashing, popped nails, or gaps at eaves and rake edges where coastal winds tend to pry at sealants. If you're contemplating material changes, consider systems that perform well under wind and moisture exposure, and pair them with proven flashing details suited to this climate. Have a plan for staged work that aligns with a predictable dry window, so your roof isn't left vulnerable during November through March. Have a trusted local contractor walk the ridge lines, valleys, and transitions with you so you know exactly where waterproofing strength will be concentrated when the rains return.
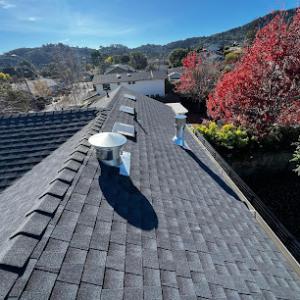
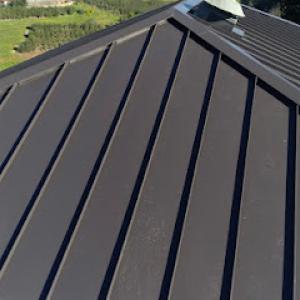
When you choose roofing in this coastal zone, the two big forces are wind and sun. The Bayfront exposure pushes edges of shingles and tiles to lift or crack if fasteners aren't robust, while the dry summer heat accelerates wear on some materials. The approach here is to pick a system that stands up to gusty hillside winds and remains durable under long, hot days without requiring constant maintenance. The material you select should balance wind resistance with the ability to shed heat, so a roof stays cooler and longer.
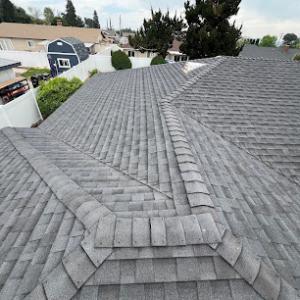
On hillside neighborhoods and near the shore, wind runs along roof ridges with a persistence that can unsettle lighter systems. Asphalt shingles can perform well if installed with premium underlayment and high-wind rated fasteners, but wind-driven rain can still find its way through undersides if the edge detailing isn't sealed properly. Clay and concrete tiles, while heavy, have inherent wind-resistance when installed with proper battens and appropriate fasteners. However, their weight means a structural check is essential before replacement. If the home's structure isn't designed for added heft, the installation should be staged with reinforcement, or choose a lighter yet wind-competent option. For homes already carrying a heavier roof, the existing framing often navigates better resilience, but a professional assessment remains vital to avoid compromising the long-term integrity of rafters and supports.
Hot summer heat in this area can shorten the life of asphalt shingles more quickly than in milder climates. The UV and heat cycling cause granule loss and curling that reduces the roof's protective layer over time. In contrast, concrete tile offers excellent UV resistance and color retention, while clay tiles can maintain appearance with proper coatings and color stability. The trade-off is weight and the need for structural confirmation. If the plan is to switch from a lighter system, expect a detailed review of load paths and potential reinforcement to accommodate the heavier tile option. The goal is to choose a surface that reflects a significant portion of heat, minimizes thermal expansion stress, and keeps attic temperatures in check to protect insulation and interior finishes.
A practical approach is to pair a wind-tolerant sheathing and underlayment with a roof cover that can withstand sun-driven degradation. For asphalt lovers, look for high-wind rated shingles and a installation method that secures the edges against wind-driven uplift, including sealed penetrations and solid starter courses. For tile enthusiasts, ensure the decking is solid enough to bear the load and that fasteners are corrosion-resistant to resist coastal moisture. In both cases, careful edge detailing, valley protection, and flashings around penetrations are essential to reduce moisture intrusion during winter storms and strong Santa Ana-like gusts. Consider color choices that reflect sunlight; lighter tones can help keep roof temperatures lower, potentially reducing attic heat gain and accompanying energy strains on cooling systems.
Regular inspection after heavy storms and seasonal checks help catch lift indicators or micro-cracks early. Pay attention to fastener security, flashing integrity, and any split or loose tiles after strong winds. Cleaning debris that blocks ventilation helps maintain roof performance through the dry season. If a tile roof shows signs of movement or waviness, a careful evaluation of the underlying structure and fastener system becomes more urgent, since that can indicate wind-driven settlement or failure in the roof deck. For asphalt, monitor for granule loss and edge damage, and address it before water can penetrate. The aim is a durable roof that keeps moisture out during storms and stands up to long, hot days without frequent repairs.
When you're planning a re-roof in Hercules, you'll notice a clear ladder of price by material. Typical Hercules roofing costs run about $400 to $700 per square for asphalt shingles, $700 to $1200 for metal, $900 to $1700 for clay tile, $750 to $1200 for concrete tile, $600 to $1100 for wood shingles or shakes, and $1100 to $2000 for slate. Those ranges reflect local supply, weather exposure, and the labor pool you'll see around the Bay Area. In practice, a mid-range asphalt replacement is common for many neighborhoods, while hillside and shoreline-adjacent homes tend to push you toward metal or tile for longer life in wind and moisture.
Costs in Hercules can rise when homeowners move from a lighter roof to clay or concrete tile because heavier assemblies may require structural review or permit changes. If your existing structure isn't built to carry extra weight, you'll see added steps and costs-both in labor and materials-before any shingle is removed. Tile roofs, especially clay and concrete, bring substantial weight and wind considerations, so plan for potential framing assessment, upgraded fasteners, and improved underlayment. If structural reinforcement becomes part of the plan, that can push your total beyond the base square-price ranges listed above. Budget some cushion for these contingencies, particularly in older homes or on hillside foundations where framing details vary.
Seasonal demand pressure is local and predictable in Hercules because most full replacements are pushed into the late-spring-through-early-fall work window after the wet season. If you aim for a summer install, expect a rise in contractor availability and, occasionally, short-notice scheduling. Early spring can offer a mild window before heavy rain, but many crews book up quickly once the weather dries and humidity drops. If you have year-round constraints or specific timelines, start conversations with contractors well ahead of your preferred installation period so you don't face last-minute price bumps or limited labor slots.
In environments shaped by Bay-front moisture and wind exposure, you'll want to balance upfront cost against long-term performance. Asphalt shields against wind-driven leaks at a lower initial price, while metal provides strong wind resistance and good hail durability with a moderate-to-long lifespan. Clay and concrete tile shine in dry summer sun but add weight and a steeper upfront investment. Wood shingles offer a natural look and good insulating value but can require more maintenance in damp months. Slate delivers long life and high durability but at the highest price point and weight. Consider not just the per-square price, but the total system-underlayment, fasteners, and flashing-particularly in wind-exposed elevations and near the Bay.

Atlas Roofing
(415) 625-4567 atlasroofingpro.com
Serving
5.0 from 83 reviews
Atlas Roofing is your trusted roofing expert in the San Francisco Bay Area. We specialize in new roof installations, roof replacements, roof repairs, and re-roofing services. Our team of skilled professionals is dedicated to providing top-quality craftsmanship and exceptional customer service. Whether you need a new roof for your home or a repair to extend the life of your existing roof, we have the expertise to get the job done right. At Atlas Roofing, we use only the highest quality materials to ensure your roof stands the test of time. Contact us today for a free estimate!

Advanced Roofing El Cerrito Works
(341) 230-1042 advancedroofingelcerritoworks.com
Serving
5.0 from 36 reviews
Advanced Roofing El Cerrito Works proudly serves El Cerrito, CA with reliable roofing and professional plumbing solutions, available 7 days a week. We handle roof inspections, leak repair, new roof installations, and long-term maintenance to keep homes protected. Alongside our roofing expertise, we provide complete plumbing services, including leak detection, pipe repair, drain cleaning, water heater service, faucet and fixture work, and full system troubleshooting. Our team focuses on honest service, quality workmanship, and fast response, helping local homeowners stay safe, comfortable, and stress-free. If you need trusted roofing or plumbing in El Cerrito, we’re here to help.

Pinole Roofing
(341) 348-8847 pinoleroofing.site
Serving
4.8 from 6 reviews
Pinole Roofing is a professional roofing service company located in Pinole, CA. We focus on roof repairs, inspections, and ongoing roofing maintenance for residential and commercial properties. Our experienced team handles roof leaks, damaged materials, and age-related roofing issues using proven methods and quality materials. We are committed to clear communication, reliable workmanship, and prompt service from start to finish. Proudly serving Pinole and surrounding California communities, we help property owners protect and maintain their roofs with trusted roofing solutions.
California Premier Roofing
(707) 209-9390 californiapremierroofing.com
Serving
5.0 from 18 reviews
Your roof is an integral part of your home or business that protects it from the elements, so don’t choose just anyone as your preferred Vallejo & Benicia roofing company. After all, a roof & gutter inspection, roof & gutter repair, roof & gutter installation is only as good as the company you hire. California Premier Roofing is one of California's most respected roofing repair and installation companies. In our 25 years of service we’ve earned our reputation through hard work, quality customer service, and unbeatable savings! From small single-family homes to large restaurants and offices, no job is too complex or large for us. So if you’re ready to hire the best roofers in the business, contact California Premier Roofing today.
Pablo Restorations Roofing
(510) 671-6161 pabloroofingca.com
Serving
5.0 from 23 reviews
Pablo Restorations Roofing is your trusted roofing contractor serving Richmond, CA, and surrounding areas. Specializing in asphalt shingle roofs, flat roofing, and metal roofing, we provide tailored solutions to meet your roofing needs. Whether you need expert roof leak repair, a thorough roof inspection, or a full roof installation, our experienced team delivers exceptional craftsmanship and reliable results. Committed to quality and customer satisfaction, we ensure durable, long-lasting roofs that protect your home or business. With Pablo Restorations Roofing, you can expect prompt service, competitive pricing, and peace of mind. Contact us today to secure your property with a roof built to last!
Frontline Roofing
(530) 402-3246 frontlineroofing.com
Serving
4.8 from 20 reviews
Frontline Roofing, located at 12669 San Pablo Ave Suite 107, is your trusted roofing contractor providing top-notch roofing services in Lake Elsinore, California. Specializing in both residential and commercial roofing, our dedicated team excels in roof repair, replacement, and maintenance, ensuring lasting durability and aesthetic appeal. We proudly offer diverse solutions including metal roofing, flat roofing, and energy-efficient commercial systems. Rated 4.9 stars by our clients, our expert craftsmanship, prompt service, and free quotes make us the go-to choice for "roofing near me." Contact us today for reliable roofing solutions tailored to your needs.
G&T Brothers Roofing
Serving
5.0 from 24 reviews
G&T Brothers Roofing has 15 years experience working with residential roofing bringing our clients the best quality work. We are trained for quality workmanship to do the best job possible.

Planchon Roofing
(510) 235-4056 www.planchonroofing.com
Serving
4.5 from 30 reviews
Planchon Roofing is a reliable roofing company in San Pablo, CA, providing fast and professional solutions to protect your home or business. We specialize in emergency roofing service, responsive roof repairs, and comprehensive maintenance to prevent future damage. Our licensed team works with quality materials and proven techniques to ensure lasting results on every project. Unique advantages include rapid response times, honest estimates, insurance assistance, and craftsmanship backed by experience. From minor leaks to major repairs, we prioritize safety, durability, and customer satisfaction. Contact Planchon Roofing today for prompt, dependable roofing support when you need it most.
Apex Line Roofers Service
Serving
4.9 from 7 reviews
Apex Line Roofers Service, located at 13728 San Pablo Ave, San Pablo, CA 94806, United States, stands as a premier roofing supply store. We are dedicated to providing top-quality materials for all your roofing needs. From durable shingles to essential accessories, our extensive inventory ensures professionals and DIY enthusiasts alike find exactly what they require for a successful project. Trust Apex Line for reliable products that build lasting roofs.
VRC Roofing
Serving
5.0 from 9 reviews
VGR Roofing is your local and family operated roofing contractor and we are here to serve you as you deserve. We are specializing in metal roof, torch down roof, asphalt shingles, roof tiles, slate. etc etc, we are professional, clean. we love the work we do and will always strive to provide the best customer experience with best quality possible

ELM Roofing Contractors
(510) 737-0883 elmroofingcontractor.com
Serving
5.0 from 22 reviews
ELM Roofing Contractors - Trusted Roofers in San Mateo Since 2018 ELM Roofing Contractors has been providing top-quality roofing services in San Mateo, CA, and surrounding areas since 2018. Fully licensed and insured (C39 license), we specialize in roof replacements, repairs, and inspections for all roof types. Our skilled team works with leading roofing materials, ensuring durable results backed by a warranty. Each project is overseen by a dedicated manager to provide updates and ensure safety and quality. We offer free on-site consultations to assess your needs. Contact ELM Roofing Contractors today for reliable, professional roofing services you can trust!
Sunshine Gutters
(510) 525-0880 www.sunshinegutters.com
Serving
5.0 from 5 reviews
We offer Seamless gutter installation, repair, and maintenance in Contra costa county, San Francisco , Alameda county, Marin County and the surrounding areas. We offer a 5 year workmanship guarantee! Our gutters are guaranteed not to leak for as long as you own your home. The Bay area , Northern California is full of trees of all types, deciduous and fir. Leaves, needles, and debris are constantly falling into your gutters. Before the rain starts have us come out and inspect your gutter system and clean out the gunk in your gutters, this will allow them to flow smoothly and keep rain water away from damaging your house, foundation and landscaping.
For a full roof replacement, you will typically need a building permit. The City of Hercules Building Division is the point of contact for both permit issuance and inspection scheduling for roofing work. It's crucial to start this process early, because the review and approval steps can impact your project timeline, especially if the planned materials are heavier than what your current structure was built to carry. The Building Division will want to see structural details and may request engineered drawings if the selected tile system alters the load on the framing.
Inspections in Hercules commonly occur at two key milestones: first, during the roof sheathing or underlayment stage, to confirm proper nailing patterns, attic ventilation, moisture barrier installation, and wind-resistance detailing; and second, after completion for a final inspection. If the framing or structural components are modified to accommodate heavier tile products, you should expect the inspection scope to address those changes as well. Delays or re-inspections can occur if notes from the first visit aren't fully addressed or if the permit amendments do not reflect the actual construction.
Clay and concrete tiles bring notable weight compared with asphalt or metal. In a Bay Area climate like Hercules, wind exposure and moisture at the coast can amplify load concerns, especially on hillside homes or structures with older framing. If the project contemplates heavier tile, anticipate possible structural review. Framing members, anchorage to the deck, and roof-to-wall connections may require reinforcement or framing amendments. The Building Division may request a structural engineer's report or product-specific wind uplift calculations to confirm the existing structure can safely carry the chosen tile system. A permit amendment is not unusual when framing changes are involved, and that amendment will require additional review time and re-inspection.
Before you commit to a material change, contact the City of Hercules Building Division to confirm permit requirements for your specific house and roof plan. Bring loads or uplift data from the tile manufacturer, as well as any existing framing details. If heavier tile is on the table, secure a qualified contractor who can provide a thorough structural assessment and a clear plan for any needed reinforcements. Document all correspondence and keep a proactive schedule; that proactive approach reduces surprises during inspections and helps ensure your roof replacement proceeds smoothly through Hercules's permit process.
Hercules homeowners operate in a California insurance environment where wildfire risk and rising premiums have made roof age and condition more important during underwriting and renewal. In practice, carriers scrutinize how a roof has stood up to Bay-front moisture, salt spray, and seasonal wind events, and they often favor roofs with modern rapid-venting underlayment and verified hail resistance. If your roof looks worn or shows recurring leaks, expect higher questions and tighter conditions. The message is plain: older roofs and weak flashings become underwriting red flags that can slow or derail coverage decisions.
Insurers serving Hercules may ask for wind-mitigation documentation, roof age verification, and detailed loss-history records before binding or renewing coverage. Having these items organized-photographs of flashing, attic ventilation, gable ends, and any installed wind-rated products-speeds the process and reduces surprises at renewal. Keep a simple binder with roof replacement dates, contractor notes, and evidence of recent repairs, especially around valleys and hips where wind-driven moisture concentrates. Your goal is to demonstrate a proactive, well-maintained roof profile.
When damage occurs, adjusters may want closer documentation and contractor estimates, especially where wildfire-hazard concerns influence claim review standards in California. Document the damage with dated photos, notes on wind events, and evidence of prior repairs or vulnerabilities. Solicit multiple, licensed contractor estimates that clearly separate materials, labor, and any mitigation work. Be ready to share weather reports and maintenance records, and understand that insurers may request proof of recent inspections or professional wind-stability upgrades before approving large settlements.
Practical steps for staying insured start long before the next storm. Build your file before the wet season ends by scheduling a roof health check with a local contractor who understands Santa Cruz-heritage winds and Hercules's exposure. After inspection, photograph flashings at hips and valleys, and record attic ventilation performance. Note any rust, loose tiles, missing granules, or signs of moisture intrusion from seams around skylights. Keeping current records helps you respond if a claim is needed. Discuss your plan with your insurer, showing how age, maintenance, and any upgrades reduce risk, so they see you as a responsible, proactive owner.
Connect with contractors who help homeowners navigate the claims process from damage assessment to final approval.

The local contractor market shows meaningful specialization in skylight work, solar-integrated roofing, and flat or low-slope systems, indicating these roof details are a recurring service need locally. When the wet season arrives, penetrations and transitions such as skylights become more vulnerable to leaks if flashing and edge details are stressed by moisture and wind. Start with high-quality curb or flashing systems and ensure proper sealant compatibility with metal or terracotta edge metals common on hillside homes. Keep skylight flashes clean, dry, and accessible for seasonal checks, and plan for extra sealant or flashing upgrades where the curb meets the surrounding roof plane.
Low-slope tie-ins require meticulous edge treatment since these sections are prone to wind-driven moisture infiltration during storms. Inspect the intersection of the low-slope roof with vertical walls and parapets for proper terminations, counter-flashing, and secure membranes. In Hercules's damp winters, a deliberate inspection routine after heavy rains helps catch hairline breaches before they widen. Consider drip edges and cladding that resist chlorine-treated or salt-laden air if the home sits near the bayfront. Ensure transitions around solar mounts or equipment headers integrate with the existing membrane system to avoid abrupt terminations.
Roof-mounted solar arrays are a common sight, and their mounting details must harmonize with both the roof profile and prevailing winds. Use mounting rails and clamps designed for the local climate, with extra attention to gasket seals around penetrations where salt air can accelerate degradation. When solar is planned or retrofitted, verify that the conduit routes avoid sharp edges and that protective boots maintain a watertight seal at every penetration.
Fall wind events and storm debris in Hercules can make post-storm inspection of skylights, low-slope drainage areas, and roof-mounted equipment more important before winter rains intensify. After a major wind or debris event, inspect for loose flashing, lifted edge materials, and clogged drainage paths. Schedule quick checks of skylight seals, parapet transitions, and any areas where wind-driven rain could penetrate, then address issues promptly to prevent winter infiltration.
Find specialists in TPO, EPDM, and built-up flat roofing systems for residential and commercial properties.


Advanced Roofing El Cerrito Works
(341) 230-1042 advancedroofingelcerritoworks.com
Serving
5.0 from 36 reviews