Last updated: Apr 19, 2026
New London's position along Long Island Sound means roofs endure wind-driven rain and salt air that aggressively attack metal components and flashing. You may notice premature corrosion on metal flashings, fasteners, and vent pipes, especially where salt spray deposits accumulate. In late fall and early winter, salt-laden humidity can seep into seam gaps and nut-and-bolt connections, making small issues feel suddenly urgent. If you see white, chalky corrosion on metal, or dark streaks and rust along flashing joints, treat it as a warning: these are precursors to leaks that widen with every gusty front.
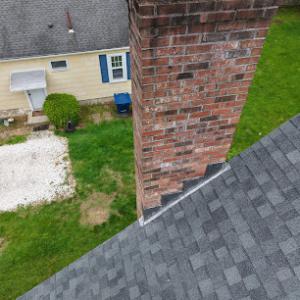
Southeastern Connecticut experiences frequent freeze-thaw cycles that torment vulnerable joints. Small flashing gaps-often hidden behind skylights, chimneys, and vent collars-can widen through repeated cycles, turning into active leaks by late winter. Shingles and underlayment may look intact from the ground, but the hidden edge where flashing meets roofing material becomes the weak link. Pay particular attention after a stretch of freezing nights followed by bright sunny days, which drives expansion and contraction. If you notice damp patches in the attic, musty odors, or condensation staining around flashing points, address it promptly before leaks become widespread.
Summer thunderstorms and hail present a second, equally aggressive damage season. Salt-laden air does not rest in the warm months, and hail can dent metal components, loosen fasteners, and bend flashing edges. The resulting micro-leaks often appear near roof penetrations and valleys, where hail impact concentrates. After a severe storm, inspect visually for lifted shingles, dented flashings, or displaced sealant around vents and chimneys. If a roof edge or valley looks wobbly or corroded, treat it as an urgent repair candidate before a subsequent storm compounds the problem.
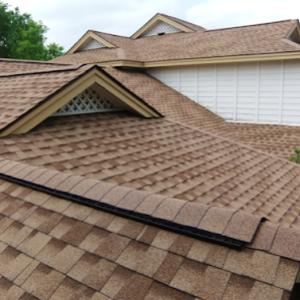
In this climate, the most susceptible areas are along edges, around protrusions, and in valleys where moisture concentrates. Look for granule loss on asphalt shingles, discolored staining under eaves, and any salt crusting on metal flashings. Establish a practical inspection cadence tied to seasonal shifts: a post-winter check to catch freeze-thaw damage early, a pre-spring wind season review, and a post-storm inspection after any significant coastal storm. If you sense air leaks, wind-driven rain intrusion, or visible flashing gaps, plan targeted remediation rather than broad, aesthetic fixes.
Keep pathways clear so a ladder can safely reach roof penetrations identified as high-risk. Use binoculars to spot signs of flashing misalignment from ground level after storms, and schedule a careful rooftop scan following a severe thunderstorm or hail event. Replace or reseal compromised flashings promptly, especially where metal has begun to corrode or fasteners show rust. Maintain a proactive stance: once you notice salt deposition affecting metal components or widening flashing gaps, treat it as an actionable repair trigger rather than a cosmetic concern.
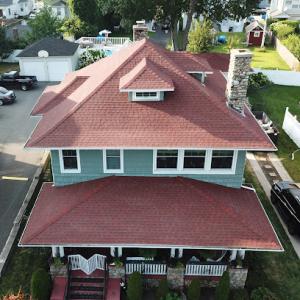
Coastal exposure along the Sound brings extra wear from salt, humidity, and occasional coastal storms. The roofing choices that best hold up here balance weight, fastener longevity, and the ability to retrofit older structures without heavy framing changes. Asphalt shingles dominate locally because they fit the common re-roofing market and are easier to replace on older homes without the structural demands of heavier systems. When evaluating options, you'll want to consider how each material handles salt-laden air, wind-driven rain, and the need for durable flashing at roof edges, valleys, and chimneys.
For many Sound-side homes, asphalt shingles are the most straightforward long-term choice. They're lighter than most alternatives, which helps on aging framing, and they respond well to standard coastal maintenance routines. Choose architectural or strand-cement shingles for better wind resistance and a thicker seal, which reduces the risk of wind uplift during coastal storms. Pay attention to the underlayment and flashing around dormers, skylights, and chimney penetrations, where salt creep and freezing cycles can create micro-leaks. If you replace asphalt, factor in the need to reseal surrounding trim and drip edges to maintain a tight barrier against salt spray.
Metal roofing performs well where salt exposure and humidity are persistent, but the critical detail is fastener selection and trim workmanship. In New London's coastal markets, look for metal systems with corrosion-resistant coatings and stainless or high-grade aluminum-fastened components. Seams should be sealed or clipped to minimize water tracking, and the trim around vent pipes and skylights must be coral-tested for salt resistance. A metal roof's heavier weight isn't as big a downside as it sounds when the structure has been maintained, but it can influence how the roof is anchored to resist wind-driven salt spray. If you're replacing existing trim, upgrade to corrosion-resistant flashing that stays supple under freeze-thaw cycles.
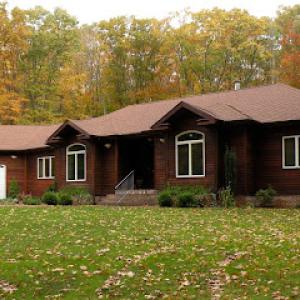
Slate, wood, clay, and concrete tile appear in the city's material mix, but heavier materials can complicate replacement on older structures if framing upgrades are needed. Concrete and clay tiles shed water well and can resist wind with proper installation, but their weight may require structural assessment before upgrading from a lighter system. Slate offers exceptional longevity and a classic look, yet it demands careful handling and a solid, well-anchored deck. Wood shingles or shakes provide a traditional coastal aesthetic but are more vulnerable to salt-induced rot and higher maintenance. If choosing tiles, ensure the deck can support the load and that anti-siphon details are installed to handle the local wind and spray conditions.
Regardless of the primary material, coastal homes benefit from meticulous flashing and fastener choices that resist salt corrosion. Inspect the roof after each winter and after major storms for lifted edges, corroded nails, and damaged sealants. Keep gutters and downspouts clear so salt-laden rain can drain away without backing up under flashing. For older homes, plan for potential framing checks during any replacement, especially when opting for heavier options, to avoid hidden structural surprises later. A well-chosen roof that aligns with a home's age and construction will weather the Sound-side climate more reliably than a one-size-fits-all solution.
In a city with exposed Long Island Sound frontage, local pricing for roof replacements tends to reflect more frequent tear-offs, decking repair, and flashing replacement than newer subdivisions. Asphalt shingles sit in the lower end of the spectrum, but a full replacement often includes deck assessments and minor repairs that push the job beyond the material price alone. Metal roofs run higher, and coastal corrosion can accelerate wear on flashing, fasteners, and trim, especially when older homes use metal accessories not rated for salt spray. Clay and concrete tiles drift higher still, with weight, cranking support, and underlayment requirements adding to the baseline. Wood shingles and shakes sit mid-to-high, particularly when knotty seams and potential fire-rated underlayment drive up material and labor needs. Slate remains the premium option with steep labor and unique fastening challenges in this environment.
Costs can rise after winter storms and summer thunderstorm events when emergency demand compresses contractor schedules across southeastern Connecticut. When crews shift from routine maintenance to urgent replacements, you may see premium pricing for expedited timelines, disposal, and material transport. In practice, expect longer project windows and tighter access on steep or multi-penetration roofs, especially where chimneys, skylights, or dormers complicate the layout. The price pressure is not just on the contractor side; supply chain hiccups for specialty materials or flashing components used to resist salt exposure can push the per-square price higher. Build a contingency into your bid for weather-driven delays and partial teardown scenarios.
Steeper older rooflines, complex chimney intersections, and coastal corrosion of metal accessories are common cost multipliers. A roof with multiple dormers or vents often requires more flashing, step-flashing integration, and careful sealing where salt air accelerates corrosion of fasteners. If the original roof used undersized or mismatched decking, the project may need extensive replacement, adding to labor hours and disposal fees. In New London, rapid weather shifts can necessitate temporary protection during work, which translates to additional material and setup costs. Expect to pay more for thorough surface prep and ensuring long-term performance against salt-laden humidity.
Asphalt shingles typically range from a modest base to higher installed costs when decking repair and flashing replacement are included. Metal roofing commands a noticeably higher installed price, with coastal corrosion considerations and steeper pitches contributing to the spread. Clay and concrete tiles add weight and require structural verification, often placing a premium on labor and crane or hoisting needs. Wood shingles or shakes sit between asphalt and higher-end options, with potential for greater maintenance in damp coastal air. Slate remains the premium choice, particularly for older homes aiming to preserve historic character, but expect the top-end price when roof geometry adds fasteners and precise cuts to resist wind uplift and salt exposure.
Start with a detailed inspection that prioritizes deck condition, venting, and flashing integrity, since those items commonly drive cost in this area. Gather multiple bids and ask for a line-item breakdown that separates material, tear-off, deck repair, and flashing work. If a storm event recently occurred, request a phased schedule or staged replacements to spread labor costs. Consider coatings or sealants designed for salt exposure on metal components and flashing, which can extend life and reduce frequent remedial work. For steeper or irregular rooflines, verify the contractor's experience with multi-penetration roofs and chimney intersections, as this is where the bulk of extra labor hours appear. Finally, plan for potential extra days of access, debris management, and protection for landscaping, particularly near coastal properties subject to wind-driven debris.

AM PM Roofing
(860) 961-2825 www.ampmroofing.com
81 Granite St, New London, Connecticut
4.7 from 66 reviews
LOCAL ROOFING CONTRACTORS AM PM Roofing are local Roofing Contractors CT, serving Middlesex, New London, New Haven, Hartford, and Tolland Connecticut Counties. EXPERIENCED & QUALIFIED With 30+ years roofing experience, we can execute any roofing job large or small. VALUE We save you money by offering transparent and fair pricing. AWARD WINNING Recipient of award winning ratings and reviews. BBB A+, Best of HomeAdvisor 2017-2018. LICENSED & INSURED We are fully licensed and insured for your protection. BRANDS & PRODUCT The top brands, styles, and types of roofing are available to customers.
The Superior Group - Roofing Company
(860) 792-5586 thesuperiorgroupllc.com
264 Vauxhall St, New London, Connecticut
4.9 from 17 reviews
Established in 2008, The Superior Group is a leading commercial roofing contractor specializing in a wide range of services for businesses nationwide. From expert roof repair and replacement to advanced solar panel installations and maintenance, we provide durable, energy-efficient solutions. Utilizing cutting-edge technology like thermal drone inspections and non-destructive infrared surveys, our team ensures the longevity and integrity of every commercial roof. We are committed to delivering superior craftsmanship and innovative solutions tailored to a variety of roofing materials.
Chopa Contracting Services
653 Bank St, New London, Connecticut
5.0 from 5 reviews
We do new construction or repairs any kind the roof or siding free stems
DC Property Management & Maintenance
(860) 912-6094 dcpmbuilders.com
43 Bank St, New London, Connecticut
5.0 from 3 reviews
Complete building services from the ground up, including roofing, siding, decking, windows, and other home repairs and renovations to meet your needs. Fully insured and licensed in Connecticut and Rhode Island. CT HIC 0664062 RI GC-22094
BP Builders | Roofer, Roof Replacement, Roofing Company & General Contractor
(860) 245-1708 bpbuilderct.com
Serving
4.9 from 216 reviews
At BP Builders, we specialize in providing top-notch roofing solutions for both residential and commercial properties across Connecticut. Our expert services include Residential Roof Replacement, Residential Roof Installation, Insurance Claims assistance, and Emergency Roof Repair. For our commercial clients, we offer exceptional Commercial Roof Restoration, Commercial Roof Coatings, and advanced Drone-Assisted Roof Inspections with Infrared Cameras.
Brennan Roofing & Contracting
(860) 710-2506 brennanroofingandcontracting.com
Serving
5.0 from 74 reviews
Family-owned veteran owned business. Looking to serve Connecticut residents with reliable service quality products warranties. We here to put all your worries aside with our top-rated roofing services. Our services range from roof installation to roof repair replacement that are tailored to your budget and the property's needs. We use premium quality materials for your roofs to make them damage and weather-resistant bringing back their optimal performance within no time. Call now and get a free quote.
Henderson Roofing
(860) 532-6804 www.johnhendersonconstruction.com
Serving
5.0 from 428 reviews
Founded in 2000 by John and Mandi Henderson, Henderson Roofing has become the trusted name for roofing and exterior remodeling services throughout Rhode Island and Eastern Connecticut. With a mission to deliver exceptional quality and unmatched customer service, we’ve built a reputation as the area’s leading roofing company after more than 25 years. Our unwavering commitment to excellence means when you choose Henderson Roofing, you’re choosing a company that guarantees your satisfaction every time - because that’s the Henderson Way.
Thomas Garbati Builders
(860) 443-1232 garbatibuilders.com
Serving
4.9 from 69 reviews
With over 28 years as a local contractor, Thomas Garbati Builders, LLC is well known and well respected. A local building contractor that handles residential roofs, windows, siding, decks, new construction, garages or complete renovation projects.
RSR Residential
(860) 800-5777 www.rsrresidential.com
Serving
5.0 from 49 reviews
RSR Residential, a family-owned and operated business, has been a New England staple for many years. Their team of experts provides exceptional customer service with a commitment to sealing comfort and quality on every job. RSR Residential specializes in a range of services, including roofing, siding, waterproofing, and window installation for both residential and commercial properties, across Connecticut and Rhode Island. Their highly skilled team offers quick response times, meticulous craftsmanship, and a dedication to excellence that sets them apart.
Strong Roofing
(860) 248-6730 www.roofcontractorct.com
Serving
4.9 from 58 reviews
At Strong Roofing, our roofing company takes pride in creating long-term relationships with our clients by always meeting demands and surpassing expectations. When you need expert repairs or exceptional installation service, we're the dependable team you can rely on. Whether you want a shingle roof or metal roofing, give us a call to start your roofing project!
JS & R Roofing LLC | Roofing Company | Roofer | Siding | Gutters
(860) 822-1204 www.jsandroofing.com
Serving
4.9 from 37 reviews
Our roofing company offers Repair / Replacement, Vinyl Siding & Gutter Cleaning Services To Homeowners & Business Owners in Waterford and throughout New London County Connecticut. JS & R Roofing is Southeastern CT's premiere roofing services experts. Family owned and operated since 2003. Quality roofing services guaranteed! JS&R Roofing has been located in Norwich since 2003. Let us put our experience to work for you. • Most jobs done in one day • All workers fully insured • Competitive pricing • Chimney work When it comes to guaranteeing a job is done right.... JS&R stands alone!
Rainey Construction
(860) 405-5776 raineyconstructionct.com
Serving
5.0 from 4 reviews
Roofing and siding since 1987 started my company in 1996. We do all types of roofing residential and commercial specializing in custom wood shingle built homes And custom copper work. Specialize in composite roofing systems. And factory warranty installations for EPDM, Architectural, Metal and Euroshield composite roofs. We work at the highest level in craftsmanship and want only satisfied customers for more than 25yr’s word of mouth business.
For a full roof replacement, the permit is not treated as maintenance and must be obtained before work begins. This distinction matters because it determines the review path and required documentation. In practice, the city expects a permit application that clearly shows you are replacing the entire roof, not just patching or re-covering a section. The process is straightforward when the proposal does not involve structural changes, but a complete replacement still travels through the permit channel to verify code compliance and proper installation.
When preparing the submission, you'll want to include a precise scope of work that aligns with the actual project. Identify the roof type you plan to install, such as asphalt shingles, metal, clay or concrete tile, or other materials common to the area's coastal homes. Provide complete contractor details, including licensing information and contact for inspection coordination. Clear drawings or sketches that show attic ventilation strategies, flashing details around dormers and chimney penetrations, and any changes to roof penetrations help the review move efficiently. Because coastal exposure accelerates wear on flashing and fasteners, it helps to specify products rated for salt spray and high humidity.
Review tends to move faster when no structural changes are proposed, but a full replacement still requires careful consideration of how the new system integrates with existing structure. Expect the plan reviewer to focus on the interface between roof assemblies and wall flashings, soffits, and vents. Be prepared to adjust details if the plans show gaps in ventilation or improper flashing transitions-these are common sticking points in older coastal homes with mixed sheathing or uneven decking.
City inspections are scheduled to occur during the installation and again after the work is completed. The inspector will pay particular attention to flashing integrity, proper ventilation placement, and overall code compliance before closeout. Coordination with the contractor for access and temporary stair or ladder safety is important, especially on upper stories or homes with attic spaces that must meet venting requirements. Understanding these steps helps ensure a smooth path from permit through to a signed final.
In Connecticut, roof claim activity rises after winter storms and summer thunderstorms, which matches New London's two-season damage pattern. The salt air, high humidity, and coastal wind combine to stress shingles, flashing, and joints in ways that aren't obvious until after the next severe weather event. Homeowners who saw frost-related cracking or wind-driven shingle lift in March should expect an uptick in activity when the next thunderstorm season arrives. Insurance decisions in these cycles can hinge on how well a roof stood up to those stress periods, and how promptly you respond with documentation after a storm.
Homeowners here should expect insurers to ask for roof age, prior repair history, current photos, and a contractor scope of work when storm damage is reported. These items aren't just routine checkboxes; they shape how the claim is evaluated and whether certain components are deemed repairable or require full replacement. If a roof has coastal corrosion or visible salt buildup on metal flashing, that detail should be described clearly in the claim narrative and supported with photos. The more precise you are about the roof's condition before the storm, the less room there is for dispute later on.
Because adjusters may request added inspections or documentation, New London owners benefit from photographing coastal corrosion, flashing failures, and storm-created openings before temporary repairs. Coastal exposures tend to accelerate wear on fasteners, seams, and flashings, so a dated photo record showing rusted nails, loose flashing seams, or blown-off ridge caps can help justify the need for a more thorough assessment. When possible, tie images to visible fixtures-chimneys, vent stacks, and dormer detailing-so the adjuster can see how the mass of the roof was built to manage salt spray and wind-driven rain.
Damage from coastal storms can be incremental: a small opening can expand after a few windy days, and salt corrosion can masquerade as acceptable wear to an inexperienced eye. A careful home documentation plan, timely communication with the insurer, and a clear contractor scope of work all reduce the risk of misclassification or delays. If an inspection reveals more extensive issues than anticipated, understanding the two-season pattern helps set expectations about whether a repair, retrofit, or replacement is in order, and how that choice may influence the claim outcome.
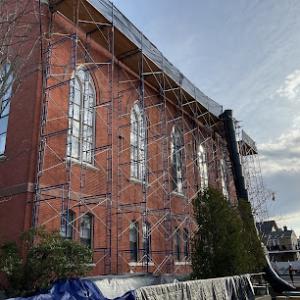
Flat and low-slope roofing matters in New London because the local contractor market shows meaningful demand for it, reflecting the city's mix of commercial buildings and some residential additions. Inspect these areas after heavy coastal storms and at seasonal transitions when freeze-thaw cycles can expose weak spots. Look for blisters, pooling water, or soft spots that hint at moisture intrusion. Because salt-laden humidity accelerates wear, pay extra attention to seams near parapets and along edge details where water can linger.
On low-slope sections, drainage is not optional-it's essential. Ensure gutters and scuppers are clear and sized for the wind-driven rain common along the harbor. Check the slope is adequate to move water away from seams and skylight curbs, especially where the roof meets the parapet. In salty air, debris packs quickly, so schedule proactive cleaning. If standing water remains after a rain, address the slope or add internal drains. Proper drainage reduces the chance of capillary rise into the deck and adjacent living spaces.
Harbor-area moisture and salt exposure make sealant condition, curb flashing, and drainage details more important on low-slope sections than on simple gable roofs. Inspect curb flashing with a close eye for corrosion at fasteners and for any hairline cracks in sealant joints. Re-seal or replace deteriorated elastomeric coatings, and confirm the flashing continues to wrap the parapet properly. Fasteners should be tight and resistant to rust; if you see corrosion or loosening, plan timely repairs before water penetrates.
Skylight leak risk is amplified by freeze-thaw movement and wind-driven rain, both relevant in this exposed coastal setting. Inspect skylight flashing annually, especially after storms, and watch for gaps at the frame where salt air can corrode seals. Ensure the skylight sits squarely and that the curb flashing overlaps the roofing membrane correctly. Consider upgrading to a vented or laminated unit if condensation becomes persistent in winter and early spring.
Create a routine that includes twice-yearly inspections of flat sections, with emphasis after heavy coastal weather. Keep a log of any sealant or flashing work, and verify drainage paths remain unobstructed. In New London, timely attention to low-slope details saves interior damage and extends the life of both roof and skylight components.
Find specialists in TPO, EPDM, and built-up flat roofing systems for residential and commercial properties.

The Superior Group - Roofing Company
(860) 792-5586 thesuperiorgroupllc.com
264 Vauxhall St, New London, Connecticut
4.9 from 17 reviews

Late spring through early fall is the preferred replacement window in New London because crews can avoid winter weather delays and complete work before heating season. That coastal exposure means storm season can interrupt schedules, so aim for mid-May to early October when wind and rain are less severe and daylight is longer. Winter installations are harder to schedule locally due to snow, cold-weather sealing limits, and the higher volume of emergency leak calls after storms. If a roof failure happens in winter, temporary fixes may be required, but full replacement will typically wait for a thaw window to ensure attic ventilation and flashing sealants perform as intended.
Coastal storms bring salt spray and high humidity, accelerating flashing wear and fastener corrosion. In a spring or summer replacement, metal flashings should be inspected first for pitting or verdegris-like spots, and any compromised joints should be addressed during installation. When fall arrives, the job should be paced to avoid rain-ended work weeks and to keep crews from rushing through critical stages. The salt-laden air can dull shingles and underlayment more quickly, so matching materials to the existing roof line and detailing for coastal exposure matters.
Fall timing requires extra attention to leaf buildup and gutter blockage, which can trap moisture on roofs and around eaves in New London's tree-lined neighborhoods. If a replacement occurs in late autumn, plan for a final clean of gutters and downspouts, plus a close inspection of drip edges and fascia boards. A clean downstream of debris helps prevent moisture invasion behind new flashing and underlayment, reducing the risk of slow leaks after the crew leaves.
Expect daylight-extending work days in late spring and summer, with shorter schedules during peak heat. Weather contingencies are part of the plan, so crews may stage materials on higher sections of the roof to minimize exposed underlayment. After the job, have a nearby downspout and ground surface checked for shingle granules or debris that could affect drainage and curb appeal in this harbor-adjacent neighborhood.
The local market strongly favors re-roofing specialists over niche new-build firms, so you'll hear more about teams with long track records handling complete roof replacements on storm-dcarried wear rather than single-service crews. Homeowners next to the water often describe the choice as trading a lower installation price for the confidence that a seasoned crew will match experienced flashing, underlayment, and ventilation decisions to the house's age and coastal exposure. In practice, that means you'll be comparing contractor portfolios that emphasize full tear-offs, shingle and underlayment durability, and long-term warranty alignment rather than quick, one-off fixes.
Quick response and cleanup are prominent hiring priorities in this area, reflecting storm-repair demand and the realities of occupied homes during repairs. Your neighbors expect a contractor to answer promptly after a call, stage temporary protection if a storm risk is present, and complete both the roof work and debris removal with minimal intrusion to daily life. When you're evaluating bids, ask for a timeline, a clearly defined daily work plan, and a description of how cleanup will be handled at the end of each workday. A crew that treats the yard, driveway, and entryways with care earns practical trust, especially for homes with salt-spray exposure near the Sound.
A meaningful share of contractors also handle chimney-related roof intersections, which matters on older southeastern Connecticut homes with more complex flashing points. The salt-laden humidity and freeze-thaw cycles wear metal flashings and masonry chases differently, so you'll want a team that can inspect the flashing at the chimney, vent stacks, and valley intersections and propose cohesive fixes rather than compartmentalized repairs. Look for a walk-through that prioritizes flashing integrity around chimneys, dormers, and skylight perimeters.
Every home has its own quirks: slate and tile roofs perched over older timber, or asphalt shingle crowns that sit close to decks and overhangs. Neighbors report better results when the contractor offers a detailed, site-specific plan that accounts for coastal humidity, potential salt erosion on fasteners, and the need to coordinate with any existing attic insulation or ventilation improvements. In short, homeowners tend to hire teams that present a comprehensive, homeowner-focused approach rather than a simple installation quote.