Last updated: Apr 19, 2026
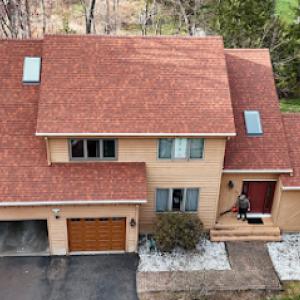
In this area, the winter rhythm is relentless: cold snaps followed by thawing cycles that push ice dams to the front of the roof risk. Heavy snow loads on shallow sections and gutters create a perfect setup for meltwater to back up behind shingles and flashing, especially where eaves are poorly flashed or where roof edges sag. When water freezes again, it locks into place, and every thaw cycles once more, forcing more water under the shingle layer and around chimney flashings. This repeated stress doesn't stay outside; the warm, humid summers afterward reveal itself as interior leaks during spring and early summer, when those hidden breaches finally show up as stained ceilings or damp walls. If your roof already shows signs of age or has aging flashing around chimneys and valleys, the danger rises quickly.
Winter's freeze-thaw pattern hides problems until spring, so you need to act on warning signs as soon as they appear. Look for small patchy ice buildups along the eaves and near valleys after a storm, especially if the attic is unusually warm or the ceiling in upper rooms feels damp in the morning. Stains on ceilings or walls that appear after winter storms indicate water has found its way through the roof assembly. If you notice icicles growing aggressively from the edges or see moisture on interior trims around dormers and chimneys, treat those as urgent signals. Weak flashing around a chimney, vent stacks, or where the roof meets siding is a frequent starting point for leaks in this climate.
If you discover an active leak, prioritize patching the interior entry point to slow further water intrusion while you arrange assessment. Keep gutters and downspouts clear so meltwater can shed away rather than backing up near the eaves. Do a quick exterior check: look for loose or cracked flashing at the chimney, valleys, and edge metal; inspect for exposed or missing step flashings along transitions; note any sagging areas where ice dams could form. Do not climb onto a snow-covered roof during winter conditions; instead, contact a local professional who understands Meriden's typical roof assemblies and the nuances of older housing stock. If you are able to safely clear light snow from the lower roof edge from the ground or a stable ladder, do so to reduce risk of ice dam formation, but avoid deep or icy patches that can lead to a fall.
Plan for robust eaves and flashing details that resist water intrusion through several freezing cycles. Prioritize proper chimney flashing integration, valley flashing, and roof edge metal that can shed water efficiently even after heavy snow. Reinforce attic insulation and roof ventilation to maintain a cooler attic temperature during prolonged cold snaps, reducing the intensity of meltwater that travels toward the edges. Consider a staged approach to roof upgrades that aligns with typical Meriden housing stock: targeting aging shingles, worn flashings, and inadequately vented attics first, then upgrading the edge detailing for maximum freeze-thaw resilience. In the months between winter seasons, address any detected damage promptly-small repairs now prevent larger, costlier failures once spring rain returns.
Spring through early summer storms bring more frequent roof exposure in this area, especially after a long winter. If a roof has compromised flashing around chimneys, vent pipes, or valley intersections, or if the underlayment shows wear from freeze-thaw cycles, a gusty May wind or a heavy spring rain can expose those weak points. In older housing stock common around town, the combination of masonry chimneys and aging flashing details means a small leak can become a larger problem quickly after a storm passes. You'll want to pay attention to attic signs as well: damp spots, new stains, or a musty smell right after a storm. Don't wait for an obvious ceiling drip to act.
When wind or hail-related damage is involved, insurers in this area commonly request a clear picture of the roof's age and condition, recent maintenance records, and a set of photos that shows both the overall roof and close-ups of flashing and any damaged areas. Having those ready before you call can speed things along. Photos should cover ridges, flashing around chimneys, skylights, vents, and any hail-hit spots. If there are prior repairs, note them so the adjuster can distinguish between pre-existing conditions and storm-related damage. A well-organized file with notes on when repairs were done and what materials were used helps the review go smoother.
Homeowners should expect an insurer inspection after you file the claim. The inspector will assess the current roof condition, the extent of damage, and whether the material cost can be depreciated. Depreciation affects repair-versus-replacement decisions after storms, since some materials on older roofs might be deemed less valuable from an insurer's perspective. This can influence whether the claim funds a full replacement or just targeted repairs. Keeping your roof's maintenance history accessible helps demonstrate ongoing care and may support a stronger case for needed replacements in the event of widespread damage.
First, document the damage in real time after a storm passes: note leaks, soaked insulation, and interior staining, and photograph any visible roof issues from a safe vantage point. If you can safely access the attic, check for daylight peeking through or moisture along rafters. Contact your insurer promptly, describing the storm's timing and the affected areas, and ask for guidance on preferred documentation. If a contractor is already addressing leaks, coordinate with the insurer so the work aligns with the assessment timeline and avoids duplicate claims. Keeping a simple maintenance log-dates of cleanings, minor repairs, and flashing resealing-helps during the claim review and supports a clearer path to either repair or replacement depending on the damage documented.
Connect with contractors who help homeowners navigate the claims process from damage assessment to final approval.
V. Nanfito Roofing & Siding
(203) 639-1634 www.vnanfito.com
558 Hanover St, Meriden, Connecticut
4.6 from 201 reviews

Heritage Home Roofing & Exteriors
(860) 990-0689 www.heritagehomeroofing.com
Meriden, Connecticut
5.0 from 21 reviews
Best Connecticut Roofing
(203) 442-4165 www.bestconnecticutroofing.com
35 Meridian St, Meriden, Connecticut
5.0 from 250 reviews
Best Connecticut Roofing has been in business since 2009. Our name reflects how we feel about our company and how we operate. We are a hard working crew that provides a quality service and product. We use the best products to give best guarantees to the owners, we install lifetime guarantee shingle. If we touch your roof we bring up to the building code, roofing code, don’t settle for less call the bes 203-442-4165 Roofing specialist Licensed & Insured Complete Clean Up Reliable Affordable On Time Satisfaction Guaranteed! You are in good hands. Peace of mine.
Valley Roofing
(203) 560-1818 www.valleyroofingllc.net
Meriden, Connecticut
5.0 from 56 reviews
With over 35 years of experience, Valley Roofing, led by owners Tony and Eliza Palmieri, provides top-quality roofing services to Southington, CT, and surrounding areas. Specializing in both residential and commercial roofing, our team is committed to delivering reliable, on-time, and affordable solutions. From roof repairs to complete installations, we prioritize customer satisfaction and precision. Trust Valley Roofing for expert craftsmanship and personalized service, backed by decades of expertise in the roofing industry.

The Roof Girl
(203) 463-5075 www.theroofgirl.net
Meriden, Connecticut
4.9 from 133 reviews
The Roof Girl, LLC is a woman-owned business with a focus on providing exceptional, highly personalized customer service and superior workmanship. We strive to enhance the value and your enjoyment of your home. Our commitment to high-quality roofing is backed with a 12 year workmanship warranty. In order to personalize each roof, The Roof Girl is proud to offer all customers a detailed proposal outlining the job, tailored to the customer's needs and taste. We make roofing fun! It's a whole new way to do roofing.
Ace Top Roofing
(475) 302-9209 acetoproofing.com
425 S Broad St, Meriden, Connecticut
5.0 from 48 reviews
Ace Top Roofing delivers reliable, high-quality roofing services for homeowners and businesses across Connecticut. We specialize in full roof replacements, repairs, storm-damage restoration, and offer expert gutter and siding services to protect and elevate your property. Our team is known for honest communication, dependable craftsmanship, and using premium materials that stand the test of time. As a fully licensed and insured company, we show up with integrity, clear expectations, and workmanship you can trust. Whether you need a minor repair or a full exterior upgrade, Ace Top Roofing is committed to keeping your home safe, strong, and looking its best.
ENH Restoration
(203) 453-5571 www.enhrestoration.com
Meriden, Connecticut
5.0 from 46 reviews
ENH Restoration is your trusted roofing contractor, gutter service, and siding specialist proudly serving the Connecticut Shoreline. We provide professional roof installation, roof repair, roof cleaning, gutter replacement, and siding services for residential and commercial properties. Fully licensed and insured, our team delivers top-quality results for new construction, remodeling, and restoration projects. From small repairs to full exterior upgrades, ENH Restoration ensures your home or business is protected and built to last. Contact us today for a free estimate and let your roof shine!
KLS Construction
(203) 565-9188 klsconstructionllc.com
Meriden, Connecticut
5.0 from 44 reviews
KLS Construction is a family-owned business specializing in roofing, siding, and windows. We are well trusted and ensure that our customers are happy and satisfied with our work. KLS Construction prides itself on professionalism.
International Home Improvement
(203) 346-8087 inthomeimprovement.com
Meriden, Connecticut
5.0 from 36 reviews
Inthome Improvement is a company dedicated to transforming residential and commercial spaces with high quality solutions in Roofing, Interiors, Gutter and Siding. With years of experience in the industry, we pride ourselves on offering exceptional services that exceed our clients' expectations. This company began as a father and son collaboration, where we have served the New York and Connecticut areas for over 13 years. This gives us credibility with our clients by offering quality service.
Starter Home Improvements
(203) 395-9675 www.starterhomeimprovements.com
Meriden, Connecticut
4.9 from 52 reviews
Roofing Roof Vinyl Siding Gutters Doors WIndows Flooring Home Improvements Remodeling Contractors Oxford Seymour New Haven Southbury Waterbury Shelton CT Connecticut

Crown Home Improvement
(203) 528-6750 crownhomeimprov.com
Meriden, Connecticut
4.9 from 33 reviews
Crown Home Improvement is a full-service commercial and residential roofing company serving all of Waterbury, CT. We focus on providing our customers with the right information about their property, issues affecting their roof, and the ideal solutions for their particular issue. Our team emphasizes the highest quality of service and most substantial return on investment for the customer on every single job we do.

AAA Standard Siding
(203) 675-0110 www.aaasidingct.com
Meriden, Connecticut
5.0 from 30 reviews
Welcome to AAA Standard, your premier option for home remodeling and renovations in Orange, CT and the surrounding area. AAA Standard can handle all your home improvement needs in one place, ensuring that you get a property that looks and works in all the ways you want it to. Here at AAA Standard, we are committed to crafting every aspect of your home to meet your every expectation.

Duration Exteriors
(860) 550-3481 www.durationexteriorsct.com
Meriden, Connecticut
5.0 from 29 reviews
Roofing & Siding Experts. We work with all insurance companies.
Evans Commercial Roofing
(203) 886-9851 evanscommercialroofingct.com
54 Sophia Ct, Meriden, Connecticut
5.0 from 29 reviews
Residential and commercial roofing contracting Company fully licensed and insured serving all of Connecticut and Westchester County New York
In this area, the mix of roof styles and built-up ages means you'll see a broad spread in what different homes pay. Asphalt shingles are the dominant, lower-cost option, with a local range of 350 to 700 USD per square, which makes them the practical starting point for many updates or a first-pass re-cover. Slate sits at the top end, generally 1200 to 2000 USD per square, reflecting the durability and labor intensity of handling heavy, natural stone tiles on older rooflines that often feature tight valleys and chimney transitions. When a Meriden home leans into specialty materials like clay or concrete tile, wood shingles, synthetic composites, or slate, the project can quickly widen beyond the basics, especially if the job requires careful tear-off, deck prep, or flashing transitions around unique rooftop features.
Asphalt shingles are the go-to for affordability and decent here-and-now performance in freeze-thaw winters, but you'll notice the regional impact when spring storms expose leaks or when ice dam vulnerabilities demand extra attention to attic insulation and eave detailing. Slate, while premium, is favored on certain older homes with existing slate rotting through, because it preserves the historical look and long service life-yet the weight and the need for skilled slaters push the price up. Concrete and clay tile introduce their own tradeoffs: longer-lasting but heavier, with a higher deck prep requirement and more meticulous flashing around chimneys. Wood shingles or shakes bring a classic feel but can escalate cost if fire-retardant treatment or tighter maintenance is needed after winter exposure. Synthetic or composite shingles sit between asphalt and premium options, offering decent durability at a mid-range price but sometimes requiring more careful installation around older flashing details.
Meriden experiences a window when most roofs get done: spring through early fall. That seasonality tightens contractor availability after winter damage and spring storm surges, which can push both pricing and lead times higher. If a job drags into peak season, you may see longer wait times and tighter scheduling, especially for complex re-roofs that involve specialty tear-offs, deck prep, or delicate flashing transitions over older roof features. Planning ahead in late winter to early spring helps lock in crews before the busiest months, and it gives you a chance to compare material options without rushing through critical details like chimney and vent flashing.
Start with asphalt if price is the guiding factor, but keep an eye on the roof's age and existing flashing around chimneys and valleys. If your roof will need tear-off or a transition between old features, budget for extra deck prep and flashing work, which can push costs up quickly in any material category. For homes with distinct architectural details or historic shingles, factor in the potential premium associated with slate or clay choices. In practice, coordinating material choice with the right upgrade to attic insulation and ventilation helps mitigate winter ice dam issues and reduces long-term risk for Meriden homes.
In this city, most full re-roofs require a building permit from the City of Meriden Building Department before work begins. The permit process helps ensure that roofing work meets local codes and addresses winter conditions, including proper ice dam mitigation and flashing details around chimneys. Typically, the contractor handles the permit submission on the homeowner's behalf, taking care of the paperwork and scheduling. You should expect to provide the project scope, a basic roof plan, and any relevant details about existing roof structure. Having your contractor manage the permit can streamline timelines, but it's wise to keep a copy of all submitted documents for your records and to confirm the inspector's contact information before work starts.
Permits are not just a box to check; they formalize the steps needed to weather the freeze-thaw cycles that this area experiences. The approval process often includes verification that roof ventilation, insulation, and underlayment meet code requirements, which directly influence how well the roof withstands winter ice dams and moisture intrusion. In some instances, the city will request clarifications or additional details about attic ventilation, eave protection, and egress clearance around roof penetrations. If unusual roof features exist-such as exceptionally tall structures, dormers, or complex chimney flashing-the plan review may be more thorough to ensure all elements are properly integrated. The goal is to prevent leaks and ensure long-term durability through typical Meriden winter conditions.
Meriden may require plan review for non-standard roofing materials or unusual roof height. This is particularly relevant if the chosen materials diverge from common applications for residential homes or if the roof features require specialized flashing details around chimneys, skylights, or vent stacks. When plan review is triggered, expect a formal review step where the structural implications, load considerations, and water shedding characteristics are examined. This can affect scheduling, so discuss potential timelines with the contractor early in the process. If plan review is not triggered, the city still expects accurate drawings and specifications to accompany the permit so inspectors can verify compliance during rough-in and final inspections.
Inspections typically include at least a rough-in and a final completion review. The rough-in inspection often occurs after major components-such as roof deck, underlayment, and flashing details-are installed but before the final finishing layers are completed. This step ensures that the installation aligns with permit plans and code requirements, including proper bleed-through prevention and adequate reinforcement around chimneys and venting. The final inspection confirms that the entire roof system is properly installed, watertight, and capable of performing through Meriden's winter conditions. Prepare for inspector questions about attic ventilation, insulation continuity, and any deviations from the permit plans, and have all manufacturer installation guidelines on hand for reference.
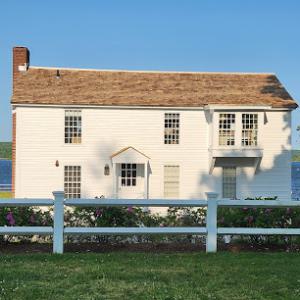
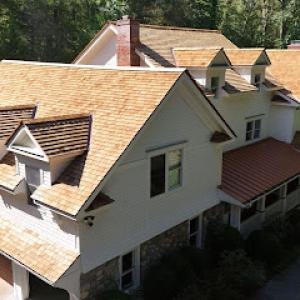
Meriden homeowners commonly choose among asphalt shingles, slate, wood shingles or shakes, synthetic composites, and smaller shares of clay and concrete tile. Each option has a distinct balance of weight, durability, and upkeep that matters when the winter freeze-thaw cycle and spring storm leaks are part of the yearly rhythm. Asphalt shingles remain practical for many later-century homes with moderate roof pitches, offering straightforward maintenance and repair work around chimneys and flashing details. Slate, while heavier and more demanding to install, stays a durable traditional choice for older houses with thick rooflines and sizable chimneys. Wood shingles or shakes bring a timeless look but require closer attention to moisture trapping and periodic treatment, particularly on exposed elevations. Synthetic composites provide a lighter, more uniform alternative that can mimic slate or shake textures without the same weight, while clay and concrete tiles are best reserved for crews comfortable with heavier roof assemblies and their impact on attic ventilation and structural load.
Slate remains locally relevant in this part of Connecticut, so replacement planning often involves deciding between preserving a heavy traditional roof system or switching to a lighter alternative. If the existing roof supports the load, slate can preserve the original profile and add long-term durability against salt-logged winters and thaw cycles. If a home has marginal attic strength or limited access for a careful slate retrofit, a lighter option such as synthetic shingles or certain high-performance composites can deliver similar waterproofing and curb appeal with less structural strain. When choosing between heavy slate and a lighter substitute, consider how winter ice dam prevention and expansion joints around the chimney will behave over several cycles of freeze-thaw. A lighter system may respond more flexibly to movement and reduce the risk of hidden hinge failures in flashing.
Material choice in Meriden should account for winter freeze-thaw stress, summer humidity, and whether the home has roof details that are harder to waterproof with brittle or heavy coverings. Older homes often feature complex chimney-to-flashings connections, vent stacks, and skylight penetrations where ice dams tend to form first. For these features, prioritize roof systems with robust flashing compatibility and proven performance around irregular shapes. If you opt for slate, plan for meticulous flashings and professional slate installation to maintain watertight transitions at chimneys and dormers. For synthetic or architectural shingles, ensure the product you select has good compatibility with existing roof geometry and can be integrated with accurate drip edges and snow guards. In all cases, confirm that the chosen system pairs effectively with attic ventilation and insulation to slow ice dam development and support durable sealing through the seasons.
Chimneys in this area carry extra risk because mortar joints and flashing meet the roofline where ice dams tend to form first. Homeowners often see cracked mortar, loosened flashing, or gaps where soot and moisture hide behind brickwork. A small failure here can cascade into attic leaks and mold growth, especially after thaw/freeze cycles. Inspect visible flashing at least annually, and pay attention to any staining or spalling along the chimney chase. If flashing shows wrinkles, gaps, or corrosion, treat it as a red flag and bring in a roofer who specializes in masonry transitions to avoid costly water intrusion later.
Spring storms expose the weak link between shingle field quality and perimeter detailing. Water can back up at the flashing, around vents, and along the chimney crickets or cricket pads that were never fully sealed. Do not rely on shingles alone to shed water during heavy rains; compromised flashing can allow moisture to migrate into eaves, soffits, and knee walls. Regularly clean clogged gutters and ensure drip edge seals are intact, but the priority is to reseal and reflash where the roof plane meets brick or stone features.
Skylight penetrations are a common local headache because curb details and flashing are what fail when ice builds up. Look for cracked sealant, displaced curb mounting, or worn head flashing where the unit meets the roofing plane. A stubborn leak may travel a long way before showing up inside. When inspecting, check the curb installation, membrane continuity around the skylight, and the transition from curb to shingles. If the skylight has seen repeated condensation or staining, consider professional resealing or curb replacement to restore a reliable seal.
Treat every chimney, vent, and skylight as a potential water entry point after winter. Walk the roof with dry, clear conditions, focusing on the joints where masonry meets roofing, as well as any unusual ice dam patterns along eaves. Contractor selection should emphasize experience with residential brickwork and careful flashing details, not just shingle replacement. In Meriden, subtle failures in these areas are often what precede larger, costly water damage.
Find contractors experienced in skylight installation, flashing, and leak repairs to bring natural light into your home.

Best Connecticut Roofing
(203) 442-4165 www.bestconnecticutroofing.com
35 Meridian St, Meriden, Connecticut
5.0 from 250 reviews


Spring through early fall offers the most reliable installation conditions for typical Meriden roofs. You'll encounter milder temperatures, standing daylight, and less frequent storms compared to the heart of winter. This window makes it easier to safeguard interior spaces from exposure, manage sealants and underlayment properly, and ensure full shingle adhesion. For homes with older stock, this period also aligns with calmer scheduling for crews who need to address chimney joints and flashing details safely.
Winter brings ice, snow, and stiff winds that challenge any roof project. When a leak is detected or urgent stabilization is needed, temporary measures can mitigate interior damage, but full replacement quality can suffer until temperatures rise. If a winter emergency arises, focus on tarping vulnerable areas, clearing ice dams where safe, and planning a careful schedule for the first open stretch of dry, above-freezing days. Expect potential delays if cold snaps persist.
Summer heat and humidity in Meriden can stress materials and worker conditions, especially on roof decks exposed to strong sun. Prolonged heat may affect fastener performance and material handling, so crews still need to pace work, manage ventilation inside attic spaces, and schedule rest breaks. Early mornings or late afternoons often become the work windows to minimize heat exposure and to protect around existing attic insulation. Proper hydration and material storage on site help maintain quality.
As the frost recedes, establish a clear plan for addressing ice dam prevention and long-term sealing. Spring is a good time to inspect attic ventilation, insulation, and gutter systems, since these factors drive freeze-thaw resilience. Coordinating around spring storms lowers the risk of last-minute leaks during gradual roof bring-ups. Aligning with a season that allows thorough flashing repairs and chimney chase work helps reduce winter vulnerability.
Older houses in the area routinely feature chimney details and complex flashing that demand meticulous attention. The best season supports careful reseaming, joint sealing, and shingle-to-flash transition work without hurried compromises. When planning during shoulder seasons, prioritize flashing replacements or upgrades to avert spring leaks from residual winter ice dam activity. Properly addressed chimney Tegs and step flashing substantially boost winter resilience.
When you can't wait, these contractors offer fast response times to stop leaks and prevent further damage.
Certified Roofing Pro
(203) 332-7663 www.certifiedroofingpro.com
Meriden, Connecticut
4.7 from 14 reviews

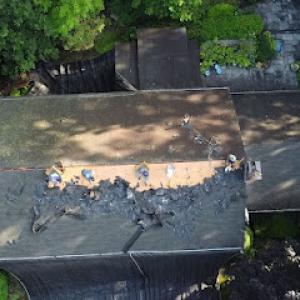
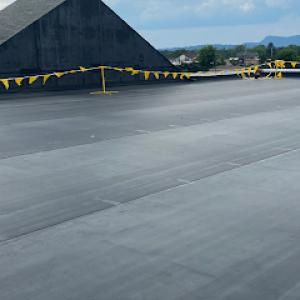
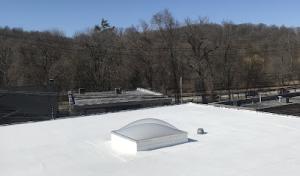
In Meriden, flat-roof specialization is active even though the city's dominant residential materials are steep-slope products. You'll see local contractors who focus on built-up, modified bitumen, and single-pply membranes able to work quickly at midweek roof-access points, gutters, and parapets. When a flat section ties into a steep-slope roof, expect mismatched drainage and flashing detail challenges that demand careful detailing at transitions, curbs, and HVAC penetrations. Plan on a thorough edge and flash inspection after heavy storms, since small defects here tend to escalate along the roof plane.
Meriden also has a smaller but real solar-roofing specialty presence, so some homeowners will need roof replacement planning coordinated with mounted or integrated solar systems. If a panel upgrade or replacement is on your horizon, map current penetrations, verify racking compatibility with your roof type, and note cable routes that cross the roof deck. A clean, well-sealed interface between the roof and mounting hardware minimizes edge leaks and ice-dam buildup around rails and end caps. In homes with flat portions, consider how solar modules will interact with scuppers, drains, and parapets to avoid creating new high spots for snow accumulation.
Low-slope sections and solar penetrations in Meriden should be evaluated carefully after winter snow stress and spring leak events. After a heavy winter, check for ice dams near the base of penetrations, along flashing seams, and at transitions from flat to steep areas. Use a ladder-assisted interior check for signs of moisture staining near ceiling lines under flat roofs and around skylights or vent curbs. Schedule a proactive moisture survey if recent storms produced unusual staining or damp spots along the solar array or edge details.
Find specialists in TPO, EPDM, and built-up flat roofing systems for residential and commercial properties.
Certified Roofing Pro
(203) 332-7663 www.certifiedroofingpro.com
Meriden, Connecticut
4.7 from 14 reviews


In a market dominated by re-roof projects, the right contractor understands Meriden's winter ice dams, freeze-thaw cycles, and spring storm quirks. Look for a crew that has a proven track record with tear-offs, thorough cleanups, and work around occupied homes. A real local presence means crews can coordinate around neighbors, street parking, and chimney-flashing detail work that often triggers leaks after a heavy melt or hail. The goal is a tried-and-true workflow that minimizes disruption while ensuring every layer is removed, inspected, and reinstalled with attention to existing venting and attic insulation.
Response time is a practical hiring signal in this climate. If a contractor returns calls promptly and can dispatch someone to tarp a leaking area before a full replacement, that reflects preparedness for Meriden's typical spring leaks. Family-owned firms often show up with longstanding neighborhood relationships, which helps when coordination and cleanup need a personal touch. However, keep expectations clear: site protection, temporary tarps, and a defined schedule matter just as much as the final roof installation.
Ask for a written plan that covers tear-off sequence, dust and debris containment, and how crews protect siding, windows, and chimneys during work. Confirm who will manage the site daily, how waste will be removed, and how access will be maintained for occupied homes. Request references from local projects with similar roof types and heights, and verify that the crew has documented experience with complex flashing details around dormers, chimneys, and skylights. A deliberate, clear workflow isn't optional-it's essential for a Meriden re-roof.
Get a clear picture of your project costs upfront - no commitment required.


Next Gen Construction
(203) 623-4954 ngcroofingservices.com
Meriden, Connecticut
5.0 from 14 reviews