Last updated: Apr 19, 2026
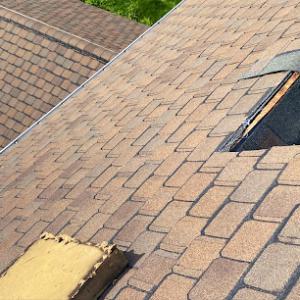
Worcester's cold winters regularly combine snowfall with freeze-thaw cycles, making ice dam formation a primary roof risk in the city. As meltwater refreezes at the eaves, dam buildup pushes water under shingles and into the attic or along interior ceilings. In double-digit ice months, a single warm spell followed by a cold snap can create thick, stubborn ice that traps water and accelerates insulation and decking damage. If moisture is allowed to persist behind ice dams, wood rot, insulation saturation, and enlargement of existing leaks become almost inevitable. This isn't theoretical: every heavy winter, a number of older homes experience sudden indoor leaks that start as a small drip near a dormer or chimney before spreading across ceiling planes.
Older Worcester homes frequently feature rooflines with chimneys, dormers, and extended eaves, all of which create vulnerable flashing and edge conditions when winter icing runs high. Chimney chases cut across the roof deck and often rely on metal flashing that can corrode or lift with repeated freeze-thaw cycles. Dormers introduce intersections where roof planes meet walls, creating complex flashing details that are easy to misseal in winter. Eaves and overhangs are exposed to drifting snow, cold wind, and rapid temperature shifts, setting the stage for edge damage and gutter separation. When ice dams form, those weak points become failure points, letting meltwater penetrate under shingles and into attic spaces where insulation is already strained by the cold.
Replacement timing in Worcester is often constrained by snow cover, frozen decking concerns, and winter emergency leak conditions rather than by summer-only planning. When temps stay consistently below freezing, you cannot safely work on certain roofing components without risking further decking damage or triggering new leaks mid-ice season. This means that proactive work for ice dam prevention-down to flashing integrity, insulation depth, and ventilation-needs to be scheduled with winter realities in mind. If a roof is currently hosting recurring leaks or visible water stains, address it promptly, understanding that a full, proper repair may require weather windows that align with thaw periods and dry days.
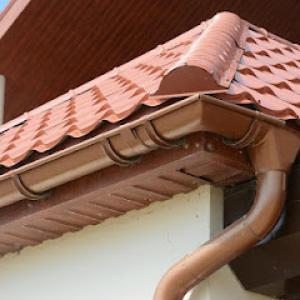
Start by inspecting likely dam sites around chimneys, dormers, and eave lines for loose or damaged flashing. If meltwater is entering the attic, locate and seal obvious gaps along ridge and eave lines and ensure attic ventilation is not obstructed by insulation without breathable outlets. Clear gutters and downspouts of debris so that drainage pathways remain free during thaw cycles, and consider temporary ice barriers or roof patches that prevent further water ingress until a permanent fix can be completed in safer weather. For homes with a history of ice dam issues, plan a targeted retrofit that improves flashing continuity, seals edge conditions, and enhances roof and attic ventilation to break the cycle of freeze-thaw damage.
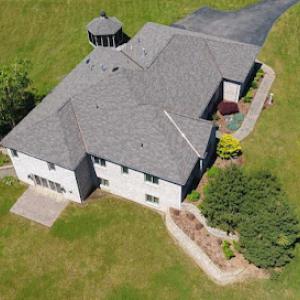
Asphalt shingles are the dominant practical choice for the city's traditional pitched roof stock. The broad re-roofing demand across older homes means that asphalt shingles are often the most reliable way to restore a roof that has faced repeated freeze-thaw cycles and ice dam challenges. When selecting asphalt, prioritize architectural or dimensional profiles that help shed snow and channel water toward gutters. In practice, look for a system with a high-performing underlayment and properly sealed valleys, as Worcester winters push water into the fascia and eaves. A cautious approach to installation around dormers and chimney penetrations reduces the chance of ice dam formation in colder snaps. The goal is a layered, tensioned roof that resists wind uplift while staying compatible with the house's traditional aesthetic.
Slate remains locally relevant because the city has older historic-era housing where replacement decisions may involve preserving the original roof character. If the existing roof is slate, keeping or carefully repairing the material can preserve curb appeal and long-term durability. In newer slate repairs or replacements, match the color and texture to the surrounding structures to maintain the historic look. Slate performs well under freeze-thaw conditions when installed with proper underlayment and reliable flashing details at valleys, chimneys, and skylights. Pay particular attention to batten spacing and fastener corrosion, since Worcester winters expose slower corrosion cycles and potential eave-line issues. For historic homes, a careful contractor will balance authenticity with modern underlayment and a water-resistant barrier to address ice dam risks without compromising the roofline's character.
Metal roofing is a growing fit for Worcester's snow-shedding needs, but detailing around penetrations and transitions matters because freeze-thaw movement can expose weak installation work. In practical terms, metal shines where steep slopes and heavy snowfall are common. Look for concealed fasteners or corrosion-resistant screws, and ensure flashings at chimneys and skylights are continuous and well-sealed. Pay special attention to ridge and valley terminations, as ice buildup often starts at these joints. A metal roof can shed snow more effectively than other materials, reducing ice dam potential, but the transitions to gutters, soffits, and downspouts must be made with precision. If the home has multiple generations of roofing or a mix of materials, a thoughtful integration plan prevents gaps where meltwater can back up and refreeze.
In Worcester, the best choice balances how a roof looks on the street with how it performs under a freezing, snow-heavy climate. For most traditional sloped homes, a well-installed asphalt system with modern underlayment offers straightforward maintenance and predictable performance. For historic or character-rich structures, slate preserves the original look and can endure for generations if properly installed and ventilated. If the priority is rapid snow shedding and a modern profile, metal provides strong winter performance with careful attention to flashing details. Regardless of material, ensure proper attic ventilation, a robust drip edge, and sound attic-to-roof drainage so meltwater doesn't linger and refreeze at eaves, which is a common Worcester concern.
Chimney-related roof work is particularly critical on aging sloped roofs where a masonry chimney rises through multiple roof planes. The joint where brick or stone meets shingles or metal is a natural weak spot, especially when mortar has begun to crumble or the chimney cap is missing. In this climate, expansion and contraction with each freeze-thaw cycle tug at the flashing, causing slow drips or sudden leaks after a heavy thaw. A compromised flashing seam can cascade into rot in the sheathing and attic framing if left unchecked.
In the winter, Worcester's pattern of repeated freeze-thaw events drives stress right at the transitions around chimneys and skylights. Flashing that seems sound in September may reveal loose legs or lifted seams after a January thaw, when refreezing ice plugs drainage and pushes water laterally into vulnerable corners. Skylight curbs and sidewall transitions share the same fate: poorly sealed fasteners loosen, sealants crack, and water finds its way around the sealant line rather than over it. Chains of failure often start as a small bead that grows into a stain.
Autumn leaf buildup can hide drainage issues near valleys, skylights, and chimney saddles before winter weather exposes them as leaks. Leaves clog gutters and downspouts, forcing water toward the roof's low points and into joints that are already stressed by temperature swings. In homes with decorative valleys, consider clearing leaf buildup and inspecting the metal or shingle transitions where water concentrates. A quiet drip behind a chimney saddle may be an early warning that drainage is blocked and requires attention before the first heavy snow.
Valleys and saddle flashings near chimneys are common failure points when aging shingles loosen or the metal is dented by hail. Ice dams tend to form where water has to climb over these obstructions, pooling at the base of the chimney and seeping inward. Check the intersection of metal flashing with the vented components around skylights; any gap or crease invites moisture intrusion. If flashing has any lift, even at corners, moisture will exploit it during thaw cycles, leading to interior staining or attic condensation.
Schedule fall inspections that focus on the chimney chase, flashing joints, skylight curb-to-roof transitions, and the lead edges of valleys. Look for hairline cracks in sealants, rust along metal flashings, or loose shingles at the base of the chimney. Small repairs now prevent larger damage later, reducing the risk of interior leaks during the next freeze. A proactive approach keeps heat loss and moisture migration in check, protecting the home's structural integrity through Worcester's demanding winters.
Find contractors experienced in skylight installation, flashing, and leak repairs to bring natural light into your home.
Pinkman Roofing
(508) 233-7411 www.pinkmanroofing.com
110 Winfield St, Worcester, Massachusetts
5.0 from 123 reviews
Seven Hills Roofing
(508) 414-8305 www.sevenhillsroofing.com
100 Canterbury St, Worcester, Massachusetts
4.8 from 119 reviews
Altitude Roofing
(508) 963-7794 altituderoofingma.com
241 Wildwood Ave, Worcester, Massachusetts
4.8 from 44 reviews
In this city, the price you'll see for a roof replacement moves with whether you're installing standard asphalt shingles or tackling specialty work on slate, tile, or metal roofs that appear on pockets of the older housing stock. A straightforward asphalt re-roof is typically the most economical path, while slate or clay tile demands more material handling, longer teardown, and careful installation to avoid future failures on steep slopes. The range reflects that split: from affordable asphalt to premium materials, with metal, concrete tile, or slate landing toward the higher end. The exact total depends on square footage, existing decking condition, and your roof's complexity, but in practice Worcester projects often run higher than the national average when steep pitches and large, multi-gabled layouts are involved.
Steeper roof pitches are a common feature on older, traditional homes here, and that changes the math. More time is needed for staging, safer access, and careful material management on upper cornices and chimneys. The impact isn't just on labor hours; it also changes equipment needs, potential for weather-related delays, and the risk profile for fall protection and protection of interior spaces. On trouble spots like multiple skylights or intricate ridge work, expect additional cost for extra flashing, ice dam prevention measures, and durable underlayment. In short, a similar-looking job on a steep roof will push pricing above a flatter, simpler layout.
Winter damage surges, followed by spring weather volatility, which locks in more scheduling pressure. In Worcester, that means fewer available crews and tighter windows to get tear-off and re-roof work completed before the next freeze-thaw cycle. If a project stretches into spring with rain or warm spells that melt and refreeze, you may see longer tear-off times and potential for temporary repairs that stretch the budget. Planning ahead for early spring start dates and staging contingencies helps stabilize both timing and pricing, reducing the risk of emergency calls that spike costs.
For standard asphalt, expect the affordable end of the range per square and a relatively quick tear-off with straightforward installation. For metal, concrete tile, or slate, the price per square climbs as specialty labor, fasteners, and precision flashing become essential. Clay tile sits between asphalt and slate in terms of complexity but still commands higher installation time and care due to brittleness and breakage risk. Each profile benefits from a pre-project assessment that maps ridge vents, chimney flashing, and drainage paths to forecast potential added costs.
Start with a clear assessment of roof condition, noting any deck rot or compromised flashing that could require early replacement. If the home has a particularly steep pitch or a historic appearance with original materials, set aside extra for careful handling and material matching. Given the variability driven by material choice and roof geometry, you'll want a few competitive bids that itemize tear-off, disposal, underlayment, flashing, and attic protection costs. This approach helps you compare not just the sticker price, but the scope and timeline that fit Worcester's climate realities.
Hemlock Roofing
(774) 418-3724 hemlockroofingco.com
2 Richmond Ave apt 2R, Worcester, Massachusetts
5.0 from 214 reviews
Family owned Roofing Contractor specializing in all kinds of Roof replacements ! Shingle , metal , slate , tpo/Rubber
Pinkman Roofing
(508) 233-7411 www.pinkmanroofing.com
110 Winfield St, Worcester, Massachusetts
5.0 from 123 reviews
At Pinkman Roofing, we bring over 20 years of combined experience in roofing, siding, skylights, gutters, painting, and solar removal. Our team is committed to delivering high-quality craftsmanship, reliable service, and tailored solutions for residential and commercial projects. Trust us to bring expertise and professionalism to every job.
Tri-State Construction
(508) 751-8585 tristateconstruction.org
5 Brussels St BLDG B, Worcester, Massachusetts
5.0 from 248 reviews
Tri-State Construction is where you will get the best value, service, and warranty on the highest quality roofing, vinyl siding, and windows. We are a licensed construction contractor in Massachusetts, Rhode Island, and Connecticut that constantly delivers outstanding home improvement services and achieves customer satisfaction. Our mission is to provide top-quality, affordable roofing and siding installation services.

JPV Roofing & Construction
(508) 397-3272 www.jpvroofing.com
Worcester, Massachusetts
5.0 from 167 reviews
JPV Roofing & Construction provides roofing services to Worcester County, Connecticut & Massachusetts

Seven Hills Roofing
(508) 414-8305 www.sevenhillsroofing.com
100 Canterbury St, Worcester, Massachusetts
4.8 from 119 reviews
Seven Hills Roofing Contractors at 100 Canterbury St, Worcester, MA, with 30 years of experience, offers roof repair, replacement, and installation for residential and commercial properties. Specializing in emergency repairs, using high-quality materials like asphalt shingles. Expert in commercial roofing and flat roof systems with materials like EPDM, PVC, and TPO. Prompt, professional service, "100% Satisfaction Guarantee".
A Eagle Gutters
(508) 523-0414 www.aeaglegutters.com
210 Park Ave, Worcester, Massachusetts
4.8 from 80 reviews
Eagle Gutters provides reliable gutter installation, cleaning, and maintenance services designed to protect your home from water damage. We offer durable gutter and downspout systems, seamless gutter options, and premium materials built to last. Our team focuses on quality workmanship, quick turnaround, and long-term performance—keeping your property safe and looking its best. Whether you need a new gutter system or a seasonal cleaning, Eagle Gutters delivers dependable service you can count on. Call today to schedule your gutter service or request a free estimate!
G&O Construction & Roofing
(774) 243-9700 www.gandoconstruction.com
25 Kansas St, Worcester, Massachusetts
4.9 from 55 reviews
G&O Construction and Roofing is your top roofing companies in the area. Our roofing contractors are highly skilled to handle any roof repair job or full roof replacement. We're one of the top roofing companies in the area because of our high quality workmanship and industry top roofing warranties. There is no roof we can't handle. From residential roofing to commercial roofing we're your go to when your looking for affordable roofing options. So when your looking for a roof repair near me company call us for your free roof estimate. We handle metal roofing, regular roof shingles, sheet metal roofing, aluminum roofing and all other types. So contact us today for your FREE roof estimate. Proudly serving the community for over decade!
Kidd-Luukko Corporation
(508) 799-9500 kidd-luukko.com
23 North St, Worcester, Massachusetts
4.8 from 54 reviews
Kidd-Luukko Corporation was established in 1999 and incorporated in 2002. We’re constantly raising industry standards by bringing high-end service and products to the customer. Three generations of residential construction and an impressive array of commercial exposure have revealed serious shortcomings in the roofing sector. Kidd-Luukko Corporation is determined to raise the bar. Commanding a network of the region’s finest and most talented roofing professionals, Kidd-Luukko Corporation is an industry leader offering superior results at an affordable price.
Altitude Roofing
(508) 963-7794 altituderoofingma.com
241 Wildwood Ave, Worcester, Massachusetts
4.8 from 44 reviews
Altitude Roofing is a family owned and operated, full service residential, commercial and industrial roofing company based in Worcester, Ma. We provide roofing services for ALL types of roofing including: Single-ply membrane, Asphalt shingles, Standing seam metal, Custom copper, Natural slate tiles, Composite roofing materials and Wood shingle roofing. We are fully licensed and insured throughout New England. If you do not see your zip code not to worry, we service all of MA and most parts of CT, RI, NH. We can venture as far as Vermont and Maine. We stand behind our craftsmanship! You can trust our knowledgable roofers to handler all your roof repair, replacement, and installation needs.
Complete Roofing Services
(774) 208-0667 www.crsrooftop.com
10 Cuba Rd, Worcester, Massachusetts
4.7 from 18 reviews
Complete Roofing Services is your reliable and professional roofer servicing Worcester, MA, and the surrounding area, providing property owners with quality roofing services. We have years of extensive experience in this industry and have worked on roofs of all kinds, ensuring that each property we work on has roofing that is both durable and aesthetically appealing. Our expert contractors are all fully equipped to take on any job and will ensure that it is completed the first time correctly to provide you with a satisfactory customer experience.
Markopoulos Roofing
(774) 437-2313 markopoulosroofing.com
347 Chandler St Ste A, Worcester, Massachusetts
4.7 from 13 reviews
Markopoulos Roofing, a family owned and operated company, founded in 2018, evolved from our Development company. With more than ten years in the real estate sector, we recognized a significant demand for dependable roofing experts. Our mission is to maintain the high standards of quality, integrity, and service that have been the hallmark of our parent company. We take pride in our significant role within the community, striving to set ourselves apart with our exceptional standards.

The Roof Guru
(508) 579-9370 roofingunlimitedly.com
544 Pleasant St, Worcester, Massachusetts
5.0 from 5 reviews
The Roof Guru has been installing Quality Roofs on Homes for Years now. The only thing every single job has in common is the FACT that every single Homeowner is happy with their new roof. I personally make sure of it. We let the homeowner have as much input as we can ,for the type of materials and the yearly rating on shingles and even the color. We are also fully insured , liability and workers comp. these are two seperate insurance policies and Roofing companies must have both in place in order to protect the homeowner . We would love to make you our next happy customer so if you NEED quality , and clean Roof Replacement then please call us today.
For a full roof replacement, a building permit is typically required through the Department of Inspectional Services. This means your project will go through a formal review rather than a simple notice to proceed. When submitting, expect the package to include the scope of work, roof dimensions, and contractor details, rather than a bare notification. In practice, Worcester's process favors a clear plan that outlines materials, fastening methods, and any ventilation or insulation work attached to the roof project. Preparing drawings or fibered specifications that show how the new roof will handle Worcester's cold winters and heavy snowfall can help keeps things moving smoothly. Timely submission can reduce delays caused by missing information or miscommunications about the extent of work.
Inspections are scheduled during the course of the project and again after completion to verify compliance with code and the specifics of the approved permit. Scheduling can vary depending on departmental workload, so expect some variability. It's wise to plan around the potential for additional check-ins if the project includes ice-dam mitigation features, upgraded flashing at chimneys, or enhanced drainage solutions. Having the permit and inspection numbers visible on site, along with contractor contact information, helps inspectors coordinate quickly. If weather or heavy snows impact access, coordinate ahead of time to keep the inspection timeline intact.
Choose a contractor who understands Worcester's climate- and code-related constraints, including proper ice dam prevention, slope drainage, and flashing details. A qualified pro will know to align the permit submittal with the correct material specifications, installation methods, and ventilation requirements that address freeze-thaw cycles. Verify the contractor's license and insurance, and confirm that their scope of work aligns with the permit plan. Communication about anticipated inspections and what the inspector will look for-such as attic ventilation, underlayment adherence, and proper fastener spacing-helps prevent re-inspection delays.
Start the permit process early and assemble a complete package with scope, dimensions, and contractor details to avoid back-and-forth cycles. Include a roof plan that addresses snow loads, drainage routes, and any upgrades to improve ice dam resistance. Ensure access for the inspector is maintained during work, and keep all change orders documented if material or scope adjustments occur. After completion, double-check that all required paperwork is submitted for the final sign-off, so discharge of the permit can occur without lingering holds. A smooth permit and inspection path can save time and reduce the risk of unexpected interruptions during a winter-sensitive roof project.
In the aftermath of snow, wind, or a leak event, take clear photos from multiple angles, including interior ceilings, attic space, and any visible parapets or flashing. In Worcester, prompt photo documentation after snow, wind, or leak events is important because adjuster visits and visual records are standard in roof claims handling. Keep a dated log that ties each image to a specific time and weather event, and store copies of any prior repair receipts or roof notes. Local adjusters often rely on this material to gauge whether preexisting vulnerabilities contributed to the loss.
When you first contact the carrier, provide a concise description of what failed and when the failure was first noticed. Massachusetts insurers commonly request roof age and condition records, which matters in Worcester where many homes have older roofs and layered repair histories. If there is visible water intrusion, request an expedited inspection to help prevent secondary damage such as mold or structural deterioration. Designate one point of contact for the claim to avoid conflicting repair requests and to keep the scope consistent with the adjuster's assessment.
During the inspection, point out any signs of ice damming, failed chimney flashing, or drainage issues that could be linked to the current damage. Carrier requirements for added underlayment or retrofit work can affect Worcester replacement scopes when storm damage reveals broader vulnerability in an aging roof system. Have a current roof age estimate and any contractor notes ready, and be prepared to compare the as-found condition with the installed specifications from the original warranty or past repairs.
If the adjuster recommends a scope that seems inconsistent with observed damage, request a second opinion or a re-inspection. In Worcester, the history of layered repairs can complicate coverage decisions, so ensure all weaknesses identified by the adjuster are clearly documented in the claim file. Keep all communications in writing, and confirm any agreed-upon scope with a formal amendment to the claim before authorizing work.
Connect with contractors who help homeowners navigate the claims process from damage assessment to final approval.
Seven Hills Roofing
(508) 414-8305 www.sevenhillsroofing.com
100 Canterbury St, Worcester, Massachusetts
4.8 from 119 reviews
G&O Construction & Roofing
(774) 243-9700 www.gandoconstruction.com
25 Kansas St, Worcester, Massachusetts
4.9 from 55 reviews

Winter in Worcester brings snow and ice that can delay full replacements and shift many projects into temporary protection or emergency repair mode. When roof work is interrupted by a storm, durable temporary coverings and careful snow removal planning become part of the project plan. Ice dams are a common concern, so the focus during cold snaps shifts to securing flashing at chimneys and valleys, ensuring heat tracing or insulation strategies are in place, and keeping eaves clear enough to prevent new dam formation. If a project is pace-limited by cold weather, communication with the crew about expected pauses and rescheduling windows helps maintain a coherent sequence without sacrificing protection.
Spring rains in Worcester can slow tear-off and dry-in schedules, making project sequencing and weather windows especially important. As temperatures climb, it is common to see a surge of rain events that can postpone roofing work mid-tear-off or delay shingle installation. Proper drainage planning becomes critical because rain-soaked decking or clogged gutters can propagate delays and complicate moisture management. Early-season inspections should verify that underlayment and flashing installations anticipate sudden downpours, while crews coordinate ladder access and material staging to minimize exposure to wet conditions.
Late summer heat and humid shoulder seasons in Worcester affect installation conditions, while autumn leaves can reduce drainage performance and obscure inspection findings. Hot, sun-baked roofs can accelerate certain membrane and sealant failures if not managed with shade, ventilation, and dry-in timing. Humidity can hinder adhesive cures and tear-off feasibility, so scheduling should prioritize cooler hours and frequent hydration of crews. Keep an eye on gutter cleanliness as leaves start to accumulate, because debris-filled valleys and conductors can mask underlying roof damage until a heavy rain reveals gaps.
Autumn leaves can reduce drainage performance and obscure inspection findings. This period is ideal for finalizing inspections and addressing hidden issues uncovered during leaf drop. A thorough assessment before snow returns helps validate flashing integrity, vent pipe sealants, and overall slope drainage behavior. Plan ahead for seasonal shifts in daylight and temperature so that critical steps-such as window and attic barrier checks, as well as fascia and soffit upkeep-are completed before winter sets in.
Flat-roof work matters for portions of the city's mixed residential and commercial stock, even though pitched re-roofing dominates the market. When evaluating a flat or low-slope roof, look for evidence of past repairs, ponding water, and membrane wear. In Worcester, snow and ice loads couple with aging flashings, so the first step is a careful inspection of drainage paths, scuppers, and any penetrations around skylights or vents. Plan for a detailed water test after installation or major repairs to confirm that the system sheds meltwater reliably rather than allowing it to linger.
Snow behaves differently on low-slope surfaces than on steep asphalt roofs, and Worcester winters amplify that difference. Start with a drainage assessment that traces every line from drip edge to primary downspout, including interior transitions where sloped sections meet flat planes. Install appropriate snow-retention devices where appropriate, but avoid clutter that could trap ice. Maintain clear secondary drainage routes and consider a continuous membrane or enhanced insulation at edges to minimize freeze-thaw damage. Regularly remove debris that can block scuppers or gutters during mid-winter thaws.
Flat or low-slope roofs in this area benefit from membranes that tolerate prolonged freeze-thaw cycles and vertical offsets around parapets. Synthetic or built-up options often balance durability with ease of maintenance, while metal is worth evaluating where reflective and drainage performance are priorities. For any flat section, prioritize a robust flashing strategy at transitions, penetrations, and along edges to reduce recurring leaks driven by seasonally shifting temperatures.
Solar-integrated roofing is a smaller but active specialty in Worcester and needs to be evaluated against roof age, penetrations, and replacement timing before installation. Assess how mounting hardware interacts with existing flashings and insulation layers. Consider whether a roof with known freeze-thaw exposure has enough structural margin to support additional hardware and potential patching over time. Plan for long-term accessibility, ensuring that future maintenance or replacement can occur without compromising the solar system or the roof membrane.
Find specialists in TPO, EPDM, and built-up flat roofing systems for residential and commercial properties.
Hemlock Roofing
(774) 418-3724 hemlockroofingco.com
2 Richmond Ave apt 2R, Worcester, Massachusetts
5.0 from 214 reviews
Seven Hills Roofing
(508) 414-8305 www.sevenhillsroofing.com
100 Canterbury St, Worcester, Massachusetts
4.8 from 119 reviews
G&O Construction & Roofing
(774) 243-9700 www.gandoconstruction.com
25 Kansas St, Worcester, Massachusetts
4.9 from 55 reviews
In Worcester, homeowners often prioritize quick response and cleanup because many projects begin with active leaks, storm calls, or occupied-home re-roofing concerns. The pace of winter thaw and the scroll of freeze-thaw cycles means a contractor who shows up, protects your interior, and completes debris control can save you from weeks of disruption. A long-running local company isn't just a name on a sign; it's a relationship you'll rely on for future repairs and warranty follow-ups.
Because the market here features many long-established and family-run outfits, you have a built-in opportunity to vet not just price but continuity. Look for a team with a consistent crew, documentary references, and a plan for winter protection on the roof during shingle or metal installs. Ask about how they handle chimney details and flashing-areas that frequently fail after heavy snows or rapid warming. Debris control matters, especially with steep, snow-laden slopes and busy spring cleanup windows. A contractor should present a clear method for sealing the ridge and eaves, plus a plan for protecting interior finishes during storms or heavy rain.
When speaking with bidders, push for a written outline of their approach to water intrusion, ice dam risk, and temporary containment during unsettled weather. Inquire specifically about chimney flashing, valley details, and how they address drainage on older homes with variable roof pitches. If they propose quick fixes, ask what long-term measures they include to prevent recurrence through multiple seasons. Finally, verify that the crew will respect occupied-home routines, protect landscaping, and restore the site to a clean condition at project close.