Last updated: Apr 19, 2026
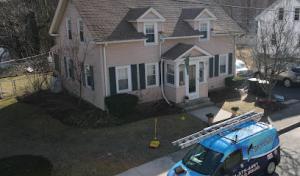
Rhode Island's cold winters and repeated freeze-thaw cycles make ice damming a primary roof-edge problem in Providence. When snow piles along steep-slope roofs and refreezes at the eave, meltwater backs up behind the dam and leaks under shingles, flashing, and edge finishes. This city's dense historic neighborhoods mean many homes have sharply defined eaves and limited overhangs, so the edge is where the problem concentrates first. Icicles along gutters aren't just a seasonal nuisance: they signal that meltwater is struggling to shed properly and is potentially backing up into the roof plane. The pattern you'll see after a heavy snow is thaw, then another freeze, followed by pull-apart flashing transitions and corroded or aged edge details that were never meant to cope with repeat cycles from December through March. In homes with older eave details and gutter lines, those vulnerable points become the first failure points when snow refreezes along roof edges.
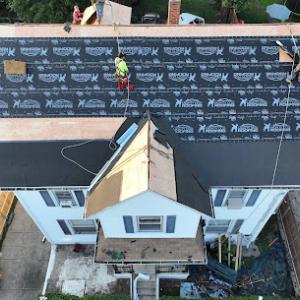
Winter roof failures here often begin at eaves, flashing transitions, and around chimneys after snow accumulation followed by thaw and refreeze. A visible sign is a ridge of ice along the gutter line that grows as the sun warms and then refreezes at night, creating a dam that prevents drainage. Inside the attic, warm air escaping through gaps in ceiling planes can melt snow near the edge, feeding ice buildup at the eave and revealing itself as staining or damp patches along interior walls near the top plate. On the roof, you may notice missing shingle granules near the edge, lifted flashing atop chimneys, vent stacks, or along skylight margins, and a general trend of granular wear on edge courses that were never reinforced for winter stress. In Providence, where many homes rely on older edge details, a small edge crack or a loose gutter hanger can become a conduit for water intrusion after only a few freeze-thaw cycles.
If cold weather is forecast and snow is already on the roof, prioritize safety and manage the risk from ground level with a roof rake before warmer afternoons soften the ice. Clear the gutter line where possible to restore at least some drainage capacity, but do not reach onto a slippery roof if the pitch is steep or if ice has formed a solid lip at the eave. Inspect eave boards, fascia, and soffits from ground level for signs of sagging or loosened trim that could fail under a thaw-to-refreeze cycle. Look for compromised flashing at chimneys and transitions where snowmelt would pool; any loose flashing should be addressed promptly, because a small leak there translates into water intrusion behind interior walls and ceilings. Ventilation and insulation play a crucial role: ensure attic spaces are adequately vented and sealed so that warm attic air doesn't continually melt edge snow, enlarging the dam. If professional help is required, plan for a cautious assessment of edge details, flashing integrity, and gutter support, focusing on the roof edges most exposed to winter weather. In short, Providence homeowners should treat ice dam risk as an edge-structure issue first: protect the eaves, stabilize flashing, and keep drainage pathways clear, because snow accumulation followed by thaw and refreeze will relentlessly test every vulnerable edge on an older home.
Providence roofs are routinely tested by coastal New England nor'easters that combine wind, prolonged rain, and debris rather than just short summer storms. When a nor'easter roars through, the wind hurls shards of ice and grit against edge flashing, ridge caps, and eave details. If the drainage system is already stressed, water doesn't just shed; it pools, backs up, and starts sneaking under shingles. It's not a single event you can shrug off-it's a sequence of pressures that can crack sealants, lift shingles, and push water into vulnerable joints. In late winter and early spring, that pressure shows up as damp spots that spread along the eaves and inside attic corners where the roof meets the walls.
Fall storms in this region commonly clog drainage with leaves and debris before heavy rain arrives, increasing backup and leak risk. That combination-wet debris sitting on the roof plus rushing water behind it-creates opportunities for ice dams to form at the eaves, even in homes with decent insulation. After a wind event, walk the roof line (carefully, from ground or with proper footing) and inspect for lifted shingles, torn or loose flashing around chimneys and skylights, and any gaps where moisture could bypass edge protection. Inside, check ceilings and upper walls for new stains or a cooler spot along the perimeter-these are early signs that drainage failed you at the edge and water found a path inward.
Spring and fall are the seasons when Providence homeowners are most likely to notice lifted shingles, flashing failures, and water entry after wind events. The combination of lingering cold snaps, thaw cycles, and gusty storms drives edges to flex and seals to weaken. If you see shingles that sit unevenly or hear a loose flutter when the wind picks up, treat it as a warning. Don't wait for a leak to confirm the problem; address loose edge materials and compromised flashing now, before another storm compounds the damage. A single properly secured edge can prevent a cascade of water entry years later.
Start with a fast, practical edge check after each major wind event: look for lifted corner shingles and gaps around flashing at vents, chimneys, and dormers. If debris is visible along the gutter line, clear it carefully only if it's safe to do so from ground level or with a sturdy ladder and a helper. Clear drainage paths of leaves and mulch, and ensure downspouts discharge well away from the foundation. If you find advanced signs-shingle tabs torn loose, flashing bent or separated, or water staining extending far from the eaves-schedule a professional inspection promptly. Edge integrity is the gatekeeper against interior leaks and escalating repairs after the next nor'easter.
Consider upgrading edge materials and sealants to higher-performance options that resist wind-driven rain and freeze-thaw cycles. In storm-prone neighborhoods, reinforcing flashing around roof penetrations and ensuring a continuous ice-and-water barrier along the eaves can dramatically reduce the risk of water entry. If your roof has aged flashing or old seals, a targeted retrofit now can save substantial damage later, especially during those sharp spring and fall windstorms. Keep a simple maintenance cadence: after heavy wind events, recheck for lifted components and promptly resecure them to maintain a resilient roof edge.
Find local contractors experienced in assessing and restoring roofs after hail, wind, and severe weather events.
Five Stars Roofing Company
808 Charles St, Providence, Rhode Island
5.0 from 19 reviews

Exact Exteriors
(401) 420-5645 exactexteriorsllc.com
701 River Ave, Providence, Rhode Island
5.0 from 136 reviews
Exact Exteriors is a trusted local roofing company serving Providence, RI, and surrounding areas since 2019. We specialize in both residential and commercial roofing, siding, windows, and exterior painting—using quality materials and expert craftsmanship to deliver lasting results. Contact us today for a free, hassle-free estimate!
Skyview Exteriors
(401) 375-4491 www.skyviewexteriors.com
9 Redwing St, Providence, Rhode Island
5.0 from 254 reviews
Skyview Exteriors is a leading roofing company in Providence, Rhode Island, providing top-notch services such as roof repairs, replacements, skylight installations, and more. Our skilled team also specializes in solar installations, siding, and gutters, ensuring comprehensive exterior solutions for your home. Experience unmatched quality and expertise with Skyview Exteriors for all your roofing and exterior needs.

Concep Roofs
10 Dorrance St, Providence, Rhode Island
5.0 from 11 reviews
Concep Roofs, your premier roofing experts serving the beautiful state of Rhode Island. With years of experience and a commitment to excellence, we are dedicated to providing top-quality roofing solutions to homeowners and businesses alike. Our skilled team of roofing professionals is trained in the latest techniques and uses only the finest materials to ensure durable and long-lasting roofs. Whether you need a roof repair, replacement, or installation, we've got you covered. We offer a wide range of services, including shingle replacement, leak detection and repair, gutter installation, and much more. Our goal is to deliver superior craftsmanship and exceptional customer service on every project we undertake.
Pioneer Roofing Solutions
356 Richmond St, Providence, Rhode Island
4.5 from 26 reviews
Pioneer Roofing Solutions is your trusted roofing contractor in Providence, RI, committed to delivering top-quality roofing services for both residential and commercial properties. Whether you're in need of a brand-new roof installation, a timely roof replacement, or expert roof repairs, we've got you covered. Our team specializes in a wide range of roofing options, including durable metal roofing, traditional asphalt shingle roofing, and modern commercial TPO roofing solutions. We also excel in new construction roofing projects and flat roofing installations, ensuring long-lasting, reliable protection for your property. With Pioneer Roofing Solutions, you can expect exceptional craftsmanship and customer satisfaction on every project.
(401) 345-3108 macconstructionri.com
Providence, Rhode Island
4.6 from 9 reviews
At Mac Construction DBA, we are committed to providing top-notch construction and remodeling services in Cranston, RI, and the surrounding areas. With our team of skilled professionals, we deliver high-quality workmanship and exceptional customer service. From home renovations to commercial builds, we strive to exceed our clients' expectations every time.

757 Exteriors Roofing & Siding
(401) 583-6671 757roofingandsiding.com
Serving
5.0 from 72 reviews
757 Exteriors Roofing and Siding specializes in reliable roofing services in Cranston, RI, and the surrounding areas. We offer roof repairs, installations, replacements, and siding solutions. Our experienced contractors ensure your roof is repaired efficiently, providing peace of mind for your home security against the elements. Contact us today to learn more about how we can protect your investment!
Miceli Roofing
(401) 433-7663 miceliroofing.com
Serving
4.9 from 151 reviews
Miceli Roofing is a family-owned and operated business that has offered residential and commercial roofing services since 1960. Our longevity is a testament to us having consistently provided homeowners and property managers a superior experience. We truly partner with our clients to execute precise roof installations (and repairs) that fulfill the desired goals. We’re licensed and fully insured. We also offer up to a 10-year labor warranty, which reflects the utmost confidence we have in our craftsmanship. Homeowners choose us for several reasons: roof customization; a wide selection of products; accountability for our work; affordability; and craftsmanship. Request a custom (on roof) quote today.
Mighty Dog Roofing of Rhode Island
(401) 425-4108 www.mightydogroofing.com
Serving
5.0 from 67 reviews
When it comes to your home’s exterior, Mighty Dog Roofing delivers top-of-the-line services matched with the neighborly customer care our clients have come to love. Our team of skilled experts will conduct a free, detailed inspection of your home, treating it as our own. Whether your home needs a simple repair or a full roof replacement, expect to receive the transparent guidance you deserve. Whatever the case, our team will work to meet your safety and budget needs. We take pride in operating with quality materials, hiring skilled roofers, and providing our customers with a high-quality experience. See for yourself; our reviews say it all. Schedule your free, exterior home inspection today!
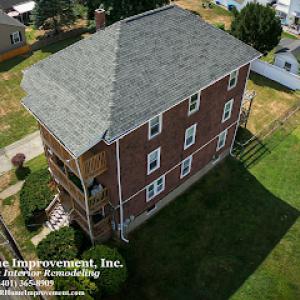
B&R Home Improvement
(401) 365-8909 www.bandrhomeimprovement.com
Serving
4.9 from 213 reviews
B & R Home Improvement offers services for all your residential home repair needs. We offer interior and exterior remodeling, such as roofing, gutters, decks, kitchen and bath makeovers, as well as additions.
Patriot Roofing & Framing
(401) 639-7663 usapatriotroofing.com
Serving
5.0 from 15 reviews
(401) NEW - ROOF After the 15 years of experience in all aspects of construction, Patriot Roofing is a Local Veteran Owned company specializing in commercial as well as residential roofing and have teams that cover all aspects of property exteriors including framing, siding, windows/doors, decks etc. We expertly Install all forms of roofing systems including but not limited to: - Asphalt Shingle - Architectual - Rubber Roofing - EPDM - TPO - Metal Roofing - Standing Seam - Copper Roofing

Seaberg Construction
(401) 499-3891 www.seabergconstruction.com
Serving
4.9 from 128 reviews
Exterior renovations without the pitch! Seaberg Construction’s team specializes in residential roofing, siding, windows, doors, and decks. With over 60 years of combined experience, we are committed to delivering professional work, treating our homeowners like neighbors, and standing behind every single job we do. We believe in transparency, so we provide free, detailed estimates before starting any project. With our secure financing options, achieving your dream renovations has never been more accessible. Contact us today to schedule your FREE consultation, and let’s get started on this home improvement journey together. With Seaberg Construction, turning your house into a home is just around the corner!

QSPS Housing Solutions
(401) 230-9004 www.qspshousingsolutions.com
Serving
4.8 from 283 reviews
Roofing & Water Restoration Solar Specialists. 15+ years.Siding,Windows Skylight Gutters & PVC Fencing
Older homes in this area often showcase steep-slope roofs that hinge on intricate flashing around chimneys, dormers, and masonry joints. The combination of historic materials and dense urban shading creates dead zones where snow and ice linger, increasing the risk of ice damming at the eaves and along roof edges. When repairs occur, flashing must be integrated with the existing roof geometry rather than patched as a quick fix. A careful match to the original edge detail helps prevent slow leaks that harbor hidden rot, especially where multiple roof planes meet near a brick or stone wall.
Chimney intersections are a recurring leak point in this market, and the pattern holds across many older homes with masonry stacks. Chimneys extend through both roof and attic assemblies, so misaligned flashing or deteriorated joints can channel water right into the attic space. The strongest safeguard is a comprehensive approach: verify that counter-flashing is continuous behind the brick veneer, ensure step flashing is correctly stepped along the chimney chase, and inspect the throat and cricket (or saddle) for proper drainage. If a chimney shows signs of spalling or loose mortar, treat it as a warning flag-water will find any gap to follow into the roof cavity, especially after a nor'easter or a heavy thaw cycle.
Providence experiences freeze-thaw cycles that stress edge metal, shingles, and underlayment near eaves. Retrofitted skylights, common in older city homes, add additional flashing complexities that require precise integration with surrounding roof planes. Skylight flashing should be backed by a solid, crack-resistant seal and kit-compatible termination at the perimeter so that winter moisture cannot creep under the flashing. When replacing or re-cladding sections of the roof, ensure that the new edge details align with the original roof pitch and overhang, preserving the intended drip line and ventilation path to avoid cold spots that encourage ice dams.
Slate, clay tile, and fiber cement shingles appear on many Providence roofs, each demanding a tailored flashing strategy. Slate and clay tile require meticulous step and counter-flashing schedules to protect the long edges where wind-driven meltwater can back up under tightly set joins. Synthetic or composite shingles may offer easier flashing integration in retrofit projects, but misalignment with existing parapets and dormers still invites leaks if not carefully tucked under proper drip edges. A cautious pace during re-roofing-checking every corner, joint, and return-helps ensure that the roof line sheds water as designed, even after a heavy storm.
When evaluating a historic roof, focus on the intersection points: chimney collars, dormer-to-roof transitions, skylight surrounds, and crate-like edge tie-ins where multiple planes meet. Look for cracked mortar, loose flashing, or dark stains that indicate ongoing seepage. Any repair plan should prioritize continuity of the weather barrier around these anchors, with attention to how new materials will age alongside the old. In a city with steep roofs and old masonry, a conservative, integration-first approach reduces the risk of edge failures triggered by harsh winter conditions.
Find contractors experienced in skylight installation, flashing, and leak repairs to bring natural light into your home.
Skyview Exteriors
(401) 375-4491 www.skyviewexteriors.com
9 Redwing St, Providence, Rhode Island
5.0 from 254 reviews
Complete Roofing Contractors
134 Thurbers Ave, Providence, Rhode Island
5.0 from 22 reviews
Five Stars Roofing Company
808 Charles St, Providence, Rhode Island
5.0 from 19 reviews
Replacement timing in Providence is driven toward late spring through early fall because Rhode Island winters are hard on tear-offs and sealing. That means if you're planning a roof, start coordinating before mud season ends and frost heave returns, but not so early that a late autumn cold snap complicates work. Dry, stable days make for cleaner nail sealing and longer-lasting edge details.
Warm humid summers can accelerate shingle and sealant aging, so delayed replacement after winter damage can shorten remaining roof life. If you've survived a nor'easter, inspect gutters and flashing first; frozen leftovers from ice dams stress the rake edges and valleys. A contractor who specializes in steep slopes will stage work to protect soffits and keep drainage clear as the season shifts.
Scheduling pressure often rises after winter and after nor'easter seasons, which can affect contractor availability in the Providence market. Booked crews tend to fill quickly, and storm-heavy periods leave a backlog of emergency calls. Consider arranging a spring inspection with a plan for a mid-summer or early fall replacement, rather than trying to fit a rush window between March and May. In denser historic neighborhoods, access and staging through tight driveways matters, so confirm material delivery and crane or ladder needs early.
In Providence, roof edge failures often trace back to inadequate ice dam management and missing or faulty flashing. After the freeze, walk the attic access and check for daylight around dormers, chimney flashing, and valley intersections. In late winter, you may notice wind-driven shingle lift or micro-cracks along the eaves that signal a future leak. When you plan replacement, coordinate sequencing so that tear-off happens in a stretch with daytime temperatures above freezing and nighttime lows not thawing away sealant. If you must roof during shoulder months, choose a crew that can stage repairs to hold deck integrity while lasting materials cure.
Get a clear picture of your project costs upfront - no commitment required.
Exact Exteriors
(401) 420-5645 exactexteriorsllc.com
701 River Ave, Providence, Rhode Island
5.0 from 136 reviews

Asphalt shingles remain the dominant practical choice for many homes with steep roofs in these tight, historic neighborhoods. They install fairly quickly, handle the varied weather of Rhode Island, and come in finishes that blend with older facades without looking out of place. In outreach to homeowners, it's useful to pair this option with a robust emphasis on edge flashing and proper ice and water shield placement along the eaves and around valleys. When a property faces frequent freeze-thaw cycles, the sensible approach is to make sure the underlayment and flashing are sized to resist ice damming at projection points, gutters, and dormer junctions. For a roof facing snow-driven storms, a well-sealed, properly ventilated attic remains essential to prevent interior moisture from applying extra stress to shingle edges during long winters.
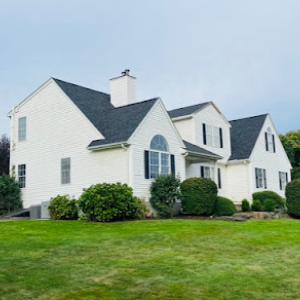
Slate is still a locally relevant choice on the region's older housing stock, where roofs often bear the weight and character that homeowners want to preserve. Its natural beauty and long service life align with the high-value, historic feel of many Providence homes. The downside is weight and cost; slate requires structural assessment, and edge details must be carefully flashed to resist repeated wet-weather exposure. For those with historic neighbors or homes featuring distinctive masonry, slate can be an authentic match-provided the underlying structure is prepared to carry the load and the roof edge details are upgraded to manage seasonal stress. In many cases, homeowners explore synthetic or fiber cement substitutes that imitate slate's heritage look while offering lighter weight and easier maintenance.
Metal roofing is a strong regional fit for shedding snow and handling Rhode Island's wet cycles. Snap-lock or standing-seam configurations provide reliable edge performance and a clean line that suits both modern and historic renovations. Metal edges and flashing tend to better resist lifting and corrosion when exposed to salt-logged winter winds and repeated freeze-thaw events. For steep roofs high on the block, metal can deliver years of low maintenance, especially where roof edges, gutters, and downspouts are designed to manage rapid cold-season runoff. If a home previously faced ice damming or edge-water intrusion, metal can be paired with strategically placed roof vents and ridge caps to keep warm attic air moving and edge temperatures more uniform.
Synthetic and fiber cement products appeal where homeowners want a traditional aesthetic without the heavy weight of natural slate or clay tile. These materials can mimic the appearance of historic shingles or slate while offering easier handling, lower maintenance, and improved edge protection. For Providence homes that sit on tight lots or have multiple roof planes, this option provides a practical balance between curb appeal and long-term durability. When combined with upgraded flashing at cornices, dormers, and valley intersections, synthetic and fiber cement shingles become a reliable choice for weathering winter ice damming and Nor'easter exposure without compromising the home's period character.
In this city, pricing is affected by the mix of straightforward asphalt re-roofs and more complex older homes with chimneys, flashing transitions, and steep roof geometry. Tear-offs that reveal aging decking or require extra flashing work can push the price up, especially when heavy materials like slate demand specialized crews common in historic New England housing. Seasonal storm demand in Rhode Island can tighten scheduling and pricing after winter damage or major nor'easter events.
Asphalt shingles are the baseline in many Providence neighborhoods, offering the most predictable pricing. Typical costs run from about 350 to 650 USD per square for a standard tear-off and re-roof, depending on roof complexity and deck condition. Synthetic or composite shingles sit in a similar range but may lean toward the upper end if existing flashing transitions are stubborn or if there are multiple chimneys and skylights that require careful detailing.
Metal options bring higher upfront material costs but often better long-term performance against ice damming and wind. Expect prices from roughly 700 to 1100 USD per square, with the final total influenced by roof complexity, seam type, and any necessary deck prep. In steeper, older homes with tight roof geometry, installation time can climb, so labor may push the price toward the higher end.
Clay tile and slate are popular in select historic pockets but demand skilled labor and careful handling. Clay tile typically ranges around 900 to 1700 USD per square, while slate runs 1500 to 2300 USD per square. Costs rise when tear-offs reveal need-for-repair decking or when crews must match historic details and transitions. Heavy materials also extend installation windows and potentially require additional scaffolding.
Fiber cement shingles bring moderate costs, about 550 to 900 USD per square, balancing durability with easier handling than slate. Synthetic shingles sit near asphalt, usually 450 to 750 USD per square, and can be a practical middle ground when historic details must be preserved but budget is tight.
Seasonal storms influence not just the price but availability of crews. After a major nor'easter, expect tighter timelines and potential price bumps, especially for complex or tear-off projects with special flashing needs. Planning ahead in late winter or early spring can help lock in crews before demand spikes.
In this urban fabric of dense historic neighborhoods, a full re-roof in Providence typically requires a building permit through the City of Providence Department of Inspections and Permits. The process is not something to start informally after work has begun; the permit application is generally submitted by the applicant or the roofing contractor. Plan for a straightforward submission that includes the project scope, description of the roofing materials, and any related work such as venting, flashing, or drainage changes. Having the contractor involved in the application helps ensure the details align with local code expectations and the site's constraints, especially on older homes with steep slopes and delicate trim.
Inspections in Providence are scheduled at two pivotal milestones: rough-in before covering and final after completion. The rough-in inspection is your checkpoint to confirm that underlayment, eaves, ice-and-water shield details at the edges, and any attic or roof deck work meet code requirements before the roof is closed up. The final inspection verifies that the installation aligns with the approved plan, that flashing at valleys, chimneys, and roof edges is properly integrated, and that drainage and venting function as intended. This sequencing directly shapes how a contractor staggers tear-off and dry-in: you need access to the roof structure for the first inspection, and you should plan clearance for a second, post-covering walkthrough. Delays in scheduling either inspection can ripple into material staging and work pace, particularly when winter conditions threaten ice dam risk.
Because edge detail and drainage are critical in this climate, coordinate with the inspector on acceptable dry-in windows and weather buffers. Ensure access routes for inspectors around narrow alleys or tight urban lot configurations, and confirm that temporary protections are in place for steep slopes and neighboring property impacts during tear-off. Clear communication with the permit office and the contractor helps prevent missteps that could trigger rework or delay, especially when historic massing and tight roof lines require careful flashing and edge detailing.
Rhode Island's homeowners insurance market is generally stable, so Providence owners are usually dealing with documentation and scope disputes rather than widespread carrier withdrawal. That reality means a claim can stall or stall out on details rather than a denial driven by market shifts. If a storm season hits hard, expect carriers to request careful explanations of what happened to the roof edge, flashing, and drainage before they step into major repairs. Be prepared to follow the process with patience, but also with persistence.
Seasonal wind and hail claims do occur here, and adjusters commonly ask for roof age, prior repair history, and photo documentation. Quick, thorough photos of the attic, ceilings, and any interior staining help tell the full story if water is finding its way from the edge during another nor'easter. Neatly staged images showing shingle lifting, flashing gaps, and ice dam traces near eaves can shorten back-and-forth with the adjuster. Because repeated nor'easter exposure can blur the line between old and new damage, timely documentation is especially important for a clean reconstruction path.
Adjusters tend to focus on the roof edge, flashing, and drainage system, where ice damming and wind-driven impacts do the most damage in Providence winters. They will want a clear record of roof age and any prior repairs, which influence scope and attribution. Provide a concise repair timeline, keep a log of communications, and share weather injury notes from local forecasts if available. If gaps appear in coverage or if a claim seems misaligned with observed conditions, request a written explanation and, if needed, an independent assessment to support your case.
Providence's denser urban building stock includes low-slope and flat roofs that face drainage stress during prolonged rain and snowmelt. In these neighborhoods, roofs often collect debris from fall storms, which can block drainage paths just as winter approaches. The combination of dense tree and street debris, limited rooftop access, and aging edge details means that edge flashing, seams, and penetrations are more vulnerable to ice damming and edge leaks than on steeper homes. This is not about a single storm, but a pattern where small failures at the edge accumulate into larger water intrusion over many freeze-thaw cycles.
After nor'easters, inspect the roof edge and parapet detail for signs of movement, loose flashing, or torn sealant. Look for granule loss near eaves if asphalt shingles are present, and check metal edging for corrosion or gap formation at joints. Debris accumulation from autumn storms should be cleared from gutters and scuppers promptly, especially on roofs with limited slope where standing water can back up into seams during rapid temperature swings. If puddling persists for more than 48 hours after a storm, treat it as a potential warning sign of edge or flashing vulnerability. Prioritize repairs to seams and penetrations before the first hard freeze, when ice can expand and worsen small gaps.
Flat and low-slope roofs in these urban blocks rely heavily on robust edge detailing. Ensure parapet caps are flashing-secure and watertight, with a sloped transition toward drains or scuppers. Penetrations for vents, plumbing, or HVAC equipment should use multi-layer sealing methods and, where feasible, have integrated drip edges to shed water away from joints. In Providence, drainage strategy matters: determine whether multiple drains exist and verify that downspouts discharge to safe outlets without backing water during snowmelt. Consider upgrading sealants to weather-appropriate formulations that resist chloride exposure from winter road treatment, and schedule seasonal inspections that align with the end of winter and the onset of spring thaw. These targeted checks help prevent ice dam formation and edge failures that are common on low-slope roofs in this city's climate.
Find specialists in TPO, EPDM, and built-up flat roofing systems for residential and commercial properties.
Pioneer Roofing Solutions
356 Richmond St, Providence, Rhode Island
4.5 from 26 reviews
Solar roofing is present in the Providence market but is far less prevalent than standard re-roofing and storm-response work. When a home has an older roof system, every new penetration or integrated product should be matched to the remaining roof life. In practice, that means evaluating shingles, underlayment, and flashing for compatibility with the planned solar hardware. A thorough assessment with a local roofer who understands winter cycles and Nor'easter impacts can reveal if the roof will support a new solar layer without compromising edge detail, gutters, or the attic ventilation. The goal is to avoid prematurely narrowing the window between maintenance cycles and solar installation, especially when ice damming and edge failures are common concerns in this climate.
Historic-looking rooflines are a defining feature in many Providence neighborhoods, and texture, color, and profile matter as much as function. Solar planning has to account for existing materials and the visual rhythm of dormers, chimneys, and parapets. For homes with clay or slate-inspired appearances, the installer may need to choose mounting and racking that minimizes visible penetrations and preserves the roof's historic silhouette. In tight urban lots, discreet placement of arrays along secondary slopes or integrated ridges can reduce visual impact while maintaining performance. The outcome should feel like a natural extension of the roof, not a jarring add-on.
Roof edge failures and ice damming are particular risks when integrating solar with older edge details. Ensure that flashing around skylights, vents, and rake edges remains watertight and compatible with any solar apertures. In Providence's freeze-thaw cycles, back-venting and proper drainage paths prevent water from backing up under shingles or tiles. A phased approach-first restoring or upgrading critical edge components, then adding solar-often yields better long-term performance and reduces the chance of retrofits that create new leaks.
When solar is part of a roof that already has a strong character, placement becomes a design constraint. If a solar array must be visible from the street or a principal sightline, select panels with low-profile frames or color-uniform finishes to blend with the roof. In some cases, a partial array on lower slopes or a curb-mounted system along a side roof can deliver sun exposure without compromising the roof's historic appearance. Collaboration between the roofer, a solar designer, and the homeowner helps ensure that performance, durability, and aesthetics align.
Find contractors who integrate solar panels or solar shingles into your roof for long-term energy savings.
Skyview Exteriors
(401) 375-4491 www.skyviewexteriors.com
9 Redwing St, Providence, Rhode Island
5.0 from 254 reviews
Mighty Dog Roofing of Rhode Island
(401) 425-4108 www.mightydogroofing.com
Serving
5.0 from 67 reviews