Last updated: Apr 19, 2026
White Plains winters regularly bring snow followed by temperature swings that refreeze meltwater at eaves, making ice-dam prevention more important than in milder downstate markets. When warm attic air migrates and meets a cold roof, the meltwater refreezes at the eaves, creating an ice dam that can push water back under shingles and into soffits, walls, and ceilings. The result is a slow drip you notice only after a heavy thaw or a mid-winter thaw-storm, plus hidden rot behind fascia and underlayment. The repeated freeze-thaw cycle is unrelenting on edge details, gutters, and penetrations around chimneys and vents. If you haven't addressed these weak points, a single season can push you into costly interior damage.
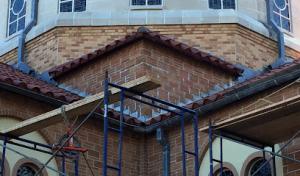
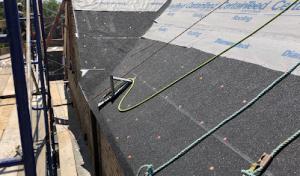
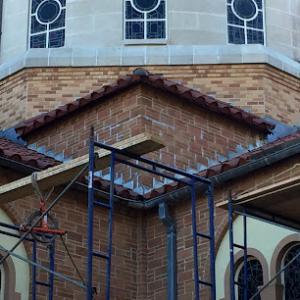
The city's older housing stock commonly combines venting upgrades, flashing corrections, and underlayment improvements during reroofing because repeated freeze-thaw cycling exposes weak roof edges and penetrations. That means you don't just replace shingles; you upgrade the whole edge system: proper ridge and eave ventilation to pull cold air across the deck, upgraded flashing around valleys, dormers, chimneys, and skylights, plus a continuous, well-sealed underlayment that won't shed moisture under pressure. When a roofer talks about a lifeboat for your roof edge, they're talking about these improvements that specifically counter White Plains' moisture cycles. The result is a roof assembly that breathes correctly, sheds meltwater, and prevents that backflow that causes interior leaks.
You should inspect eaves, gutters, and downspouts for ice buildup after heavy storms and before cold snaps set in. If ice damming appears imminent, clear safe access routes and ensure downspouts discharge away from walls and foundations. Ask for a plan that includes enhanced attic ventilation, such as balanced intake and exhaust venting, so warm attic air doesn't overheat the deck. Emphasize improvements to edge flashing, termite-blocking underlayment, and a continuous roof-to-wall seal that won't fail where tar fades or old flashing lifts. In addition, plan for a robust drip edge and properly sealed valley and boot flashings to stop meltwater from creeping into the attic or soffit spaces. With snow in the forecast, you want a system that moves water quickly to the gutters and away from the fascia, not a roof that holds onto moisture at the edge.
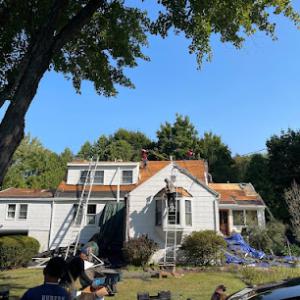
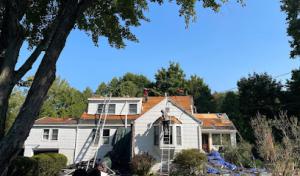
Roof replacement timing in White Plains is often planned around late spring through fall because winter tear-offs are complicated by snow load, icy access, and the need to keep interiors protected during cold-weather leak events. If you're facing an active leak, don't delay: temporary repairs that address flashing and vent seals can buy you safe navigation through the worst of winter while you line up the ideal reroofing plan. In all cases, expect your contractor to address edge details first and to verify attic ventilation, underlayment integrity, and flashing continuity before shingles are replaced. This targeted sequence is what stops ice dams before they start and keeps entrapped meltwater from infiltrating living spaces.
In White Plains, spring hail and summer thunderstorm bursts can expose roof weaknesses fast. Wind-driven rain can find flashing seams and vent collars that look fine from the ground but fail under pressure, often long before you notice full field-shingle damage. If you hear rain tapping or see water streaks indoors after a storm, treat it as an active leak. Your first move is to seal the most exposed area with a temporary tarp or plastic while you arrange a professional assessment. Time matters: the longer active leaks run, the higher the risk of interior damage and accelerated deck rot beneath the shingles. Focus on vulnerable zones-valleys, penetrations, edges, and any roof lines that align with recent high-wind gusts in your neighborhood.
White Plains homeowners see claim activity spike after storms, so documenting thoroughly is essential. Insurers typically want photos, written estimates, and permit records. Take clear, dated photos from ground level and from the attic if accessible. Capture every loose shingle edge, lifted flashing, torn underlayment, and any interior water intrusion on ceilings or walls. Keep copies of all professional assessments, temporary repairs, and any contractor communications. When you contact a contractor, request a written inspection report that itemizes damaged components and suggests immediate stabilization steps. Don't remove temporary fixes right away; insurers will want to see the condition before and after any repair. Your organized file speeds the claims process and reduces back-and-forth, especially if a regional storm passes and contractors tighten up availability.
Seasonal demand spikes after regional storm events can tighten contractor availability in Westchester, so response speed matters. If you uncover an active leak, prioritize tarping and secure a temporary seal to prevent rain from cascading into ceilings and walls. White Plains homes with older flashing or near-loss seams often show water intrusion first at flashing joints rather than shingle failure, so address flashing vulnerabilities promptly. When scheduling repairs, aim for a plan that restores weatherproofing quickly while a longer-term solution is designed. If your roof has known vulnerabilities-steep slopes, valleys, or complex flashing-consider preemptive inspections after heavy storms to catch issues early before they become widespread leaks. Acting decisively preserves interior living space and reduces the risk of freeze-thaw cycles compounding the damage once fall arrives.
Find local contractors experienced in assessing and restoring roofs after hail, wind, and severe weather events.
Neptune Construction Corporation
(347) 225-6404 neptuneconstructioncorp.com
137 Dobbs Ferry Rd, White Plains, New York
4.9 from 28 reviews

Towers Roofing of White Plains
(914) 293-4364 towersroofingwhiteplains.xyz
470 Mamaroneck Ave #240, White Plains, New York
4.9 from 14 reviews

Expert Roofing of Westchester
(914) 446-3072 expertroofingwestchester.com
777 Westchester Ave Suit 101, White Plains, New York
4.9 from 328 reviews
Expert Roofing of Westchester offers professional commercial and residential roofing in Westchester County, NY. With over 20 years of trusted experience, we serve homeowners and businesses with reliable, long-lasting roofing solutions. As a licensed and insured contractor, we handle everything from roof installation, roof replacement, and roof leak repair to siding, chimney, masonry, and gutter work. Our crews are also available 24/7 for emergency roofing repairs. Every project includes written estimates, clean workmanship, and a 10-year limited warranty. Choose Expert Roofing of Westchester for dependable service, quality materials, and craftsmanship built to last. Get a free estimate today.
Delta Roofing Westchester
(914) 229-9777 deltaroofingwestchester.com
445 Hamilton Ave #1102, White Plains, New York
4.9 from 63 reviews
Delta Roofing Westchester is your reliable roofing contractor, proudly serving residential and commercial clients across Westchester, NY. We specialize in roof repairs, installations, maintenance, and cleaning services, offering high-quality solutions tailored to your needs. Our fully licensed and experienced team provides expert roof inspections, leak repairs, and complete roof replacements. Whether you need a new roof installation or routine maintenance, we use top-grade materials to ensure durability and long-lasting results. Serving Westchester and surrounding areas, we are committed to providing professional roofing services with exceptional customer satisfaction. Solve Roof Issues Now by Calling Our Experts!
American Star Contractor
(800) 663-6036 www.americanstarcontractor.com
77 Lafayette Ave, White Plains, New York
4.9 from 87 reviews
American Star Contractor is a trusted construction company serving New York City with expert roofing, masonry, chimney repair, flat roof installations, and more. We specialize in durable roof replacements and repairs to protect your property from the elements. Our skilled team offers high-quality masonry services, including brick, stone, and concrete work for residential and commercial properties. We also provide siding installations to enhance curb appeal and energy efficiency. Additionally, our comprehensive gutter services help prevent water damage. With years of experience, we’re committed to delivering superior craftsmanship, professionalism, and customer satisfaction on every project. Contact us for reliable construction service!
Neptune Construction Corporation
(347) 225-6404 neptuneconstructioncorp.com
137 Dobbs Ferry Rd, White Plains, New York
4.9 from 28 reviews
Neptune Construction offers a comprehensive range of roofing services, including installations and repairs for any type of roof. Our team of experienced professionals is equipped with the latest tools and techniques to ensure that each project is completed to the highest standards. In addition to roofing, we are a full contractor that has the ability to construct entire buildings from the ground up. With 18 years of experience in the construction business, the company has a proven track record and a broad range of capabilities. Our team works efficiently and effectively to complete each project on time and within budget, delivering stunning results that exceed expectations. With our commitment to quality and our extensive range of cap
Towers Roofing of White Plains
(914) 293-4364 towersroofingwhiteplains.xyz
470 Mamaroneck Ave #240, White Plains, New York
4.9 from 14 reviews
Towers Roofing of White Plains is a premier roofing contractor based in White Plains, New York, proudly serving homeowners and businesses throughout Westchester County. We specialize in Roof Replacement, Roof Repair, New Roof Installation, Roof Inspection, and Emergency Roof Repair. Whether you're dealing with storm damage, aging shingles, or building a new home, our skilled team delivers high-quality craftsmanship and dependable service on every project. At Towers Roofing of White Plains, we’re committed to protecting your property with durable roofing solutions tailored to your needs. Contact us today for expert service, fast response times, and trusted local experience.
Morocho’s Home Improvement
1 W Prospect Ave 2nd Floor, White Plains, New York
4.8 from 12 reviews
Morocho’s Home Improvement is a family-owned company that was established 17 years ago in White Plains, NY. Our company was built with the commitment to ensure cost-effectiveness and high-quality in every home improvement Services. Our company was founded under the great values of: Professionalism Commitment Diligence Cost-Effectiveness Contact our team today and get a free estimate for any of the services that we offer Call us at 914-384-7580 and get more information about our services. If you hire us to do the job we will work hard and smart until your expectations are exceeded. Contact our professional and reliable company today to save time and money on your upcoming home improvement project!
Mortelliti Contractors
(914) 592-6860 mortelliticontractors.com
Serving
5.0 from 25 reviews
Mortelliti Contractors is your trusted local commercial roofing contractor in Westchester, NY, with over 80 years of experience. We specialize in roof repair, roof replacement, and residential roofing. We also offer expert siding, interior painting, carpentry and home improvement services. Fully licensed and insured, we take pride in delivering reliable, high-quality work that lasts. Whether it's fixing a leak, upgrading your siding, or painting your home, we handle it all with care and professionalism.
6D Roofing & Chimney Repair
(914) 688-2332 6dconstructiongroup.com
Serving
5.0 from 23 reviews
6D Construction dba 6D Roofing and Chimney Repair is your local residential and commercial roofing service company specializing in repairs, installation, and replacement of roofs, chimneys, gutters, skylights, and siding. Whether you have a roof leak or need a new roof installation, you can count on 6D Roofing and Chimney Repair for professional service at an affordable price.
King Quality Roofing & Siding
(914) 901-3910 www.kingquality.com
Serving
5.0 from 302 reviews
King Quality’s team of award-winning contractors has been transforming Westchester homes into castles fit for a king or queen. For over 35 years homeowners have trusted us for expert installation of roofing, siding and windows for your home. Serving Westchester County, King Quality installs industry-leading roofing, siding and window products to ensure your home looks beautiful and is protected against damage from bad weather. Get peace of mind for a lifetime with exceptional protection provided by quality products backed by lifetime warranties. We also offer low monthly payment options. King Quality's dedication to personalized service will make your experience exceptional.
DHA Construction
(917) 557-8644 dha-construction.com
Serving
5.0 from 76 reviews
Welcome to DHA Construction, your local construction, roofing, and painting company based in Greenville, New York. We know choosing a roofing and building contractor is a tough job. We are here to help make it easier! DHA Construction has been providing roof installations and roof repairs in the Bronx, NY area since 2010. With each new project, whether residential or commercial, we strive to provide professional, timely service at a fair price. What's more, we offer a variety of exterior home improvement services to keep your home looking its best, including interior painting, exterior painting, and masonry services. We are licensed and insured with competitive pricing.
Exterior Improvements
(914) 215-1729 www.exteriorimprovements.com
Serving
5.0 from 18 reviews
We are a locally owned, licensed and insured roofing contractor known for our community-minded, service-focused, high-quality storm damage restoration projects.
Unified Home Remodeling
(914) 358-9650 www.unifiedhomeremodeling.com
Serving
4.5 from 42 reviews
OPEN BY APPOINTMENT 7 DAYS A WEEK! Call 888-631-2131 to schedule an Appointment with our Home Remodeling Experts to meet you at this showroom at a time & date that works for you! Unified Home Remodeling’s Scarsdale, NY location at 757 Central Park Ave serves Scarsdale and Westchester County with exterior upgrades backed by three generations of experience. We deliver roofing, siding, windows, doors, masonry, gutters, decking, insulation, and more—using top brands like Andersen, Owens Corning, CertainTeed, ProVia, and GAF. As a family-owned and BBB A+ rated contractor since 1989, we’ve completed over 350,000 jobs with a 99.6% customer satisfaction rating. Fully licensed, insured, and factory certified, we offer lifetime warranties!
In White Plains, roofing choices span asphalt shingles, slate, wood shakes, metal, and tile because the city includes both modest postwar homes and older higher-value properties common in southern Westchester. This mix means a single approach won't fit every roof. The key is matching material behavior to the typical White Plains climate: heavy snows, freeze-thaw cycles, humid summers, and a web of chimneys, valleys, and flashing that were built decades ago.
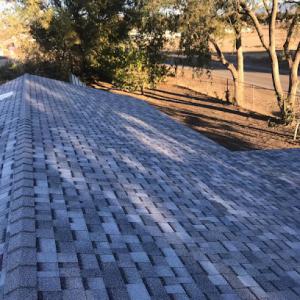
Asphalt shingles remain a practical, versatile option on many modest postwar homes. They shed snow reasonably well when you choose architectural or higher-end three-tab profiles and ensure proper attic ventilation and continuous underlayment. For steeper slopes, proper installation around chimneys and flashing details helps keep ice dams from forming at the eaves and in valleys. On steeper roofs, you'll still want a snow-retention plan and well-sealed flashing to minimize heat loss that triggers melt-and-refreeze cycles.
Slate remains locally relevant in White Plains because many older homes in the area were built with premium steep-slope materials, making repair-versus-replacement decisions more complex than in all-shingle markets. If you own a historic or higher-value home with intact slate, prioritize preserving original ridges and flashing. When slate needs replacement, matching the slope, weight considerations, and fastener compatibility is crucial. In some cases, replacing a few broken slates and upgrading flashing yields a durable result without a total roof rebuild.
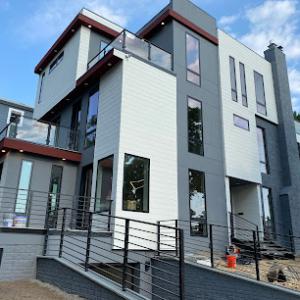
Metal roofing offers excellent durability against freeze-thaw damage and rapid snow shedding, which helps reduce ice dam risk on moderate and steep slopes. In White Plains, metal can be a strong choice for homes with tall, prominent ridges or complex rooflines where long, sleek panels minimize seam problems. Pay attention to panel seams, end-laps, and flashing around chimneys, as these areas drive performance in humid summers and heat-driven expansion.
Wood shakes and tile provide aesthetic and performance advantages on specific elevations and historic neighborhoods. Wood can handle the winter moisture if treated and maintained, but it demands more ongoing care in humid summers to prevent rot and mold in eaves and soffits. Clay and concrete tile offer long life and good snow-shedding behavior, yet weight and roof structure limitations must be checked, especially for older homes with marginal framing. Flashing around chimneys and valleys must be robust and compatible with heavier materials to prevent leaks during freeze-thaw transitions.
When selecting material, evaluate how often the roof faces the sun, how heat escapes from the attic, and how the existing chimney and valley configurations channel moisture. For older regional homes, compatibility with flashing details, ridge lines, and fastener patterns matters as much as the material selection itself. In practice, a mix of modern underlayment, thoughtful snow-shedding design, and careful integration with the current flashing details will yield the most reliable performance through White Plains winters and humid summers.
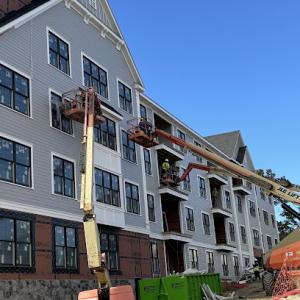
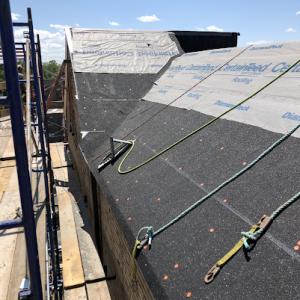
Flat and low-slope roofing matters in White Plains because the city has a substantial mix of commercial buildings, multifamily properties, and attached structures near the downtown core. The practical realities are that many roofs here carry weight from repeated freeze-thaw cycles, followed by humid summers that push moisture into seams and edge details. In this climate, drainage and edge detailing must be treated as primary design considerations, not afterthoughts. A flat or low-slope roof in this setting should address both the daily water load and the seasonal stress from winter conditions.
Snow retention is a bigger concern on White Plains low-slope roofs than on steep suburban roofs. When snow sits and melts, it can refreeze at seams, drains, and parapet edges, creating ice dams that back up water under flashing and into fascia lines. The goal is to keep water moving toward proper scuppers and internal drains without creating standing pockets. Pay particular attention to gradually draining slopes, properly pitched transitions, and tested drainage calculations that anticipate mid-winter temperature swings. Edge details matter: keep metal edging and drip edges sound, and verify that waterproofing membranes extend over edge flashings to prevent wind-driven leaks.
Owners of mixed-use and multifamily buildings in White Plains often need roofing scopes that coordinate drainage, flashing, and staged access in tighter urbanized settings. Ensure that flashing transitions align with parapets, skylights, and mechanical curbs, and plan for access routes that don't compromise waterproofing during routine maintenance. In multi-tenant settings, specify consistent flashing materials and joint designs so that repairs in one unit don't inadvertently affect another. Drainage paths should be clearly mapped, with redundancy: a primary internal drain system supported by secondary scuppers where practical, and clear low spots eliminated during installation.
For a White Plains flat or low-slope roof, implement a proactive maintenance calendar that targets freeze-thaw risk windows in late fall and early spring. Before winter, verify that all drains are clear of debris and that interior scuppers remain unobstructed. After heavy snows, inspect for ice buildup near flashing, parapets, and edge details, and remove compacted ice where safe. Schedule annual inspections that focus on seam integrity, flashing adhesion, and membrane wear at transitions, corners, and penetrations. Document any repairs with photos and keep a log for the next season so that drainage and flashing choices remain consistent as the building changes hands or tenants. This approach keeps the roof resilient through White Plains' distinctive seasonal cycle.
Find specialists in TPO, EPDM, and built-up flat roofing systems for residential and commercial properties.
American Star Contractor
(800) 663-6036 www.americanstarcontractor.com
77 Lafayette Ave, White Plains, New York
4.9 from 87 reviews
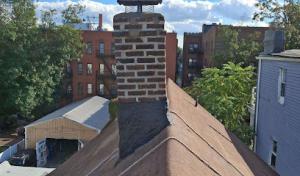
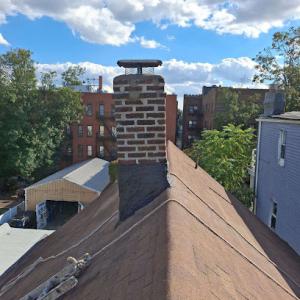
Chimney-related roof work is especially relevant here because many homes in this part of Westchester still have masonry chimneys that create recurring flashing and cricket leak points. The combination of freeze-thaw cycles and humid summers means mortar joints and flashing can deteriorate faster than neighboring roofing field. When leaks appear, they rarely track neatly across the roof surface; they often wander in along the sides of the chimney or around flat, narrow cricket channels designed to shed water. Knowing where to look helps avoid chasing symptoms rather than fixes.
On older houses, leak tracing frequently centers on chimney flashing details and the crickets that channel water away from the chimney base. Crickets can fail or settle over time, allowing pooling behind the flashing and along wall intersections. A common sign is a narrow damp line or softening at the chimney-to-roof seam, sometimes accompanied by mineral staining on interior ceilings near the chimney chase. When diagnosing, inspect the step and counter-flashing where the masonry meets the roof deck, and check the cricket for proper slope and sealant continuity. Replacing old or cracked step flashing and resealing the chase can stop repeated leaks without a full roof replacement.
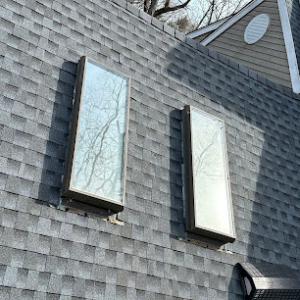
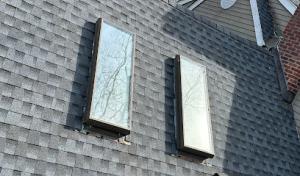
Skylight leak diagnosis is important locally because freeze-thaw movement and wind-driven rain can mimic field-roof failure when the real problem is curb flashing or aging seals. The curb is a common failure point as the sealant around the base dries out or the flashing is misaligned. Wind-driven rain can force water under the curb even when the visible glass appears intact. If interior staining tracks to a skylight, pay close attention to the fasteners, gasket integrity, and the seal at the curb. Often, resealing or replacing aging gaskets and adjusting curb flashing resolves leaks that otherwise look like widespread roof trouble.
On older homes, leak tracing often centers on roof-to-wall transitions, chimney flashing, and skylight penetrations rather than only the main roofing field. Water may intrude where a wall intersects the roof deck, where flashing is buried under old roofing materials, or where a chimney meets the roof plane. When inspecting, follow the water path inward to identify whether the culprit is a failed transition seal, deteriorated kickout flashing, or compromised sealant at penetrations. Targeted resealing and flashing improvements at these transition points can prevent recurring moisture intrusion.
Find contractors experienced in skylight installation, flashing, and leak repairs to bring natural light into your home.
Uzma General Contractors | Yonkers Roofing Contractors
(347) 280-4937 www.uzmacontractinggroup.com
Serving
4.9 from 115 reviews
Replacement pricing in this market follows local housing styles and the typical White Plains roof profile. Using local averages, asphalt shingles run about 350 to 750 USD per square, metal 900 to 1400, clay tile 1000 to 1900, concrete tile 900 to 1600, wood shingles or shakes 700 to 1200, and slate 1100 to 2500 per square.
In this area, costs are often pushed up by tear-off and disposal logistics, especially when older roofs have multiple layers or when access is tighter on established neighborhood lots and denser in-city parcels. Expect higher disposal fees and more time spent maneuvering equipment in narrower driveways and tight yards around mature trees and brick facades.
Local pricing also rises when reroofing requires upgraded underlayment, ventilation, flashing, and detailed work around chimneys or premium materials common on older Westchester homes. If a roof deck needs repair or replacement, or if skylights and ventilation runs must be reworked, line items can expand quickly.
Begin with a clear scope that includes tear-off, disposal, underlayment, and flashing around penetrations. Get multiple bids that itemize these pieces, and build in a contingency for irregularities common in older structures-from soft decking to long-lead ridge vents.
Get a clear picture of your project costs upfront - no commitment required.
Expert Roofing of Westchester
(914) 446-3072 expertroofingwestchester.com
777 Westchester Ave Suit 101, White Plains, New York
4.9 from 328 reviews
American Star Contractor
(800) 663-6036 www.americanstarcontractor.com
77 Lafayette Ave, White Plains, New York
4.9 from 87 reviews
Morocho’s Home Improvement
1 W Prospect Ave 2nd Floor, White Plains, New York
4.8 from 12 reviews
In White Plains, a full roof replacement typically requires a building permit rather than being handled as informal maintenance. Start by confirming with the local building department early in the planning process, since missed steps can cause delays or rework. The permit package is commonly submitted by the contractor and includes the work scope, proposed materials, and a disposal plan for tear-off debris. You should expect the plan to spell out how old underlayment will be removed, where waste will be staged, and how shingles or other materials will be loaded for removal. Having these details lined up helps the review go smoothly and reduces the risk of field changes once work begins.
Inspections are typically scheduled during installation and again after completion. The building department focuses on current-code items that matter here in Westchester's freeze-thaw climate, including proper underlayment, adequate roof ventilation, and flashing details around chimneys, skylights, and vent piping. Expect inspectors to verify attic ventilation is balanced with soffit and ridge intake, and that attic access or hatch openings meet code for safe access and ventilation. They'll also check that flashing at valleys, eaves, and mullions is continuous and properly secured to resist moisture ingress. Being present or having your contractor present during key inspections helps address any questions on the spot and keeps the timeline on track.
Coordinate with a licensed contractor who understands White Plains' zoning nuances and permit workflows. Request copies of the permit, drainage and disposal plan, and any approved shop drawings before work starts. Keep a file with receipts, product data, and inspection notices, and have a clear point of contact for scheduling inspections. If you live in a multi-unit building or a historic section near the downtown core, confirm any additional approvals from condo associations or the historic review board, and ensure temporary protection for landscaping and walkways during tear-off and debris removal.
When a White Plains roof needs attention, insurers expect solid documentation rather than a casual contractor opinion. You should collect dated photos showing the roof's current condition, close-ups of flashing and underlayment where visible, written estimates from reputable contractors, and any relevant repair or replacement invoices. If a full replacement is involved, keep copies of the permit records as part of the file. This level of detail helps you avoid delays and questions about what actually happened to your roof.
Wind and hail events are the most likely triggers for claim activity in this neighborhood, especially near the downtown core where storms can batter exposed edges and ridge lines. After a severe storm, inspect for lifted shingles, granule loss, or damaged vents, and document them quickly. Insurers may also ask whether the roof was installed to current code with proper underlayment and flashing. If you have doubts about the installation, address them with your contractor's written notes to support your claim trajectory.
White Plains permits and inspections create a paper trail that can matter if a claim is later questioned. Keep final approvals, invoices, and product information organized and accessible. If questions arise about installation quality or roof age, you'll want to show the sequence of events from inspection through final payment. Avoid assuming a claim will be straightforward; a clear, organized record can prevent miscommunications and help you move toward a timely resolution.
Move quickly to photograph damage from ground level and from ladders or a safe position that reveals the severity. Save correspondence with the insurer and your contractor, including any adjustments to the scope of work. If you're faced with a dispute, having a well-documented claim file that ties images, estimates, and approvals together will be your strongest position in resolving it, especially when winter's freeze-thaw cycles threaten lingering vulnerability on older homes.