Last updated: Apr 19, 2026
Rochester homeowners often face a two-part damage pattern: winter snow and ice stress followed by spring hail that can turn a repair decision into a full reroof. The ice and freeze-thaw cycles gnaw at shingles, underlayment, and flashing, creating micro-cracks that quietly worsen until a storm load exposes the full extent. Then spring hail arrives with a burst of force that can punch through protective layers, shift attic warmth into faster deterioration, and expose soft spots that look fine from the ground. That sequence means you may start with a small leak that seems trivial in late winter, only to confront a larger, urgent reroof decision after the first round of May storms.
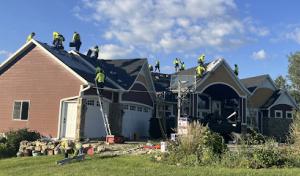
Late spring and early summer are the key reroof months in Rochester because crews are trying to avoid winter installation conditions while also responding to fresh storm damage. Weather can swing quickly from gray melt days to hot sun, and that cadence drives scheduling challenges. If your roof shows winter damage, you should anticipate a tight window once the snow is gone but before the next round of severe weather. Delays can push you out of preferred installation weather, which reduces roof life and heightens risk of interior damage if a leak sits untreated.
Minnesota's hail- and wind-driven claim environment makes fast photo documentation and date tracking especially important after Rochester-area storms. After a storm, photograph all visible damage from multiple angles, including ridge lines, vents, and flashing. Note the exact date on the photos, and keep a running timeline of repairs and evaluations. If shingles are torn, granules are exposed, or you notice moisture in the attic, treat the situation as time-sensitive. The faster you document, the stronger your position will be when insurers and contractors assess the damage in the weeks that follow.
In a two-part damage cycle, small repairs that address active leaks can buy time, but you must be honest about the roof's overall condition. If ice damage has compromised the underlayment or if hail has created widespread granule loss, the risk of interior damage increases quickly with a new storm. When several roof faces show consistent wear or there are multiple failed penetrations, it is prudent to plan for a reroof rather than chasing recurring patch jobs. In Rochester's climate, waiting for a single perfect day is a gamble; plan around the practical window that opens once ground thaw allows safe access and closes as heat and humidity push crews out of optimal working conditions.
Keep a dated notebook or digital log of every storm, every assessment, and every temporary repair. Include contractor communications, insurance estimates, and photos labeled by date and problem area. This log becomes a concrete roadmap when weather cycles resume and you must align repair scope with the season's constraints. In the end, a well-documented sequence protects the home and clarifies when to choose a full reroof versus staged fixes.

Above All Roofing of Rochester
(507) 281-8585 www.rochesterroofs.com
6889 10th Ave SW #1, Rochester, Minnesota
4.9 from 163 reviews
In business since 2005, Above All Roofing, Rochester's residential and commercial roofing experts, continue to provide personalized customer experiences, honest services, and a lifetime workmanship warranty. Their services range from full roof replacements to roof repairs and preventive roof maintenance, ensuring maximum protection for homes and businesses. This local team of roofing professionals, committed to their community, is dedicated to offering top-notch services, including free roof inspections, metal roofing options, snow removal, and thorough storm damage assessments from hail and wind. Contact Above All Roofing to ensure the longevity and integrity of your property's most important asset—your roof.
Gray Duck Roofing
(507) 407-6552 www.grayduckroofing.com
606 11th Ave NW, Rochester, Minnesota
5.0 from 78 reviews
At Gray Duck Roofing, we are a full-service roofing contractor in Rochester, Minnesota. We offer unparalleled customer service, superior building materials, and outstanding quality of installation. Our company is locally owned and operated servicing Rochester and the surrounding areas. We are fully licensed and insured to guarantee our workmanship. Our company was built on the promise of exceptional customer service, high quality craftsmanship, and innovative solutions.
Gary Kline Roofing
(507) 289-6686 garyklineroofing.com
3021 43rd St NW, Rochester, Minnesota
4.9 from 99 reviews
Roofing Specialists
Heyn Brothers Roofing
(507) 593-7522 www.heynbrothers.com
6169 Rome Cir NW, Rochester, Minnesota
4.9 from 117 reviews
We pride ourselves in being the most professional roofing business in Southern Minnesota. For 26 years we have been helping homeowners and businesses with all of their roofing needs. With over 20 years experience installing steel roofing! Fast and dependable service is our highest priority on every project. Our professionalism has made us one of the elite roofing companies in Minnesota. After working with us, you will see that our staff is easy to work with and very knowledgeable on all of our products and services offered. Give Heyn Brothers a call and protect your biggest investment!

Built Strong Exteriors
(651) 702-1300 builtstrongexteriors.com
5931 Bandel Rd NW #120, Rochester, Minnesota
5.0 from 58 reviews
Built Strong Exteriors is a family-owned and operated company proud to serve our Minnesota & Wisconsin communities. Our roots and our hearts are right here, and we know what it takes to keep your property’s exterior safe and sturdy year-round. With over 25 years of experience in the industry, our highly-qualified staff is here to serve you with professionalism, kindness, and an excellent work ethic. Built Strong Exteriors specializes and are experts in Residential, Commercial & Industrial Roofing & Exteriors.
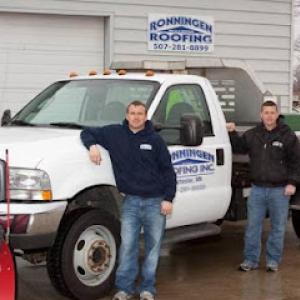
Ronningen Roofing
(507) 281-8899 ronningenroofing.com
608 11th Ave NW, Rochester, Minnesota
4.9 from 111 reviews
Are you looking for affordable, professional solutions to roof leaks or storm damage? The specialists at Ronningen Roofing, Inc. have served the Rochester, MN, area since 1998, completing countless roofing and gutter repair and replacement projects. This business is here to help with everything from shingle replacement to storm damage repairs to new roof installation. Ronningen Roofing understands the importance of your home’s appearance. Whether you need a refreshed look for your aged shingles or you’re repairing a pesky leak, this team of experts will provide a cost-effective solution.
Redemptive Roofing
(507) 251-6283 redemptiveroofing.com
3661 36th Ave SE, Rochester, Minnesota
4.9 from 72 reviews
Redemptive Roofing of Rochester, MN has 25+ years of experience in providing residential roofing and light commercial services. The crews are well qualified and supervised, and we guarantee the quality of the work; so you can have peace of mind that your roofing project will be done efficiently and well. We are not satisfied until you are satisfied. Redemptive Roofing is licensed in Minnesota and fully insured—a business of integrity, quality, and safety.
Rainey Gutters
(507) 884-8705 raineygutters.com
2443 Clare Ln NE Suite 112, Rochester, Minnesota
4.8 from 143 reviews
Rainey Gutters provides gutter installation service, gutter guards, and gutter cleaning and over 50 years of combined experience to the Rochester, MN area.
H & H Construction
(612) 570-0216 mnhandhconstructionllc.com
6109 Rome Cir NW, Rochester, Minnesota
4.9 from 37 reviews
H & H Construction is a trusted roofing and remodeling contractor serving Rochester, MN and surrounding areas. We specialize in roof replacement, storm damage repair, siding installation, custom deck building, and interior renovations. Our team handles kitchens, bathrooms, basements, and other interior projects with the same attention to detail we bring to our exterior work. We work with high-quality materials, including Trex composite decking, to deliver lasting results. From design to completion, we manage every step to ensure your project is done right the first time. Committed to craftsmanship, clear communication, and excellent service, we help homeowners protect, improve, and enjoy their homes inside and out.
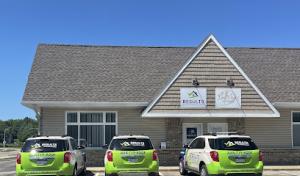
Results Contracting
(888) 719-7663 resultscontracting.com
3003 43rd St NW STE 101, Rochester, Minnesota
4.9 from 28 reviews
Licensed MN General Contractor Specializing in Exterior Storm Damage Repair

Weather Shield Home Experts
(507) 628-0839 wshomeexperts.com
816 N Broadway Ave, Rochester, Minnesota
4.8 from 89 reviews
Weather Shield Home Experts provides asphalt and rubber roofing, seamless gutters, and ice dam removal in the Rochester, MN.
Tri-State Commercial Roofing
(507) 322-7773 tristatecommercialroofing.com
Rochester, Minnesota
5.0 from 22 reviews
Tri-State Commercial Roofing provides roof installation, repair and restoration services to the Harmony, MN area.
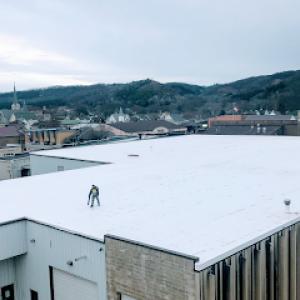
Rooftops in this winter-heavy climate face repeated snow accumulation and ice formation at eaves, making moisture barrier performance a central roof concern. When the snow piles high, the weight sits on the deck and underlayment can stretch or fail if the roof isn't prepared for sustained cold. Ice can creep up under shingles and flashing, pressing against seams and vent collars, which invites slow leaks that only become obvious after a thaw or a heavy melt. The result is a quiet, creeping weakness that can undermine years of good workmanship if left unchecked.
The key early warning is the eave line. Ice dams form when melted snow refreezes at the edge, creating a dam that traps water on the roof. That water backs up behind the dam and seeks any small opening-loose shingles, a gap in flashing, or a cracked boot-and can pry up shingles as it freezes and expands. A roof that looks sound from the street can hide eroded edges, torn granules, or delaminating underlayment beneath the surface. If you see a line of dark streaks or damp patches along the ceiling inside, that's a signal to look closer before a minor issue becomes a bigger, more expensive repair.
Freeze-thaw swings in fall and spring can expose weak decking, flashing, and shingle edges as temperatures move above and below freezing. During a warm spell, sun-warmed shingles can soften and bend, while nighttime freezes lock everything tight again. That cycle stresses fasteners, nails, and sealants, and it is a common source of wind-driven damage as well. In practice, this means small gaps around vents or chimney flashing may grow over successive cycles, inviting moisture infiltration even if a quick roof inspection was performed the week before. Regular checks after notable temperature shifts are worth it.
Focusing on the top edge and penetrations is practical without turning every gutter job into a major project. Start by inspecting around vent pipes, flashing at chimneys, skylights, and dormers, and at the transition between roof and walls. Look for lifted shingles at the eave line, curling edges, and granule loss in the gutter or downspout debris-the telltales of a deck and flashing that have seen better days. If you notice staining on the interior ceiling or a musty odor after a storm, treat it as an early leak signal and respond promptly. Delaying a fix risks escalating the damage, which can threaten insulation and attic ventilation as well.
Emergency leak response matters locally because winter roof failures may need temporary protection before full replacement can be scheduled. If a leak begins during a cold spell, place a tarp or plastic sheeting over the affected area to slow water intrusion while you arrange professional assistance. Avoid creating hazardous conditions by climbing on a slick roof unattended, and keep walkways clear of ice and snow to prevent falls. A temporary patch is not a cure, but it buys time to get a proper assessment and a plan in place for a thorough reroof when conditions allow.
Ultimately, a well-coordinated approach during the late winter-to-early-summer window reduces the risk from hail, wind, and the freeze-thaw cycle. Proactive maintenance-timely flashing reseals, edge protection, and attention to the eaves-can extend the life of the roof, minimize interior damage, and help you avoid the most disruptive failures when the region's typical weather patterns reassert themselves.
When you can't wait, these contractors offer fast response times to stop leaks and prevent further damage.
Built Strong Exteriors
(651) 702-1300 builtstrongexteriors.com
5931 Bandel Rd NW #120, Rochester, Minnesota
5.0 from 58 reviews
Redemptive Roofing
(507) 251-6283 redemptiveroofing.com
3661 36th Ave SE, Rochester, Minnesota
4.9 from 72 reviews
In Rochester, asphalt shingles dominate replacements because they fit the storm-repair market and broad range of residential reroof budgets. They're familiar to local crews, install quickly, and handle the typical mix of spring wind events and summer hail with straightforward repair paths. For homes facing frequent freeze-thaw cycles, look for architectural or laminated styles that add durability and better wind resistance. A practical strategy is to pair shingles with a solid underlayment and proper attic ventilation to minimize ice dam risk during the late-season melt.
Metal roofing has a meaningful niche in Rochester, reflecting local demand for snow-shedding performance and durability through freeze-thaw cycles. If you want longer life in a harsher winter, metal can shed heavy snow more predictably and resist ice buildup along eaves. Choose panels with a concealed fastener or a standing-seam design to reduce the chance of wind-driven impacts loosening fasteners. Ensure the roof deck is solid and well-ventilated, because metal performs best when it can shed both heat and moisture without creating hidden moisture traps.
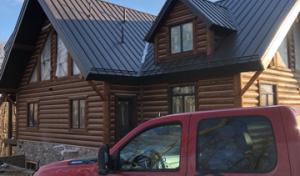
Tile and wood products are available in the market, but Rochester's winter weather and hail exposure make installation quality and structural suitability more consequential than in milder climates. Clay and concrete tiles are heavy; a qualified structural assessment is essential to confirm the attic and wall framing can support the load. Hail can crack softer tiles, so it's critical to choose impact-resistant variants or incorporate a protective underlayment. Wood shingles or shakes offer aesthetic warmth but require careful maintenance and moisture control to prevent warping or rot after icy cycles.
No matter the material, the installation schedule should align with Rochester's tendency to see late-spring to early-summer reroof activity. Proper flashing around chimneys, vents, and skylights is crucial to handling spring thaw pooling and wind-driven rain. Consider a roof system that accommodates ice dam control, effective ventilation, and a sturdy sealant strategy for year-round performance. With the right choices, the roof can resist hail punches, wind uplift, and the repeated freeze-thaw transitions characteristic of this market.
In this market, costs swing with storm-driven demand. When a hail or wind event hits, contractors tighten schedules and material deliveries, which can push pricing upward for a few days or even a week. Homeowners often see crews booked farther out or charging a premium to secure a spot, especially for a mid-season replacement. Knowing that surge is part of the rhythm helps you plan a bit of margin in both budget and timing.
Rochester's short preferred reroof window in late spring and early summer compresses labor availability. When the calendar tightens, crews may charge a premium for faster turnaround or for weekend work to meet a window, and you may face tighter sequencing with inspections and debris removal. If you're juggling other outdoor projects, align the roof replacement with the earliest feasible stretch in that window to minimize downtime and avoid weather-induced delays that ripple into labor costs.
Asphalt shingles generally run from about 350 to 700 USD per square, a range driven by shingle quality, underlayment, and disposal. Metal roofing sits higher, roughly 650 to 1300 USD per square, reflecting installation complexity and panel profile. Clay tile and concrete tile are more specialized, with clay from about 1100 to 2500 USD per square and concrete from 900 to 2100 USD per square. Wood shingles/shakes commonly fall between 450 and 1200 USD per square, while synthetic or composite shingles span roughly 600 to 1000 USD per square. The right choice balances climate durability, storm resistance, and long-term maintenance in the Upper Midwest conditions Rochester homeowners face.
Start with a conservative contingency of 10 to 15 percent above the base material and labor estimate to cover late-season scheduling shifts or small weather-driven delays. Request a phased schedule that prioritizes weather-friendly days to avoid back-to-back rain or heat spikes. When comparing bids, confirm that each proposal accounts for tear-off, disposal, flashing, and ventilation, since gaps there can quietly inflate the final tally during a busy, storm-prone season.
Get a clear picture of your project costs upfront - no commitment required.

Above All Roofing of Rochester
(507) 281-8585 www.rochesterroofs.com
6889 10th Ave SW #1, Rochester, Minnesota
4.9 from 163 reviews
Results Contracting
(888) 719-7663 resultscontracting.com
3003 43rd St NW STE 101, Rochester, Minnesota
4.9 from 28 reviews
Renner Roofing
(507) 757-8852 rennerroofingmn.com
3169 Wellner Dr NE, Rochester, Minnesota
4.9 from 29 reviews
A full reroof typically requires a permit through the City of Rochester Building Safety Department. Before lifting shingles or pulling underlayment, you'll want to confirm that the project scope is clear and that the permit is active for the exact roof area being replaced. In Rochester, the permit process can influence the timing of a reroof, especially when early-season weather, post-storm debris, or workload at the department slows progress. Planning ahead with your contractor to align material deliveries and weather windows helps avoid last-minute hold-ups.
The city reviews reroof projects and conducts inspections at rough-in and final stages to verify compliance with roofing, underlayment, and wind-related requirements. Rough-in inspection focuses on materials stored on-site, installation method, and adherence to local wind uplift standards. The final inspection confirms that flashing, venting, and overall installation meet code and the contract documents. If your project includes upgrading underlayment or adding vented soffits, these elements are common points of review during the rough-in and again at final. Understanding this helps you coordinate with your roofer to address potential notes promptly.
Inspection scheduling and permit turnaround in Rochester can be affected by weather and departmental workload, which matters during storm-recovery periods. Cold snaps or heavy precipitation can push inspections to later days, while a backlog during peak hail season can stretch the timeline. If a storm increases the number of claims in a short window, expect the Building Safety Department to prioritize urgent repairs and safety-critical permits. Communicate anticipated weather gaps to your contractor and plan contingency days so the project doesn't stall between a rough-in and final inspection.
Maintain open lines of communication with the contractor about permit status, required documentation, and upcoming inspection dates. Have accessible copies of copy permits, plan sets, and any engineering or wind-resistance amendments on site. If a snag arises-such as a missing inspection card or a required reinspection-address it promptly to prevent delays in storm-damaged periods. Remember that roof work must align with other local permits if adjacent exterior work is happening simultaneously.
Rochester sits in Minnesota's active hail and wind claim environment, so insurers commonly expect date-stamped photos, damage notes, and prompt reporting. After a harsh winter, the first signs of trouble often show up with spring sun and thaw, but claims timing can hinge on when moisture actually shows up in the attic or on ceilings.
Because winter damage can be followed by spring hail, homeowners need documentation that separates storm events and tracks when leaks or shingle loss first appeared. A clear timeline helps avoid confusion when multiple events affect the same roof. Keep dated photos from each significant storm and note the exact locations of new leaks.
Adjuster site visits are a normal part of the local claims process, and workmanship or material condition may be scrutinized when a roof has mixed old and new damage. Present a consistent, event-by-event record so the adjuster can distinguish preexisting wear from recent impacts. Inaccurate or missing details tend to slow the process and complicate recovery.
When a roof shows signs of both wind-driven granule loss and hail bruising, Rochester homeowners benefit from a careful claim narrative that connects events to visible damage. If a leak appears after a warm spell, document whether it coincides with a newly exposed seam or a damaged shingle edge. Honest, timely reporting remains the best way to keep a claim on track.
Connect with contractors who help homeowners navigate the claims process from damage assessment to final approval.
Above All Roofing of Rochester
(507) 281-8585 www.rochesterroofs.com
6889 10th Ave SW #1, Rochester, Minnesota
4.9 from 163 reviews
Gray Duck Roofing
(507) 407-6552 www.grayduckroofing.com
606 11th Ave NW, Rochester, Minnesota
5.0 from 78 reviews
Gary Kline Roofing
(507) 289-6686 garyklineroofing.com
3021 43rd St NW, Rochester, Minnesota
4.9 from 99 reviews
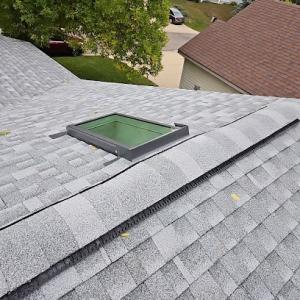
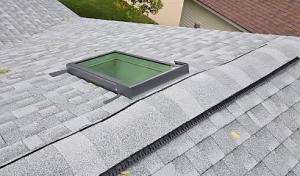
In Rochester, the freeze-thaw cycle stresses flashing around skylights and chimneys, making these spots common weak points. Expansion and contraction from winter temperatures, combined with ice buildup, stress seals and can create slow leaks that aren't obvious until a melt starts. The daily cycles of warm afternoons and cold nights keep these flashing seams under pressure, especially where metals meet shingles.
Snow and ice lingering around penetrations can hold moisture longer on this roofscape than during dry-season leak conditions. Water can back up against the flashing, creep under sealant, and saturate underlayment high up the slope. When the sun returns and a new warm spell hits, that absorbed moisture can migrate and appear as interior dampness or staining even if the visible leak seems minor. Penetrations stay vulnerable until a thorough melt-and-check cycle finishes.
Local pros note steady demand for chimney and skylight-related roof work, not just total roof-covering replacement. Typical needs include replacing aging step and counter flashings, repairing or resealing curb flashings, and upgrading end-dams around skylights. If flashing shows torn metal, loose fasteners, or detached seals, the underlying issue is usually moisture-lifting at the seam rather than a shingle failure.
After a heavy snow melt or ice dam event, walk the roof with a focus on skylights, chimneys, vents, and dormer flashings. Look for lifted shingles near penetrations, dark staining on underlayment edges, or granule loss clustered around flashings. From the attic, inspect for telltales: damp insulation, musty smells, or light peeking through flashing seams. If any red flags appear, arrange a targeted flashing diagnostic and, if needed, a flashing-only repair before issues migrate to the roof deck.
Find contractors experienced in skylight installation, flashing, and leak repairs to bring natural light into your home.
Gray Duck Roofing
(507) 407-6552 www.grayduckroofing.com
606 11th Ave NW, Rochester, Minnesota
5.0 from 78 reviews

Heyn Brothers Roofing
(507) 593-7522 www.heynbrothers.com
6169 Rome Cir NW, Rochester, Minnesota
4.9 from 117 reviews
Merit Contracting
(507) 281-4317 www.meritquality.com
4661 Hadley View Ct NE, Rochester, Minnesota
4.8 from 11 reviews