Last updated: Apr 19, 2026
Tonawanda's cold, snowy winters and repeated freeze-thaw cycles make ice backup at eaves one of the most locally relevant roof damage patterns. When meltwater from the roof refreezes at the edge, a dam forms that backs water up under shingles, into soffits, and eventually into ceilings. The result is hidden rot and costly interior damage that often shows up only after a thaw or a heavy snowstorm has begun to melt. This is not theoretical here-it's a repeated winter reality, and the clock often runs fast once temperatures flip from below freezing to above.
Many homes in this part of Erie/Niagara County have attached garages, porches, and additions with lower roof transitions. Those lower pitches create a gravity trap: snow settles there, melts, refreezes, and concentrates ice buildup where water has a harder time draining. The problem is compounded by how snow slides off steeper main sections and then refreezes at the junction with the lower roof areas. Ice backup tends to form along eave edges, underlayment seams, and around dormers or transitions where roof planes meet wall surfaces. If you notice ice sheets hanging from roof ledges or icicles the size of your palm, that's a loud warning sign of developing dam conditions.
Emergency leak calls in this market are strongly tied to winter access problems, snow-covered surfaces, and active interior water intrusion during thaw events. When the roof is buried under snow and a thaw starts, the quickest escape route for meltwater becomes compromised, sending water into attic spaces and down interior walls. This is not just a nuisance-water intrusion can threaten insulation integrity, attic ventilation, and electrical pathways. If a thaw hits while snow is piled high on the roof, the risk of a rapid interior leak spikes.
Start by clearing safe access paths to the eaves and keeping a clear area around the downspouts. If you have a garage or porch roof with a low slope joining a higher main roof, consider temporary snow removal methods that minimize damage to the shingles and avoid stepping on delicate areas. For roofs with visible ice dam formations, do not chisel ice aggressively from the edge; this can damage the shingles and create more leakage routes. Instead, use a roof-ice safety plan: create a small perimeter clearance of snow from the lower edge where feasible, and employ heat cables or safe, manufacturer-approved de-icing methods only if you've consulted with a roofer who understands local conditions. A cautious approach that avoids personal risk matters most when ice dams are forming.
Addressing the root causes means improving insulation and ventilation in attic spaces to keep the roof deck closer to outside temperatures during cold spells. Seal gaps around soffits, penetrations, and knee walls so warm attic air cannot migrate to the roof deck. Ensure attic baffles are properly installed to maintain continuous ventilation from soffits to the ridge, helping to keep the entire roof surface cold enough to prevent widespread meltwater. For garages, porches, and additions with lower roof lines, consider insulation upgrades and weatherization that reduce heat loss at the interface with the main roof. In Tonawanda, small upgrades done now can change how the roof handles a big thaw later.
If ice dam formation becomes a recurring event, or if water stains appear on ceilings after a thaw, a professional should evaluate the roof's edge condition, insulation integrity, and ventilation balance. A local roofer can perform a targeted assessment of how the eaves, transitions, and low-slope sections handle snow load, identify failing sealants or flashing, and propose a staged plan to retrofit insulation, add ventilation, and install safe edge protection. Immediate attention is warranted when interior moisture signals appear, or when icicles extend far enough to threaten gutters, fascia, or entryways.
Autumn wind events and winter snow cycles create a local pattern of lifted shingles, flashing damage, and leaks that may not be obvious until interior staining appears. In Tonawanda, roofs face freeze-thaw stress, ice dams, and repeated snow loads that stress the underlayment and fasteners. The mix of older steep-slope homes with garages, porches, and low-slope sections means ice backup can travel from roof runs into eaves, gutters, and interior ceilings. The danger is not just a missing shingle; it's a quiet failure that compounds over weeks, leaving attic spaces damp and rafters vulnerable. Stay vigilant after every windy day and every new snowfall, especially on porches, garages, and any roof transitions where water can linger.
Local insurers in the region commonly handle wind, hail, and snow-related roof claims, making documentation a routine part of roofing work in Tonawanda. When damage is suspected, you need a clear record. Photograph every angle of the roof, venting, flashing, and eaves, both before work begins and after the job is finished. Capture close-ups of lifted shingles, saturated decking, and any staining or staining patterns on ceilings or walls inside the home. A simple timeline shows when the issue appeared, how it progressed with the season, and how the repair will address the root causes like ice dam risk or poor attic insulation. An accurate, full scope of work backed by photos and notes helps prevent future back-and-forth with the insurer and speeds claims decisions.
Adjusters in this market often want before-and-after photos and a full scope of work, and roof age and material type can affect depreciation or coverage decisions. Be prepared to present a concise, itemized scope that includes roof decking where affected, flashing around chimneys and valleys, ice barriers in the eaves, and any underlayment that shows damage. If an inspector questions the roof's remaining life, present records of your roof's age, previous repairs, and the pattern of winter-related wear observed over multiple seasons. Keep a calm, organized file: photos, notes, and a written summary of conditions that prompted the claim. Your goal is to demonstrate a clear cause-and-effect path-from wind and snow to leaks-so the claim aligns with the required scope and prevents gaps in coverage. Acting quickly after a storm lowers risk of further interior damage and supports a smoother adjustment process.
Find local contractors experienced in assessing and restoring roofs after hail, wind, and severe weather events.

AVA Roofing & Siding
(716) 343-7663 www.avaroofing.com
2120 Niagara Falls Blvd, Tonawanda, New York
4.8 from 562 reviews
William C Rott & Son
454 Young St, Tonawanda, New York
4.2 from 120 reviews

AVA Roofing & Siding
(716) 343-7663 www.avaroofing.com
2120 Niagara Falls Blvd, Tonawanda, New York
4.8 from 562 reviews
We are AVA Roofing, a family owned and operated company. We are four brothers that joined together to serve #WNY and to provide premium craftsmanship for a fair price. We have served over four thousand customers and have over 500 online references.
Try-Lock Roofing
(716) 447-1688 www.trylock.com
440 Northwood Dr, Tonawanda, New York
5.0 from 18 reviews
Try-Lock Roofing is Western New York's most qualified and experienced commercial flat roofing and residential roofing contractor. We are proud to be a customer driven company that strives to give prompt, quality service for your roof repair and installations. We provide our clients with the most current roofing products available and utilize only time tested roof systems to ensure total customer satisfaction.
William C Rott & Son
454 Young St, Tonawanda, New York
4.2 from 120 reviews
We are one of the oldest residential roofing companies serving the Buffalo area for more than 100 years. Apart from roof cleaning & roof replacement, we also replace windows, sidings, and rain gutters. Based in Tonawanda since 1909, we specialize in offering full-service Buffalo roofing & remodeling services that suit your budget and requirements. If you are looking for a dependable roofing contractor in Buffalo or the surrounding areas, call us today to schedule an appointment.
Five Star Roofing Consultants & Services
(716) 828-6279 www.fivestarserviceswny.com
Serving
4.9 from 121 reviews
Five Star is known for its roofing and home improvement; we offer a wide variety of services including siding, custom trim, window & door replacements, kitchen & bath remodels, and additions. Each is performed with an emphasis on customer service and honest work.
Martin Roofing Services
(716) 884-7737 martinroofingwny.com
Serving
3.8 from 29 reviews
Since 1952, Martin Roofing has applied thousands of roofing systems in WNY. As a second-generation contractor, Martin Roofing has provided many families roofing with integrity throughout the decades. Many of our customers call Martin Roofing because their parents and grandparents called Martin Roofing. We offer a wide range of performance-proven shingles, backed with solid manufacturer warranties.

DSS Roofing
(716) 907-7373 www.dssroofing.com
Serving
5.0 from 87 reviews
DSS Roofing is a Buffalo, NY-based authorized roof replacement and installation contractor, DSS Roofing Team has been renowned for its world-class services and professional workmanship in roofing services – replacement and construction, chimney repairs and construction, and emergency roof snow removal services in Buffalo, New York, and across the USA. The team is trusted and known for fast and efficient work and that all too on reasonable pricing. DSS Roofing provides free pre-estimate for its services by that anyone can make and analyse their construction and service budget. For Residential or commercial needs opt-out free quote for roofing services.

MP Roofing & Siding
Serving
4.8 from 64 reviews
MP Roofing and Siding is a family-owned and operated business specializing in roofing and siding. We offer a wide range of services, are fully licensed and insured, use the highest quality materials and offer financing options. We understand every project is different and work with our customers to create a customized plan that meets their specific needs. We are committed to providing the best possible service and are confident we can exceed your expectations.
Lifetime Siding, Roofing & Construction
(716) 239-6476 www.lifetimesidingandroofing.com
Serving
4.9 from 115 reviews
We are a team of professional roofing contractors that service Buffalo, NY as well as Cheektowaga and Niagara Falls. Our services include new roof installations, roof trimming, roof repairs, chimney services foundation works, or decks and porches. We are here to make sure your family and your homes are protected from the harsh weather seasons in WNY during the most unexpected time of the year. Get your FREE quote today!
Above & Beyond Construction
Serving
5.0 from 5 reviews
Here at Above And Beyond Construction We do Our best to make our customers Happy with Outstanding work Performances, There is only one way to go and That’s Above And Beyond So give us a Call 716-939-1193!
Beautiful Homes of W.N.Y
(716) 500-1969 beautifulhomesofwny.com
Serving
4.9 from 16 reviews
Roofing Company in Lockport N.Y. serving Niagara and Erie Counties
R & A Roofing
Serving
5.0 from 26 reviews
R & A Roofing Company is a locally family owned and operated company, proudly serving WNY for 10 years. We pride ourselves on top notch quality service. Roofing Siding Trim, Gutters, and More. Call Today for your Free Estimate.
Dalex Roofing
(716) 609-2918 www.dalexroofing.com
Serving
4.8 from 250 reviews
Since 2004 the Dedovets brothers have strived to provide quality materials and the best roof installation practices. As a locally owned and operated business, Dalex has built a reputation as a leading roofing contractor in the Western New York area, continually advancing and evolving our practices to the latest roofing materials and technology. Thousands of pleased customers have depended on Dalex Construction for their roofing needs.
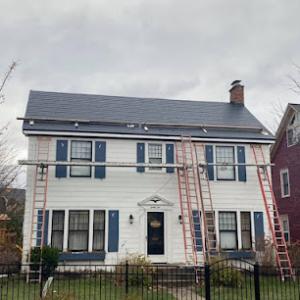
Late spring through early fall is typically the best replacement window for a Tonawanda roof. The region's winter snow and spring moisture can push tear-offs and inspections into tighter timelines or cause delays, so aim for when the ground is bare and temps are moderate. By lining up the project in late spring, you give crews solid daylight hours and a steadier schedule before the first round of autumn winds. This timing also helps manage ice dam concerns, since the harshest melt cycles are past and frozen gutters are less of an obstacle.
Spring rains and higher humidity common to Western New York can slow drying and staging, especially on homes with decking repairs or low-slope sections. If your roof has any area that sits flat against the deck or accumulates moisture from shade, expect the drying phase to stretch a bit longer. Schedule staging days with extra buffer for rain events, and plan for a portion of work to pause if a steady rain threatens flashing and sealant work. Coordinating deck repairs and roof deck exposure in the same window helps keep the whole project moving rather than chasing intermittent dry spells.
Hot summer installation days add heat stress to shingles and adhesives, which can affect handling and set times. In Tonawanda, high sun and elevated temperatures can cause faster drying of some sealants, but also increase the risk of material handling fatigue for crews. If you opt for a summer start, build in early morning work blocks, with shaded breaks and a clear plan for roof access and material storage on-site. Autumn brings stronger winds that can complicate shingle staging and rooftop moves. Open-roof scheduling should anticipate gusts and ensure temporary protective measures are in place for exposed edges and valleys. In practice, this means tighter coordination with the crew to move materials efficiently between sheltered zones and the rooftop, plus a contingency for windier days that can push timelines.
Coordinate a block of dry days with minimal precipitation in the forecast, and avoid dates that collide with late-winter snow melt spillover or early-season storms. If the house has extended eaves, plan for edge protection and temporary fall restraints during prep work to reduce weather-related delays. For homes with low-slope sections, confirm that staging brackets and ground protection are ready before any tear-off begins, since those areas harbor more moisture risk and backflow potential during thaw cycles. Finally, build a realistic buffer into the schedule for eventual ice dam checks in shoulder seasons, so small leaks or ice-related backups don't derail the entire replacement window.
Get a clear picture of your project costs upfront - no commitment required.

Lifetime Siding, Roofing & Construction
(716) 239-6476 www.lifetimesidingandroofing.com
Serving
4.9 from 115 reviews
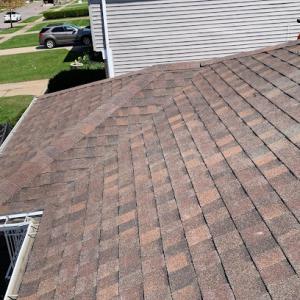
Asphalt shingles dominate locally because they fit the area's common residential roof forms and offer a lower entry cost for re-roofing after weather wear. In Tonawanda, many homes feature steep pitches on older structures and a mix of garages and porches that pair well with simple, durable shingle profiles. The familiar granule finish helps reflect a portion of sun exposure, which matters in sudden thaws followed by cold spells. When choosing asphalt, pay attention to impact resistance and algae resistance for the Lake Erie climate, where occasional moisture and humidity can accompany long winters. For homeowners with standard roof footprints and limited time for complex installation, asphalt remains the most straightforward path to restore a weathered roof without sacrificing interior protection.
Metal roofing is a meaningful local upgrade option where homeowners want better snow shedding and durability through repeated freeze-thaw seasons. The smooth, overlapping panels make ice dams less aggressive by reducing edge build-up, which is a frequent concern on low-slope sections and garages where ice backup tends to start. In Tonawanda, metal can also help with wind resilience on exposed gables and porch additions. If choosing metal, consider a panel profile that minimizes thermal movement while maintaining a clean appearance with the surrounding homes. A reflective coating or lighter color can help reduce heat absorption on sunny winter days, which indirectly supports edge flashing and long-term seal integrity around skylights or vents.
Slate appears in the local material mix, which matters in older Western New York neighborhoods where heavier legacy roofs and repair matching can complicate replacement decisions. Slate delivers exceptional longevity and a classic aesthetic that suits brick and stone-adorned facades common in this city's historic pockets. However, slate's weight and the need for compatible roof decks mean more careful assessment before replacing any existing covering. Matching fasteners, underlayment, and flashings becomes essential to maintain a cohesive look and reliable leak protection across the roof's edge and valleys. If slate is not a feasible retrofit due to structural limits, a high-quality synthetic option can provide a close appearance with more forgiving installation criteria while preserving the look that characterizes older neighborhoods.
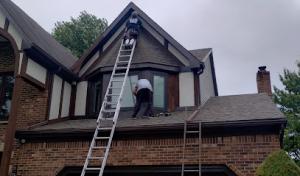
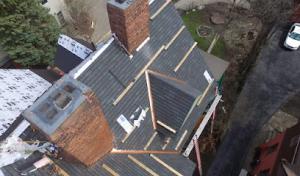
In Tonawanda, even where the main house is steep-slope, homes often include low-slope sections over porches, garages, bays, or rear additions that fail differently from the main roof. Those flat or low-slope areas face their own set of stresses from Western New York winters, including freeze-thaw cycles and heavier snow loads, which can push on edges and seams where the main roof does not. Snow retention and ponding risk are more consequential on these low-slope sections during winter and spring weather swings. This means you may see leaks tracing along the line where the steeper roof meets the flatter addition, rather than a single uniform plane failing.
Flat and low-slope sections demand attention where they tie into the rest of the roof. Start by inspecting transition zones: the fascia lines, upstands, and flashing where the low-slope meets a steeper plane. Water can back up at these joints during thaw cycles, creating hidden ice dams that push under roofing materials. Look for sheet seams, crickets, or saddles that might be missing or compromised. A thoughtful approach is to treat each transition as its own potential failure path, not just as a continuation of the main roof.
Snow retention devices matter on these areas because ponding water and ice buildup can form in corners and low spots long after a storm ends. When you clear pathways for snow removal, prioritize keeping the overhangs and parapets free of ice dams. If a low-slope section has a persistent low spot, consider regrading or adding slope-adjusted water channels to guide meltwater toward proper drainage. Regularly remove heavy accumulations before a thaw, because rapid melt can flood joints and flashings that are already stressed from winter conditions.
Leak tracing in this market often involves transitions between the main shingle roof and attached low-slope sections rather than a single uniform roof plane. If you notice stains running along a line from the main roof toward a garage or porch roof, follow the path to the closest flashing, sealant joints, and penetrations from soffit to ridge. Use dye or moisture tests sparingly to confirm whether water is migrating across that transition or seeping through a failed seam.
Perform targeted inspections at least twice a year, focusing on the seams, penetrations, and edge details where the flat and steep planes meet. After heavy snowfalls or thaws, re-check for ice buildup along eaves and at the transition zones. Keep gutters clear and ensure downspouts direct water away from the foundation, especially near low-slope additions. Address small signs of deterioration promptly-loose flashing, cracked sealant, or worn underlayment can become agents of larger leaks in the next freeze-thaw cycle.
Find specialists in TPO, EPDM, and built-up flat roofing systems for residential and commercial properties.
AVA Roofing & Siding
(716) 343-7663 www.avaroofing.com
2120 Niagara Falls Blvd, Tonawanda, New York
4.8 from 562 reviews
Try-Lock Roofing
(716) 447-1688 www.trylock.com
440 Northwood Dr, Tonawanda, New York
5.0 from 18 reviews
Five Star Roofing Consultants & Services
(716) 828-6279 www.fivestarserviceswny.com
Serving
4.9 from 121 reviews
In Tonawanda, the typical ranges for common roof materials are: asphalt shingles 400-900 per square, metal 600-1100, clay tile 1000-1800, concrete tile 900-1500, synthetic/composite 450-900, and slate 1200-2300. These figures reflect a mix of steep-slope homes and many add-ons like garages and porches where transitions complicate the install. When planning, consider square footage, roof pitch, and any irregular sections that drive labor time. Additionally, if your roof has multiple elevations or long valleys, expect to see numbers trending toward the upper ends. If you're replacing sheathing or fascia at the same time, costs will rise accordingly. For smaller repairs, you may see savings at the lower end, but transitions still matter. Talk options with tradesmen.
Costs can rise in Tonawanda when winter damage reveals wet decking, older homes require more tear-off and disposal, or when multiple roof sections and transitions increase labor time. These factors can push prices toward the higher end of the ranges. Ice dam prevention measures, venting improvements, and underlayment upgrades common in Tonawanda can add roughly 5-15% on top of material costs. In practice, many Tonawanda roofs require ice-and-water shield at eaves and upgraded ventilation to cope with freeze-thaw cycles.
Seasonal storm demand in the Buffalo-Niagara market tightens scheduling and pricing after major wind or snow events, especially for quick-turn re-roofing. If a storm hits, you may see crews quote shorter timelines and higher mobilization fees. Build a contingency for weather-driven delays and material lead times, and discuss blackout dates with your contractor to avoid rushed work on vulnerable ice-prone eaves. After a storm, have your contractor check attic insulation and venting to slow meltwater and potential leaks. Document damage with photos and notes for insurance claims and for comparison when reviewing bids.
Don't let upfront costs delay a critical repair - these contractors offer payment plans to fit your budget.
Five Star Roofing Consultants & Services
(716) 828-6279 www.fivestarserviceswny.com
Serving
4.9 from 121 reviews
Buffalo's Best Roofing Company
(716) 276-3673 www.buffalosbestroofing.com
Serving
4.9 from 564 reviews
For a full re-roof, the City of Tonawanda Building Department generally requires a permit. This is not something to guess about after a project is underway; securing the permit early helps avoid delays if an inspector notices something missing. The permit signals that the project plan adheres to local code expectations for wind, ice dam prevention, and firestopping around penetrations.
In practice, the roofing contractor typically pulls the permit, coordinates the submission, and schedules inspections. This means you should expect the contractor to handle most of the administrative steps, but you remain responsible for understanding what is being inspected and when. Inspections are scheduled during and after the work to verify code compliance and installation standards, so plan around the anticipated inspection windows to minimize disruption to you and your family.
A final inspection is generally expected before closeout. This is your checkpoint that the installation completed by the crew meets Tonawanda's safety and performance requirements, especially for ice-dam resistance and proper attic ventilation. Do not assume a pass is automatic; the inspector will check flashing, underlayment, insulation adequacy, and any penetrations through the roofline.
Homeowners should confirm any project-specific plan submittal or fee quirks directly with the local permit office. Some projects require additional documentation, such as venting details, drip edge specifications, or snow-load considerations relevant to the local climate. Contact the permit office early to clarify whether the contractor's plan meets the city's expectations and to note any unique requirements tied to porch or garage roof sections commonly found in Tonawanda homes.
In this regional insurance environment, weather-related roof claims are common enough that documentation quality can materially affect outcomes. That means every storm, icicle, or sudden thaw can trigger a claim, but the insurer will want solid proof that damage is weather-driven rather than long-term wear. The seasonality you see here-heavy lake-effect snows, freeze-thaw cycles, and rapid melt events-creates a pattern insurers recognize. When a claim is filed, the adjuster will weigh whether the roof age and material type justify depreciation or coverage decisions, so precise records matter.
Because carriers may weigh roof age and material type in depreciation or coverage decisions, older asphalt roofs can be treated differently from newer metal or slate systems. A steep-slope, multi-story home with aging shingles may face more scrutiny than a newer, well-maintained metal roof or a slate installation with documented maintenance. The insurer's eye tends to drift toward longevity expectations, past repairs, and visible wear. This is especially true after a harsh winter season when ice dam activity or freeze-thaw cycles have caused localized damage.
Homeowners here should keep dated photos, contractor scopes, and inspection notes because claim review often focuses on proving storm-related damage versus long-term wear. Photograph snow buildup on eaves, ice dam formation, gutter conditions, and any interior signs of water intrusion near ceilings or walls. Save contractor evaluations that pinpoint weather-driven impacts, not just generic wear. When you can, align your notes with a dated calendar of storms and repair milestones so the claim trail clearly shows an active chain of events tied to specific weather episodes.
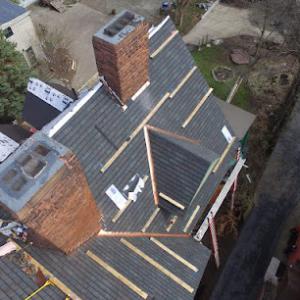
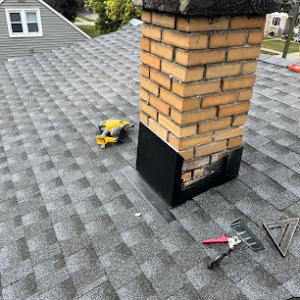
In this market, chimney work is a common job, reflecting the older housing stock and the mix of contractors advertising chimney services alongside roofing. Leaks around a chimney aren't just about the mortar; flashing where the chimney meets the roof is the real weak link, especially after freeze-thaw cycles and winter wind-driven rain. You'll notice damp spots seep in along the chimney base, staining on interior ceilings, or a visible ridge where flashing should be. When you hire, expect a project that includes flashing replacement or resealing, plus attention to any cracked step flashing along the roof line. A cautious homeowner keeps an eye on signs of masonry deterioration, such as spalling or loose bricks, which can push moisture behind the chimney crown and complicate flashing.
Skylight repairs are a meaningful specialty locally, and these penetrations become higher-risk during freeze-thaw cycling. The sealant around the skylight frame, the curb, and the flashing beneath the shingles all matter. Wind-driven rain can force water under poorly caulked edges, and ice buildup next to the curb can pry joints apart. If you notice condensation between panes, fogging, or recurring damp spots on adjoining ceilings, treat the skylight as a priority-early intervention is cheaper than mounting a full roof section later.
On older Tonawanda homes, leak diagnosis often centers on flashing at chimneys, skylights, and roof-to-wall transitions rather than field shingles alone. Look for gaps or misalignment where the roof meets vertical walls, as well as deteriorated kick-out flashing at corners. When directing a contractor, emphasize a thorough check of transitions, proper shingle dethatching near penetrations, and ensuring ice-damming precautions are integrated into the full repair plan.
Find contractors experienced in skylight installation, flashing, and leak repairs to bring natural light into your home.
AVA Roofing & Siding
(716) 343-7663 www.avaroofing.com
2120 Niagara Falls Blvd, Tonawanda, New York
4.8 from 562 reviews
William C Rott & Son
454 Young St, Tonawanda, New York
4.2 from 120 reviews
Five Star Roofing Consultants & Services
(716) 828-6279 www.fivestarserviceswny.com
Serving
4.9 from 121 reviews
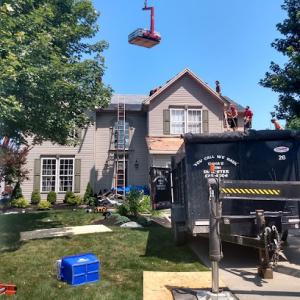
In this market, the clock matters. When a leak starts or wind rips shingles loose, you want a crew that answers promptly and arrives with the right gear to secure the site and prevent further damage. Tonawanda winters bring freeze-thaw cycles that stress shingles and underlayment, so a roofer that can be on site quickly to tarp or contain a leak saves interior work and mirrors the level of care expected in this community. Expect crews to provide a clear plan for stopping the ingress and preventing ice backup before they start any repair or replacement.
Cleanup isn't afterthought here-it's a trust signal. Homeowners expect debris and old roofing materials to be removed without leaving nails or shards behind, especially around garages and porches where snow piles can trap materials. Look for crews that lay down ground cloth, use magnetic cleanups, and protect landscaping and walkways from falling debris. A responsible crew finishes with a tidy, roof-free yard and a marked, safe work zone so driveways and sidewalks aren't left with debris or stain marks.
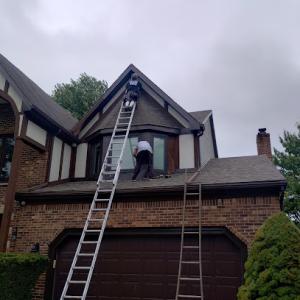
Most Tonawanda projects are re-roofs rather than brand-new builds, so your selected contractor should emphasize replacement techniques, not just shingle installation. Ask about experience with steep-slope and low-slope transitions, ice dam prevention strategies, and snow-load considerations specific to local homes. A practical team will walk you through why certain methods and materials are chosen to reduce future freeze-thaw stress and minimize the chance of recurring leaks in bays, porches, or added garage roofs.