Last updated: Apr 19, 2026
Spring in this valley hits with sudden hail and gusty winds that carve up roofs before homeowners even realize the damage. Those events are a regular pattern in this area, and claim activity tends to spike well before the main summer roofing season gets fully underway. Because the Wasatch Front sees both hailstorms and canyon-driven wind bursts, roofs tucked between the mountain bench and the Great Salt Lake corridor endure repeated impacts. That means a higher likelihood of shingles, flashing, and vent damage by late April through May, with continued activity into early summer. The urgency is real: acting quickly helps prevent interior leaks and secondary damage that can complicate a claim later on.
Local insurance handling has adapted to northern Utah's frequent hail and wind losses. Carriers often ask for documentation that confirms the extent of damage and supports the age and condition of the roof. Before filing, gather a recent photo record of the roof, any visible flaws, and notes on prior damage or repairs. When a storm hits, you should be prepared to provide the roof's age and installation date, plus a concise history of prior claims on the same roof line. Getting a quick, clear assessment from a qualified roofer helps streamline the approval process, especially when the insurer wants to see whether the damage is storm-related or pre-existing. The more organized the evidence, the faster the path to repairs.
Because many replacements are scheduled from late spring through early fall in this area, storm-related backlogs can compress contractor availability right after spring events. That pressure means a sudden surge of homeowners needing assessments, temporary protection, and full roof replacements in a tight window. When that happens, delay becomes a real cost risk: waiting can push an approved job into a crowded calendar, potentially extending exposures to weather and raising the chance of additional damage. The best move is proactive scheduling: secure a trusted local contractor as soon as the storm stops, not after a second round of hail arrives. Ask about preferred timelines, and request a written estimate that aligns with the claim approval so there is a clear plan once the claim is opened.
After a hail or wind event, document everything immediately. Take wide-angle and close-up photos of all roof planes, gutters, and flashing, focusing on hail marks, lifted shingles, cracking, and missing granules. Record the storm date, wind speeds if available, and notes on any interior water intrusion. Contact the insurer promptly to open a claim, referencing the storm as the cause of damage. If a contractor is engaged, secure temporary protections-such as tarps or boards-to prevent further moisture intrusion while the claim is processed. Keep a file of all correspondence, photos, and contractor assessments. By acting decisively in this peak window, homeowners can minimize damage progression and position the claim for smoother approval and faster replacement when the season tightens.
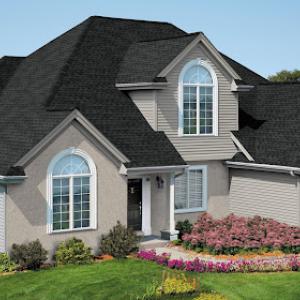
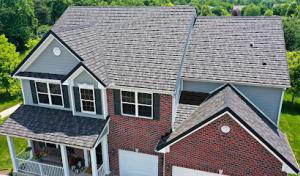
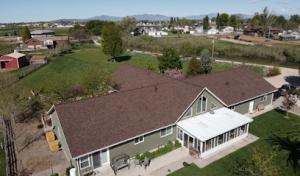
In this market, asphalt shingle and metal roofing are both active specialties, reflecting homeowner demand for systems that can handle hot summers, cold winters, and hail exposure. Asphalt is familiar, easy to repair, and forgiving during rapid temperature swings, while metal excels at shedding hail impacts and dealing with intense sun without absorbing heat. For most homes between the mountain bench and the Great Salt Lake corridor, starting with one of these two materials keeps you aligned with local expectations and local trade skills. When choosing, look for options with good impact resistance ratings and a strong warranty that covers wind uplift and hail events.
Farmington experiences a pronounced freeze-thaw cycle, especially in fall and winter. That means flashing details around chimneys, skylights, vent pipes, and roof-to-wall transitions must be rock solid. Underlayment choice matters more here than in milder valleys, because repeated freezing and thawing can push at joints. Ventilation matters too: a well-vented attic reduces indoor condensation that can deteriorate sheathing and membranes after a cold snap. If your home sees strong canyon winds, consider cresting and ridge venting that encourages consistent air movement without creating negative pressure points that pull moisture under the deck.
Hail exposure in the Farmington market pushes some homeowners toward metal for its impact resistance and faster shedding during a hailstorm. Asphalt can be engineered with higher-grade granules and impact-rated shingles, but the installation quality is decisive. In practice, choose installers who emphasize nail patterns, proper sealing around fasteners, and adequate attic ventilation to prevent ice damming and wind-driven leaks. Pay attention to edge details on metal systems: interlocks, seam closures, and proper fastening into roof framing to resist gusts from canyon winds. For shingles, look for a 130- or 150-mph wind-resistance rating if the house sits on a wind-prone slope.
Snow shedding behavior matters more here than aesthetics alone. Metal roofs naturally shed snow more quickly, reducing ice dam risk on eaves and lowering the load during heavy storms. If you opt for asphalt, select a shingle with a reflective granule layer to minimize heat buildup in summer and choose a dead-level or low-slope transition carefully to control ice dam formation. In either case, ensure better attic ventilation near eave returns and near the ridge to promote a consistent roof temperature profile. This reduces thermal stress on flashing and improves long-term performance in freeze-thaw cycles.
Flashing quality around chimneys, skylights, and vent stacks is a decisive factor for longevity. The underlayment should be a high-performance, cold-weather type that remains flexible when temperatures drop. Ventilation details-proper soffit intake, balanced attic venting, and a clear path for air to move from eave to ridge-are not cosmetic; they are crucial for avoiding condensation and prolonging shingle or metal life. Choose contractors who walk you through how their flashing plan ties to wind zones and hail paths in Davis County, and who can show a field-tested approach to securing the roof edge in gusty conditions.
Late spring through early fall is the preferred Farmington roofing window because winter snow and sustained cold can halt work. Begin planning for a reroof around late spring when daylight is longer, temperatures are reliably mild, and the cold snaps that halt progress are less frequent. If a storm front pops up or a late frost sneaks in, crews will rework their schedule rather than push ahead. By sticking to this window, the risk of material warping, shingle curl, or adhesive failure drops noticeably. The goal is to minimize weather-related interruptions that leave underlayment exposed or shingles sitting on the roof deck longer than necessary.
Summer heat and frequent afternoon thunderstorms in Farmington can slow installation pace and affect how crews handle materials during the day. High daytime temperatures can accelerate asphalt shingle drying times, which may cause dimensional changes or awkward alignment if a crew rushes. Afternoon storms force quick wrap-ups and protective tarping, which can add days to a project if lightning or heavy rain moves through. Plan for mornings to be the primetime work blocks, with crews pausing when heat peaks or when storm cells build over the benches and canyons. A smart crew will stagger roof access to avoid heat-related worker fatigue and to protect rolled underlayment from heat damage.
Fall freeze-thaw cycles in Farmington can complicate underlayment and shingle installation, making late-season scheduling riskier than many homeowners expect. As temperatures swing, moisture can creep into the underlayment and early-set shingles. If a cold snap hits after the underlayment is in place but before shingles are secured, the material can stiffen, causing wind uplift risk or improper seating. Scheduling a reroof in late fall requires a preliminary dry period forecast and a contingency plan for remote work areas like attic ventilation and deck staging. Crews may push to finish before the first hard freeze, but that often shortens daylight windows and can lead to rushed workmanship. If late-season rain or snow becomes likely, consider delaying until the next mild stretch to avoid compromised seals and warranty concerns.
In this window, you should expect steadier progress than mid-winter or peak mid-summer. A responsible crew will monitor forecasts, shield vulnerable components during afternoon storms, and communicate any adjustments to pacing or sequencing. By choosing the right months and planning around temperature and moisture cycles, a reroof can proceed with fewer weather-induced setbacks and greater confidence that the finished roof will perform well when the next round of spring hail travels through the Wasatch Front.
Get a clear picture of your project costs upfront - no commitment required.

Lloyd's Quality Roofing
(801) 671-7576 www.lloydsqualityroofing.com
311 S 650 W, Farmington, Utah
4.8 from 35 reviews
Whether you are looking for a re-roof or a new roof, we can assure you that you’ll be offered the best selection when it comes to us. Our clients have the most professionally installed roofs in the region. Your roofing services will be done timely as promised and in an orderly way by a team of experts. Servicing the Wasatch Front for over 50 years. We offer Asphalt shingle roofs, metal roofing, TPO roofing, TPO commercial roofing, and repairs. GAF Certified Contractor.
1Solar + Roofing
819 Lagoon Dr, Farmington, Utah
4.0 from 392 reviews
1Solar + Roofing is a full-service energy and roofing company, specializing in solar system installations and high-quality roofing solutions. We manage every step of your solar project — from permitting and engineering to installation and inspection — while also offering expert roofing services through our dedicated roofing division.
Best Roofing
(801) 898-7526 bestroofinginutah.com
1189 N Main St, Farmington, Utah
4.8 from 11 reviews
Best Roofing has served the residential & commercial roofing needs of the Salt Lake City region for over 30 years! We offer a premium warranty on all work!
Roof Maxx of Woods Cross, UT
Serving
5.0 from 27 reviews
Roof Maxx® is a scientifically formulated and 100% safe, plant-based roof rejuvenating spray treatment that was developed by renowned scientists from the world’s largest private research and development company.
JM Roofing Solutions
(801) 791-9940 jmroofingsolutions.org
Serving
5.0 from 173 reviews
Throughout the years, the professional crew at JM Roofing Solutions has become known throughout the Salt Lake, UT area for pristine and affordable painting, stucco, roofing, and siding services. The highly skilled and experienced experts at JM Roofing Solutions know that home improvements and maintenance can often be very costly. Many competitors see this as an opportunity to win. JM Roofing Solutions is different, and this company was founded to simply better the surrounding communities.
Legacy Roofing
(385) 526-5597 legacyroofingutah.com
Serving
5.0 from 20 reviews
Legacy Roofing is Utah's most trusted Kaysville roofer. We pride ourselves in using the highest quality GAF materials and offering our customers competitive pricing. We're Tesla's first solar roof installer in Utah. We have the knowledge and experience to install roofing the way it should be done so your home and family remain protected for years. We are GAF certified and offer up to fifty years warranty on many of our GAF roofing materials. We offer free inspections and we have hundreds of Google 5 star reviews from happy customers. Since roofing is our expertise, it is our job to make sure your home is safe and especially after severe weather. Contact us today to schedule your free roof inspection and estimate.
Kanga Roof
(801) 845-0021 www.roofingcontractorsutah.com
Serving
5.0 from 132 reviews
RW Design, the company behind Kanga Roof, has been family owned and operated for over 30 years. Rex started the business so he could use his skills as a carpenter and make a safe, controlled environment to teach his children the value of hard work. Now Doug, his son, has taken the reins and is working hard to teach his children those same values. Our favorite part of this job is the people we get to work with and for. You can count on a personal touch when you hire us! Our team has been awarded the Technician Seal of Safety. You can have peace of mind when we come to your home. We are a Recommended Roofer, which means you can count on the very best in quality and know that you have a reliable roofing professional on the job.
Apex Commercial Roofing
(385) 837-5236 www.apexcommercialroofingllc.com
Serving
5.0 from 11 reviews
Apex Commercial Roofing is a commercial and metal roof restoration business.
CLM Roofing
(801) 628-7311 www.clmroofingutah.com
Serving
5.0 from 25 reviews
A Trusted Roofing Company in Davis County Are you looking for a licensed, insured, and experienced contractor to tackle a roofing project? Get guaranteed quality results with CLM Roofing, a local roofing company serving customers everywhere from Ogden to Salt Lake City. We offer professional roofing services for both residential and commercial buildings, with the dedication and craftsmanship that has earned us a reputation for excellence. Get in touch for a free estimate today.
Bob Harvey Roofing
(801) 544-5125 www.bobharveyroofing.com
Serving
4.8 from 51 reviews
Bob Harvey Roofing is a full service roofing company serving Northern Utah for more than 35 years. Our trained roofing maintenance technicians are able to install both commercial and residential roofing systems. We hold ourselves to the highest quality standard, setting the standard by which others are measured. Bob Harvey Roofing serves Davis County, Weber County, Salt Lake County, Utah County, Box Elder County, Cache County and more. We often travel to these areas for new roofing construction or roofing repairs and maintenance! We work with the following roofing materials: Shingles Cedar shakes Metal Low-pitch Asphalt Tile roofing Thermal Plastic Olefin. Receive professional and reliable results from an insured and licensed dealer.
Rick Bangerter Roofing
(801) 544-0147 www.rbr-roofing.com
Serving
4.4 from 43 reviews
After 3 generations of roofing, and being established for well over 40 years, we know roofing. We will get you honest, fair pricing as soon as possible and get the job done right, in a timely fashion. Let us help you with your home improvements!

M.W. Roofing
(385) 243-4458 www.mwroofingutah.com
Serving
4.9 from 128 reviews
M.W. Roofing in Layton Utah repairs and replaces residential and commercial roofs in Davis county, Weber county, Box Elder County, and Salt Lake area. We provide free roof assessments. You can trust our judgment when it comes to determining whether you simply need a repair or a whole new roof. Our installers are certified, which means they have been professionally trained on how to conduct a roof inspection, repair, and replacement. If you are using an insurance company, we can help you navigate the insurance claims process and ensure that you don’t pay more out of pocket than is necessary. We do not accept payment until the job is completely finished and you are 100% satisfied with the finished product! Call us today for a free assessment.
In Farmington, reroof permits are issued through the City of Farmington Building Department as part of the standard building permit process. The permit acts as a formal authorization for replacing the roof and ensures the project meets local codes and safety standards. Because the roofing season can be impacted by spring hail and canyon-driven winds, getting the permit lined up early helps prevent weather-related delays from pushing inspections into awkward windows.
The roofer typically files the permit in Farmington rather than the homeowner handling the paperwork directly. This keeps the process streamlined and ensures all project details are correctly captured, from the scope of work to the type of underlayment and the attic ventilation strategy. If a homeowner prefers to oversee the paperwork, verify that the roofer's contact and license details are current, and confirm which stage approvals will require your presence or signature. Local inspectors will expect a clear plan that matches the actual materials chosen and the installation method.
Farmington inspections commonly verify roofing installation, flashing, underlayment, and ventilation during scheduled inspection stages. Typical milestones include a pre-installation or framing check, a mid-project inspection to confirm attic ventilation and roof deck preparation, and a final inspection to verify the completed installation, flashing around penetrations, proper underlayment placement, and ventilation adequacy. Scheduling these inspections promptly after the roofer completes each stage helps reduce delays, especially when spring weather brings sudden storms that can complicate access or require rework.
Before each inspection, ensure all flashings around chimneys, vents, skylights, and roof-to-wall transitions are properly secured and sealed. Underlayment should be continuous and free of tears or gaps, with any taped joints meeting manufacturer specifications. Ventilation components-intake and exhaust-should be visible and unobstructed, with attic spaces unobstructed for the inspector to verify airflow. Keep access clear to the eaves and the attic, and have manufacturer product data sheets on hand if the inspector asks for confirmation about material ratings or installation methods.
Maintain a project folder with permit numbers, contractor contact information, and inspection notice dates. If weather interrupts a planned inspection, coordinate with the Building Department and the roofer to reschedule promptly, ensuring that the sequence remains compliant with local timelines and windy-season contingencies. Clear, proactive communication helps keep the permit process smooth and avoids missed approvals during critical spring repair windows.
In Farmington, price moves with demand spikes after spring hail and canyon-driven wind storms. When a big hail event hits, you'll see a rush of inspections, claim activity, and contractor scheduling squeeze. Costs can climb quickly as crews shift from routine maintenance to emergency replacement mode. If you're dealing with damage, plan for a faster decision cycle than you might expect in calmer years. Delays in deciding can push work into the narrow late-spring-to-early-fall window, which often carries higher labor rates and tighter crew availability. Budget a contingency for a shorter shopping season and the need to lock in dates before weather shifts again.
Active contractors in this area commonly price asphalt shingle and metal systems, which are the most familiar to homeowners and the easiest to stock for quick turnaround after storms. Tile and cedar shake are less common and can come with longer lead times because specialists are fewer and installation windows are stricter. If you're evaluating options, expect not only material costs but also possible premium for expedited delivery or scheduling gaps for less-common materials. In practice, choosing a widely supported system can reduce both wait times and the risk of price changes as supply chains tighten after a big event.
Replacement costs can rise when projects get pushed into the late-spring-to-early-fall window to dodge lingering winter weather. In this area, that schedule is tightly linked to restoration after heavy storm days and the region's freeze-thaw cycles. The sooner a contractor can secure a firm start date, the less exposure there is to price volatility driven by back-to-back storm warnings or labor shortages. If you can align your project with the early portion of the window, you may mitigate some of the peak-season price pressure, though you'll still contend with the typical spring demand surge.
Spring hail events often trigger rapid claim activity, which can influence material selection and labor estimates. A common path is to line up multiple quotes quickly, then narrow to one option that balances best-ware performance with availability. Documentation quality-before-and-after photos, weather affidavits, and a clear scope of work-helps keep pricing transparent as crews mobilize. Expect some adjustments tied to scope changes once the project is underway, especially if unseen damage becomes apparent during installation.
If you're weighing a quick turnaround versus a longer lead time, timing your project to minimize callbacks and warranty disputes is worth considering. In this market, a straightforward, standard system with readily available materials typically reduces risk of price creep. On the other hand, if a premium finish or a unique profile is desired, anticipate longer lead times and higher labor costs. Planning with a trusted local contractor who understands the seasonal cadence and supply-timing quirks can save both money and frustration.
Don't let upfront costs delay a critical repair - these contractors offer payment plans to fit your budget.
In this area, insurers often send adjusters to verify not only what happened but whether the roof is still functional and what the policy actually covers. Hailstorms and canyon winds can mask underlying problems, so the adjuster will look for signs of wear, age, and prior repairs. You should be prepared to show both the damage and the roof's current performance, especially after a heavy storm when neighboring homes might look similar but have different policy interpretations. Delays or disputed damage can arise if documentation is incomplete or if the damage appears cosmetic rather than structural. Realistically, having clear, time-stamped evidence helps the claim move through the process without unnecessary back-and-forth.
Older roofs in Farmington may face more restrictive claim treatment depending on carrier rules and policy language, especially after repeated regional storm losses. Some carriers tighten thresholds or require higher deductibles for aging materials or for prior repair history. If a roof has weathered multiple hail events, the insurer may scrutinize current damage more closely to determine causation and coverage. This means it's especially important to establish a well-documented narrative of what happened, when, and what has been done previously to the roof.
Homeowners should keep date-stamped photos, installation age records, and any prior repair or claim paperwork because carriers commonly request that documentation here. Photos taken immediately after a storm help establish the scope of damage and can clarify what is new versus pre-existing. Having the installation date, material specs, and receipts for any repairs can support a fair evaluation. If a claim is filed, organize a concise timeline of events and corresponding documents so the adjuster can quickly verify causation and coverage. In a tight storm season, prompt, organized documentation often reduces frustration and accelerates the settlement.
Connect with contractors who help homeowners navigate the claims process from damage assessment to final approval.
Lloyd's Quality Roofing
(801) 671-7576 www.lloydsqualityroofing.com
311 S 650 W, Farmington, Utah
4.8 from 35 reviews
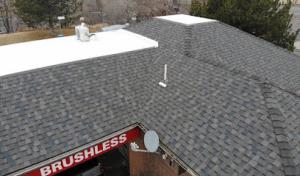
Farmington inspectors specifically checking flashing and ventilation reflects how often leak problems trace back to edge details and penetrations rather than field shingles alone. That means after a storm, the first places to inspect are the flashing around chimneys, valleys, skylights, vents, and where the roof meets the wall. In many homes, a small misstep at a corner or a poorly sealed boot can become a pathway for water, long before you see any stain on the ceiling. Pay close attention to seams where metal flashing sits on top of roofing felt, and where gutters meet the roofline. If you notice any bubbling, loose flashing, or movement when wind picks up, treat it as a warning sign, not a cosmetic issue.
Gusty spring conditions in Farmington can turn minor flashing weaknesses into active leaks before homeowners notice visible interior staining. Wind-driven hail can lift edges just enough to expose underlayment to leaking paths, especially along the eaves and rake edges. After a storm, run a careful eye along all edge details and penetrations: if flashing has peeled, cracked sealant is visible, or there are gaps around vents, act quickly. The reality is that the roof may look fine from the ground, while a hidden edge detail has already begun to fail, and that failure will progress with the next strong wind gust.
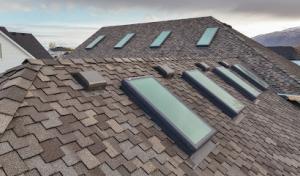
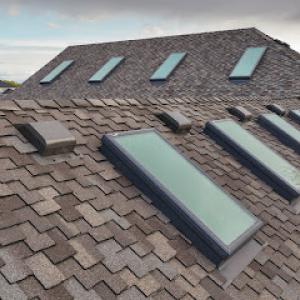
Skylights and other roof penetrations deserve extra attention in Farmington after hail and wind events because local contractors actively advertise repair experience in those areas. Skylight flashing is a frequent weak point; sealant corners can degrade with temperature swings, and hail can nick or dent the frame, allowing slow seepage that becomes a spill once a storm adds pressure. Inspect around all vent stacks, attic fans, and any roof-mounted equipment. Look for stains near these penetrations, and test for moisture in the around-the-frames area-water traveling along a rafter can arc away from the visible spot and still be doing damage.
Following a storm, start at the top but think like a Farmington inspector: treat edge and penetration points as first responders. Walk the roof only if it's safe, and document any loose, cracked, or missing sealant, torn flashing, or displaced shingles near eave lines and penetrations. Use daylight to spot small leaks before they grow, because the combination of canyon winds and snow thaw cycles can turn a minor weakness into a costly repair, and by then the evidence is often in the attic as damp insulation or staining rather than on the surface.
Find contractors experienced in skylight installation, flashing, and leak repairs to bring natural light into your home.
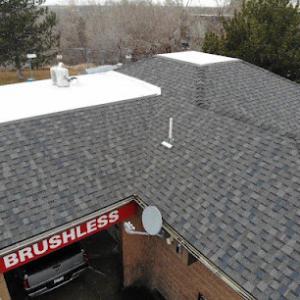
Flat-roof specialists are meaningfully present in the local market, indicating that some homes, additions, garages, and commercial-adjacent structures need low-slope expertise rather than standard steep-slope crews. When planning a reroof or a replacement, you should expect crews to assess roof deck conditions, flashing at penetrations, and edge details that differ from traditional shingles. In Farmington, the combination of canyon winds and hail-prone springs means a careful evaluation of drainage, parapet integrity, and membrane performance is essential before selecting materials. Expect longer installation timelines if the roof area includes large flat sections or complex transitions, especially around HVAC curbs or roof-mounted equipment.
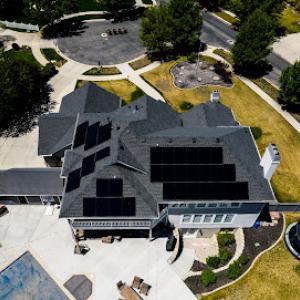
Solar roofing is an active specialty in this area, so reroof planning may need to account for roof-mounted solar components during replacement timing and inspection coordination. If you already have panels, or plan to add them, coordinate the roofing sequence so penetrations, flashing, and edge details accommodate the racking system and safety clearances. Solar-ready membranes, fastening patterns, and puncture resistance become crucial on low-slope surfaces. During replacement, ensure the solar array is protected from damage and that inspection points align with panel mounting hardware, roof-to-wall transitions, and any overhangs that could affect wind uplift on the flat sections.
Farmington's snow, summer heat, and storm timing make sequencing more important on low-slope and solar-adjacent projects than on straightforward shingle tear-offs. Plan around winter freeze-thaw cycles that can stress a new membrane, and align the project so that wind-driven rain does not linger on exposed seams during a mid-spring storm. If hail claims are involved, document roof area before and after any storm events with photos showing flat sections and edge details. In the planning phase, confirm that the chosen low-slope membrane and any solar integration can tolerate Utah's temperature swings and rapid sun exposure without compromising warranty terms or performance.
After installation, conduct targeted inspections of seams, penetrations, and curb flashings, paying particular attention to transitions where solar racking interfaces with the membrane. For ongoing upkeep, monitor flat roofs for ponding, blisters, or fastener-backed flashings that might loosen after heavy snows or summer heat. In windy conditions, check parapets and edge metal for strain or uplift, and ensure that any roof-mounted equipment remains securely fastened and properly sealed. This local climate lends itself to proactive staging of inspections, so align follow-ups with seasonal transitions to catch minor issues before they escalate.
Find specialists in TPO, EPDM, and built-up flat roofing systems for residential and commercial properties.
Lloyd's Quality Roofing
(801) 671-7576 www.lloydsqualityroofing.com
311 S 650 W, Farmington, Utah
4.8 from 35 reviews