Last updated: Apr 19, 2026
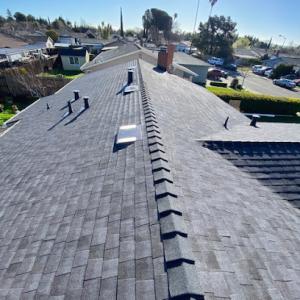
The region's Mediterranean pattern means reroofing tends to go best in the long dry stretch rather than during the cool, wet winter period. If your roof yearns for a clean, stable tear-off and a reliable dry-in, plan the bulk of the work for late spring through early fall. That window minimizes the chance that overnight moisture from seasonal rain will expose underlayment or let water creep under flashing while the crew is removing and replacing shingles or tiles. When you map the project, lock in the dry days first and then weave in the occasional warm, dry wind day only if the crew can safely manage it without creating a blow-off risk.
Winter rainfall in this area can disrupt tear-off schedules and raise the risk of water intrusion if underlayment is exposed overnight. If a forecast turns squirrely, you'll want a contingency plan that keeps the underlayment protected-think continuous plastic or tarps, but do not rely on these as a substitute for solid, weather-proofed temporary coverage. Have your crew stage materials in dry areas and practice rapid, controlled drips and edge protection. For a homeowner in a temperate, open-valley setting, the priority is to minimize the time roofing sheathing sits exposed if a storm arrives. Talk through wind-when-rain scenarios with the contractor so they have a clear plan for securing edges, vents, and any temporary dry-in measures.
Spring winds in the open agricultural landscape around Dixon can complicate shingle handling, debris control, and temporary dry-in planning. In windy stretches, small debris can become projectiles, and loose bundles of shingles or tiles can shift or tear. Coordinate with the crew on daily wind forecasts and establish a plan for staging materials away from prevailing gust directions. Consider pre-installing anchor mats or wind-break panels for the most exposed edges, and ensure temporary protection over openings during high-wind days. If you anticipate wind spikes, request staggered progress-do the most critical edge work when winds are calmer, and push non-urgent tasks to lull periods. For tile roofs, this is especially important: bent panels or cracked edge pieces in a windy sequence are a common source of water intrusion risk during the dry-in phase.
Edge detailing stands out as a more consequential factor in this climate. Dry-season schedules pair well with precise, well-fastened edge metal and starter courses, since wind exposure can destabilize marginal rows. Make sure the roofer confirms that a continuous drip edge and corrosion-resistant fasteners are used where the valley and eave lines meet. If a storm window is narrow, your crew should implement a robust temporary seal along the rakes and eaves during the dry-in phase, then swap to permanent flashing once the weather clears. The goal is to maintain a tight seal along the edges long enough to ride out any residual windy spells without letting humidity creep into the roof deck.
The plan should align with the local dry-season lull, but also accommodate the unpredictable nature of a farming wind cycle. Work with the contractor to set a realistic tear-off duration that accounts for potential weather-induced pauses. On days when wind or heat becomes extreme, it is prudent to pause work and resume when the air is cooler and calmer, so materials do not overheat or shift unexpectedly. Maintain a clear communication line with the roofer about rain forecasts, wind advisories, and any overnight protection needs. A practical approach is to prepare the yard and work area in advance-clear debris, secure vehicles, and designate a safe spot for storing bundles away from the prevailing wind direction. This keeps the project moving smoothly when the dry spell returns and avoids unnecessary delays that can complicate edge detailing and underlayment protection.
Dixon's valley winds press hard on edges and penetrations, turning ordinary roof details into points of failure if not treated with meticulous care. When you reroof, your edge securement should be uncompromising: fasteners driven to the correct depth, with sealants that stay put under repeated gusts. Ridge lines demand precise alignment and continuous, weather-tight cap coverage so wind can't peel away vulnerable seams. Flashings around dormers, vents, and chimney stacks must be integrated with durable transition pieces and backed with a robust sealant system that won't crack in the heat or peel during a winter storm. The consequence of skimping on any of these elements is not just a leak, but the kind of wind-driven lifting that shortens a roof's life and leaves you dealing with interior surprises you didn't plan for.
Hot, dry summers in this region aren't just uncomfortable-they accelerate surface aging on sun-exposed slopes and complicate installation schedules. Shingle granules can shed faster in relentless sun, decking can expand and contract, and crews may need to pause work to avoid heat-related hazards. Reroof timelines should build in shade-aware material handling, shortened daily heat windows, and a plan for moisture management on underlayment and attic ventilation. If a contractor rushes through exposure-prone steps at peak heat, the resulting flexing and micro-movements along edge details and flashing can set the stage for accelerated wear, curling shingles, or flashing degradation long before the roof would otherwise reach mid-life. Expect careful material place-and-seal routines to be the norm, not the exception, during the hottest weeks.
With summer waning, fall storms arrive with surprises-often before the first meaningful rains you expect. That pressure to finish a reroof project before wet weather becomes a real factor in Dixon. In practice, the window between hot season and wet season is a tense balance: you want a complete, tested installation, but you don't want to rush critical sealant cures or flashing adjustments. Poorly timed work can leave you with exposed penetrations and marginal roof-to-wall interfaces just as a cold front sweeps through. Plan for a cautious pace that respects curing times for mastics and sealants, and schedule a final post-install inspection while temperatures are still favorable. A thorough check of all flashing joints, kick-out details at edges, and valley intersections is not a luxury but a practical necessity to avert a leak in early autumn.
Choose materials with proven resilience to sun exposure and wind-driven edge lift, and insist on a detailed edge-and-flashing plan from the crew. Ask specifically about ridge cap continuity, underlayment backing, and the type and placement of fasteners in risk-prone edges. If a storm window looms, confirm a contingency for delaying nonessential work that would leave openings exposed. And after installation, don't skip the final walkthrough: a keen eye for ridge alignment, flashing seals, and edge fasteners now saves bigger headaches when the first heavy rains arrive. You'll sleep easier knowing the roof's secure against both the dry-season glare and the first gusty storm.
Find local contractors experienced in assessing and restoring roofs after hail, wind, and severe weather events.


Piscatelli Roofing
(415) 914-7663 www.piscatelliroofing.com
Serving
4.4 from 8 reviews
Piscatelli Roofing is a full-service, family-owned and -operated roofing contractor serving the Greater Bay Area since 1992. Our experienced team handles all types of residential and commercial roofing—from repairs and replacements to roof coatings, cleanings, and gutter repairs. We work with asphalt shingles, flat roofs, tile, and single-ply systems, always using top-quality materials and workmanship you can rely on. Whether you need a small leak repaired or a full roof replacement, we deliver honest pricing, dependable service, and results that protect and endure.
N. American Roofing
(707) 624-5836 namericanroofing.com
Serving
5.0 from 37 reviews
North American Roofing is a local family-owned business ready to serve our community. We are fully insured and bonded. We specialize in new roofs, repairs, and gutter systems. Our pledge is to get the job done right. Contact us today!
Northern California Roofing
(707) 447-5655 northerncaliforniaroofing.com
Serving
4.7 from 113 reviews
Northern California Roofing Company has been serving our neighbors throughout the Northern California area since 1990. We specialize in all phases of the roofing process: from roof repairs to roof replacements, as well as maintenance programs and complete roof overhauls. Our professionals are dedicated to serving your needs in a timely manner, with an emphasis on quality craftsmanship, as well as a commitment to customer service excellence. We pride ourselves in being a “one-stop contractor” in the roofing industry. Call us today to get your free estimate
Roof Solutions
(707) 449-7663 roofsolutionsca.com
Serving
5.0 from 205 reviews
GAF Master Elite certified. Licensed #1038832, BBB A+, insured, established 2018. Professional roofing contractor serving Residential, Commercial, HOAs & Property managers, throughout Northern California. Live person answers. Written warranties. Schedules honored - no all-day waiting. Free estimates. Insurance claims handled. Your problem→Our solution: Need new roof? Financing available. Leak today? Same-day response when possible. Storm damage? Emergency tarp: 1 hour Solano County, 2+ hours other counties. Insurance claim? We meet adjusters. HOA meeting? Board-ready presentation. Multiple properties? Dedicated project manager. All systems: Shingle, Tile, Metal, Slate, TPO, EPDM, flat. Solano, Yolo, Contra Costa, Napa, Sonoma counties.
Frontline Roofing
(707) 471-5249 www.frontlineroofing.com
Serving
4.7 from 41 reviews
Located at 419 Mason Suite 102, Frontline Roofing is your local expert roofing contractor, specializing in roof replacement, repair, and installation for both residential and commercial properties. As a top-rated "roofing company near me," we offer exceptional services including metal roofing, flat roof services, shingle roofing, and comprehensive commercial roofing solutions throughout California. Our team is dedicated to ensuring durability and energy efficiency for every project. Choose Frontline Roofing for reliable protection and enhanced aesthetic appeal. Contact us today for competitive pricing and personalized consultations, and experience why our clients rate us so highly.

Roof Doctors Solano County
(707) 674-5775 theroofdoctors.net
Serving
4.7 from 84 reviews
"Nobody inspects, repairs and certifies more roofs or solves more roof leak problems in the SF Bay Region." Over 300,000 roofs inspected. We do complimentary roof inspections with detailed reports that include pictures. Reports sent within 24 hours of inspection. We are a licensed roofing contractor that offer repairs, replacment bids, gutter cleaning bids, gutter guard installs, and general roof maintenance. Service in the following San Francisco Bay Area counties: Alameda, Contra Costa, Marin, Napa, Solano & Sonoma Counties.
Lucas Roofing
(530) 304-3665 www.lucasroofingindavis.com
Serving
5.0 from 16 reviews
We are a local company established in 1991. I truly enjoy helping my community with all of their all roofing needs,rain or shine. You can count on us. Gerald lucas owner
Crowson Roofing
(707) 451-2041 www.crowsonroofing.com
Serving
5.0 from 7 reviews
When it comes to roofing and more, no one compares to Crowson Roofing. With years of combined experience, Crowson Roofing has worked hard to build the trust of our clients in Vacaville and surrounding areas. Visit our website to learn more or better yet, call us today!
Bay Area Affordable Roofers
(707) 506-0312 bayareaaffordableroofers.com
Serving
5.0 from 22 reviews
Bay Area Affordable Roofers is a roofing company serving Fairfield, CA, providing roof repair, roof replacement, roof installation, roof inspections, emergency roof repair, metal roof repair, and shingle installation and repair. Since 2002, Bay Area Affordable Roofers has worked with homeowners across Fairfield, CA and nearby communities to support long-lasting and reliable roofing solutions. Our team understands the roofing needs of homes in the Bay Area and applies experience with local materials and weather conditions to deliver steady, dependable service for a wide range of roofing projects.

Spartan Home Services - Roofing & Solar
Serving
5.0 from 27 reviews
At Spartan Home Services we specialize in premium roof and solar systems. Whether you're in need of roof repair or considering a roof replacement, our team is here to provide comprehensive solutions tailored to your needs. Extending beyond quality, we have a passion for creating lasting relationships with our neighbors, to listen, to hear, and to help. Trust Spartan Home Services for quality work that stands the test of time from a team that will nurture you through your whole project.
Above All Roofing & Seamless Gutters
(707) 446-8819 aboveallroofingnorcal.com
Serving
4.3 from 19 reviews
Above All Roofing is a family owned and operated business that has serviced the community for over 25 years. We’re here to work with you from start to finish of any job we do. Our family is committed fully to our customers. -Family owned for over 25 years -BBB Accredited Business -CertainTeed Master Shingle Application -Owens Corning Preferred Contractor -Licensed, Bonded and Insured
Carmichael Roofing
(916) 347-7839 carmichaelroof.com
Serving
5.0 from 6 reviews
Carmichael Roofing, your trusted roofing experts serving the Sacramento Valley since 1989. With over three decades of experience, we've been committed to providing top-notch roofing solutions for both residential and commercial properties. Our skilled team specializes in a variety of roofing services, including repairs, replacements, and maintenance. From shingle to tile, metal to flat roofing systems, we've got you covered. Count on us for quality craftsmanship and reliable service. Contact us today to discuss your roofing needs and experience the Carmichael Roofing difference
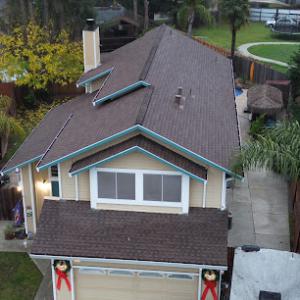
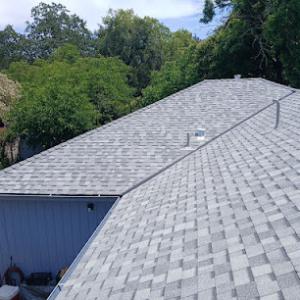
Asphalt shingles and tile are both locally relevant in Dixon, reflecting a mix of practical reroofing budgets and California-style residential architecture. Asphalt shingles bring straightforward repairability and a familiar look that suits the plentiful ranch- and cottage-style homes found along the valley edges. Tile, with its Mediterranean and Mediterranean-inspired lines, offers a long-lasting silhouette that pairs well with the region's solar exposure and privacy-conscious lot layouts. When choosing between these, consider how tile's heavier weight interacts with existing framing and how asphalt can be a friend to more modest-budget reroofs while still delivering dependable wind resistance when installed with proper underlayment and fasteners. The goal is a roof that looks right on the street while standing up to July heat and February rain without demanding a prolonged dry window for work.
Metal roofing is a meaningful but smaller specialty in Dixon, often considered for heat performance and long service life in the area's dry summers. A metal roof can reflect a portion of the sun's energy and can reduce cooling loads, which matters when bulk heat stress combines with open-valley winds. Metal panels also excel at shedding wind-driven debris and performing well in gusty conditions, given proper edge detailing and continuous fastening. For homes that aim for a modern or industrial aesthetic, metal can be a durable, low-maintenance choice. The key is selecting a profile and coating that resist glare, resist fading, and accommodate the typical seasonal swings without amplifying noise during rare heavy rains.
Material choice in Dixon should account for both summer heat load and the need to perform through wet winters without relying on prolonged dry weather during repairs. In practice, that means prioritizing underlayment and roof deck protection that can handle rapid temperature swings and moisture without compromising the installation. Tiles and shingles should have compatible underlayment systems and sufficient attic venting to prevent heat buildup beneath the roofing material, which accelerates wear. In homes with open valley or ridge venting, edge detailing becomes critical to minimize wind-driven water intrusion. For steeper pitches, ensure fasteners are appropriate for wind exposure, and consider a higher-quality sealant around penetrations to maintain performance through the wet season. If a reroof is planned near the wet season's start, schedule with enough lead time to allow for sealant cure and thorough inspection of flashing.
Edge detailing is not a cosmetic afterthought in this climate. Winds can stress the fascia, drip edge, and ridge lines, especially where properties sit on the valley breeze corridors. Asphalt shingles benefit from wind-rated underlayment and a thorough sealant schedule at eaves and rakes. Tile roofs demand careful cementitious or interlocking fasteners and a lattice of high-quality sealant around hips and ridges to prevent wind-driven leaks. Metal roofs require precision in seam sealing and panel fastening, as loose seams can fail under gusts. In all cases, a proactive approach to edge detailing reduces the chance of wind-driven weather getting under the roofing surface during windy periods.
When selecting a roof style, aim for a balance between regional aesthetics and performance. Asphalt shingles offer a cost-appropriate, repair-friendly option that respects the local street character, while tile provides a long-lasting look with substantial heat tolerance. For homes facing intense dry-season sun, metal roofing becomes appealing if the design can accommodate the lighter, glare-resistant finishes. Regardless of material, plan installation to align with the seasonal weather patterns: protect from heavy winter rain during work, ensure proper underlayment and ventilation, and invest in robust flashing and edge detailing to withstand Dixon's wind exposure.
Clay and concrete tile are common enough locally that the underlayment condition matters as much as the visible tile when replacement decisions are made. In practice, that means a close look under the tiles to assess deck integrity, insulation, and any signs of water intrusion that travel through the underlayment. In dry seasons, small breaches can hide under routinely hot days, only to reveal themselves after a few winter storms. Expect to spend a careful afternoon tracing fluttering felt or missing battens and verifying that the roof deck is solid where tiles meet the eave and hips. Because wind exposure is a constant factor, ensure gaskets and fasteners for underlayment are compatible with the wind loads typical for the valley plain. A thorough assessment should map out any soft spots, dry-rot, or prior repairs that could compromise a reroof decision.
Full reroofs in this area may trigger closer review when homeowners switch materials or make structural changes under heavier roof systems. If the plan is to go from lighter tile to a heavier system, or to alter roof geometry (valleys, dormers, or skylights), anticipate a more extensive evaluation of rafters, supports, and sheathing. Underlayment strategy will often shift with a new roof assembly, especially if the structure has seen years of wind-driven wear. The timing window matters: the dry season provides the most stable working conditions for removing and reinstalling heavy tile and replacing underlayment, while steep or exposed eave edges demand careful staging to avoid wind-blown debris. Expect the crew to re-tie or reinforce flashing at transitions to maintain a watertight seal once the new roof goes down.
On older tile roofs, leak complaints frequently trace to flashings, valleys, and aged underlayment rather than widespread tile failure. Valleys collect runoff and are especially vulnerable to shingle-free overlaps or degraded metal flashing. Flashing around chimneys, vents, and roof-to-wall interfaces should be inspected for lift, corrosion, or gaps where wind can pry them loose. Underlayment beneath cracked or missing tiles ages faster in Dixon's windy, dry-to-wet cycle, so replacement decisions should treat the underlayment as a primary line of defense, not just a backup plan. Addressing these specifics early prevents recurring leaks after a reroof and keeps the tile system performing in the open valley conditions that define the local climate.
Find contractors who specialize in clay and concrete tile roofs, known for their durability and curb appeal.
Northern California Roofing
(707) 447-5655 northerncaliforniaroofing.com
Serving
4.7 from 113 reviews
Provided local pricing ranges run from 350 to 650 USD per square for asphalt shingles, 700 to 1100 for metal, 950 to 1800 for clay tile, 900 to 1600 for concrete tile, 600 to 1100 for wood shingles or shakes, and 1500 to 3200 for slate. Those numbers reflect Dixon's mix of windy days, dry summers, and winter rains that shape reroof timing and material choice.
In this area, timing reroof projects around the dry season matters. If a replacement is scheduled during the rainy window, costs can push higher because dry-in logistics, weather delays, and protection measures add labor and materials. When crews have to cover more of the project with tarps, coordinate staged waterproofing, and extend the project timeline, the bill climbs. For asphalt shingles, plan for the mid-summer to early fall window when winds are more predictable and rain is scarce. For heavier, tile-based systems, a longer dry stretch helps avoid repeat cycles of protection work that drive up costs.
Asphalt shingles sit in a lower-cost range, typically 350 to 650 USD per square, making them appealing for budget-conscious reroofs that still need solid wind resistance. Metal roofs run higher, about 700 to 1100 per square, with the advantage of lighter weight than tile and faster installation in many Dixon projects, especially where wind exposure is a factor. Clay tile, at 950 to 1800 per square, and concrete tile, 900 to 1600 per square, bring notable weight and handling considerations that influence both labor time and disposal fees. Tile and slate costs rise further when the roof carries higher wind or open-valley exposure, or when additional underlayment and fasteners are required to meet local wind performance expectations.
Tile and slate replacements can carry higher labor and disposal costs than asphalt reroofs because of weight, handling, and underlayment complexity. In Dixon's windy, exposed terrain, edge detailing and proper sealing against gusts require careful installation. Expect crews to spend extra time on rake detailing, valley flashing, and wind-driven retrofit measures. If a roof already leans toward steep or long runs, those edge details multiply, even before material costs are tallied.
For a homeowner evaluating bids, use the material ranges above as anchors and ask contractors to itemize dry-in protections, wind-rated fasteners, and underlayment choices. Given Dixon's climate, a cooler dry period not only lowers the risk of weather delays but can also stabilize material performance, especially for heavier options like clay, concrete, or slate. When tile or slate is selected, verify anticipated disposal costs and the potential need for crane or staged lifting, which can noticeably affect the final price.
Get a clear picture of your project costs upfront - no commitment required.
Northern California Roofing
(707) 447-5655 northerncaliforniaroofing.com
Serving
4.7 from 113 reviews
A full reroof project in this area is typically routed through the City of Dixon Building Department rather than handled informally. Before any shingles come off or new material goes on, you or your contractor should pull a building permit that covers the reroof scope, including tear-off, replacement, and any ventilation or flashing work. The process is designed to keep weather exposure and wind-driven debris from compromising the structure, especially given the local climate and prevalent roof lines in the neighborhood. Expect to submit a simple plan set and a brief description of the proposed materials and methods, with the permit reviewer confirming that the project adheres to applicable codes and local amendments.
Inspections are typically scheduled at two critical milestones: tear-off and final completion. The tear-off inspection ensures the roof deck is accessible, structurally sound, and free of condition issues that could affect fastener placement or underlayment. This inspection also verifies that the chosen underlayment is appropriate for the season and expected wind exposure, since a robust underlayment is vital to performance during dry spells and sudden storms. The final completion inspection concentrates on the installed system's integrity, including proper ventilation to manage attic temperatures and condensation, correct flashing at penetrations and along eaves, and adherence to roofing material specifications. If the project includes structural changes-such as truss modifications, added skylights, or changes to roof loads-the reviewer will require an added review, which can extend timelines. Having a prepared plan and a clear note on any structural work helps prevent delays.
Coordinate with the Building Department early to confirm the current permit requirements and any local amendments to the Uniform Building Code that might impact Dixon's wind exposure. Ensure that the permit packet includes details on underlayment type, venting strategy (including ridge or soffit vents where applicable), and flashing details around chimneys, skylights, and dormers. During tear-off, protect interior spaces from wind-driven debris and verify that temporary coverings are secure to prevent weather intrusion. For the final inspection, have all manufacturer installation guidelines and accompanying product data on site, ready to demonstrate that the chosen materials were installed per specification and local code.
Dixon homeowners operate within California's tougher insurance environment, where wildfire-related underwriting pressure affects roof age scrutiny even outside the highest-risk mountain zones. That means insurers may look closely at how long a roof has served, how it was maintained, and whether the replacement occurred with proper regard for fire-resistance and weather resilience. If your roof has visible aging or mismatched components, expect sharper questions and potentially tighter coverage decisions. Being prepared with a clear record can prevent drawn-out disputes when a claim arises.
Insurers serving Dixon may expect clear roof-age records, date-stamped photos, and documentation showing proper underlayment and ventilation on replacement work. You should gather a project timeline, contractor receipts, material specifications, and any warranty information from the installer. For a reroof, ensure you have before-and-after photos taken from multiple angles, with timestamps, plus notes on roof deck condition and ventilation upgrades. A tidy folder of these items, organized by date, can smooth conversations with the adjuster and reduce back-and-forth later.
For larger or older Dixon roofs, adjuster involvement can be more significant, and contractor licensing status is typically important in claim-related conversations. Expect questions about the feasibility of extending existing underlayment, the adequacy of attic ventilation, and adherence to fire-rated roof coverings. If the roof is near the end of its service life, be prepared to discuss replacement options that align with both performance expectations and risk mitigation. Clear, professional communication from the contractor and a transparent record trail help prevent delays or misinterpretations.
When a claim touches roofing, the contractor's licensing status matters in conversations with the insurer and the homeowner. Choose a licensed, reputable local roofer who can confidently explain the chosen materials, installation methods, and why those choices meet current fire and weather resilience expectations. Document who performed the work, their license numbers, and any subcontractors involved. Having this information ready can avert questions about credentialing and keep the claim moving toward a fair resolution.
Connect with contractors who help homeowners navigate the claims process from damage assessment to final approval.

Flat and low-slope roofing appears as a meaningful specialty in Dixon's contractor market even though the city is primarily residential reroof territory. When a home has a low-slope section, the choice of material and the way seams are sealed matters as much as the pitch itself. Look for local crews who show steady experience with a few recent projects in the area, and ask for a short checklist of tests they perform before approving a plan. In practice, a careful assessment of deck condition, insulation, and drainage layout saves trouble later in the season.
On low-slope sections, winter ponding risk and flashing integrity become more important once the wet season starts. Plan ahead for a thorough drain-path analysis and ensure edge details carry proper water diversion beyond the eave line. In Dixon, wind can drive rain under flashing, so expect crews to emphasize step flashing or counter-flashing along walls and any penetrations. A practical step is to have the contractor walk you through the expected ponding area, confirm that fasteners are corrosion-resistant, and verify that the chosen seam material matches the climate's wet-to-dry cycles.
Roof coatings are an active local specialty, suggesting some owners are evaluating restoration paths instead of immediate full replacement on eligible low-slope roofs. If a coating is proposed, verify the substrate is compatible, surface is clean, and the coating system carries a proven warranty for weathering exposures typical in this area. In some cases, a coating can extend service life and reduce disruption during the dry season, especially when timing practicalities or budget cycles favor restoration over replacement.
Find specialists in TPO, EPDM, and built-up flat roofing systems for residential and commercial properties.
Northern California Roofing
(707) 447-5655 northerncaliforniaroofing.com
Serving
4.7 from 113 reviews
Solar-related roofing appears in Dixon's contractor market, and that matters because roof penetrations and reroof sequencing need to be coordinated before winter rains. If you're adding solar panels, plan the rooftop work so panel mounts, racking, and electrical penetrations are finished before any final roof surface is sealed. In practice, align the solar timeline with the roof's underlayment and edge detailing so water flow remains unbroken during the first big winter storms.
Skylight work is a smaller but present specialty in Dixon, relevant because leak points often emerge first at penetrations during the rainy season. When a skylight is involved, ensure the flashing is integrated with the roof edge and any nearby vents or chimneys. For repairs, prioritize resealing around the curb and flashing, and verify that the flashing materials match the existing roof assembly. Weather-appropriate sealants and compatible flashing tapes can prevent slow weeps through the upcoming wet season.
In the hot summer climate, homeowners often weigh reroof timing alongside solar upgrades to avoid reopening a newly finished roof. If a reroof is on the table, coordinate with the solar installer to avoid re-doing penetrations and to keep the final roof surface uninterrupted for as long as possible once installed. Consider staging: complete roof deck and underlayment first, then install solar mounts, and finally seal all penetrations. This approach helps limit wind-driven water exposure and edge vulnerabilities during the transition between layers.
Find contractors who integrate solar panels or solar shingles into your roof for long-term energy savings.