Last updated: Apr 19, 2026
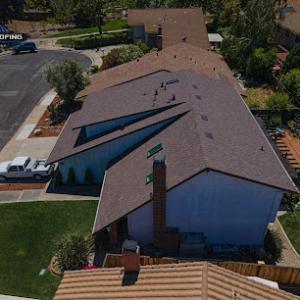
Mill Valley sits on the south and east slopes below Mount Tamalpais, where homes often have shaded roof planes that stay damp longer than sunnier inland parts of Marin. The combination of persistent shade and cool, moist air means northern and tree-covered faces of the roof are ground zero for moisture-related issues. The marine layer that repeatedly drapes Richardson Bay and the Pacific brings fog that lingers into late morning and early afternoon on many hillside properties. This means moss, algae, and general moisture retention become routine maintenance considerations, not occasional annoyances. Your roof's orientation, nearby trees, and hillside runoff all shape how quickly debris accumulates and how long damp conditions persist on each plane.
On shaded sections, moss can take root quickly and form a soft, slippery layer that holds moisture against the roofing material. You'll notice it most on north-facing slopes and under branches where fog keeps the surface damp for extended periods. To keep moss under control, plan for regular, safe removal during dry windows. Use a stiff brush or a plastic scraper to dislodge moss without gouging shingles or tiles, and follow up with a gentle rinse to wash debris into the gutters. Treating the roof with a moss-inhibiting solution after the heavy wet season helps reduce regrowth, but choose products that are safe for the underlying material and compliant with local foliage and landscaping considerations. Be mindful that fog-driven humidity can push moss growth toward the eaves, hip lines, and ridge caps where water tends to linger.
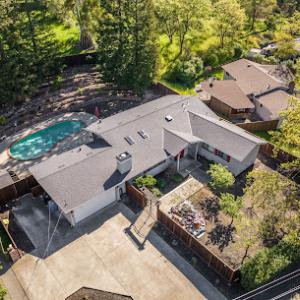
Neighborhoods with dense tree canopy and hillside runoff face added debris loading in valleys, gutters, and roof-to-wall transitions during the wet season. Redwood debris, pine needles, and leaf litter accumulate quickly on shaded slopes, particularly where branches overhang roof planes. Establish a proactive cleaning cadence: clear gutters and downspouts before storms arrive, and inspect roof-to-wall transitions for moss colonies and organic buildup that can trap moisture against the fascia. In tight valley areas, consider installing debris screens or micro-guards on gutters to slow down and trap organic matter before it migrates into the drainage system. Keep an eye on flashing and seam seals where runoff concentrates, since moisture exposure is higher in these junctions and can lead to slow-soaking leaks if not addressed.
Shaded hillside roofs benefit from materials with good moisture tolerance and robust dry-out performance. For roofs with persistent dampness, ensure that flashing, joints, and valley intersections are well-sealed and designed to shed water efficiently even when debris slows flow. Consider confirmatory checks after heavy fog events or extended drizzle periods: look for soft spots, curling edges, or lifted granules along ridge lines and in shady gables. Treat the roof as a system where shade, moss susceptibility, and hillside runoff intersect; prioritize preventative cleaning, timely moss control, and reinforcing transitions between roof planes and gutters so moisture does not linger in seams or under overhangs. In these conditions, a proactive maintenance rhythm beats reactive patching when dampness becomes visible.
When thick marine fog thickens and atmospheric-river style downpours arrive, leaks tend to reveal themselves in spots that heat and hail don't test. Shaded hillside roofs with moisture trapping are prime for slow seepage along seams, under flashing, and at transitions where moss and debris hold moisture longer than exposed sections. If you notice damp spots on ceilings after these rain events, treat it as a warning sign rather than a one-off nuisance. Inspect along roof-to-wall transitions, vent penetrations, and any area where the roof plane meets a shaded deck or overhang. The goal is to identify and repair vulnerable joints before water finds its way into attic framing, insulation, or interior ceilings during the next storm.
Skylights are popular on homes seeking daylight under heavy tree cover, and in older roof systems they can become chronic leak sources if flashing details aren't sound. In mill-hill oak canopies, tree debris and persistent moisture compound flashing failures around curb-mounted units. Check skylight flashing monthly during the wet season, especially after storms with strong winds. Look for lifted edges, cracked sealant, or pooled water at the curb. When resealing, use flashing-compatible sealants that stay pliable in foggy, cool temperatures, and ensure the curb flange is properly integrated with the roofing membrane. If a skylight sits near a major tree line, consider upgrading to a broader flashing collar or a drip edge that directs runoff away from the frame.
Fall wind events can drop branches and redwood litter onto roofs before the rainy season, increasing the chance of clogged drainage paths and localized water intrusion. Gutter guards may reduce debris, but they're not foolproof in a redwood canopy neighborhood. Inspect gutters and downspouts for blockages after wind storms, then again after the first heavy rains. Clear needles and cones from valleys, rakes, and roof edges. Pay special attention to rooke edges where debris can trap moisture against the underlayment and fascia. If moss or algae are present, limit their moisture-retaining growth by improving drainage paths and removing shading where feasible, as damp, shaded surfaces are a magnet for persistent leaks.
After extremal rain events, perform a proactive leak check from the attic with a bright flashlight and a roof access point if safe. Look for daylight through seams, and feel for breeze or dampness along flashing and around penetrations. If leaks persist during the next storm, don't delay in securing a professional assessment focused on flashing integrity, curb details around skylights, and drainage efficiency on shaded slopes. In these conditions, timely maintenance is the difference between a minor repair and extensive water damage.
Find local contractors experienced in assessing and restoring roofs after hail, wind, and severe weather events.
Xerlo Cast Roofers
(628) 877-0002 xerlocastroofers.online
242 CA-1, Mill Valley, California
4.9 from 29 reviews
Xerlo Cast Roofers
(628) 877-0002 xerlocastroofers.online
242 CA-1, Mill Valley, California
4.9 from 29 reviews
Xerlo Cast Roofers, the roofing experts based in Mill Valley, California, are dedicated to providing high-quality solutions for residential and commercial properties. Led by highly skilled technicians armed with cutting-edge tools and profound technical know-how, this team is committed to delivering efficient and long-lasting repairs. From minor household issues to demanding structural fixes, their unwavering commitment to excellence ensures timely, detailed work, ensuring your property's resilience and protection year after year.
NC Roofing Solution
(415) 687-3636 ncroofingsolution.com
Serving
5.0 from 149 reviews
At NC Roofing Solutions, we know that finding a quality roofing company that fits your budget can be challenging. That's why we offer exceptional roofing services that won't break the bank. With our expert team, you can have peace of mind knowing your roof is in good hands. Don't let roof issues escalate. Choose NC Roofing Solutions for the best roofing services. Contact us today for a consultation and let us take care of your roofing needs!
Northern Pacific Roofing
(415) 456-3482 northernpacificroofing.com
Serving
4.7 from 30 reviews
We are a full service roofing and siding contractor. We are certified with all of the major manufacturers specializing in GAF, Malarkey, Certainteed, James Hardie siding and more. Family owned and operated for over 20 years in Marin and Sonoma counties.
Bay Area Roofing Master
(510) 373-3161 www.bayarearoofingmasters.com
Serving
5.0 from 45 reviews
Bay Area Roofing Master has been recognized as a top Roofing Contractor in the Bay Area. We provide a wide range of services for all kinds of roofing needs. Whether you’re looking to work on an existing space or undertake a bigger project, we guarantee that we can help you achieve the results you seek. Our number one priority is happy customers through quality work. Contact your friends at Bay Area Roofing Master for a quote.
Northbay Roofing & Gutters
(415) 497-1714 www.northbayroofinggutters.com
Serving
5.0 from 10 reviews
We are a full service Roofing & Gutter Company specializing in Composition Shingles, Standing Seam Metal Roofing, Tar & Gravel, TPO, Torchdown, and Lifetime, Pre-Painted, Galvanized Steel, Seamless Gutters and lifetime seamless copper gutters. We are rated A+ with the BBB. Our customer service and quality workmanship can't be beat! Call us today for a free estimate. We also offer tile roofing, foam roofing, roof restoration, siding, gutter cleaning, repairs, and power washing. Roof Inspections. We are a local family oriented and owned company for over 20 years.

Eco Smart Roofer
Serving
4.9 from 141 reviews
Eco Smart is San Francisco's leading construction, roofing and general contracting company. Our repairs, adjustments, replacements and renovations are done to ecologically responsible standards, we specialize in structural reinforcement and waterproofing of residential and commercial buildings.
Apollo Roofing Company
(925) 701-9136 www.apolloroofingcompany.com
Serving
5.0 from 63 reviews
Apollo Roofing Company is a residential and commercial roofing contractor located in San Rafael, CA. We offer roof installation, roof repair, and roof maintenance services for a wide variety of modern and traditional roof types, which includes asphalt shingle roofs, tile roofs, metal roofs, and more. We maintain a high level of safety, honesty, and reliability while giving the same first-class service to all customers regardless of project size. As an expert in the industry, we are dedicated to taking your roofing services to the next level at prices you can afford. "By Appointment Only"
GBR Roofing
(855) 478-3292 www.gbrroof.com
Serving
5.0 from 7 reviews
At GBR Roofing, we deliver reliable, high-quality roofing services throughout San Rafael and the northern Bay Area. Specializing in roof installation San Rafael CA and expert roof replacement, our licensed team handles both residential and commercial projects with precision. Homeowners and businesses choose us for superior craftsmanship, transparent communication, and long-lasting results. Whether you need a new roof for a custom build or a replacement for an aging system, we make the process seamless and stress-free. Contact GBR Roofing today to schedule your free estimate and protect your property with a roof built to last.

Crown Ridge Roofing
(415) 485-1500 www.crownridgeroofing.com
Serving
5.0 from 8 reviews
Welcome to Crown Ridge Roofing, experts in roofing with over 25 years of experience, serving customers in Marin County and the East Bay including Berkeley, Corte Madera, Fairfax, Greenbrae, Hercules, Kentfield, Larkspur, Mill Valley, Novato, Oakland, Petaluma, Richmond, San Anselmo, San Rafael, Sausalito, and Tiburon. We install and repair roofs and gutters to prevent leaks.

McLeran Roofing
(415) 456-7663 www.mcleranroofing.com
Serving
4.5 from 16 reviews
Dependable Roofing Service Since 1929.

SF Pro Roofing
(415) 571-6604 sfproroofings.com
Serving
5.0 from 19 reviews
SF Pro Roofing, located at 77 Van Ness Ave, San Francisco, CA, is your premier roofing contractor specializing in top-notch roofing services, roof repair, and roof replacement in the Bay Area. Known for excellence, we provide a comprehensive range of services that include new roof installations, emergency repairs, and thorough inspections. As one of the leading roofing companies, we are dedicated to safeguarding your home or business with high-quality craftsmanship and premium materials. With over two decades of experience, our expert roofers ensure durability and aesthetic appeal for every project. Contact SF Pro Roofing for reliable roofing solutions today!

Marina Bay Roofing
(628) 233-8140 marinabayroofing.com
Serving
5.0 from 102 reviews
Marina Bay Roofing helps homeowners and businesses in San Francisco and the Greater Bay Area protect their properties with reliable roofing solutions designed to last.
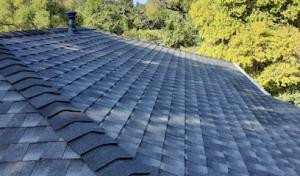
On shaded hillside homes where fog lingers and redwood debris sweeps across the roof, moisture management drives every roofing decision. The combination of marine fog, winter runoff, and limited sun means moss and staining can appear faster, even on durable materials. Roofs under tree cover collect more organic matter, trim debris, and hold dampness against shingles and underlayment longer. In this environment, choosing materials that shed moisture efficiently and resist biological growth is as important as choosing a look that fits the style of your house.
Asphalt shingles remain common because they fit the area's mix of older cottages and hillside homes, but shaded exposures in Mill Valley can shorten appearance life through staining and biological growth. If you opt for asphalt, select architectural or laminated shingles with a dense mineral granule coating and a reflective or light-colored option to mitigate heat buildup during rare sun pockets. Regular cleaning to remove moss, lichen, and fallen needles helps maintain the surface and prolongs the appearance life. Consider ensuring proper attic ventilation and a well-sealed underlayment to protect against the extra moisture exposure that comes with foggy, damp seasons.
Clay and concrete tile suit many Mediterranean-style homes found in parts of southern Marin, but their weight and repair complexity matter on older structures and steep access sites. Clay retains color well but can become slippery when stained or mossy, increasing maintenance needs on shaded slopes. Concrete tiles offer robust moisture resistance but are heavier and may require structural assessment, particularly on aging roofs. On steep lots with restricted access, tile replacement or repairs demand careful planning and, sometimes, temporary staging to avoid damage to trees and debris-laden gutters.
Metal roofing is attractive in Mill Valley for shedding debris and resisting moisture, especially where homeowners want lower maintenance under tree cover or are planning solar integration. Panels or standing-seam configurations offer excellent moisture drainage and are less prone to surface moss than some other options. A smooth, reflective metal surface tends to stay cleaner longer in foggy conditions, and it can pair well with integrated solar systems without compromising roof integrity. Ensure flashings and penetrations are sealed with hardware rated for high-humidity environments to prevent slow leaks in shaded zones.
Where tree canopy is dense, routine moss control and gutter upkeep become essential. Sloped, shaded roofs benefit from a deliberate debris-removal plan and a schedule for moss treatment that minimizes chemical impact on surrounding landscape. When installing any material on a hillside home, pay special attention to staggered joints, secure fasteners, and sealants that tolerate repeated moisture exposure. A well-vented attic and a robust drainage plan help manage fog-driven condensation and winter runoff, preserving both the roof deck and the chosen material.
Explore specialists in steel, aluminum, and standing seam metal roofs built to last 50 years or more.
Xerlo Cast Roofers
(628) 877-0002 xerlocastroofers.online
242 CA-1, Mill Valley, California
4.9 from 29 reviews
Northbay Roofing & Gutters
(415) 497-1714 www.northbayroofinggutters.com
Serving
5.0 from 10 reviews
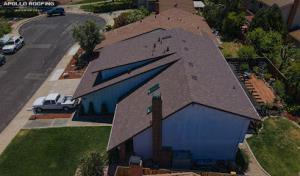
Mill Valley's narrow hillside streets, limited staging space, and multi-level lots complicate both material delivery and ladder or crane setup. This isn't flat-Marin territory where crews can park a truck and move shingles by wheelbarrow. On steep roofs, crews often need additional protective measure for the deck and landscaping, plus edge protection for fog-logged mornings. Those extra setup steps translate into time and labor, and they show up as higher labor intensity in your overall quote.
Tree cover and debris cleanup are meaningful cost factors locally because crews often need extra protection, cleanup, and moisture-related deck assessment before installation. Redwood needles, moss-prone shaded slopes, and winter runoff alongside fog-seepage mean more frequent cleaning during the project and careful staging to prevent tracking moisture into interiors. Expect higher waste disposal and protective film or tarping expenses, and plan for a thorough inspection of the roof deck for moisture damage after the old layers come off.
Using the provided local ranges, homeowners should compare material costs against access difficulty, roof pitch, disposal logistics, and the timing pressure of the late spring through early fall replacement season. Asphalt shingles are generally the most budget-friendly upfront, but on steep, moss-prone roofs with heavy debris, you may see a premium in labor and cleanup that narrows the gap with higher-end options. Metal roofs, clay tile, and concrete tile bring their own access quirks: metal can be slick on a steep incline, while tile systems require careful handling to avoid breakage as shingles and tiles are moved through tight corridors and around trees.
Roof pitch dramatically affects labor hours in this terrain. A steeper slope not only increases fall-protection costs but also extend the project window, which matters because the late-spring to early-fall window is competitive and weather-sensitive. If staging space is especially constrained, crews may need off-site storage or staged delivery, adding a logistics fee. Factor in the potential for weather-driven delays tied to marine fog and winter runoff, which can compress or stretch project timelines and impact disposal scheduling.
Get a clear picture of your project costs upfront - no commitment required.
Northbay Roofing & Gutters
(415) 497-1714 www.northbayroofinggutters.com
Serving
5.0 from 10 reviews

A full re-roof in this area typically requires a permit through the City of Mill Valley or Marin County jurisdiction, depending on the property's governing authority. The local process is not centralized, and the authority can hinge on parcel lines, historic status, or a homeowner association's rules. Skipping or rushing the permit step can lead to a stop-work order, lien risk, or delays that cascade into missed seasonal moisture windows. It's essential to know who issues the permit before any tear-off or new roofing material is staged on site.
Before work begins, you must align with a licensed contractor who understands the local climate realities-fog, shaded slopes, and winter runoff. The permit package generally requires contractor information and roofing material specifications, along with project scope and the anticipated schedule. Concrete, clay, and synthetic options each bring different installation nuances that must be disclosed upfront. If the project touches any drainage, venting, or attic ventilation changes, those details typically show up in the permit documents and may trigger additional reviews. Double-check that the installer's license is current and that any subcontractors are properly listed.
Inspections are typically performed during installation and again at project completion. A common sequence includes a rough inspection after the roof deck, underlayment, and flashing are in place, followed by a final inspection once the finished roof is installed and any venting or moisture-management measures are in place. The final sign-off is required before permit closeout, which means waiting for the inspector's confirmation that all code and permit conditions are met. If any moisture-management detailing-such as proper moss control measures and hillside slope considerations-was part of the approved plan, it will be checked during the final walk-through. If discrepancies are found, re-inspection may be necessary, potentially extending the project timeline.
Coordinate closely with the contractor to schedule inspections at logical milestones, avoiding weather-induced delays that are common on shaded hillside sites. Have all product data, installation manuals, and moisture-management specifications readily available for the inspector. Keep the job site accessible for the inspector's required traverses-tight hillside access can complicate timing. Finally, treat the permit as a live document: if changes arise-material substitutions, framing adjustments, or drainage alterations-confirm whether a permit amendment is needed to avoid compliance gaps and sign-off delays.
In Marin's coastal foothills, insurers are weighing wildfire exposure and hillside fragility as much as they look at roofing age and tree coverage. The Mount Tamalpais interface and southern Marin edge create a risk profile where fog and winter runoff stress shingles and underlayment, and where densely treed canyons amplify ember risk. The result is a market that treats older roofs and shaded, moss-prone surfaces with extra scrutiny, even if a roof has performed well for decades.
Carriers may ask for roof age, prior damage history, and post-work inspection documentation before renewing or underwriting coverage. A clear, organized file that documents durability improvements, debris history, and moisture-related repairs can smooth the process. Expect questions about moss control measures, ventilation, and how runoff is managed along the slope lines. If the roof has had recent moss remediation or resealing, have that record ready to show how moisture is being managed on the shaded hillside span.
Photo documentation before and after work is especially important locally because some insurers are limiting coverage on older roofs or scrutinizing new installations in higher-risk zones. Take high-resolution images from multiple angles, showing flashing details, valley intersections, and gutter conditions. After work, re-photograph to capture any new seals, ridge lines, or underlayment access points. Keep a dated album to demonstrate ongoing maintenance and the durability of moisture-control measures against fog-driven dampness and leaf litter.
Understand that coverage decisions can hinge on how well a roof handles moisture, moss invasion, and winter runoff. If the insurer signals tighter terms, you'll want a robust maintenance log, clear evidence of moss management, and timely post-work inspections to document continued performance in the damp, shaded hillside setting. Staying proactive with documentation can help prevent surprise lapses in protection when the market tightens.
Connect with contractors who help homeowners navigate the claims process from damage assessment to final approval.
Xerlo Cast Roofers
(628) 877-0002 xerlocastroofers.online
242 CA-1, Mill Valley, California
4.9 from 29 reviews
On hillside homes with low-slope sections, fog-damp and winter runoff funnel toward scuppers, parapets, and roof-deck interfaces. Ponding becomes the real concern, not wear on a shingle edge. When a roof deck ties into a deck or hillside terrace, ensure water can reach a defined drainage path without backing up behind a parapet or into a skylight curb. In this climate, debris from redwoods and needles can clog drains quickly, so expect more frequent checks than on a flat urban roof. Focus on the transition points where roof, deck, and landscape meet, and watch for dark blotches or moss growth that indicate persistent moisture.
Low-slope additions and mixed-slope configurations are common in hillside remodels. Plan drainage with that in mind: slope toward properly sized scuppers, ensure membranes extend over parapets with reliable terminations, and double-check that interface flashing remains watertight at every change in plane. Pay attention to membrane laps near parapet caps and around penetrations, as foggy air and winter runoff can magnify slow leaks. For roof-deck interfaces, specify a continuous, reinforced detailing that resists moss and debris buildup, with a drip edge that directs moisture toward drainage paths rather than toward living spaces or exterior walls. Regularly inspect flashing at transitions between metal edges, parapets, and protected roof decks.
Locally, homes with both steep and flat sections appear in the same project more often than not. Verify your contractor routinely handles the full spectrum of slope layouts, including proper integration of drainage elements across different planes. Ask for project references that show successful moisture management on hillside, low-slope areas, and deck interfaces. A cohesive detailing plan that treats the flat roof as an integrated system-scuppers, deck drains, curb flashings, and edge treatments-will reduce winter moisture issues and keep the living spaces dry.
Find specialists in TPO, EPDM, and built-up flat roofing systems for residential and commercial properties.
Northbay Roofing & Gutters
(415) 497-1714 www.northbayroofinggutters.com
Serving
5.0 from 10 reviews