Last updated: Apr 19, 2026
In Saint Johns, homeowners commonly plan reroofs in the drier November to April window to reduce weather delays before Atlantic hurricane season ramps up. That cadence isn't just about avoiding summer showers; it's about aligning a reroof with a stretch when you can safely tear off, dry in, and complete critical details without a sudden tropical disruption derailing progress. If your plan hinges on a spring or early summer start, you'll want a tight schedule and a contingency plan for rain bands that can push completion into the hurricane-heavy months. This timing approach helps ensure you aren't caught with a roof open during peak storm risk.
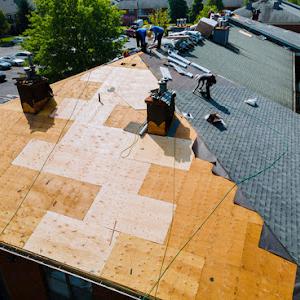
Summer and early fall work in Saint Johns County is routinely interrupted by tropical weather bands and afternoon thunderstorms, which can pause tear-off and dry-in sequencing. Those sudden storms don't just delay; they expose exposed roofing substrates to saturation and can complicate ventilation and underlayment work the county looks at closely. When storms threaten, a well-organized crew will have a clearly defined halt protocol and a backup plan for securing open roofing areas, tarping vulnerable spots, and protecting interior spaces. Plan around the typical daily thunderstorm pattern, and build buffer days into the project calendar to absorb delays without rushing critical procedures.
Local reroof decisions are strongly tied to wind resistance because county inspections review fastening, underlayment, ventilation, and wind-related installation details. That means you should not treat a reroof as a generic replacement. The choice of fasteners, the layering of underlayment, and the design of ventilation must reflect Florida wind zones and the likelihood of hurricane-strength gusts. In practice, this means coordinating with the contractor to ensure impact-resistant components, validated fastening schedules, and a ventilation strategy that preserves attic moisture balance while resisting wind uplift. If the forecast calls for a tropical system, the urgency to confirm wind-rated assembly details becomes not just prudent but essential.
Prepare for a thorough documentation routine because wind-focused inspections look for precise installation sequences and materials. Keep a locally relevant record: product details, installation diagrams, and weather windows tied to your project timeline. Having a clear log helps validate that the roof was installed in accordance with wind-resistant standards and that each step-from raw deck preparation to fastener patterns and flashing details-was executed with scrutinized care. In practice, that means photos at key milestones, notes on substrate condition, and confirmation that ventilation components are properly integrated to prevent moisture buildup even in storm-weary months.
To stay ahead of hurricane season, align the project with your chosen November-to-April window and lock in milestones that are resilient to weather variability. Communicate contingency plans with your crew: staged tear-off, secure temporary coverings, and rapid-dry-in targets that can tolerate occasional rain without sacrificing adherence to wind-resistance requirements. Consider the typical Saint Johns rainfall pattern and coordinate with neighbors in adjacent homes who may be pursuing similar timelines; coordinated scheduling can reduce street-level disruption and material-vulnerability risk.
After a storm threat passes, quick verification of the roof's wind-resistant integrity matters. A swift post-storm inspection or a pre-hurricane readiness check helps ensure fasteners, underlayment, and ventilation remain intact or are promptly addressed. If any weather event brushes through the area, schedule a quick follow-up visit to confirm seal integrity around penetrations and edge details, because a single compromised seam can become a gateway for water intrusion during the next windy period. In Saint Johns, staying proactive with this monitoring-especially around the peak of hurricane season-helps protect your investment and reduces long-term risk.
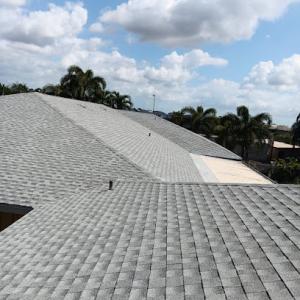
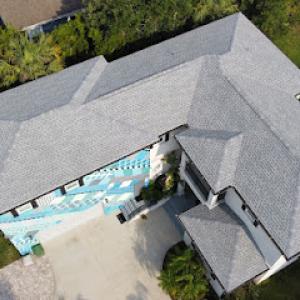
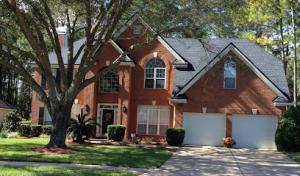
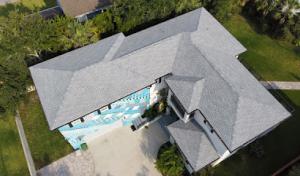
Saint Johns housing stock ranges from newer suburban homes to established renovations, and the replacement market reflects that mix: asphalt shingles, metal, clay tile, concrete tile, wood products, and synthetic shingles are all common options. Hot, humid summers accelerate UV aging and moisture-related wear, turning material choice into a lifespan and maintenance decision rather than a purely cosmetic one. When planning a roof replacement, the decision hinges on how a material handles wind, moisture, heat, and the local tendency toward fast seasonal shifts. The right choice considers both initial performance and how the roof will respond to Saint Johns' intense sun and occasional heavy rain events.
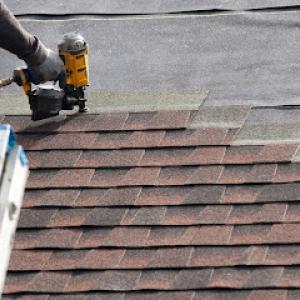
Asphalt remains the dominant budget-conscious option in this market, especially for reroof projects on homes built in recent decades. In this climate, asphalt can deliver solid all-around performance when paired with proper underlayment, adequate ventilation, and reliable wind-fastening methods. Look for a high-quality laminated shingle with a favorable wind rating and a underlayment system designed for humidity. For homes that see regular sun exposure, a reflective or mid-range shingle can help moderate attic temperatures and extend the life of the roof deck. If the goal is a straightforward replacement with reliable service life, asphalt shingles are the practical baseline.
Metal roofs are a well-understood upgrade in this area, delivering durability and resistance to wind uplift that often exceeds other materials. In a hot climate like this, metal panels shed heat effectively when paired with a proper ventilated attic and radiant-barrier considerations. Metal works well on many newer homes with simple, clean lines, and it tends to pair nicely with the local aesthetic when finished in subdued, architectural colors. The long-term resilience matters here: metal's performance under repeated storms and its public perception as a secondary layer of protection against wind make it a compelling option for homeowners seeking lower maintenance over time.
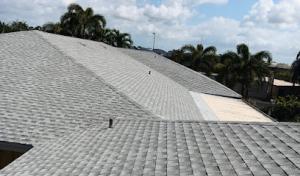
Clay tile and concrete tile are proven upgrades in Saint Johns, with long lifespans and strong wind resistance when installed correctly. Clay tile brings a traditional, high-end look and excellent heat tolerance, but it can be heavier and may require structural checks to ensure the existing frame can support it. Concrete tile shares many benefits with clay but tends to be more affordable and lighter on some structural demands while still offering impressive durability and a distinctive profile. Tile roofs excel where aesthetics align with long-term performance, especially on homes designed to handle the weight and moisture management requirements of tile systems.
Wood shingles and shakes bring a classic texture that suits many styles found in newer developments and historic-adjacent neighborhoods. They require meticulous ventilation and moisture control to prevent rapid deterioration in Saint Johns' humidity. Synthetic shingles offer a lower-maintenance alternative that can mimic the look of wood or slate while delivering better resistance to moisture and UV exposure. When choosing synthetic options, verify that the product line is designed for high-humidity environments and offers reliable color stability and warranty terms in the local market.
Start with assessing your home's existing roof geometry, attic ventilation, and underlayment readiness. For areas prone to high humidity and sun exposure, prioritize materials with robust UV resistance and wind performance. In many neighborhoods, tile or metal systems become the preferred upgrade due to their durability and long-term upkeep profiles, while asphalt remains a sensible, affordable option for routine reroofs. Consider your roof's line, the slope, and how the chosen material will integrate with the home's exterior and surrounding streetscape. A solid plan pairs the material's performance with proper installation details, especially in wind-prone conditions.
Frequent thunderstorms and hurricane activity in Saint Johns create a local pattern of wind-lifted shingles, displaced ridge components, and water intrusion after heavy rain events. On a hot summer afternoon, you can hear shingles fluttering like loose cabinet doors before you see the telltale curling at the edges. Inward drafts and damp attic smells are early signals that wind-driven rain found its way under the cap. The risk is not just cosmetic: accelerated deck decay, compromised underlayment, and accelerated deterioration of fasteners can set a minor leak on a path to widespread interior damage if ignored. The clock ticks on every major storm.
Rapid leak response matters here because repeated summer downpours can turn a small opening into interior damage before a full repair crew can return. As soon as you notice water streaks, bubbling paint, or soft spots on ceilings, act fast. Contain the area with a tarp secured to solid roofing components and protect valuables in the attic once access is safe. If you cannot reach the source quickly, place a bucket under the drip and document persevere with photos. Schedule a roof inspection after the next surge of storms, prioritizing the suspected penetration points so crews can seal the openings before the next front passes through. Consistent, timely checks during the storm season save far more damage than a late fix.
Skylight penetrations and roof transitions deserve extra attention in this market because wind-driven rain during tropical systems can expose weak flashing details. Skylights are routinely challenged by wind gusts that peel flashing away from joints, while transitions between roofing materials-where metal flashings meet shingles or tiles-tend to corrode or loosen first under pressure. Check around chimney crickets, vents, and plumbing stacks, but don't overlook edge shingles along eaves and rake lines, where wind pressure concentrates. In Saint Johns, the most persistent leaks often ride the wind from these points into the attic, then flood the ceiling below.
Documentation matters more here than elsewhere because storm patterns repeat with predictable intensity in hurricane season. After every significant event, photograph all suspect areas from multiple angles, note the direction of wind, and timestamp any new water trails. Keep a simple log of observed leaks, spray patterns during rainstorms, and any changes in attic humidity. When a pro returns for a repair, bring the documentation so they can reproduce and seal the failure points accurately. This record helps target the root cause, rather than chasing lingering drips after each storm.
The Roof Boutique
(904) 902-7663 www.theroofboutique.com
Serving
5.0 from 21 reviews
Our mission is to ensure exceptional customer service while providing a superior roof. The Roof Boutique values integrity, professionalism, and delivering great results. We make sure our customers’ homes and properties are quickly restored in the aftermath of northeast Florida’s torrential rains, severe winds, and the inevitable hurricanes that impact our communities. The Roof Boutique works hard to demonstrate a passion for our customers, their property, and their complete satisfaction with our work.
Champion Seamless Gutters
(904) 586-7279 www.championseamlessgutters.com
Serving
4.4 from 14 reviews
Champion Seamless Gutters, LLC is North Florida's premiere gutter installation contractor. Owner Steven Quick prides his company on a customer-centric approach and quality worksmanship. As homeowners, we understand that you want the best service for the best price. That's why we let our independent reviews at HomeAdvisor from homeowners just like you speak for our quality work.
ARICA Roofing & Construction
(904) 232-8475 aricaconstruction.com
Serving
5.0 from 47 reviews
At ARICA Roofing & Construction, LLC, we proudly serve homeowners and businesses across Jacksonville, FL, with expert roofing solutions you can trust. As a family-owned and operated company, we’re dedicated to completing every project on time, within budget, and to the highest standards of quality and craftsmanship. As GAF Certified Contractors, we bring top-tier roofing, and siding services to your doorstep—without breaking the bank. We also offer flexible payment plans designed to fit any budget, making it easier than ever to protect and enhance your property. Your satisfaction is our top priority. Contact ARICA Roofing & Construction, LLC today for your free estimate—and let’s build the roof of your dreams together!

Armor RoofingCompany
(904) 371-0234 www.armorroofingcojax.com
Serving
5.0 from 51 reviews
Locally owned and operated family run business. I estimate every new roof project personally and am a State Certified Roofing Contractor. I oversee every project personally. We do not sub out our work and take pride in maintaining an excellent relationship with our customers. Call today for a free estimate and I promise you will not be disappointed.

Trinity Restoration & Roofing
(904) 763-2006 trinityrestoration.com
Serving
4.9 from 1146 reviews
Established in 2019, Trinity Restoration and Roofing is a premier roofing service dedicated to the Jacksonville community. They specialize in both full-service roof repair and complete replacement, ensuring that every project is handled with professionalism and expertise. Their commitment to quality craftsmanship and customer satisfaction has made them a trusted name in the industry. For reliable and comprehensive roofing solutions, Trinity Restoration and Roofing is the local expert you can depend on.

Cooper Roofing
(904) 806-3030 cooperroofinginc.com
Serving
5.0 from 3 reviews
Licensed, insured & experienced experts in roofing repair & replacement. Serving St. Augustine and Northeast Florida. We bring a level of quality in service & materials like no other roofing company in the area. Free roof estimates!
Poe Construction & Roofing
(904) 209-6579 poeconstructionandroofing.com
Serving
4.8 from 63 reviews
Poe Construction and Roofing has proudly served North Florida for over 25 years, offering expert roofing and construction services built on trust, quality, and craftsmanship. Specializing in roof replacement, roof repair, and roof inspections, our team ensures your home or business stays protected and beautiful year-round. As a state-certified building contractor and roofing specialist, we also provide professional remodeling and home addition services. From small repairs to large-scale renovations, Poe Construction and Roofing delivers reliable results with integrity and a commitment to excellence on every project.

SEC Roofing & Construction Group
(904) 230-9175 www.secconstructiongroup.com
Serving
5.0 from 164 reviews
SEC Roofing & Construction Group provides trusted roofing services across Northeast Florida for both homeowners and businesses. We specialize in residential roofing, offering roof replacements, repairs, storm damage restoration, and inspections with dependable workmanship and honest service.

Legion Roofing & Construction
(904) 612-3599 legionroofingfla.com
Serving
4.9 from 135 reviews
Legion Roofing & Construction is a trusted family-owned roofing company serving Jacksonville, FL and surrounding areas. We provide expert roof repairs, replacements, and installations for residential and commercial roofs. Specializing in asphalt shingle, tile, wood shake, metal, and flat roofing, we ensure durable, high-quality craftsmanship. Our commercial roofing services include flat roof installations, repairs, and re-roofing. Whether you need a roof inspection, leak repair, skylight installation, or full replacement, we deliver reliable, long-lasting results backed by a strong warranty.

Legacy Roofing & Solar
(904) 442-7663 www.roofsbylegacy.com
Serving
4.9 from 70 reviews
Legacy Roofing & Solar, in St. Augustine, FL, is the area's leading roofing company serving St. Johns County, FL, and surrounding areas. We specialize in commercial and residential roofing. From repairs and replacements to restoration and installations, we have the experience, skills, and equipment needed to deliver the premier roofing services you need. For all your roofing and solar needs, contact Legacy Roofing & Solar in St. Augustine, FL.
Hester's Roofing & Coating
(904) 484-4324 www.hestersroofing.com
Serving
4.9 from 124 reviews
Hester's Roofing and Coating is a veteran-owned roofing company and local industry leader based in St. Augustine, FL. With 16+ years in business, our GAF certified + GAF coding pros deliver high-quality residential and commercial roofing services. We specialize in roof replacements, repairs, inspections, and advanced coating solutions, including metal, tile, and flat roofs. Serving St. Augustine, St. Johns, Ponte Vedra, Palm Coast, and surrounding areas, we provide durable roofing systems built to handle Florida’s demanding weather while delivering exceptional craftsmanship and customer service. Upgrade your roof with our professional team!
Top View Roofing & Restoration
(904) 460-4991 www.topviewfl.com
Serving
5.0 from 4 reviews
In the heart of Jacksonville, Top View Roofing and Restoration stands as a family-owned enterprise, dedicated to providing unparalleled roofing services to the community. With over half a century of combined construction expertise, their seasoned professionals are adept at handling all types of roofing projects, from repairs to replacements, gutters, and siding restoration. Their service area encompasses Jacksonville, St. Augustine, Fernandina, Jacksonville Beach, Ponte Vedra Beach, Palm Coast, and the entire North Eastern region of Florida.
A building permit is typically required in Saint Johns County for a full roof replacement, and the licensed contractor usually submits the permit application. That means you should expect to provide project details, material choices, and a work schedule to your contractor, who then handles the county intake. In inland master-planned neighborhoods, crews commonly coordinate permit submissions to align with neighborhood review calendars and local wind-ventilation requirements. Keeping a copy of the permit and the contractor's license handy during the project helps during any follow-up questions from county staff.
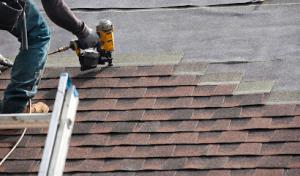
County inspections occur during and after installation to verify underlayment, nailing patterns, ventilation, and wind-resistance provisions. In Saint Johns, the Inspector will check that the underlayment is properly overlapped and fastened, that the roof deck is solid and free of damage, and that the chosen nailing pattern matches the roof's slope and chosen fastening method. Ventilation checks ensure soffit intake and ridge or mechanical ventilators meet code allowances to manage attic moisture and heat in our hot, humid climate. Your contractor should schedule inspections promptly, and you may need to be present for certain inspections to confirm access and compliance.
Because reroof inspections are part of the local process, homeowners in Saint Johns should expect scheduling around county sign-offs rather than treating replacement as a same-day private transaction. The hurricane season can add a layer of urgency or delay depending on weather windows, so plan ahead and keep the project window as contiguous as possible. If a storm approaches, confirm with the contractor how temporary protection, debris management, and access will be handled while awaiting a required inspection or sign-off.
Keep a dedicated folder with permit numbers, inspection appointment notices, and any county feedback notes. When scheduling, ask the contractor to share the inspection calendar and confirm whether any adjustments are needed due to weather or county backlogs. If you have structural or venting concerns specific to your home, raise them early so the permit packet reflects your house's needs and the county can verify wind-resistance provisions without delays.
In Saint Johns, asphalt shingles sit around 350 to 650 USD per square, metal between 900 and 1800, clay tile from 1000 to 2000, concrete tile 800 to 1600, wood shingles or shakes 600 to 1100, and synthetic or composite shingles 600 to 1200 per square. These ranges reflect inland master-planned communities, where steep-slope designs are common and square-based pricing is still the norm. When a contractor is quoting, expect the base material to be only part of the story; roof geometry, attic ventilation, and underlayment quality push the final number higher or lower within these bands.
Costs can rise after major wind events or during regional demand surges across Northeast Florida. When a storm season hits and crews are booked for storm-related reroofing and repairs, scheduling slots compress and labor rates shift upward. Homeowners who plan to replace soon after a hurricane or tropical storm should be prepared for shorter lead times and potential price footing on urgent crews and expedited material delivery. In practice, that means twice-checking current availability and recognizing that the same material may carry a higher labor component during peak storm months.
Material choice has an outsized budget effect locally because many homes are steep-slope residential roofs where tile and metal upgrades increase labor complexity compared with standard asphalt replacements. Tile and metal roofs require more precise installation, enhanced fastener patterns, and careful detailing at edges and penetrations, all of which add to both time on the roof and risk management costs. Concrete tiles, clay tiles, and high-end metal options frequently run at the upper end of their ranges, while asphalt remains the most predictable in timing and crew efficiency. If a reroof involves adding or upgrading attic ventilation and addressing wind fastening, expect additional line items that are tied to local climate expectations and permit scrutiny.
Because storm-driven demand can compress schedules, align expectations around timing, especially if a storm-season replacement is anticipated. A practical approach is to lock in a recommended material and a staged plan for underlayment, ventilation, and wind-resistant detailing early in the process. This helps ensure the chosen system meets performance goals without triggering staggered price bumps mid-project. If a homeowner chooses tile or metal, build in a buffer for potential longer installation timelines and greater on-roof coordination, since labor complexity correlates with the final cost more than with asphalt paths in this market.
Get a clear picture of your project costs upfront - no commitment required.
Champion Seamless Gutters
(904) 586-7279 www.championseamlessgutters.com
Serving
4.4 from 14 reviews
This area sits in Florida's high-claim wind and hurricane insurance environment, where carriers routinely request detailed roof age, condition, and installation documentation before they approve a policy or a renewal. The weather pattern that arrives with hurricane season means insurers scrutinize roofing systems for vulnerability, and the more complete your documentation, the clearer your risk picture. The goal is to avoid last-minute surprises when a claim is needed during or after a storm.
Clear, contemporaneous records matter. Homeowners should expect carriers to want specifications that show how the roof was fastened, what underlayment was installed, and how ventilation is integrated with the overall system. If a reroof is on the horizon, gather every piece of evidence you can: manufacturer data for the shingles or tiles, installation receipts, and notes from the installer about wind resistance features. Photos taken throughout the project-before, during, and after-can quickly demonstrate diligence and best practice to an underwriter.
Storm exposure compounds the stakes. In this market, gaps between what was installed and what was observed during a claim can influence deductible levels or coverage decisions. Documentation should extend beyond the roof itself: note attic ventilation, flashing transitions, and any mismatches with surrounding structures that could affect wind performance. A well-documented project reduces ambiguity and helps avoid coverage friction when a wind event occurs.
Finally, understand that wind mitigation documentation can materially affect insurance outcomes. When reroof work is completed, ensure final inspection evidence is preserved, and keep a tidy, chronological file of all records. The more transparent you are about construction details and condition, the smoother the path to recovery after a storm.
Connect with contractors who help homeowners navigate the claims process from damage assessment to final approval.
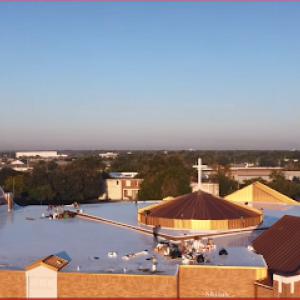
Although steep-slope roofs dominate Saint Johns, the local contractor market shows meaningful demand for flat and low-slope work on porches, additions, garages, and some commercial structures. Those sections behave differently when it's hot and humid, and when afternoon storms roll in. If your roof plan includes any porch or extension with a low-slope surface, confirm that the contractor's scope explicitly covers that area and matches the main roof material or uses a compatible transition. In practice, this means clarifying materials, fasteners, and flashing details at every transition from a steep roof to a low-slope section.
These low-slope sections are especially vulnerable during Saint Johns summer downpours because drainage problems show up quickly under repeated thunderstorm cycles. A reliable roof replacement should include a dedicated assessment of drainage paths, scuppers, and edge detailing for any flat or low-slope zones. Consider upgrading to a cohesive membrane or vented drip edge where appropriate, and ensure the new surface has a proven test for ponding resistance. Note that even small pooling can stress the system during the next storm season, so plan for robust sealing and continuous water shedding away from walls and foundations.
Homeowners replacing the main roof should ask whether attached low-slope areas, transitions, and tie-ins are included in the scope rather than assuming one system covers all sections. Pay attention to how the new roof joins near doors, windows, or existing parapets, and verify that flashing designs account for wind-driven rain common in summer squalls. For additions or porches, insist on matching or compatible underlayment, venting strategy, and drainage to prevent mismatches that can undermine overall performance.
Start by mapping every low-slope surface and its connection to the main roof. Request detailed drawings showing transitions, flashing, and chosen sealants. During installation, inspect for uniform drainage and proper slope where possible. After work completes, document storm-related performance notes for the first season, including any wind-driven rain entries around tie-ins, so future maintenance can be targeted and quick.
Find specialists in TPO, EPDM, and built-up flat roofing systems for residential and commercial properties.

Newer residential growth brings homes with flatter roofs and modern attic spaces, which can make solar compatibility a practical reroof consideration. When options are evaluated during a replacement cycle, the ability to integrate solar without compromising the roof's wind resistance becomes a decisive factor. That means thinking ahead about underlayment, decking attachments, and edge details so the roof remains sturdy through hurricane season while accommodating future solar equipment.
In this market, planning should be coordinated before reroofing so penetrations and mounting details do not compromise a newly installed wind-resistant roof assembly. A shaded attic, proper ventilation, and the spacing of fasteners all influence how well a solar array will perform over time. Engage both the roofing contractor and a solar installer early to map out panel racking, conduit runs, and inverter placement so penetrations are aligned with existing roof lines and structural members rather than retrofitted later. The goal is to minimize roof penetrations while preserving wind uplift resistance and drainage.
Metal and some synthetic systems can be part of the local conversation when homeowners want long service life before adding rooftop solar. Metal roofs offer excellent wind performance and rapid drainage, which can simplify mounting and reduce long-term maintenance. Certain high-performance synthetics provide light weight and clean attachment points that pair well with solar racking. If choosing these options, ensure the chosen system has known compatibility with standard rooftop solar hardware and does not undermine the integrity of valve-flashing, edge metals, or vent terminations.
Because hurricane season is a recurring consideration, ensure the reroofing plan preserves a continuous, wind-tight envelope around penetrations and terminations. When solar is on the horizon, specify sealed flashing around any accessory mounting bases and use roofing staples or fasteners that are rated for high-wind environments. Document the anticipated mounting plan and weather-seal strategies so future solar retrofits are straightforward and do not require major rework to the roof assembly.
Start by choosing a roofing system with proven wind resistance and compatible underlayment details for solar mounting. Schedule the solar assessment as part of the reroof timeline, not after installation, to avoid rework. Ask for a detailed installation map from the contractor that marks where penetrations will fall relative to trusses and deck layers, and confirm that the chosen mounting hardware will align with the roof's edge and ridge lines for optimal performance and ease of future maintenance.
Find contractors who integrate solar panels or solar shingles into your roof for long-term energy savings.


Stonebridge Roofing, Energy & Exteriors
(904) 262-6636 www.stonebridgebuilt.com
Serving
4.6 from 214 reviews