Last updated: Apr 19, 2026
Windermere sits in southwest Orange County, where the May-October hurricane and thunderstorm season creates repeated wind-driven rain events that can damage shingles, ridge caps, flashing, and tile attachments. Each fast-moving storm brings wind gusts that slam against exposed hips, valleys, and roof edges, often lifting surge-prone materials and loosening fasteners. In this climate, a single afternoon downpour can morph into a leaking attic and sagging ceiling if leaks aren't contained within hours. The right response is urgent, targeted, and informed by the local weather pattern and housing stock that leans heavily on tile and shingle combinations.
Florida insurers commonly review roof age, condition, and wind-mitigation details, making pre-storm photos, repair invoices, and manufacturer documentation especially important for Windermere homeowners filing claims. Build a photo record that captures the entire roof from ground level and from the ladder-photos that show ridge caps, flashing around chimneys, skylights, and vent boots, plus close-ups of any existing damage. After a storm, document fresh damage quickly: torn shingles edges, lifted tiles, cracked ridges, rusted or bent flashing, and any tarping or temporary measures. Keep copies of purchase receipts or warranties for roofing materials, as well as any prior repair notes that illustrate a maintenance history. If a tile roof is present, note broken tiles and any loose fasteners; for shingles, highlight lifted tabs and granule loss in gutters and downspouts. This documentation reduces back-and-forth with insurers and accelerates claim evaluation.
In this market, storm damage, emergency repair, and insurance-claim services are among the most prevalent contractor specialties, reflecting how often homeowners need rapid tarping, leak control, and claim support after severe weather. If a leak appears, begin with temporary tarping on the affected area to keep water from spreading into the attic and ceilings. Use a waterproof tarp secured along the edges and weighted down where wind can peel it away. Place buckets or absorbent materials under active drips and protect valuables from water damage. Do not delay a temporary fix to wait for a contractor if water is actively intruding; the longer the water sits, the higher the risk of mold and interior damage, which complicates claims and increases repair complexity later.
After a storm passes, perform a careful, daylight inspection from the ground if safe, looking for obvious signs of damage: lifted shingles, missing granules, and uneven roof planes. If a fall is suspected-such as a visibly shifted ridge cap or a displaced flashing boot-treat it as an urgent repair need. Prioritize securing the most vulnerable areas first: ridge lines, penetrations around chimneys, skylights, and vent pipes. For tile roofs, check for cracked or loosened tiles and any movement in the substrate that could indicate underlayment distress. For shingle roofs, note exposed underlayment, exposed nails, and any widespread granule loss. Document these findings with dates and precise locations to streamline contractor quotes and insurer assessments.
In this climate, storm damage and insurance-support teams are among the most active contractor niches. Seek specialists who understand Windermere's roof types, including tile-heavy configurations and mixed shingle/tile assemblies, and who have a track record handling rapid tarping, leak control, and detailed claim support. A local contractor should be able to provide a rapid assessment, temporary protection plan, and a documented repair trajectory aligned with insurer expectations. Engage teams that can supply manufacturer documentation for wind mitigation and repair invoices that clearly attribute work to storm-related damage. Consistent, transparent communication with both the contractor and the insurer will help secure timely approval and restore your roof to its intended protection level before the next storm arrives.
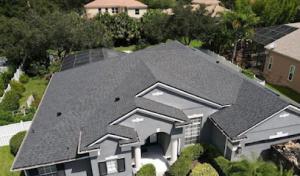
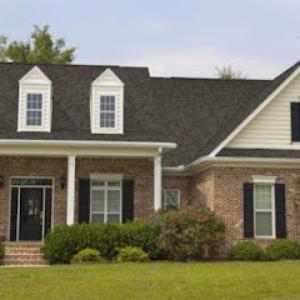
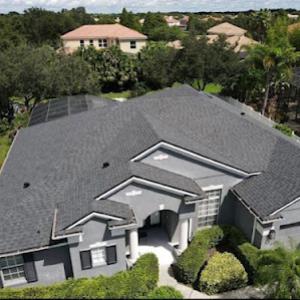
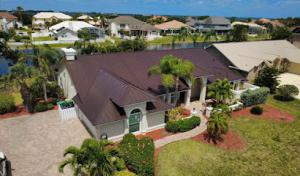
Windermere-area homes commonly use clay tile, concrete tile, and metal roofing alongside asphalt shingles, matching the architectural mix found in master-planned communities around the Butler Chain and nearby southwest Orange County growth corridors. This combination supports the hot sun, heavy summer storms, and the occasional hurricane-driven insurance scrutiny you'll notice among local carriers. Tile and metal respond well to heat and wind, but each material has its own care and failure points that show up quickly after a storm.
Tile roofs need close attention after storms because individual cracked or displaced tiles can allow water intrusion even when the roof still looks intact from the street. A roof that appears fine from ground level can have a hidden bird's-nest of leaks along eaves, hips, and valleys. Concrete and clay tiles are especially vulnerable to granular loss and microcracks that propagate under pressure from wind-driven hail or flying debris. Metal roofs, while generally durable, can suffer edge laps, fastener pull-out, or underlayment exposure if installation at edges or fastener patterns wasn't optimal for Florida wind exposure. In a Windermere storm, your first clue of trouble is often a damp ceiling or damp attic insulation near edge eaves after a heavy downpour.
If a leak is suspected, start by protecting interior spaces: place a bucket beneath any active drip, and move valuables away from the leak path. Then, document with photos from both exterior and interior angles-ties, fasteners, and any displaced tiles are key details for insurance and repair planning. For tile roofs, check the roof deck near the leak for soft spots, cracked tiles, or missing grout lines around flashing. For metal roofs, inspect seams, fasteners at ridge lines, and any lifted panels. Avoid walking on tiles or loosened metal if you're unsure of footing or tile integrity; this can cause further damage. A temporary tarping or plastic sheeting can reduce interior moisture while awaiting a pro, especially if the leak is near an interior ceiling knot or skylight.
Choose a contractor who can demonstrate experience with local wind exposure and proper flashings for both tiles and metal. Tile work should emphasize correct alignment, secure lath, and mismatches around hips, ridges, and penetrations (vent stacks, chimneys, and skylights). For metal roofs, prioritize installers who use sealant-compatible fasteners, concealed or well-sealed edge fasteners, and a wind-rated underlayment. Ask for a detailed plan that covers edge closures, valley treatments, and anti-corrosion measures in salt-influenced air areas around inland lake pockets. Request references-prefer those who can show recent repairs from Central Florida storms and a record of proper attic ventilation that helps mitigate heat buildup and moisture.
In the weeks after a storm, timely documentation matters. Collect weather reports for the affected window, photos of the roof from multiple angles including the eaves and hips, and any interior moisture evidence. If tiles are cracked or fasteners show corrosion, document that with close-up shots. A simple, orderly file of the roof's condition before and after the storm makes insurance discussions smoother and speeds up any claims for wind or hail damage. When you present the claim, include a note about the roof's material type and any flashing or edge details that were compromised by wind exposure.
Preventive care pays off in this climate. For tile roofs, maintain a consistent inspection interval to catch hairline cracks visible on closer inspection rather than from the ground. For metal roofs, ensure edge closures are intact and fasteners are not exposed to excessive sun wear or salt spray from lake winds. Seasonal checks after peak storm season can prevent small issues from becoming larger leaks and help preserve the architectural character of your home.
In this town, the roof is exposed to Central Florida heat, sudden summer storms, and the seasonal push on crews when a hurricane draws attention from insurers. When you're weighing replacement options, start with the numbers you'll actually see on the bid. Asphalt shingles sit around 350-750 USD per square, metal 800-1500 USD, clay tile 1200-2100 USD, concrete tile 900-1800 USD, wood shingles or shakes 500-1200 USD, and synthetic or composite shingles 600-1200 USD per square. Those ranges reflect Windermere's typical upscale homes with tile-heavy or mixed roofing, and they're a good baseline for planning.
Heavier tile systems drive the price up quickly, especially on larger, two-story or steeply pitched homes common in the area. In practice, a bigger, more complex roof line means more material waste, longer installation windows, and a tighter scheduling window when storms are in play. Contractors often price labor based on the roof's complexity and the time required to protect delicate features like overhangs, skylights, and tile edges. If your property includes multiple roof planes, dormers, or intricate ridge lines, expect a premium over the simple, flat-roof math.
Storm-season demand also tightens the clock. Local crews get booked faster, and supply chains can tighten as severe weather looms. That means potential delays and higher bids during hurricane season. If you're replacing during or just before peak storm activity, ask for a project timeline with concrete milestones and a contingency plan for weather days. A typical crew will optimize for minimal disruption, but the calendar can still shift when the county's weather patterns are in flux.
Beyond the basic material cost, several add-ons commonly impact Windermere projects. Underlayment upgrades improve leak resistance on tile or heavy shingle systems, especially after the wear of years of sun and storm exposure. Ventilation corrections help long-term durability and energy performance, which can matter on larger homes with complex attic spaces. Manufacturer-documentation requirements may appear on the contract, affecting timing and insurance documentation trails. These factors can add cost or delay compared with a simple dry-season re-roof.
If insurance and documentation are in play, line up the bids with a side-by-side comparison of material type, attic venting plans, underlayment choices, and any manufacturer-specific requirements. Knowing the local ranges and how they shift with roof size and complexity helps you negotiate confidently and pick a plan that stands up to Windermere's heat, storms, and insurance scrutiny.
Tiger Roofing
(407) 900-9909 www.tigerroofing.com
9100 Conroy Windermere Rd Suite 200, Windermere, Florida
4.9 from 104 reviews
At Tiger Roofing, we offer everything from residential roofing replacement to commercial roofing replacement in Windermere, Greater Orlando, Tampa and the surrounding areas. We’re a roofing contractor that takes pride in helping our customers understand the entire process, not just when it comes time for us to start working on their roofs. We’re here to ensure everything goes smoothly. Contact Us Today!

Hurricane Roofer – Roofing Contractor Windermere FL
(407) 607-4742 hurricaneroofer.com
9100 Conroy Windermere Rd Suite 200, Windermere, Florida
4.4 from 75 reviews
Hurricane Roofer is a veteran-owned and operated roofing company serving Windermere, FL, and surrounding areas. We specialize in roof inspections, repairs, replacements, and installations, focusing on properties impacted by storm damage. Our team assists with insurance restoration, ensuring a smooth and stress-free process. As a DOD-preferred hiring organization, we proudly support veterans and community contributors by providing job opportunities. Committed to quality and community service, we deliver durable roofing solutions at limited costs. Contact us today for expert roofing services and reliable protection for your home or business.
Orlando Roof Tech
(407) 809-7663 www.orlandorooftech.com
Serving
5.0 from 80 reviews
Roof Replacement and Repair. Free Estimates. Free Insurance Damage advice. Full Service company with all Roofing types. Commercial and Residential. We are truly your partner with all your roofing needs.
Arruda Roofing
(407) 473-5456 www.arrudaroofing.com
Serving
5.0 from 151 reviews
Arruda Roofing has been serving our community for many years, so we know how drastically storms can affect our daily lives. Whether you’re upgrading to a new roof or recovering from storm damage, any roofing project can disrupt your normal life. That’s why we focus on offering fast, high-quality service.
Schick Roofing
(407) 749-0808 www.schickroofing.com
Serving
5.0 from 349 reviews
Schick Roofing has been proudly serving Orlando, FL, for over 21 years as a reliable roofing contractor. Our team focuses on clear communication and quality work from start to finish. Whether you need repairs or a full roof replacement in Orlando, we handle every project with care and professionalism. We aim to make the process smooth and efficient, ensuring your home stays protected. Our experienced staff is committed to delivering dependable results and keeping you informed throughout the job. For trusted roofing services in Orlando, Schick Roofing is ready to help with your roofing needs.
Florida Roof Doctors
(407) 644-7612 floridaroofdoc.com
Serving
5.0 from 83 reviews
At Florida Roof Doctors, we are your trusted roofing experts in Central Florida. With over 20 years of experience, our licensed and insured team specializes in residential and commercial roofing installations, repairs, and maintenance. We prioritize quality, reliability, and customer satisfaction. Contact us today for a free estimate and experience the difference of our top-notch services. Serving Orlando and its surrounding areas, we are committed to delivering exceptional results for all your roofing needs.

Level Roofing
(407) 783-8207 www.level-roofing.com
Serving
4.9 from 366 reviews
Level Roofing uses high-quality materials and employs skilled craftsmanship to create a durable and long-lasting roof. We work closely with you to understand your preferences and budget, providing recommendations based on our detailed understanding of different roofing materials and styles. Our goal is to deliver a roof that not only protects your property but also enhances its aesthetic appeal. Contact us today for an estimate!
Gene's Roofing & Construction
(352) 642-5247 www.genesroofing.com
Serving
5.0 from 62 reviews
We understand that your roof is not just another component of your property; it’s your first line of defense against the elements. That’s why we approach every project with the utmost care and attention to detail, ensuring that your roof not only looks stunning but also provides the durability and protection your property deserves. Our team consists of highly skilled and experienced roofers who are experts in their craft. From minor repairs to complete roof replacements, we have the knowledge and expertise to handle projects of any size or complexity. What makes us different from the competition is our unwavering dedication to ensuring customer satisfaction and providing a lifetime guarantee.
Hi Low ROOFING & SOLAR
(407) 287-6171 hilowroofing.com
Serving
5.0 from 298 reviews
Discover Hi Low Roofing & Solar, premier roofing contractor in Winter Garden, FL. Family-owned with 30+ years of experience. We excel in residential and commercial roofing solutions. Skilled team handles everything from leak repair to installations in shingles, tile, metal, TPO, and flat roof systems. Known for our swift response to emergencies, enhancing property value with solar solutions. Experience unmatched craftsmanship and service excellence.

Next Level Roofers
(407) 237-7960 nextlevelroofs.com
Serving
4.9 from 393 reviews
Next Level Roofers was created to deliver the quality roof homeowners across Central Florida are searching for. Next Level Roofers began as an Orlando roofing company where both office staff and roof installers honed their craft. Our team has a combined experience of over 39 years in the roofing industry and we are dedicated to delivering a high standard of customer service. From humble beginnings, Next Level Roofers has taken their valuable experience and risen to a new level; we look forward to sharing our knowledge with all homeowners.

Certified Roofing Solutions
(407) 907-4722 www.certifiedroofingsolutionsllc.com
Serving
4.9 from 81 reviews
Certified Roofing Solutions, LLC is a locally owned and operated residential and commercial roofing company. With over 30 years of experience in the industry, our team of skilled professionals provide high-quality roofing services tailored to meet the unique needs of our clients. We use only the highest quality materials and cutting-edge techniques for new roof installations, repairs, and maintenance. We are a GAF Master Elite roofing contractor. Our services include asphalt shingles, metal roofing, tile roofs, flat roofs, GAF Energy Solar Roofing, TPO, PVC, EPDM, gutter and siding installation, and more. We are committed to providing exceptional customer service and transparency throughout the entire roofing process. CCC1326502 CGC058533

Sunray Roofing & Solar
(407) 347-7222 www.sunrayroofs.com
Serving
4.9 from 117 reviews
Sunray Roofing and Solar, established in 2019, is a veteran and family-owned local business providing comprehensive roofing and solar solutions for residential and commercial properties in Central Florida. Their highly experienced team offers expert shingle, tile, metal roofing installation and repair services, utilizing top-quality materials to ensure durability and long-lasting protection for your home or business. As a fully licensed and certified solar installer, Sunray Roofing and Solar provides complete solar installation services, including new installations with Tesla or Enphase systems, solar servicing and repairs, detach and reset panels, as well as the removal and reattachment of existing systems.
In this area, Windermere homeowners generally deal with Orange County permitting and inspection processes for roof replacement work, and full re-roofs typically require a permit pulled by a licensed contractor. The county's workflow emphasizes compliance with structural, mechanical, and flashing standards, as well as proper ventilation and underlayment. The process is designed to ensure durability against Central Florida heat, storms, and occasional hurricane-driven wind events, while aligning with insurance requirements. Start planning early, because the county tracks each stage from application to final inspection, not just the finished surface.
A licensed contractor files the permit application on your behalf, and that application must reflect the scope of work, roof type, and anticipated square footage. A contractor also coordinates the required inspections and ensures that materials and installation methods meet current code. For full re-roofs, the permit is typically tied to the sequence of tear-off, decking assessment, underlayment installation, ventilation provisions, and ridge vent or soffit details, in addition to the surface material. Choosing a contractor who understands local wind loads, tile and shingle tolerances, and the county's inspection expectations helps prevent delays and messy back-and-forth once the project is underway.
Inspection visits commonly occur during and after the job, with attention to underlayment, ventilation, and installation details rather than only the finished surface. Expect inspectors to verify decking condition, nail patterns, proper fasteners, and the integrity of starter and edge details. Ventilation must meet airflow requirements to reduce heat buildup in an attic or attic-like space, and underlayment must be continuous and properly sealed around penetrations. After completion, an inspection confirms that the installed system aligns with permit conditions and code. Keeping a clean, accessible roof line and orderly attic space during the job helps inspectors move efficiently and reduces re-inspection time.
During busy storm and summer seasons, permit approval and inspection scheduling can slow down, so Windermere projects often need extra lead time even before tear-off begins. Early communication with the permitting office and meticulous documentation of the project scope speeds up reviews. If a storm surge or hurricane season coincides with your project, anticipate tighter windows for inspections and potential weather-related delays. Your contractor should buffer the timeline accordingly and maintain a clear line of contact with the county inspector to minimize downtime.
Keep all project documentation organized: permit numbers, approved plans, material specifications, and any change orders. Photograph deck and underlayment conditions before tear-off as a reference for both you and the inspector. Ensure that your chosen underlayment and ventilation solutions are clearly documented in the permit package. Finally, designate a single point of contact with your contractor for inspection scheduling, so you can respond quickly to any county requests or corrective actions.
Central Florida's hot, humid pattern means Windermere roof work is routinely interrupted by afternoon thunderstorms, especially from late spring through early fall. That familiar thunderhead buildup over the lake horizon stalls progress groups and forces temporary shutdowns just as crews are reaching critical seal-down moments. You should plan for sudden delays that ripple through project timelines, especially on tile- and shingle-heavy homes where staging needs clear, dry access. Build buffer days into the schedule and establish a fixed ready-to-work window every morning so crews can maximize dry, low-wind periods after rain passes.
Hot summer conditions can accelerate material expansion and make crew timing, staging, and weather watching more important on exposed roofs. In practice, that means temperatures can push sealants and underlayment to their thermal limits, potentially affecting adhesive cure times and shingle lay-down rates. On tile roofs, expansion can alter fastener behavior and catching the right alignment becomes a short, precise task rather than a casual pace. If a large section of the roof faces the afternoon sun, expect shorter work blocks and more frequent pauses to prevent heat-related issues. Communicate with the foreman about preferred heat days and plan for morning-only shifts when heat climbs past a comfortable threshold.
Dryer winter months usually offer more reliable work windows, though morning dew and occasional cold fronts can still affect starts, seal-down timing, and inspection readiness. On cooler mornings, doors and tarps can remain damp, which slows early-stage prep and moisture checks. If a cold front rolls in, lighting and visibility can drop enough to necessitate a short pause while crews test seal integrity or re-check flashing. The key is to target the first few hours of daylight for the most efficient progress, then reassess as the day warms. Expect some days to begin with mist or low fog near the shorelines, which can delay initial measurements and needs precise timing for early-stage inspections.
Coordinate with the roofing crew to secure a predictable cadence: hold morning start times, designate an alert plan for afternoon storms, and designate a secondary indoor task for weather hold days. Have a clear communication channel for shift changes when rain moves in, and confirm material protection measures to prevent heat or moisture damage during unavoidable delays. For tile- and shingle-heavy homes, plan staggered sequences that let multiple roof planes progress in alternating windows rather than all at once, minimizing exposure to peak heat and sudden showers. By mapping a flexible, storm-aware rhythm, a Windermere project can stay on track without compromising safety or quality.
In this storm-prone climate, roof leaks tend to show up first at transitions more than across the main field. Valleys, wall flashings, penetrations, and ridge details carry the load where water movement concentrates during heavy rain and gusty winds. Tile and shingle systems both reveal vulnerabilities at these joints because movement, expansion, and debris can pry seams open quickly. A homeowner should prioritize inspection of these transition zones after every big rain event, looking for dark streaks, damp underlayment, or mineral granules tracking along fasteners. A routine is to trace water back from the ceiling line to its probable entry point, then document the condition of flashing and sealant around that area.
Skylights are a meaningful specialty in this market, which matters because heavy rain and wind-driven water can expose flashing or curb weaknesses quickly during summer storms. Check skylight flanges, curb mounting, and surrounding shingles or tiles for loose fasteners, lifted edges, or degraded sealant. If flashing shows any lifting or granular buildup at the base, address it promptly. In wind-driven storms, even small gaps become channels for water. Keep a simple diary of outdoor debris on the skylight and any condensation or dampness appearing on the interior ceiling near the skylight-these are early warning signs that the curb or flashing needs attention.
Low-slope sections over lanais, additions, or architectural transitions require separate attention from the main roof because drainage and membrane details behave differently from tile or shingle slopes. Confirm that membrane laps are intact, there are no ponding areas, and transitions to higher-pitched areas shed water as designed. Where a low-slope deck meets a higher roof, ensure there is proper membrane underlayment and a clean termination that prevents backflow during storms. A small moisture stash behind the edge is a telltale sign to pause and re-seal before summer storms intensify.
During hurricane-season, rapid precipitation and wind stress amplify existing weaknesses. Maintain a concise, photo-backed log of areas flagged during inspections: valleys, flashings, penetrations, and ridge details. Photos showing fastener rust, lifted shingles, or cured sealant gaps help when contacting a roofer or an insurer. In practice, quick, organized documentation accelerates repairs and reduces the risk of hidden damage spreading through the attic or upper walls.
When a leak is suspected, start with the closest entry point above the interior stain and move outward to confirm. Place temporary tarps or plastic under the heaviest flow to minimize interior damage while arranging a prompt roof assessment. If a skylight, vent, or flashing is involved, secure any loose edges before rain returns. Schedule a professional inspection as soon as the weather permits to assess the flashing integrity, membrane condition, and transition details that storms tend to stress most.
Find contractors experienced in skylight installation, flashing, and leak repairs to bring natural light into your home.

Certified Roofing Solutions
(407) 907-4722 www.certifiedroofingsolutionsllc.com
Serving
4.9 from 81 reviews

In this area, Orange County inspectors routinely request material and manufacturer documentation on reroof projects. Homeowners who keep product specs, warranty papers, and final inspection records together can streamline reviews and reduce back-and-forth. The combination of tile-heavy or shingle-heavy homes typical in upscale neighborhoods with Central Florida's heat and storms makes clear, organized paperwork a practical asset when questions arise after a reroof.
You should assemble a complete packet for each roof replacement, including product data sheets, model numbers, and installation instructions provided by the manufacturer. Save the original warranty terms and any extended coverage that applies to your chosen materials. Pair these with the contractor's final inspection report and any supplemental notes from the installation crew. Create a simple folder system or digital archive: product specs and warranty papers in one place, and the dated completion records in another. If you have subcontracted work, collect the certifications or qualifications for those installers as well.
Store the folder in a secure, weather-resistant location on the property-ideally somewhere near the main service panel or garage, with both digital copies and physical copies kept together. Maintain a dated timeline of milestones: material delivery, installation start, weather-related delays, and final inspection. In a market where insurers may revisit roof condition and age during underwriting or renewal, having immediate access to these records helps demonstrate ongoing warranty validity and installation quality.
Warranty-registration papers carry extra value beyond the installation itself. Register materials promptly and verify that the registration reflects the precise roof configuration, including the exact materials, colors, and accessories installed. Keep a note of renewal dates, transferability terms, and any required maintenance actions. Documentation that shows timely registration and clear completion dating supports both underwriting reviews and any future claims, reducing friction when clocking in a claim after a storm.
Warranty-offered contractors are a notable part of this market, which aligns with homeowner demand for documented installation quality in a high-weather-risk area. When evaluating bids, prioritize contractors who provide comprehensive, transferable warranties and clear documentation packages. Confirm that the warranty coverage matches the installed materials and that all documents clearly reference the specific roof system installed. This transparency helps ensure that future owners, insurers, and inspectors share a consistent understanding of what was installed and guaranteed.
High sun exposure in this area makes solar-related roof planning a practical consideration, but attachment details and waterproofing matter more in a storm-prone Florida setting than on a mild-climate roof. When choosing materials, look for a roof that can support solar equipment without compromising the integrity of tile or shingle systems common in this market. The roof should have solid flashing, clean valleys, and well-sealed terminations so that an integrated solar install doesn't turn into a leak risk after a summer hammering by rain and wind.
For homeowners considering both reroofing and solar, coordinating penetrations, flashing, and roof age upfront is especially important to avoid rework after installation. If you need a reroof in the near term, design the layout so solar arrays can align with the existing ridge lines and rafters, minimizing new penetrations. Choose an installer who can map all vent pipes, attic louvers, and attic access points, then confirm compatibility with the roof's chosen surface (tile or shingle) and the anticipated storm loads. InTile or concrete tile roofs benefit from reinforced underlayment and compatible mounting hardware that won't compromise waterproofing during a hurricane-season downpour.
Solar readiness should not come at the expense of weatherproofing. Ensure roof-to-wall transitions, edging, and drip channels direct water away from fasteners and penetrations. For homes with tile, request a plan that preserves valley integrity and uses sealants rated for heavy rain and wind-driven spray. For shingle-heavy homes, verify that edge detailing and starter courses won't create drip points where wind-driven rain can intrude. In all cases, prioritize a robust drainage plan and confirm that flashings around chimneys, vents, and skylights are upgraded to handle Florida's dynamic storm environment. Solar sits on the roof, but reliability starts with how well the roof resists the first heavy shower.
Find contractors who integrate solar panels or solar shingles into your roof for long-term energy savings.

Tiger Roofing
(407) 900-9909 www.tigerroofing.com
9100 Conroy Windermere Rd Suite 200, Windermere, Florida
4.9 from 104 reviews