Last updated: Apr 19, 2026
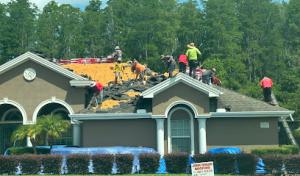
Clearwater residents know June through October brings about the highest risk of rain and wind, and tear-offs are frequently delayed by downpours or gusty squalls. If dry-in is not completed quickly after a storm, a home can sit exposed to wind-driven rain, increasing interior damage and re-roof delays. Plan with a two-pronged approach: secure the roof deck and waterproofing first, then complete the weather-tight covering as soon as a window opens. Prioritize roofs with a robust underlayment and edge securement so the system holds together even when a fast-moving front hits the coastline. Keep crews on standby for the moment a lull in the weather appears, and set realistic expectations with neighbors about possible schedule shifts when tropical systems loom.
The Gulf Coast exposure makes wind-driven rain a major concern, so underlayment performance and edge securement matter as much as the visible roof covering after tropical weather. Look for a roof system that uses a continuous, high-performance underlayment, with strong emphasis on securement along all eaves, hips, ridges, and transitions. Fasteners should be corrosion-resistant and installed with proper spacing to resist uplift. In Clearwater, a rapid response to any signs of moisture or grit-filled attic spaces is vital, since small leaks can escalate quickly in humid air. When choosing materials, ask how the edge detail is sealed at valleys, along penetrations, and around vents-the first inches of protection are the most vulnerable during a surge of wind and rain.
Local contractor demand spikes after tropical systems, which can lengthen scheduling and push homeowners toward temporary tarping or emergency leak control before full replacement. Have a plan for immediate containment: tarps that are properly secured, leak-diversion measures inside the attic, and a temporary fix for flashing where flashing fails to shed water during a front the moment it arrives. Document damage with photos and notes as soon as it's safe to be on the roof or in the attic, because rapid reporting often improves subcontractor availability and reduces the risk of further internal damage. If a roof shows exposed decking or compromised seals, avoid delaying the next rain window-temporary containment is not a substitute for a full, properly staged dry-in.
When a storm passes, Clearwater homeowners should target contractors who understand the local microclimates and seasonal timing. Ask about proven dry-in timelines, storm-ready edge detailing, and the ability to mobilize quickly after a system moves through. Preference goes to crews with tested storm-response plans and reinforced tarping protocols, so that a partial repair doesn't become a bigger exposure. Communicate urgency but stay deliberate about safety and proper sequencing-roof installation, dry-in, flashing, and then final coverings-so one damaging event doesn't lead to a chronic problem.
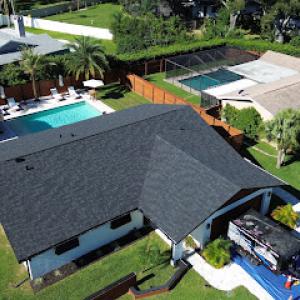
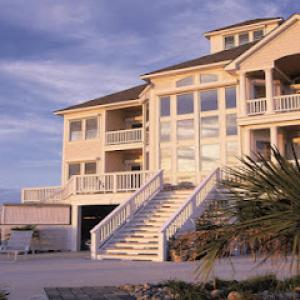
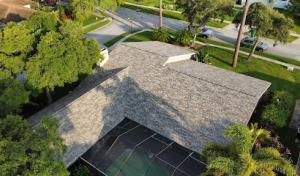
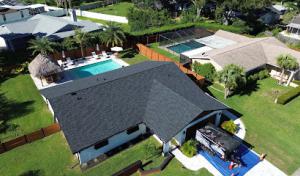
Asphalt shingles, metal, clay tile, and concrete tile dominate the roofs you'll see across Pinellas County, from aging ranches with simple lines to coastal properties and Mediterranean-style homes. Each of these types handles Clearwater's Gulf humidity and summer downpours differently, so choosing a roof is really about matching performance to the local climate and the common home styles you'll encounter around here. The salt-laden air near the Gulf makes material and accessory selection especially important in coastal neighborhoods, where corrosion risk and wind exposure are constant considerations.
In this area, asphalt shingles offer a familiar, economical option that still delivers decent wind resistance when rated for higher wind speeds and properly installed. The key here is underlayment quality, sealant integrity, and fastening patterns that keep tabs on gusts and heavy rain. Because humidity and rain can raise the chance of moisture infiltration during storms, pay attention to shingle overlaps and hip-and-ridge closures, and select shingles with algae-resistant properties to slow staining from frequent summer rains. In older ranch-style homes, ensure the roof deck is sound before any shingle replacement, since an aging deck can compound moisture issues underneath the shingle layer.
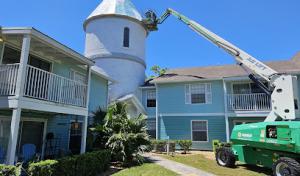
Metal roofs perform well under hurricane-force winds and have long service lives, which aligns with the coastal character of Clearwater. However, salt exposure accelerates corrosion on exposed fasteners, flashings, and lower-grade metal components. When choosing metal, opt for corrosion-resistant coatings and higher-grade fasteners, and consider hidden-fastener designs or concealed attachment systems to minimize corrosion exposure. In addition, ensure a robust sealant strategy at vents, skylights, and transitions to keep moisture out during heavy rain. For older Mediterranean and coastal-adjacent homes with metal accents, a retrofit approach that preserves the aesthetic while upgrading fasteners and flashings can be a smart balance.
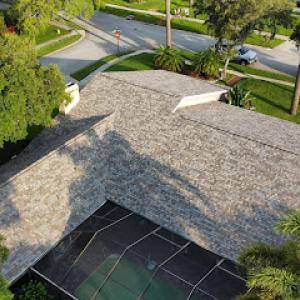
Clay tile and concrete tile can deliver a distinctive, long-lasting look for coastal-inspired homes and newer Mediterranean revisions. They handle heavy rain well when installed with a proper slope and underlayment, but they require a solid roof deck and accurate tile alignment to withstand wind-driven debris. Clay tile may be more delicate to handle during installation, while concrete tiles tend to be heavier and require structural verification to avoid deck sag. In salt-prone neighborhoods, ligature and fastener corrosion are still concerns, so use corrosion-resistant hardware and compatible sealants. Tiles also benefit from a continuous, well-sealed underlayment to prevent moisture migration through the decking in humid summers.
High humidity and frequent seasonal downpours increase the risk of algae staining, especially along shaded eaves and near coastal vegetation. Algae-resistant underlayment and color choices with heat-reflective properties help manage temperature and moisture buildup under the roof system. Ensure proper ventilation and insulation in attic spaces to minimize condensation that can feed mold growth on any roof system. For all materials, verify that the drip edges, fascia, and gutters are corrosion-resistant and well-sealed, since compromised drainage can accelerate moisture damage during storms.
When evaluating options, prioritize systems with robust wind-rated performance, coastal-grade coatings, and compatible sealants for salt exposure. Pay special attention to fastener types, flashing materials, and edge details that meet the unique exposure profile of Gulf-front neighborhoods. In Clearwater, the best choice often comes down to a balance between architectural compatibility with the home, expected wind loads, and the durability of coastal fasteners and sealants that keep moisture and salt at bay.
Typical reroof pricing runs about $350-$650 per square for asphalt shingles, $700-$1100 for metal, $900-$1500 for clay tile, $800-$1400 for concrete tile, $1200-$1800 for slate, and $1500-$2600 for copper roofing. Those ranges reflect daily realities on job sites where local crews balance material availability, labor demand, and the need for coastal corrosion resistance in fast-moving weather seasons. In practice, your final cost will hinge on roof size, existing roof deck condition, and chosen underlayment and flashing upgrades. In Clearwater, the dry-season window matters because it tends to drive scheduling and price tension for crews already booked well in advance.
Dry-season scheduling from November through April is popular in Clearwater because crews face fewer weather interruptions, but strong demand in that window can affect availability and pricing. If the project lands during peak weeks, expect some premium for priority slots and expedited material delivery. For asphalt shingles, that premium may be modest, while higher-end systems such as copper or slate can see longer lead times that push pricing upward further. The season also influences insulation and ventilation decisions: a faster dry-out during installation reduces the chance of moisture intrusion, which can cut the likelihood of later remedial work after a storm.
Costs can rise locally when storm activity creates a surge in reroof demand, when heavier tile systems require structural consideration, or when coastal corrosion resistance upgrades are needed for flashings and fasteners. In practice, homeowners may notice small price bumps if a nearby storm season triggers demand from multiple roofs simultaneously, or if a roof needs heavier fasteners, upgraded sealants, or corrosion-resistant metal flashings to stand up to salt air. When evaluating bids, compare not only the per-square price but also the scope of work: deck repair, underlayment quality, ventilation improvements, and the grade of fasteners and sealants chosen to resist Florida humidity and hurricane-season wind exposure. Planning ahead for the dry season can help lock in material choices and contractor availability, reducing the odds of expensive mid-season changes.

Strategic Roofing
(727) 442-7663 strategic-roofers.com
5830 142nd Ave N, Clearwater, Florida
5.0 from 407 reviews
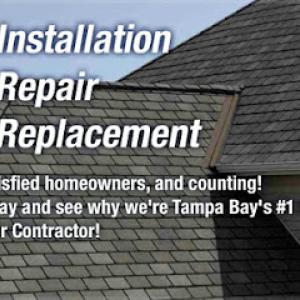
Strategic Roofing, located at 5830 142nd Ave N, Clearwater, FL, is your premier roofing contractor specializing in roof repair, metal roofing, shingle roofing, and roof installation. Serving both residential and commercial clients throughout Central Florida, including Tampa Bay, we offer comprehensive services like commercial roofing, emergency roof repair, storm damage repair, tile roofing, and roof estimates. Renowned for high-quality craftsmanship and superior materials, we ensure durable, aesthetically pleasing roofs that withstand harsh weather. Dedicated to customer satisfaction, we provide personalized service and competitive pricing. Contact us today for a free estimate and experience unmatched professionalism and reliability.
4thGen Roofing
(727) 353-3024 4thgenroofing.com
13790 49th Street N, Clearwater, Florida
5.0 from 82 reviews
4thGenRoofing is committed to delivering top-quality roofing solutions you can trust. We specialize in roof repairs, replacements, and maintenance. With over 180,000 customers served over 4 Generations give us a call today for your free estimate. Before you spend call 4thGen.

Handyman Roofing
(727) 888-2636 handymanroofing.com
11327 43rd St N, Clearwater, Florida
4.8 from 1457 reviews
Handyman Roofing is proud to be Florida’s #1 trusted source for roofing services for over 45 years. Our comprehensive services are available to assist you with all roofing needs and include expert roof repairs, roof replacements, new roof installations, roof maintenance services and roof inspections. We are available by appointment 6 days a week and have a 24-hour emergency roof service available.
Classic Roofing & Construction
(727) 945-6170 classicroofreplacement.com
14450 46th St N, Clearwater, Florida
4.8 from 1160 reviews
Classic Roofing & Construction is Florida’s top roofing company for roof replacements, repairs, inspections, and more! Whether you need residential or commercial roofing services, this family-owned and operated business is a step above other local roofers. What sets us apart? For one, we don’t use subcontractors, so everyone working on your roof is a highly trained Classic employee, not just another set of hands. And our hundreds of positive reviews show that we live up to our famous 100% happiness guarantee! We offer completely free, no-obligation roof estimates, so let us show you why Florida property owners love Classic!
Roof Bear
(727) 471-7442 ourroofbear.com
4091 AMTC Center Dr, Clearwater, Florida
4.8 from 224 reviews
Roof Bear understands there are many roofers in Orlando, Sarasota, Tampa, and The Villages, so we distinguish ourselves by providing excellent service, high quality, honest and dependable service at fair and competitive prices. To ensure excellent service, we work closely with each customer to explain the complete roofing process from consultation to finishing the roofing project. We will address and handle all issues and questions with professionalism and courteousness. We are committed to superior customer satisfaction and providing the best roofing services in Florida. We strive to provide excellence in all we do. Our work is not complete until our customers are 100% satisfied.
Mighty Dog Roofing of St.Pete/Clearwater
(727) 353-1463 www.mightydogroofing.com
29399 US Hwy 19 N Suite 150, Clearwater, Florida
4.9 from 73 reviews
When it comes to your home’s exterior, Mighty Dog Roofing delivers top-of-the-line services matched with the neighborly customer care our clients have come to love. Our team of skilled experts will conduct a free, detailed inspection of your home, treating it as our own. Whether your home needs a simple repair or a full roof replacement, expect to receive the transparent guidance you deserve. Whatever the case, our team will work to meet your safety and budget needs. We take pride in operating with quality materials, hiring skilled roofers, and providing our customers with a high-quality experience. See for yourself; our reviews say it all. Schedule your free, home inspection today!
Ridge Top Exteriors
(813) 291-3078 www.ridgetopexteriors.com
10810 US Hwy 19 N, Clearwater, Florida
4.7 from 1114 reviews
At Ridge Top Exteriors in Clearwater, we specialize in roofing, siding, and impact-rated vinyl windows designed for Florida’s intense weather and hurricane season. Our high-performance Hardie and vinyl siding options provide long-lasting durability, energy efficiency, and curb appeal, while our expert installation ensures your home is protected and beautiful. With over 20 years of experience, award-winning service, and a dedication to quality, we are proud to be the contractor Clearwater and Tampa homeowners trust. We offer free consultations, transparent pricing, and financing options to make your home improvement project simple and stress-free.
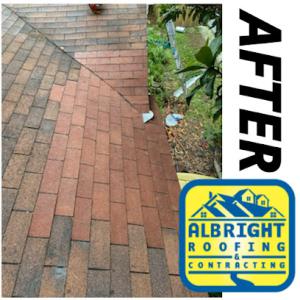
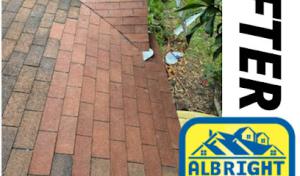
Albright Roofing & Contracting
(727) 541-2949 albrightroofing.com
2841 Roosevelt Blvd, Clearwater, Florida
4.7 from 138 reviews
Albright Roofing & Contracting specializes in roof replacement, roof repair, roof maintenance, emergency roof repair, wood rot repair, solar roofing, ridge vents, and roof ventilation, and commercial. We offer Life-Time Roof Systems which only select roofing companies are authorized due to the high standards and track records that must be met. Contact us for a free no-obligation estimate of our services!
John Hogan Roofing
(727) 353-6765 johnhoganroofing.com
14450 46th St N Ste 110, Clearwater, Florida
4.7 from 177 reviews
Since 1992, John Hogan Roofing has been a trusted roofing contractor serving Clearwater, Florida, St. Petersburg, and Pinellas and Hillsborough counties. We provide reliable residential and commercial roofing services, from roof repairs and replacements to full new construction projects. Our experienced team delivers complete roofing solutions, including installations and emergency repairs, all at budget-friendly rates. As a local roofing contractor, we’re committed to protecting your property with durable, weather-resistant roofing built to last. Choose John Hogan Roofing for quality craftsmanship and dependable service you can trust.
Sander & Sons Roofing
(727) 265-7945 sanderandsonsroofing.com
13584 49th Street N Unit B2-12, Clearwater, Florida
4.8 from 58 reviews
We are a family owned and operated business established in 2014 with more than 35 years of hands on roofing experience we install and repair all types of roofing materials and service both residential and commercial customers give us a call today for your free estimate.
Bay Area Roofing
(727) 578-1138 bayarearoof.com
4261 112th Terrace N, Clearwater, Florida
4.7 from 62 reviews
As a family-owned and operated, third-generation company, Bay Area Roofing is proud to have been providing the highest quality roofing services in Clearwater, FL and all of Florida’s west coast since 1984. We are licensed in the state of Florida, as well as bonded and insured, so you can rest assured that with us, you will receive quality work from our knowledgeable team.
Albright Family Roofing
(727) 647-4034 albrightfamilyroofing.com
Clearwater, Florida
4.7 from 38 reviews
Irv Albright Roofing is a family owned and operated Roofing Business. We offer a wide range of services including flat, tile, shingle and metal. With over 25 years of experience, Irv Albright Roofing has been the trusted Roofing Service Provider for Pinellas County.
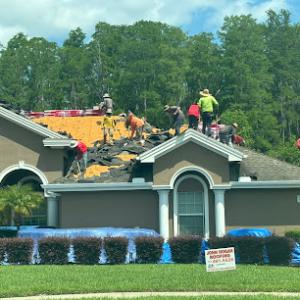
In this market, reroof permits are commonly required through the local building department, and the roofing contractor typically handles the permit application rather than the homeowner. This streamlines the process and keeps the job from stalling as weather and hurricane season approach. When the contractor takes charge, you'll still want to verify that the permit scope aligns with the project plan-especially the number of layers being removed, the chosen underlayment, and the proposed nailing pattern. clear documentation of the roof's existing condition helps avoid back-and-forth with inspectors. Retain all permit paperwork and inspector notes in a central folder accessible to you and your contractor, because storm-related schedules can tighten timelines quickly.
A rough-in stage is commonly scheduled before the roof is fully covered. This inspection focuses on underlayment installation and the nailing pattern, ensuring the deck is properly prepared to resist Gulf-front humidity, summer downpours, and wind exposure. Pay attention to the nailing schedule, fastener type, and spacing, as inspectors look for uniform coverage and secure edge fastenings that prevent uplift in gusts. Underlayment quality matters: if the deck shows any damp spots or evidence of prior leaks, address those areas before covering. Contractors often coordinate scaffold placement and material staging to avoid delaying the rough-in inspection; plan for access routes and clean staging zones around the home to keep the process efficient. If weather windows narrow, prompt communication with the inspector can help preserve the scheduled timeline and reduce the risk of rain exposure to the roof deck.
A final inspection follows completion and verifies that the roof system is properly integrated with flashing, penetrations, vents, and drip edges. The final review ensures all components are correctly installed to withstand typical Clearwater wind loads and moisture cycles, and it confirms the roof is weather-tight. Before the inspector arrives, perform a homeowner walk-through to confirm that all penetrations are sealed, gutters are reinstalled, and any temporary protections are removed. If your neighborhood has added wind-related code scrutiny or additional local requirements, be sure those elements are addressed in the final package. Keep a copy of the final inspection report and any compliance notes saved with the permit file, so future maintenance or potential storm damage claims have clear, on-record history.
Some neighborhoods or project types may face added local requirements or wind-related code scrutiny. This means permit scope and inspection timing should be confirmed before tear-off begins. The contractor should provide a clear timeline that accounts for any neighborhood-specific deliverables, such as additional test closures, specific fastener standards, or enhanced edge protection during the dry season window. If a neighborhood association exists, review their guidelines early and align them with building department expectations to avoid delays during permit processing and inspections. Coordination between you, the contractor, and the building department is the best defense against weather-driven setbacks and misaligned inspection epochs during hurricane season.
This market lives at the intersection of Gulf humidity, summer downpours, and hurricane-season winds. Insurers pay close attention to roof age, prior storm damage, and how well documentation is kept when underwriting or adjusting claims. A roof that shows its age or has gaps in written history often faces stiffer scrutiny when a claim is filed after a storm. That means the outcome of a claim can hinge on the paper trail as much as on the water intrusion itself.
Keeping dated photos, complete inspection sign-offs, and material details is not glamorous, but it matters. After a severe wind event, carriers will ask for proof of roof condition before and after the storm, and any reroof history will be reviewed carefully. If a prior contractor installed new underlayment, fasteners, or matched shingles, having record of those specifics can prevent disputes about eligibility for wind-related adjustments. Store emails from the contractor, receipts, and notes about warranty transfers; these bite-sized details accumulate into a credible narrative when a claim is examined.
Wind mitigation features-like proper nailing patterns, roof deck integrity, and the presence of underlayment rated for Florida winds-can sway insurer decisions and premiums. Documentation that demonstrates resistance to wind-related loss strengthens a policyholder's position, especially if the claim involves gust-driven damage or successive storms. If a professional has assessed the roof for wind resistance, keep that report accessible and ready for review during any claim discussion.
Age becomes a material factor when a storm hits. A roof that has an established history of repairs, patchwork, or partial replacements can complicate coverage and claim outcomes. The more transparent the reroof sequence-dates, shingles or tiles, underlayment type, and fastening method-the less room there is for controversy when adjusting damage. A clear, dated chronology helps all parties understand what stood up to wind and rain when the next storm arrives.
Before the season peaks, compile a simple, organized file of roof-related documentation. Photograph areas of wear, note any prior repairs, and ensure you can match material details to the existing roof. When a claim is necessary, this readiness reduces downtime and dispute potential, letting the focus stay on restoring a secure, dry-in roof quickly.
Connect with contractors who help homeowners navigate the claims process from damage assessment to final approval.

Strategic Roofing
(727) 442-7663 strategic-roofers.com
5830 142nd Ave N, Clearwater, Florida
5.0 from 407 reviews
Albright Roofing & Contracting
(727) 541-2949 albrightroofing.com
2841 Roosevelt Blvd, Clearwater, Florida
4.7 from 138 reviews
John Hogan Roofing
(727) 353-6765 johnhoganroofing.com
14450 46th St N Ste 110, Clearwater, Florida
4.7 from 177 reviews
In this climate, tile roofs often outlast their underlayments, so leaks may appear beneath otherwise serviceable clay or concrete tiles. The repetitive heat cycling and Gulf humidity can push underlayment seams and fasteners beyond their service life, letting water migrate without obvious tile failure. Look for hairline cracks or displaced tiles after a heavy storm, then check the underlayment for signs of moisture intrusion. Tile nails and clips should be inspected for corrosion and proper seating, because a single loose tile can channel water under a row. Clearwater homes may also show deck and parapet leaks around penetrations where flashing is stressed by wind-driven rain, so inspect around vent pipes, chimneys, and skylights after each hurricane-season round of heavy rain.
Metal roofs in coastal parts of this area need attention to panel attachment, flashing details, and corrosion-prone accessories because salt air can shorten the life of vulnerable components. Inspect panel seams and fasteners for looseness or backing-out screws, especially near eaves and rake edges where wind uplift is strongest. Flashing at transitions-where the roof meets walls, chimneys, and skylights-should be checked for gaps and buckling after storms. Pay particular attention to gutters, downspouts, and eave details; salt-laden spray can accelerate corrosion on exposed trim, vent caps, and snow guards. If surfaces look chalky or oxidized, treat promptly to prevent accelerated wear and potential leaks.
Asphalt shingle roofs face accelerated wear from heat, humidity, and repeated summer rain cycles, which can affect seal strips, granule retention, and algae appearance. Look for curling edges, cupping, or raised tabs after hot spells, and inspect sealant lines at valleys and flashings for signs of drying and separation. Granule loss will leave the felt exposed, increasing sun and moisture exposure at the deck. Algae and moss growth can trap moisture against the roof surface, speeding deterioration in shaded or north-facing sections. After downpours, check for standing water in low spots and ensure proper drainage to prevent recurrent leaks around hips and ridges.
Explore specialists in steel, aluminum, and standing seam metal roofs built to last 50 years or more.
Strategic Roofing
(727) 442-7663 strategic-roofers.com
5830 142nd Ave N, Clearwater, Florida
5.0 from 407 reviews
Roof Bear
(727) 471-7442 ourroofbear.com
4091 AMTC Center Dr, Clearwater, Florida
4.8 from 224 reviews
Florida ResCom Roofing
(727) 483-0456 flrescomroofing.com
1943 Sherwood St unit k, Clearwater, Florida
4.8 from 84 reviews
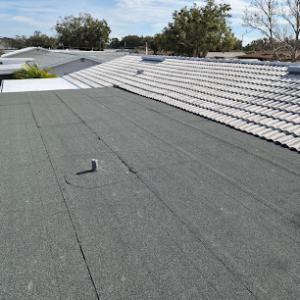
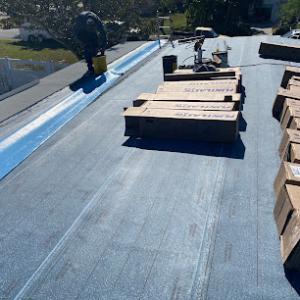
Although pitched residential roofs are common, Clearwater also has a meaningful share of low-slope and flat roofing work, especially on additions, condos, and commercial-residential mixed properties. In these setups, a small mistake in drainage details can echo into bigger problems after a heavy shower or a tropical downpour. The flatter the surface, the more critical proper edge drains, scuppers, and drip edges become. If water sits even briefly, the underlayment or membrane can begin to deteriorate, inviting slow leaks that spread before they're visible inside the attic or ceiling.
Frequent summer rain makes drainage performance critical on low-slope roofs in this market because ponding and slow drying can turn minor membrane defects into active leaks. Look for standing water after storms and check that drains stay clear of debris. Over time, expansion and contraction from heat, humidity, and salt-laden air can loosen seams and fasteners. A practical habit is to inspect after the wet season several times, confirming that membrane edges remain tight and flashing transitions still bind the parapets and penetrations. When leaks appear, they often originate near corners, joints, or where the roof meets a vertical wall, so tracing dampness back to its source is essential before patching.
Skylight penetrations are a recurring leak point in this humid, storm-prone market, particularly when flashing ages or surrounding roofing materials are replaced without matching detail work. Skylight seals can degrade from heat and humidity, and mismatched materials around the flashing leave gaps that catch wind-driven rain. If a skylight is due for a routine refresh, plan for full flashing replacement rather than just resealing the glass. In combinations with flat roof sections, ensure the flashing transitions are continuous and that counter-flashing atop the curb remains intact to resist both heavy rain and gusty hurricane-season winds.
Find specialists in TPO, EPDM, and built-up flat roofing systems for residential and commercial properties.
4thGen Roofing
(727) 353-3024 4thgenroofing.com
13790 49th Street N, Clearwater, Florida
5.0 from 82 reviews
Roof Bear
(727) 471-7442 ourroofbear.com
4091 AMTC Center Dr, Clearwater, Florida
4.8 from 224 reviews
Florida ResCom Roofing
(727) 483-0456 flrescomroofing.com
1943 Sherwood St unit k, Clearwater, Florida
4.8 from 84 reviews