Last updated: Apr 19, 2026
Spring thunderstorms and summer hail are the norm in Cobb County's inland North Georgia storm pattern. The risk isn't just a single event; it's a cascade: a fast-moving storm can bruise shingles, lift edges, and loosen granules, setting up hidden weaknesses that worsen with heat and wind. Spring wetness slows crews, while late-summer heat can push schedules into overtime or force delays. Homeowners who wait for the "right moment" risk more interior exposure and higher chances of wind-driven damage becoming a storm-related claim rather than a simple aging reroof. Timing becomes part of the protection plan.
The local reroof season routinely centers on spring and fall. In practice, that means you want to target early spring after the last round of freezes and late fall when temperatures cool but before heavy rains. Summer is a trap: heat can overwork crews, and sudden pop-up storms can interrupt work plans and complicate moisture management. If a hailstorm or strong wind event hits, don't wait for a perfect dry week; the priority is securing the site, documenting damage, and initiating an insurance-friendly plan before issues compound. Planning around those windows helps avoid schedule disruption and keeps the project within predictable weather pockets.
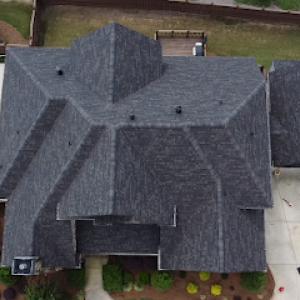
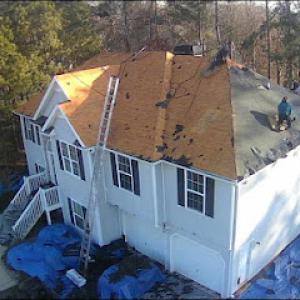
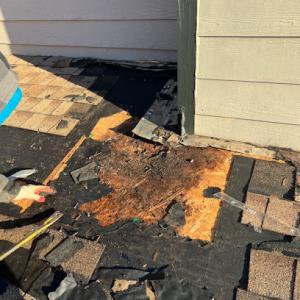
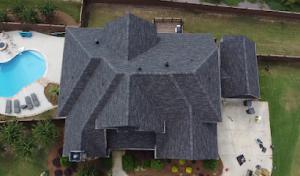
A key difference in this market is that many reroofs are storm-driven rather than purely age-driven. You must capture photo documentation that distinguishes hail bruising and wind-lifted shingles from normal granule loss and aging. Take close-ups of bruised or dented metal flashings, lifted shingle tabs, and granule patterns along flashings and valleys. Photograph the entire roof from multiple angles, plus the attic space for signs of water intrusion or compromised decking. Keep a dated log of weather events, contractor observations, and any temporary tarping or protection you install. Insurance reviewers in Cobb County expect to see the storm context clearly tied to the roof condition.
In a storm-driven reroof, the insurer often gains coverage clarity when the damage aligns with hail tracks, wind-scoured edges, or fatigue from repeated wind gusts. The key is showing sudden, localized damage that matches storm exposure rather than universal wear. If the oldest shingles look otherwise sound but certain sections show bruising or edge lift consistent with a recent event, that's a strong indicator. Don't wait for a small discrepancy to become a larger moisture path; prompt reporting with a concise narrative helps align the claim with actual storm impact.
Contact your insurer promptly after a storm and request an adjuster visit scheduled within a reasonable window. Gather the damage photos, storm date, and a simple timeline of when you first noticed issues. Hire a local roofing pro who understands steep-slope reroofing and can evaluate ventilation and wind-related concerns during a full replacement, since those details are often scrutinized in Cobb County. When arranging repairs, insist on a scope that includes attic ventilation review, proper nailing patterns for wind uplift resistance, and flashing re-seating as part of a comprehensive replacement rather than a patch job. If temporary protection is needed, install sturdy tarps and secure them against wind-driven movement to prevent further interior exposure.
Before any full reroof starts, you'll want to align with Cobb County's permit process, since in this area the county handles the building review rather than a separate city roofing department. Your contractor should pull the permit through Cobb County, and you'll receive the official permit number tied to your property. Expect a review that focuses on safety, structural compatibility, and venting details, especially if the project involves a full tear-off. A proactive contractor will anticipate a few requested submittals, including a site plan, roofing material specification, and an after-work ventilation strategy. Keep a clean set of documents ready-photos, product data, and any engineered drawings-so the county review can proceed without delays.
A common local quirk is the closer review of wind-related details and ventilation or underlayment decisions during permit and inspection, particularly for full tear-offs and replacements. In practice, this means you may be asked to show how the attic will vent once the old roof is gone and new materials are installed. Expect inspectors to scrutinize the ridge vent layout, turtle vents, soffit vents, and overall attic airflow to ensure ceiling and roof deck temperatures don't escalate in a high-wind season. The underlayment choice matters here: a high-quality synthetic or upgraded polymer underlayment that resists wind-driven moisture often tests better than traditional felt, especially under shingles with a longer service life. If your system includes ventilation baffles or a new attic exhaust strategy, document the exact locations and installation methods so the inspector can confirm compliance on the spot.
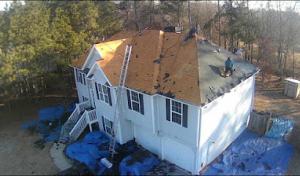
Storm-driven reroofs require careful timing. In Cobb County, weather windows matter, and the permit timeline can align with how quickly the crew can remove old material and install a wind-resilient, ventilated roof system. The county will expect you to have a plan for protecting interior spaces during work hours, including tarping exposed areas and securing debris that could be stirred by gusts. If a storm front threatens during the project, your contractor should have a contingency plan for maintaining ventilation continuity and ensuring that any temporary protective measures are secure until permanent fastening is reestablished. The permit process can accommodate a reasonable scheduling shift due to weather, but you'll want a documented plan to show inspectors during a mid-project check.
The permit must be properly closed out after final inspection, which matters for later resale, insurance documentation, and confirming the reroof was completed through the county process. The final inspection verifies that the roof is securely fastened, ventilation remains adequate, and attic protections were installed as designed. A clean set of final documents should include the permit closure notice, the inspector's approval stamp, and any specified deviations or notes about wind resistance, venting, or underlayment. Once you have the final paperwork, store it alongside the property records and upgrade receipts so it's readily available for future insurance claims or a resale package.
After final approval, confirm with your insurer that the roof replacement is documented under the county permit and that the policy notes reflect a completed reroof tied to the official permit closure. If there were any corrective actions requested at final inspection, verify they are addressed promptly and re-inspected to clear the permit completely. Keep all warranty information, product data, and contractor contact details in a accessible place, as it helps during any future maintenance or claim discussions. In the broader sequence of home upgrades, this permit and closeout step is the linchpin that ties the physical roof to official records, easing resale and defense against post-installation questions from lenders or insurers.
In this area, asphalt shingles remain the most common and aggressively priced option, driven by the Atlanta labor market. After a regional thunderstorm or hail spike, crews tighten up quickly, which can push both scheduling and material procurement timelines. When planning a reroof, you'll see price shifts tied to storm-driven demand, with labor availability tightening before the next round of repairs. For asphalt shingles, the typical cost sits toward the lower end of the spectrum, but you still should account for increased crew time if you're coordinating in a busy storm window.
A full reroof often stands or falls on the details Cobb County inspectors expect, especially if the job includes ventilation corrections or upgraded underlayment. If your home needs better soffit or ridge ventilation, be prepared for higher labor hours and material costs. Tile and specialty systems inherently carry more friction locally, not just for sourcing but for the skilled labor needed to install them correctly.ventilation-focused work tends to push projects into the mid-to-upper range for the same roof size, even before material markups. If you anticipate a full replacement, budget for these enhancements alongside the core roofing material.
The local market keeps asphalt highly competitive, with a broad spread in price by roof size and complexity. The statewide pricing framework translates into readily available quotes for typical steep-slope homes. Metal roofing, clay tile, and concrete tile appear less frequently here, which can elongate lead times and increase labor costs when crews need to source specialty components. Wood shingles and synthetic options sit in the mid-to-upper part of the range, often reflecting both material availability and installation nuance in a storm-prone area.
When storm activity spikes, plan for a window of limited crew availability and potential price tension. Get multiple detailed bids that itemize ventilation, underlayment, and any required decking work. If a full reroof is on the horizon, ask for a phased plan that sequences venting upgrades and underlayment improvements with the chosen shingle system. This approach helps keep costs predictable when local demand surges after a regional thunderstorm.
Wren's Roofing
(770) 609-0328 wrensroofing.com
Mableton, Georgia
5.0 from 46 reviews
Wrens Roofing is a family owned and operated residential roofing company located in Georgia. We specialize in roof repairs, replacements and maintenance service as well as gutter installation, and repairs. We service the entire metro Atlanta area and surrounding cities. With a combined 40 years in the customer service and roofing industry, Wrens Roofing is always the best choice for your roofing and gutter needs. Inspections and estimates are always free, with zero obligation. We offer superior workmanship and materials while never compromising quality for higher margins. Our company is fully insured with both liability and workers compensation. We offer warranties on all the work we provide and we proudly stand behind them.
Union Restoration Group
(770) 549-7437 unionrestorationatl.com
5552 Retreat Cross SW, Mableton, Georgia
4.8 from 58 reviews
Especializados en water mitigation and restoration
Trademark Roofing
(770) 437-1317 trademarkroofing.com
Mableton, Georgia
4.8 from 99 reviews
Trademark Roofing provides roofing installations and repairs, gutter installation, chimney services, and more to Atlanta, GA and surrounding areas.
Peacock Roofing & Construction
(678) 788-5150 peacock-roofing.com
262 Tony Trail SE, Mableton, Georgia
5.0 from 13 reviews
Peacock Roofing & Construction, LLC, is your trusted partner for all roofing and construction needs. With a reputation for quality and integrity, we offer a wide range of services, including roof repairs, replacements, installations, and maintenance. Our experienced team uses premium materials and cutting-edge techniques to deliver durable and efficient solutions for residential and commercial properties. Whether you need emergency repairs or a complete roof overhaul, count on us for exceptional service and results. Contact us today for a free consultation and experience the Peacock difference!
United Roof Inspections
(470) 470-9509 unitedroofinspections.com
Mableton, Georgia
5.0 from 8 reviews
United Roof Inspections is a roofing contractor located in Powder Springs, GA that has been open since 2013. We service the Atlanta metro area and surrounding counties. Our services include roof inspections, roof installation, roof repairs, attic venting, gutter installation and cleaning, skylight installation and repair, and repairing storm and wind damage. As an experienced local roofing company, we can provide commercial roofing services and comprehensive roof inspections to help extend the life of your roof. Our wide range of roofing repair services can fix any issues discovered during inspections or weather damage to ensure your home stays protected.
Diamond Roofing Company
(404) 355-4996 diamondroofingco.com
5827 Powell Dr, Mableton, Georgia
5.0 from 2 reviews
Commercial Roofing Contractor serving Atlanta area for over 50 years. New roofs, replacement roofs, repairs, and more.

Alliance Roofing
(404) 932-5260 www.allianceroof.com
Serving
4.7 from 103 reviews
Alliance Roofing, LLC has served the Atlanta area since 1992. We take pride in being a professional roofing company based in Smyrna, GA, and serving the surrounding areas. As a locally owned and operated business, we have built a strong reputation as the go-to roofing experts for residents and businesses. Our commitment is to offer more than just roofing services; we aim to deliver exceptional service, superior products, and fair pricing. Whether your project is residential or commercial, big or small, our knowledgeable team and top-quality materials ensure we do the job right and within your budget.
JG pro solutions
(770) 895-2826 jgprosolutions.com
Serving
4.9 from 123 reviews
JG Pro Solutions is a roofing company specialized in roof replacements, with a strong focus on insurance claims related to hail and wind damage. We help homeowners navigate the insurance process while delivering high-quality workmanship and reliable service.

RCB Roofing
Serving
4.6 from 119 reviews
RCB Roofing has been serving Metro Atlanta and the North Georgia mountains and has been family-owned and operated since 1998. Fully licensed and insured, we specialize in residential and commercial roofing, including re-roofs, roof replacements, and major roof repairs. Our expert team installs a wide range of roofing materials, including asphalt shingles, metal roofs and metal shingles, synthetic cedar shakes, composite slate, Spanish barrel tile, steel slate, and cedar shake roofing. Backed by industry certifications including GAF Certified, GAF Metal Certified, and Owens Corning Preferred Contractor, RCB also offers a 10-year workmanship warranty, ensuring exceptional craftsmanship and trusted service for every project.

Home Best Roofing
(470) 637-4000 www.homebestroofing.com
Serving
5.0 from 130 reviews
"Here at Home best Roofing, the Atlanta roofers are experts in the craft, and all are licensed insured, and bonded with years of professional experience and knowledge in the roofing industry. We offer free estimates, before-purchase inspections, and on-site estimates. We take advantage of all innovations and technology to be a step ahead of the competitions, birds-eye view is initiated every time a roof is inspected. Drones are used to capture where is the roof damaged. The expert roofing contractors can help you with a number of issues, including storm damage, leak repairs, general repairs, reroofing, and ansp shingles. Call Home Best Roofing today to schedule your free initial estimate."
Modern Roofing
(470) 922-6253 modernroofingusa.com
Serving
4.9 from 292 reviews
Modern Roofing in Marietta, GA, offers expert residential and commercial roofing with over 10 years of experience. Specializing in insurance claims, we use top-quality materials to ensure safety and comfort. From inspection to completion, we deliver exceptional roofing solutions.
Austin's Roofing & Gutters
(470) 664-6976 www.austinsroofingandguttersga.com
Serving
4.6 from 95 reviews
Have you noticed leaks in your house's attic or ceiling but aren't sure how they got there? Do you believe that your roof's colored tiles also have seen better days? Perhaps you are just about to put your house on the market and want to make sure that your roof is in complete working order? If you answered yes to any of these questions, then it sounds like you could benefit from the exemplary and all-encompassing support provided by Austin's Roofing and Gutters, LLC , the Atlanta, GA roofing specialists.
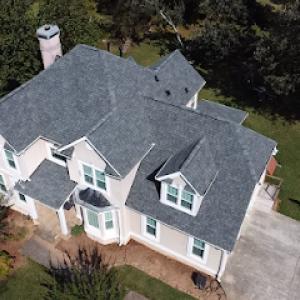
Hot, humid summers demand careful attention to attic ventilation when choosing asphalt shingles. In this climate, heat buildup beneath the roof deck accelerates aging and can drive moisture into the attic, especially if soffit vents or a ridge vent are blocked by insulation or debris. You'll want a ventilation strategy that creates a steady flow of air from eave to peak and keeps the attic dry during rain events that follow heat waves. A well-ventilated roof helps shingles resist curling and granule loss, which translates to longer life and fewer surprises after the next summer storm. If you're reroofing, ask your contractor to map a venting plan that aligns with the attic's insulation level and the attic space's layout. In practice, this means checking that intake and exhaust paths aren't obstructed by drywall, cabinets, or HVAC plenums, and reviewing how ridge and soffit vents perform when shutters or weatherproofing are added at penetrations.
Metal stands out for heat performance and storm resilience, and it often appeals to homeowners looking for a long-lived, low-maintenance option. However, detailing matters in this region because heavy spring rain can reveal weaknesses at penetrations, valleys, and transitions if the flashing, fasteners, and sealants aren't properly installed. You should plan a close walkthrough with the contractor to review skylight and vent penetrations, chimney-to-metal transitions, and edge closures. Look for a design that channels water efficiently around the roof's perimeters and intersections, while ensuring that fastener patterns avoid concentrated stress near ridge lines or overhangs. A weathered surface in this climate benefits from reflective coatings or light-colored finishes that reduce heat buildup, but ensure that the color and coating choices are compatible with the local sun exposure and rain behavior. The installer's experience with Mableton's wind patterns and seasonal storms matters as much as the material itself.
Clay and concrete tile appear in the market but are less common than asphalt, so homeowners should verify structural suitability and installer experience rather than assuming every local crew handles tile routinely. Tile adds aesthetic variety and can provide good insulation, yet it is heavier and demands a solid, well-captioned roof deck and precise underlayment details. In a storm-prone area, pay particular attention to how trays and fasteners secure the tiles at valleys, hips, and eaves, and examine how the tile roof integrates with penetrations for plumbing, HVAC, and drainage. Request examples of completed tile installations in similar architectural styles and roof pitches, and confirm the crew's depth of training in tile layout, venting integration, and lightweight deviations for heavier tiles.
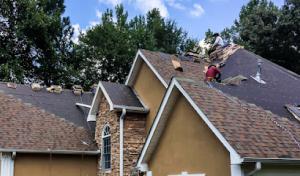
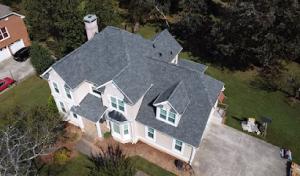
Regardless of material, roof shape and profile influence performance during vigorous spring and summer storms. Steep-slope reroofs are common here, but a careful assessment of wind uplift resistance, nailing patterns, and edge details matters more than the appearance alone. When evaluating options, consider how each system handles heat, moisture, and wind-driven rain at transitions, vents, and roof-to-wall interfaces. A thoughtful installation, with attention to attic air control and precise sealing at penetrations, can maximize the chosen roof type's long-term resilience in this local climate.
In this area, the wind layer of a thunderstorm often grabs at the shingle edges and along the ridge line after a strong spring or summer spell. The problem isn't just missing tabs; it's small, repeated lifts that loosen fasteners over time. Once an edge starts to peel, every gust can pry more shingles loose, exposing underlayment and decking to sun, rain, and hail damage. You'll notice granule loss in high-wind zones first, usually near corners, vents, and transitions. The consequence is a slow creep of vulnerability: more susceptible spots for leaks, accelerated aging, and, eventually, the need for more extensive repairs if wind-driven damage isn't addressed promptly.
Heavy rain events in Cobb County often reveal leak paths around skylights, chimneys, and flashing transitions rather than only through the field of the roof. A seemingly solid cap seam or a lightly sealed joint can become a reliable entry point when pressure drives water against it. Over time, repeated exposure along these joints can soften decking and saturate insulation, leading to higher humidity indoors and the potential for mold growth in attic spaces. Even a modest drip can escalate into a noticeable interior stain if left unchecked, especially during repeated downpours. The most telling sign is a damp ceiling or a faint mustiness near vents and chimney outlets after a heavy rain.
Humidity-related attic moisture can compound roof aging locally when older homes lack balanced intake and exhaust ventilation during reroof replacement. Without proper airflow, warm attic air traps moisture at the roof deck and in sheathing, accelerating rot and reducing the life of underlayment and fasteners. This is particularly true in homes with limited soffit intake or insufficient ridge venting, where stagnant air concentrates heat and moisture during humid Georgia summers. The result is a more brittle roof system that's slower to recover from wind or hail damage and more prone to interior condensation issues, even when the exterior looks intact. If ventilation isn't corrected at reroof, the long-term performance of the new roof can become compromised long after the shingles go down.
Find contractors experienced in skylight installation, flashing, and leak repairs to bring natural light into your home.
United Roof Inspections
(470) 470-9509 unitedroofinspections.com
Mableton, Georgia
5.0 from 8 reviews
Georgia's insurance market has seen rate pressure and some non-renewals, and in Mableton that makes installation quality and storm documentation more important when a roof is being replaced. Insurers pay closer attention to storm-caused flags, wind mitigation, and how the replacement was completed, especially after a hail or high-wind event.
Local homeowners may be asked to document hail or wind damage carefully because inland metro-Atlanta claims often involve disputed storm causation rather than obvious catastrophic loss. Start by taking dated photos of all damaged areas from multiple angles, including attic signs of moisture and any roof decking concerns. Keep notes on the date of the storm, wind speeds if known, and any decisions from public adjusters or storm chasers. Collect contractor estimates and material samples that show the exact products used.
As work begins, preserve all project records: final inspection sheets, permit-related documents, and a clear, itemized materials list with manufacturer specs. After the job closes, gather the final warranty, the steel- or concrete-tile installation details if applicable, and any wind mitigation documentation tied to the selected roof type. These items become valuable when reviewing potential wind credits with your insurer.
Wind-mitigation credits may be available depending on roof type and installation details, so homeowners in this area should keep permit records, final inspection proof, and material documentation after the job closes. When asking about credits, present the installation method, fastener type, underlayment choices, and any attic ventilation improvements made during the replacement. Strong documentation helps substantiate the quality of the redo and can support favorable outcomes with the carrier.
Connect with contractors who help homeowners navigate the claims process from damage assessment to final approval.
Union Restoration Group
(770) 549-7437 unionrestorationatl.com
5552 Retreat Cross SW, Mableton, Georgia
4.8 from 58 reviews
Peacock Roofing & Construction
(678) 788-5150 peacock-roofing.com
262 Tony Trail SE, Mableton, Georgia
5.0 from 13 reviews
In this market, after a severe storm you will notice a flurry of activity from roofers who emphasize storm response and fast replacements. The Mableton housing mix, with many steep-slope roofs, means crews will position themselves as ready to roll at a moment's notice. You should expect quick assessments, and the urgency can feel persuasive, but you still need to slow down enough to evaluate the project scope and the long-term durability of the chosen roofing system rather than a rush-through replacement.
Cleanup is a strong local hiring priority, which matters in established Cobb County neighborhoods where driveways, landscaping, and nail pickup are homeowner concerns during tear-offs. A reputable crew will detail how debris will be contained, how nails will be collected, and how their cleanup plan respects planting beds and hardscape. In practical terms, ask for a written cleanup protocol, confirm whether tarps will protect landscaping, and check that they leave no stray fasteners that could threaten lawn care equipment or neighborhood sidewalks in the weeks after installation.
Because both long-established and quick-response contractors are active in this market, homeowners should verify who is actually pulling the Cobb County permit and who will be present for inspections. It is common to see crews rotate, so you want clarity on the lead on-site, the supervisor who will be available for questions, and the person responsible for final inspection. A straightforward contact plan helps prevent miscommunication during critical moments and aligns expectations for inspection readiness and follow-up work.
Get a clear picture of your project costs upfront - no commitment required.
Union Restoration Group
(770) 549-7437 unionrestorationatl.com
5552 Retreat Cross SW, Mableton, Georgia
4.8 from 58 reviews