Last updated: Apr 19, 2026
Oswego's roofing season is strongly shaped by spring hailstorms and heavy rains followed by warm-season thunderstorm activity, making storm damage assessment a first-priority homeowner concern. After winter, the freeze-thaw cycles can hide leaks or corrosion in shingles, flashing, and sealants, turning small defects into active leaks by the time spring storms arrive. When a hail event hits, the clock starts ticking: rapid inspection, documentation, and action reduce the chance that a quick patch becomes a longer, more disruptive repair later. This isn't theoretical-it's the reality you see when winter snaps into thaw, and the sky opens with storms that test every edge of the roof.
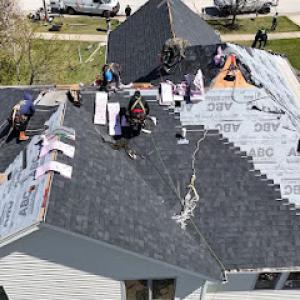
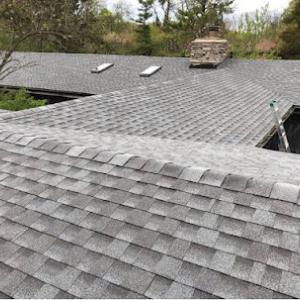
After a storm, walk the attic and exterior walls with a flashlight to spot daylight or water trails around penetrations, vents, and chimneys. Look for bruised or cracked shingles, dented flashing, loose seals, and granule loss in visible gutters or downspouts. In Oswego, the pace of claims often accelerates as the main spring and fall windows fill up with demand, so your early, careful documentation matters. Take dated photos from multiple angles, focusing on any misaligned or lifted shingles, and note trees or debris that could have caused surface damage. If you spot active leaks, prioritize temporary measures to prevent further water intrusion-cover exposed valleys or vent openings with secure, waterproof material until a professional can assess.
Your documentation should be precise and timely. Record the date of the storm, the size of hail if you know it, and any observable damage on the roof and siding. Keep a simple diary of water intrusion symptoms, including dates of observed leaks or damp spots in ceilings and walls. Photograph attic conditions, such as stained sheathing or damp insulation, and compare with pre-storm photos if you have them. A clear, dated set of images and notes helps reduce back-and-forth during the claims process and can shorten the path to a proper assessment when you call in a contractor.
Seek a contractor who understands the local baseline for wear from freeze-thaw cycles and the typical Oswego weather pattern. Early willingness to perform a careful inspection-even before an adjuster arrives-can speed up the entire process. If you have shingle edges lifting, dented metal components, or unusual attic moisture after a storm, arrange a professional evaluation promptly. The goal is to determine whether there is storm-related damage that warrants a replacement rather than a temporary fix, and to do so before contractor demand spikes in the spring surge. Acting now reduces the risk of a long, disruptive daylight-to-nighttime repair window later.
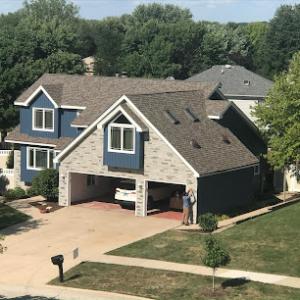
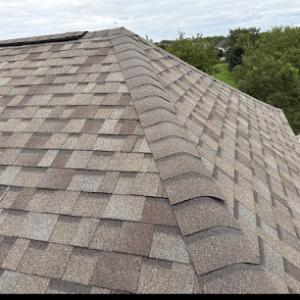
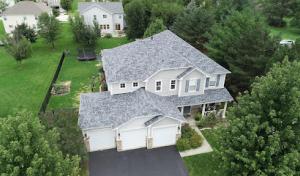
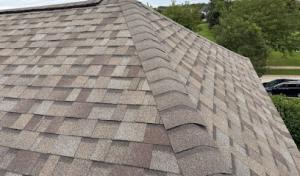
Asphalt shingles dominate replacements because they fit the area's large stock of suburban pitched roofs and are easier to replace after hail and wind events than premium systems. In this climate, a standard 3-tab or architectural shingle blends well with neighboring homes and provides solid wind resistance when installed with proper nailing patterns and underlayment. The forgiving nature of asphalt shingles also means replacements can be pursued quickly after a damaging spring storm without triggering a cascade of compatibility concerns with existing roof lines or attic ventilation. When selecting shingles, prioritize those with a good impact resistance rating and a warranty that covers wind uplift, especially for roofs facing prevailing spring gusts along the valley corridors.
Metal roofing is a meaningful but secondary choice in this market, appealing to homeowners looking for better snow shedding and durability through freeze-thaw cycles. Metal panels or shingles can excel in shedding spring hail and reducing exposed roof surface after a storm, potentially lowering risk of denting and granule loss. However, metal is often more conspicuous on the street and requires a careful match to the home's aesthetic, among other considerations like attic insulation and ventilation to prevent condensation issues in winter. If a metal option is pursued, choose a profile that minimizes the risk of hail denting and selects coatings proven to resist chalking and color fading in the bright spring sun.
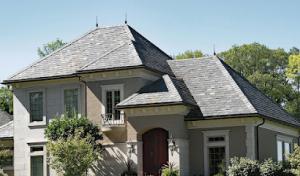
Clay tile, slate, and synthetic slate exist in the market but are less common and require closer attention to winter brittleness, weight, and repair matching after storm damage. The heavy weight of these materials demands a capable roof structure and a layout that can handle long-term wear under freeze-thaw cycles. Tile and slate can deliver a distinct curb appeal, but in this region they demand vigilant inspection after hail events to identify microcracks or hidden fractures that may propagate under cold snaps. Synthetic slate offers a lighter, potentially more forgiving option, yet its performance under repeated hail impacts should be evaluated against the home's specific roof pitch and exposure. If a home features one of these materials, plan for a professional inspection after severe spring storms to verify integrity and to coordinate color-matched replacements to preserve the roof's continuity.
Regardless of the roof type, the spring hail season following harsh winters makes storm-driven damage timing critical. Shapes and profiles influence how hail affects the surface, with flatter profiles offering more uniform impact patterns and steeper ones potentially channeling impacts toward edges. In Oswego's climate, a well-sealed underlayment and modern ventilation help minimize ice dam risk and attic moisture buildup after a wind-driven event. When evaluating replacement or repair candidates, prioritize systems that align with the home's exposure to prevailing winds and hail corridors, while ensuring the roof system can be integrated with existing gutters and downspouts to manage runoff efficiently.
Maintenance for the long run tends to favor materials that balance ease of repair with reliability after freeze-thaw cycles and spring storms. Asphalt shingles remain the easiest to source and match after a storm, which reduces the time and complexity of repairs following hail events. If a homeowner leans toward premium systems, the reasoning should center on their ability to sustain performance through repeated temperature swings and hail exposure, and on how well the chosen system can be repaired in place without compromising the existing structure. In all cases, maintaining proper attic ventilation, flashing integrity, and drip edge coverage is essential to extend roof life and protect interior spaces through Oswego's seasonal shifts.
In this part of Kendall County and the west suburbs, pricing for roof replacements tends to spike after spring hail and summer thunderstorm events. Crews book out quickly when a regionwide hail swipe hits, and Oswego's mix of detached suburban homes means most homeowners pursue full pitched-roof replacements rather than tight urban repair jobs. The result is a shorter window to compare options, plus tighter labor calendars as crews balance immediate storm work with planned reroofs on nearby blocks. When a storm drives demand, material bills can shift fast, and scheduling becomes the bigger hurdle even before a single shingle is ordered.
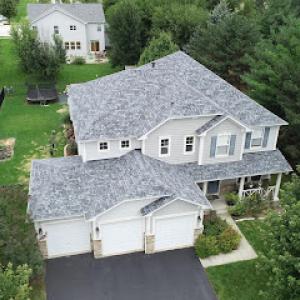
Most homes in this area sit on generous lots with pitched roofs, gutters, and visible sightlines from the street. That means contractors will price full-roof replacements rather than patchwork repairs unless there is a specific, repairable section. A full roof translates into cost ranges aligned with the roof's chosen material and the roof's size in squares. Asphalt shingles remain the baseline option for value, with metal and synthetic materials offering longer lifespans at a higher upfront cost. Clay tile and slate provide premium long-term performance but require a solid structure to support the extra weight. In Oswego, the square measurement matters: a typical replacement for a standard home lands in the general material ranges shown below, with the understanding that storm-driven demand can widen the spread during peak season.
Asphalt Shingles: 350 to 600 USD per square. This remains the most common starting point for midwestern homes, balancing upfront cost with reasonable lifespan in freeze-thaw winters and spring hail. Metal Roofing: 650 to 1100 USD per square. A popular upgrade where wind resistance and longevity matter, particularly for homes with a long south-facing exposure or areas prone to hail impact. Clay Tile: 1000 to 1800 USD per square. Heavier and more distinctive, with strong aesthetics and durable performance, though the installation demands careful structure assessment. Slate: 1500 to 3000 USD per square. The premium option, favored for its longevity and curb appeal on higher-end detached homes, provided the roof deck is reinforced adequately. EPDM Rubber Roofing: 4.5 to 8.5 USD per square foot. Common for flat or low-slope sections, sometimes used on accessory structures, with a different set of considerations than steeply pitched roofs. Synthetic Slate: 800 to 1400 USD per square. A lighter, versatile alternative that captures the look of real slate without the weight.
After a hail event, crews often do a rapid assessment to decide whether a homeowner should pursue full replacement or targeted repairs. The timing of scheduling matters: substantial storm-driven demand can push dates weeks out, increasing temporary living costs if the home needs occupancy during replacement. If the scope is a full pitched-roof replacement, coordination with the chosen material and the contractor's crew becomes critical to lock in a workable window. Weather windows in spring and early summer can narrow, so securing a detailed estimate and a clear project timeline early helps protect against escalating day rates and hardware shortages. It is common for extra costs to accrue if inspections, disposal, or incidental delays extend the project beyond the originally planned sequence.

Advantex Roofing & Restoration
(464) 224-0082 www.advantexrestorationil.com
155 Kirkland Cir suite 200, Oswego, Illinois
4.9 from 168 reviews
Advantex Roofing & Restoration, Inc is a trusted provider of residential and commercial roofing services, known for delivering quality craftsmanship and dependable results. With a focus on integrity and customer satisfaction, the company offers a full range of services including roof repair, replacement, storm damage restoration, and insurance claim assistance. Their experienced team uses top-grade materials and modern techniques to ensure long-lasting protection and curb appeal. Advantex Roofing & Restoration, Inc stands out for its prompt service, transparent communication, and commitment to exceeding client expectations, making them a go-to choice for reliable roofing and restoration solutions.
Amenity Roofing & Siding
(630) 636-9954 www.amenityroofing.com
5462 Walter Payton Memorial Hwy Unit C, Oswego, Illinois
4.9 from 93 reviews
Amenity Roofing and Siding is a locally-owned roofing contractor that takes pride in every job we complete. Whether you need a new roof, roof repairs, siding, gutters, inspections, or more, contact Amenity Roofing and Siding in Oswego, IL and as of 2022 - Genoa City, WI. We specialize in residential roofing but offer our high-quality services to commercial and industrial customers. We work on various types of roofing, including asphalt shingles, EPDM, TPO, Granulated metal roofing, Decra, Stone coat, Boral, and many others. With over 20 years of combined experience in the Oswego, IL, area, we provide comfort you can trust.
Best Roofing & Exteriors
(331) 575-1747 bestroofingandexteriors.net
Oswego, Illinois
5.0 from 17 reviews
From small repairs to complete roof and siding replacement we have you covered! Call today! free estimates!

Rise Above The Storm
(331) 255-6823 riseabovethestormllc.com
788 Oxbow Ave #112, Oswego, Illinois
5.0 from 10 reviews
Family Owned & Operated Company that has been in business since February of 2017. Owner has 15 years of experience in this industry. We specialize in storm damage claims and helping you work hand-in-hand with your insurance company to get the most out of your claim, and get your home repaired back to WHOLE with no cut corners. We are always in the best interest of our homeowners and do everything we can to ensure they are treated correctly by the insurance company.
ProCare Solutions
(888) 223-1119 www.procaresolution.com
902 Plainfield Rd, Oswego, Illinois
5.0 from 3 reviews
ProCare Solutions, a family-owned and operated business located in Oswego, Illinois, specializes in roofing and general contracting services for commercial, industrial, and residential properties. With over 25 years of experience, we have built a strong reputation for providing high-quality workmanship and exceptional customer service. ProCare Solutions is fully licensed, insured, and bonded, ensuring that every project is completed with the highest standards of safety and professionalism. Insurance claims is our specialty!
Colonial Remodeling & Construction
(630) 801-6288 colonialremodeling.net
Serving
4.8 from 25 reviews
Colonial Remodeling and Construction is a licensed and insured roofing, siding, and remodeling contractor. We have been servicing the Montgomery area for over 30 years. We provide quality workmanship using only superior materials that are bound to satisfy our valuable customers at a reasonable price. You can expect a job done well and on time. We are committed to your complete satisfaction. Colonial Remodeling and Construction has over 30 years of experience working with insurance adjusters. Your property or roof will be restored and/or upgraded to bring true distinction to your home. We invite you to experience the difference! Call today for a FREE quote! All major credit cards are accepted and zero-percent financing is available!!
Illinois Twins Roofing
(773) 837-1176 itwinsroofing.com
Serving
5.0 from 34 reviews
Unexpected hail or wind damage? Let our team help you restore your home. Upgrade your roofing with our high-quality and affordable supplies.
Astra Roofing
Serving
5.0 from 36 reviews
Welcome to ASTRA ROOFING where quality meets reliability in roofing and siding solutions. From repairs to installations, our expert team ensures your peace of mind under every roof. Explore our services and let us safeguard your home with excellence.

Reputable Roofing & Siding
(630) 849-4548 reputableroofing.net
Serving
5.0 from 61 reviews
Reputable Roofing & Siding is a leading roofing and siding contractor specializing in roof repair, roof replacement, and siding installation services for both residential and commercial properties. Our expert team is skilled in providing high-quality, durable roofing solutions, including asphalt shingles, metal roofing, flat roofs, and more. We also offer premium siding services, including vinyl siding, fiber cement, and wood siding, to enhance the beauty and energy efficiency of your home or business. At Reputable Roofing & Siding, we prioritize customer satisfaction and provide free, no-obligation estimates to ensure you get the best value for your investment. Our experienced, licensed professionals are dedicated to providing A+ service.
A&D Exteriors & Remodeling
(630) 485-8606 www.ad-exteriors.com
Serving
5.0 from 37 reviews
A&D Exteriors and Remodeling is your trusted partner for high-quality home improvement services. Specializing in Siding Services, Roofing Services, Remodeling Services, Doors Services, and Windows Services, we are committed to enhancing the beauty, functionality, and value of your home. Co-owned and operated by Gordo and Diana, who bring over 10 years of experience, our business delivers exceptional craftsmanship with a personal touch.
Huuso Exteriors
(630) 200-1537 huusoexteriors.com
Serving
4.7 from 36 reviews
Huuso Exteriors is a residential & commercial roofing contractor serving Plainfield and the South Suburbs/Chicagoland (Naperville, Aurora, Oswego, Bolingbrook, Romeoville, Joliet, Downers Grove). We do roof repair, roof replacement, roof leak help, and storm/wind/hail inspections, plus TPO & metal roofing. Also siding, gutters, insulation, and screen repair. Service with Honor. Licensed, bonded & insured. Financing available. 10-yr workmanship warranty. Many systems include 25–50 yr manufacturer warranties (by brand/tier). We answer 24/7. Book a free 7-point, no-pressure inspection. Our goal is satisfied customers and quality workmanship.
Perfect Exteriors
(708) 969-1392 www.perfectexteriors.com
Serving
5.0 from 168 reviews
Perfect Exteriors has been helping guide clients with repairs or home enhancements. Everyone Needs a starting point, Contact us for yours! We are fully licensed contractors, insured, and have great working relationships with townships. We've also maintained an award-winning status with the better business bureau for years. Our teams move with agility and precision to try to respond to your needs as soon as possible. Our Exterior Detectives can deduce your problems and give you cost effective solutions while answering and explaining what's happened. From repairs to complete replacement, our teams are skilled with roofing and siding.
A full reroof in Oswego typically requires a permit through the Village of Oswego Building & Zoning Department rather than being handled informally by the contractor alone. That means you will go through an official review, and your project must align with local code, setback rules, and any village-specific storm repair considerations. The permit process helps ensure that materials, fastening methods, and installation practices meet current standards after the harsh freeze-thaw cycles and spring hail events that the area experiences. Plan on coordinating with the village early in the project so it does not become a delaying factor once damage is identified and replacement is needed.
Inspections are scheduled during and after installation, and final approval is needed before project closeout, so homeowners should confirm who is responsible for booking each inspection. Typical workflow includes an initial inspection to verify permit applicability and roof plan compliance, followed by periodic checks during installation to confirm underlayment, nailing patterns, and ventilation meet village requirements. A final inspection confirms completion and acceptable workmanship before the permit is closed. To avoid gaps or miscommunication, designate one point of contact within the contractor's team for inspection scheduling and keep your building permit on site during the work. If weather or material delivery timing shifts, verify that inspection appointments can be adjusted without causing delays.
Some neighborhoods or historic-style areas may have added review expectations beyond the base reroof permit process, which can affect material choice or visible roof details. For example, certain street-facing elevations, color selections, or traditional shingle profiles may trigger additional review or discretionary approval. If your home sits in a district with preservation guidelines, anticipate longer lead times for board or committee input, and be prepared to present a sample of the proposed roofing material and color. Communicate early with the contractor about any known neighborhood covenants so that chosen materials, colors, and ridge vents or skylight placements align with local expectations and do not require a second round of permitting.
Start by requesting a clear scope of work from your contractor that aligns with the village's code language and any neighborhood mandates. Ask for copies of all permit documents, inspection confirmations, and any correspondence with the Building & Zoning Department. Keep a dedicated tracking file that includes permit numbers, inspection dates, approved plan revisions, and any conditions tied to final approval. Understanding and anticipating the permit timetable will help you navigate spring storm recovery more smoothly and reduce the risk of project hold-ups due to administrative requirements.
Oswego sits in a hail- and wind-claim environment where insurers commonly ask for detailed contractor estimates plus date-stamped photos or video of roof slopes, accessories, and interior leak evidence. After a spring storm, the adjuster may request a package of documentation that proves what was damaged, when it happened, and how it affects your home's envelope. If that documentation isn't ready, you risk delays or a partial settlement that doesn't cover what you expect. Being prepared with clear, organized records helps you navigate the process without letting a weather event erode your coverage.
Illinois policy language can affect whether partial damage leads to repair or full replacement, which matters in neighborhoods where matching older shingles can be difficult after storm loss. If your roof has long-run shingles or a mixed roofline, a repair might leave mismatched areas that are noticeable from the ground or in attic daylight. The insurer's guidance on matching is not universal; a decision that seems minor at first can drive a longer-term visual impact. Understanding the policy nuance now helps you set expectations with both the contractor and the adjuster before work starts, and it pushes toward outcomes that preserve the roof's uniform look for years to come.
Because adjusters often inspect after regional storm events, Oswego homeowners benefit from documenting damage before temporary repairs or weathering changes the visible condition of the roof. Take clear exterior shots from multiple angles, close-ups of damaged shingles or flashing, and interior evidence of leaks or staining. Keep a dated record of any temporary measures you install for protection. When the adjuster arrives, your file should speak for itself, reducing back-and-forth and the risk of disputes over what was initially damaged versus what worsened during a delay. This proactive approach can prevent misinterpretation and help you secure the outcome that reflects the true extent of the storm's impact.
Connect with contractors who help homeowners navigate the claims process from damage assessment to final approval.
Advantex Roofing & Restoration
(464) 224-0082 www.advantexrestorationil.com
155 Kirkland Cir suite 200, Oswego, Illinois
4.9 from 168 reviews
Amenity Roofing & Siding
(630) 636-9954 www.amenityroofing.com
5462 Walter Payton Memorial Hwy Unit C, Oswego, Illinois
4.9 from 93 reviews
Best Roofing & Exteriors
(331) 575-1747 bestroofingandexteriors.net
Oswego, Illinois
5.0 from 17 reviews
When damage shows up during snow cover or after repeated freeze-thaw cycles, you need action fast. Oswego winters can delay full replacement work, so temporary tarping and leak control are especially relevant in these conditions. A winter leak left unchecked can creep into decking and attic moisture, making spring repairs harder and longer.
Emergency calls often follow storm openings around ridge caps, flashing, and older shingle fields that held through summer but fail under winter expansion and contraction. If you notice active water dripping from the ceiling or pooling near a wall line after a storm, seal the worst gap you can safely reach and place a temporary tarp or plastic sheeting over the affected area. Do not attempt to lift heavy snow or expose live wires; prioritize safety and call for help from a contractor who can throttle the source and protect interior spaces.
Fast tarping matters locally because spring scheduling fills quickly, and a winter leak left open can worsen decking and attic moisture problems before replacement season. Secure tarps with vents left clear for airflow, and avoid plastic that can trap condensation. Check for shingle edges that flap in wind and re-tension fasteners as needed. Ensure attic access is kept dry during repairs, and coordinate with a contractor to stage a longer-term solution as soon as weather allows.
A swift assessment from a trusted local roofer helps determine whether interior containment is enough for now or if more aggressive temporary repairs are required. Prioritize sealing leaks near protrusions like chimneys and vent stacks, and schedule a comprehensive inspection to minimize damage during tail-end winter thaws and the early spring rush.
When you can't wait, these contractors offer fast response times to stop leaks and prevent further damage.
Amenity Roofing & Siding
(630) 636-9954 www.amenityroofing.com
5462 Walter Payton Memorial Hwy Unit C, Oswego, Illinois
4.9 from 93 reviews
EPDM is one of the dominant materials for low-slope sections, making it relevant for additions, porches, garages, and some mixed-roof residential designs. Its seam layout and rubber membrane suit spaces where slope is gentle and drainage is a concern. In a town with active spring storm patterns, EPDM can provide a durable, long-lasting base layer when installed by a crew that understands long, exposed edge details.
Freeze-thaw weather in Oswego can stress seams, penetrations, and drainage points on low-slope roofs, so ponding and edge details deserve more attention than on steep-slope shingle roofs. Summer heat and thunderstorms can affect installation pace and membrane performance, which is why many local low-slope projects are timed for more stable spring or fall conditions. If a project spans warm spells, plan for shaded periods and scheduled inspections to catch issues before heat raises the adhesive temperatures too high.
Edge details, flashing transitions, and penetrations deserve meticulous attention. Seams should be lapped and sealed with compatible adhesives, and drains must be closely fed with proper clamping and sump preparation to prevent ponding. For porches or garages, ensure the substrate is dry and clean, with a solid deck underneath to reduce telegraphing and seam telegraphing through the membrane. A seasoned local crew will prioritize weather-aware wrap-up, especially around transitions to steeper sections.
After installation, inspect exposed edges after strong storms and during the first freeze cycle. Clear debris near seals and verify that fasteners remain plated and tight. Keep an eye on slope transitions where winter melt could pool and stress the membrane. Regular inspections now save more involved repairs later, particularly on additions or light-framed roofs common in Oswego.
Find specialists in TPO, EPDM, and built-up flat roofing systems for residential and commercial properties.
Amenity Roofing & Siding
(630) 636-9954 www.amenityroofing.com
5462 Walter Payton Memorial Hwy Unit C, Oswego, Illinois
4.9 from 93 reviews
Skylights are a meaningful specialty in the Oswego market, and they become common leak points when winter movement and spring rain expose aging flashing details. A small overhead breach can drip onto a living space, especially after a heavy rain or rapid warming.
In this climate, repeated freezing and thawing can open vulnerable transitions around chimneys, wall flashings, and roof penetrations before interior staining appears. By the time a homeowner notices a stain, the issue has often been active for weeks, and the damage can extend into structural or insulation layers if left unchecked.
Homes that go through storm repairs or partial reroofs need careful flashing integration so replacement sections do not create new leak paths during the next spring storm cycle. In Oswego, mismatched or improperly tied flashing can line up with existing gaps, turning a single leak into a recurring problem with every heavy rain. The goal is to have a continuous, well-sealed transition where skylight curbs, vents, and chimney connections meet the roofline.
Inspect skylight flashing during dry spells after a storm cycle, paying close attention to sealants and corner joints. If a roof repair or replacement is on the horizon, blueprint the flashing plan to maintain a seamless envelope around all penetrations and edges. Ask for a detailed inspection of roof-to-wall transitions and chimney interfaces, because small faults here often drive the first signs of trouble when spring rain arrives. A mindful approach now helps avoid a cascade of interior leaks later.
Find contractors experienced in skylight installation, flashing, and leak repairs to bring natural light into your home.
Advantex Roofing & Restoration
(464) 224-0082 www.advantexrestorationil.com
155 Kirkland Cir suite 200, Oswego, Illinois
4.9 from 168 reviews
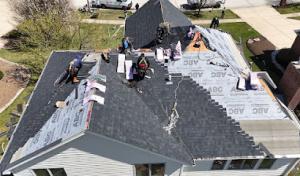
After a hail or wind event, Oswego's contractor market swings into strong competition, with many companies emphasizing fast response and debris cleanup. You'll notice crews mobilizing quickly to cover leaks, protect landscaping, and haul off storm debris. Expect estimates within days, and prioritize firms that provide on-site safety assessments and clear timelines for temporary protection.
Homeowners should probe whether a contractor handles the entire process from start to finish, including documentation for storm damage, inspection follow-through, and a complete replacement plan. Because the local market leans on reroofing, some firms promote affordability first. Verify that the actual scope aligns with what's needed for your home, and that the crew will manage waste removal, permit coordination (if applicable in your area), and final site cleanup.
Ask for a written project schedule with start and finish dates, and request references from recent spring storm work in established subdivisions. Inquire about stabilization steps for gutters, downspouts, and landscaping, plus how they protect mature trees and property lines during a rapid replacement. Confirm the warranty terms, including coverage for workmanship and any ice-dam prevention measures for freeze-thaw cycles.
Be wary of estimates that are unusually fast or low, and of crews that leave without a thorough cleanup. Look for a local presence with a physical office or established service area, and a plan for post-install inspection to verify workmanship. A reliable contractor will anticipate follow-up visits for seasonal checks and any storm-related touch-ups.