Last updated: Apr 19, 2026
After a hail or high-wind event, the clock starts ticking on your claim. Ohio carriers serving the New Philadelphia area see recurring hail and wind claim activity, so homeowners are often asked for before-photos, date-of-loss details, and a line-item estimate before approval. If you don't have immediate visuals, walk the roof from multiple angles with your phone, focusing on granule loss, hail dinging on the shingles, and any lifted or curling edges. Keep notes of the first signs you observed interiorly: damp spots, ceiling stains, or attic frost. When a claim is filed, expect the insurer to request a scope of work that matches the visible damage. If the claim packet arrives with an estimate that doesn't reflect the actual damage you've documented, you'll want a contractor's line-item breakdown ready to justify any discrepancies. The goal is to move from denial risk to an approved scope quickly, before a second wave of weather or general contractor backlog slows things down.
In town, winter snow followed by freeze-thaw cycling can turn minor shingle damage into active leaks, making delayed post-storm repairs riskier than in milder Ohio markets. The freeze-thaw sequence can push hairline breaches into larger interior issues in a matter of days, especially when attic temperatures fluctuate or when wind-driven moisture finds vulnerable edges. This is not a "wait-and-see" situation. If your roof shows even small asphalt shingle lifting, micro-cracks, or granule loss, you should pursue a timely assessment and repair plan with your insurer's adjuster and your contractor. Delays due to weather windows are common, so coordinate expectations with the contractor soon after the claim is opened. The goal is to avoid a cascade where a small problem becomes a larger, more expensive leak by the time a crew can mobilize.
Spring storm periods can overlap with wet scheduling delays in Tuscarawas County, so claim inspections and replacement dates often need to be coordinated around rain windows rather than immediate install availability. A reliable plan looks ahead: identify a preferred start window that minimizes rain interference, lock in a weather-backed backup date, and confirm the contractor's crew availability for a short, focused replacement. Given the small market dynamics, fast access to materials and crews matters. If a forecast shows a storm front or heavy moisture ahead, be prepared to accelerate pre-inspection activities-photos, measurements, and permit-ready paperwork must be in place so the replacement can slide in immediately when the weather shifts to dry conditions. You'll want to keep a flexible calendar, with a preferred install block that avoids consecutive rain spells and allows for a two-to-three day dry period to complete the roof without interruption.
Because carriers routinely request a documented loss timeline, having a clear, organized file accelerates approvals. In practice, you'll want the date-of-loss evidence, the sequence of discovered damage, and a contractor's itemized repair plan that aligns with the adjuster's scope. If the claim lingers past a favorable window, discuss interim mitigation steps with your insurer-temporary tarping or boarding to control leaks-so you're not left exposed during peak freeze-thaw swings or lingering wet weather. In the end, the objective is a concrete, scheduled path from claim approval to a sealed, weather-ready roof, minimizing the risk of further damage while respecting New Philadelphia's seasonal rhythm.

RightMark Roofing
(330) 275-0088 rightmarkroofing.com
327 Stonecreek Rd NW, New Philadelphia, Ohio
4.8 from 74 reviews
RightMark Roofing (formerly WM Commercial Roofing) has been a commercial roofing contractor serving Northeast Ohio since 2005. We install, repair, and maintain flat & low-slope systems, including TPO, EPDM, and PVC, and provide roof coatings, inspections/maintenance plans, gutter repair & replacement, and roof insulation. From leak repairs to full replacements, our safety-focused crews deliver durable results with minimal downtime. Trusted by businesses in Akron, Canton, Cleveland, and nearby communities. Request a free quote today.
Hicks Industrial Roofing
(330) 364-7737 www.hicksroofing.com
2162 Pleasant Valley Rd NE, New Philadelphia, Ohio
4.6 from 15 reviews
We are a third generation famil owned company proudly serving the Eastern Ohio and Northern West Virginia Areas with Quality Roofing Services.

Over The Top Roofing & Exteriors
122 5th St SW, New Philadelphia, Ohio
5.0 from 4 reviews
Welcome to Over The Top Roofing & Exteriors, where quality meets affordability. Our dedicated team specializes in delivering top-notch roofing solutions coupled with down-to-earth pricing. With a commitment to excellence and customer satisfaction, we strive to go above and beyond to exceed your expectations. From roof installations to repairs and exterior enhancements, trust Over The Top Roofing & Exteriors for all your roofing needs. Experience excellence without breaking the bank with our OverTheTop quality and unbeatable pricing.
Custom Exteriors & Design
(330) 440-6338 customexteriors.homes
114 E High Ave, New Philadelphia, Ohio
5.0 from 2 reviews
We offer an affordable 5 Star experience. We specialize in roofing, siding, windows and seamless gutters. Proudly serving the Columbus and surrounding areas for 16+ years. Our representatives also specialize in storm damage offering courtesy inspections and will work directly with your insurance company.
Monarch Commercial Roofing Systems
(740) 605-7872 www.monarchroofingsystems.com
Serving
5.0 from 8 reviews
Monarch Commercial Roofing Systems specializes in waterproofing, restoring, and replacing virtually every type of flat or low slope commercial roofing substrate. Customer satisfaction is one of our highest goals. We strive to create long-term business relations with all of our clients.
Tango & Gatti
(330) 308-8213 tangoandgatti.com
Serving
4.8 from 123 reviews
Tango & Gatti Roofing – Dover, OH Roof Repair & Replacement Experts. Need a roofing contractor near you? Tango & Gatti Roofing provides expert roof repair, roof replacement, metal roofing, and emergency roof services in Dover, OH and surrounding areas. We serve both residential and commercial clients with fast, reliable workmanship and fair, transparent pricing. Whether it’s storm damage, roof leaks, or a full replacement, our licensed team delivers quality you can trust. We’re manufacturer-certified and highly rated by local homeowners. Call 24/7 to schedule your FREE roof inspection or estimate. Trusted. Local. Professional. Call Tango & Gatti for roofing, Siding, Gutters, Window and Door Installation, and Deck Installation.
Premier Construction
Serving
5.0 from 19 reviews
Contractor specializing in exterior construction but our abilities go beyond that.
Pine Ridge Roofing
(330) 231-9064 pineridgeroofingllc.com
Serving
5.0 from 134 reviews
As a full-service home exterior renovation company located in Strasburg, Ohio, Pine Ridge Roofing specializes in roofing, siding, gutters, and decks across Northeast Ohio. We use our in-house crews to ensure top-notch quality and attention to detail in every project. As an Owens Corning Preferred Contractor, we bring precision and care to every roof repair and replacement, using durable materials that stand the test of time. Whether you’re updating your siding, installing seamless gutters, or building a new deck, our team is dedicated to delivering exceptional craftsmanship. Serving areas from Cleveland, Canton, Talmadge, Wooster, Mansfield, New Philadelphia, Steubenville, Zanesville, Coshocton, and beyond
Asbury Roofing & Siding
(330) 756-7683 www.asburyhomeimprovements.com
Serving
5.0 from 167 reviews
Asbury Roofing & Siding is Northeast Ohio's #1 Home Improvement Contractor. We strive to always "Build with Purpose", making Asbury Roofing and Siding the go-to destination for top-quality roofing and siding services like roof installation, metal roofing, siding, gutters, and more. Based in Sugarcreek OH, we are a trusted and reliable contractor serving residential and commercial clients in Northeastern Ohio. Services we provide include siding installation, roof installation, gutter repair and installation, soffit, fascia, window installation, metal roofing, roof repair, deck building, and much more. We are local to Ohio and a family-owned and operated company dedicated to providing world-class service for each and every customer.
J & J Roofing
(330) 231-0177 jjroofingllc.com
Serving
5.0 from 116 reviews
We are Jonas Yoder and John Hershberger and the crew of JJ Roofing John and I have worked for the same construction company since we were teenagers. When I was twenty and John was nineteen, we decide that we wanted to have our own roofing company. We promptly quit our jobs, purchased a truck and enough tools for the two of us, and hit the road looking for jobs. We started out mostly doing new construction residential roofing and over time, we have transferred to mostly residential reroofs. We now have twelve employees and three crews that average two roofs per day! Through the years, we have gained extensive knowledge in advanced roofing techniques and problem-solving in all areas of residential roofing!

Alpha Roofing & Construction
Serving
5.0 from 3 reviews
Since 2009 Alpha Roofing & Construction has been providing local homeowners with the roof repair solutions they need. With over 25 years of experience, the skilled roofers and insurance experts at Alpha Roofing & Construction has been helping the residents of Northeast Ohio replace, repair, and install their roofs. Whether your home has suffered storm damage, or it’s just time for a new look, Alpha Roofing & Construction brings integrity, quality, and craftsmanship to your door.
Stony Point Metals
(330) 852-7100 www.stonypointmetals.com
Serving
4.8 from 49 reviews
Stony Point Metals is the manufacturer of painted roofing and siding. Understanding the times we live in, we are dedicated to quality, service and fair prices, which can be hard to find. Founded in 2009, we are a family owned and operated company and are located in scenic Sugarcreek, Ohio. We specialize in POLE BARNS, GARAGES, & HOUSE ROOFS. We offer Excel paneling, Masterpiece paneling, R-paneling, and Standing seam roof applications. We offer 20+ color options all of which come coated with Ceram-A-Star 1050, A revolutionary siliconized modified polyester paint system. At Stony Point Metals Custom Roofing & Siding, We are YOUR PREMIER METAL ROOFING, SIDING, AND PANEL SUPPLIER!
New Philadelphia's cold-season freeze-thaw cycle pushes aging asphalt shingles to their limits. Repeated expansion and contraction can worsen granule loss, lift tabs, and seal-strip failure long before the rest of the roof shows obvious wear. That means a roof that looks mostly sound from the ground can still be quietly deteriorating at the micro level, especially on south-facing slopes where sun exposure accelerates changes. If you're standing on the ladder and notice more granules in the gutter than you remember from a few years ago, that's a sign to take seriously. Regular inspections after a harsh winter are not cosmetic; they're a confidence check on whether the roof can hold up under another cold snap or a sudden hail event.
Snow on the roof melts during the day and refreezes at night, a common pattern here in the valley. In homes with older flashing, loose shingles, or compromised valleys, that melt-refreeze cycle concentrates moisture at specific edges. If a section of flashing loses its seal, water can work its way into the roof deck where it's often least noticeable until staining and rot appear inside the attic or living spaces. In practice, you'll often see the first drips show up at flashing edges or around roof penetrations long before the rest of the roof looks like it needs replacement. The key is proactive resealing and targeted flashing checks after big thaws, rather than waiting for a visible sag or curling shingle to appear.
Because warm, humid summers follow these winters, roofs in this area can exhibit a mixed set of stress signs within a single service cycle. Winter cracking from freeze-thaw weather can coincide with moisture buildup related to poor attic ventilation or inadequate insulation that becomes clearer only after summer humidity climbs. The result is two problems layered on the same roof: brittle, stressed shingles in winter and moisture-driven issues in summer. That combination often shows up as misaligned tabs sitting higher than neighboring shingles, sudden granular loss on already-worn sections, and attic temperatures that feel uncomfortably hot or damp on the inside. A roof that has weathered a few winters may not fail all at once, but small, persistent leaks and accelerated wear point to a more fragile overall condition than it appears.
Begin with a careful, season-appropriate inspection plan. After a harsh winter, check for loose or curled shingles, soft spots, or granule buildup in gutters and downspouts. Pay close attention to areas around chimneys, vent pipes, and edge flashing where leakage tends to start. If you notice staining in the attic or damp spots around penetrations after a thaw, arrange a professional inspection focused on flashing integrity and deck condition. In dry, sunny stretches, consider a ventilation check inside the attic to ensure soffit, ridge, and gable vents are allowing airflow that helps keep roof decks closer to the outside environment's balance. A targeted fix-replacing a handful of compromised shingles, resealing key flashings, or adjusting attic ventilation-can prevent minor issues from becoming meaningful, costly leaks during the next freeze-thaw cycle.
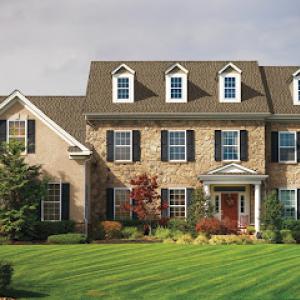
Asphalt shingles remain the practical default in this market because they fit the re-roofing-heavy pattern and the local price band is well aligned for quick, reliable replacement. In neighborhoods with a mix of older homes and newer ranches, standard 3-tab or architectural shingles deliver solid protection without requiring specialty crews or extended timelines. When storms produce hail or wind damage, asphalt can be the fastest path to getting homes watertight again, with installers who know the typical local roof-on-wood deck details and common venting configurations. If a home already has asphalt, a same-veneer replacement often minimizes additional roof deck prep and interior disruption.
Metal roofing has meaningful local contractor support and is often considered by homeowners seeking better snow shedding and lower maintenance after repeated wind and hail seasons. In the freeze-thaw pattern, metal can help reduce ice dam risk on steeper sections and shed hail faster, which translates into fewer reclaimed trips for repairs. The upfront installation is more involved than asphalt, but the long-term durability and the ability to hold up against seasonal pounding can be appealing. A metal roof pairs well with bolder architectural lines or modern updates on older homes, especially if there is a desire to minimize ongoing maintenance or if the attic insulation is already upgraded to maximize the roof's performance.
Heavy materials such as clay tile, concrete tile, and slate are available in this market but are less typical choices for homeowners who prioritize replacement efficiency. The local contractor mix centers on rapid turnaround and dependable re-roofing workflows rather than specialty steep-slope restoration. If a home already has one of these materials, reroofing with the same weight class can be feasible, but it often requires structural checks and potential deck reinforcement. For new installs, these options can create longer timelines and more coordination with subcontractors, which may clash with the market's faster replacement expectations after damage.
Storm events in the area tend to expose the limits of aging coverings and underscored by freeze-thaw cycles. When damage is found, a straight-forward asphalt replacement commonly keeps the process smooth and predictable, minimizing the chance of hidden sheathing issues. Metal roofs offer resiliency against repeated hail without excessive damage, but require careful seam and fastener maintenance to prevent leaks. Heavier tiles and slate, while capable, demand careful assessment of roof structure and installation specifics to avoid surprises during the re-roof window.
When planning after a storm, the goal is a wind- and water-tight roof that can stand up to the next freeze-thaw cycle. Start with a clear assessment of how the existing decking fared and whether fascia, soffit, or attic insulation needs upgrade. If damage is isolated to shingles, asphalt often returns the best balance of speed and reliability. If snow load and wind history point toward it, metal can reduce future maintenance, provided the installation team has solid experience with the local roof framing. Heavy tile options should be pursued only after confirming structural compatibility and achievable installation timelines.
In this area, replacement pricing is heavily shaped by a re-roofing culture. Tear-off, disposal, and cleanup are expectations homeowners have baked into the job, not optional add-ons. Contractors price quickly and clearly for a full cleanup, with tarps, disposal fees, and nail-hole restoration included in the bid. That means a straightforward, all-in price is more common here than piecemeal "extras." Expect crews to schedule and coordinate waste removal as a standard part of the project, particularly after a storm when crews are juggling multiple roofs at once.
Storm-driven demand spikes can push both scheduling and labor pricing higher after hail or high-wind events. When insurance-funded projects flood the market, timeframes shorten and crews prioritize higher-need homeowners. If a severe hail event hits, be prepared for tighter windows and possible price bumps due to material shortages and labor demand. Communicate with the contractor about a realistic timeline that balances rapid replacement with proper inspection of underlying decking and flashing.
Older homes in this market often reveal additional costs once the old roof comes off. Freeze-thaw cycles can affect decking edges, flashing lines, and chimney tie-ins, and these issues are typically discovered during tear-off. Expect slightly higher costs if decking requires edge repair, new flashing manifolds, or careful chimney detailing. A thorough roof evaluation before tear-off helps prevent surprises that slow progress and add expense after a storm.
Asphalt Shingles: 350-650 USD per square
Metal Roofing: 600-1100 USD per square
Clay Tile: 900-1800 USD per square
Concrete Tile: 900-1700 USD per square
Wood Shingles/Shakes: 550-1000 USD per square
Slate: 1200-2600 USD per square
In practice, tighten bids by confirming full tear-off scope, cleanup, and material disposal in writing. For a New Philadelphia replacement, the most predictable path keeps the process moving with storm-aware scheduling and transparent, all-inclusive pricing.
Get a clear picture of your project costs upfront - no commitment required.

RightMark Roofing
(330) 275-0088 rightmarkroofing.com
327 Stonecreek Rd NW, New Philadelphia, Ohio
4.8 from 74 reviews
A full re-roof in New Philadelphia typically requires a permit, and homeowners should expect the contractor to handle submittal and coordination with the local building department. This isn't a long entitlement process, but it is a mandatory step that impacts how quickly a job can start after a storm. The permitting office expects a straightforward set of materials, roof plan, and a scope of work, so having a clear understanding of your project from the outset helps the process move more smoothly. The city's climate-freeze-thaw cycles and occasional hail storms-means a permit review can be practical and focused on safety and proper installation rather than lengthy approvals.
The local process generally includes a brief plan review and inspection scheduling rather than a long entitlement process. Your contractor should compile the essential details: roof dimensions, the type of underlayment, attachment methods for the chosen roofing system, and any venting or chimney work involved. In a tight market, timing the submittal around anticipated weather windows is crucial. Keep in close contact with the contractor about when the plan is officially submitted and when the approval is expected, so you can align roof removal and replacement with dry, stable conditions. Since inspection windows can vary, having a prepared access route and clear worksite will help the inspector move efficiently.
New Philadelphia inspections are typically conducted after rough-in and again at final, so replacement timelines need to account for municipal sign-off rather than assuming same-day closeout. During the rough-in inspection, the focus is on deck integrity, underlayment installation, and venting connections, especially with the city's exposure to winter moisture and potential wind-driven rain. The final inspection confirms completed roofing, flashing, and ventilation meet code requirements and local standards. A practical approach is to coordinate with the contractor to build in two inspection slots: one soon after roof removal and deck prep, and a second after all finishing touches are in place. If weather delays push the project into unpredictable periods, the permit office will typically expect updated inspection dates, so keep lines of communication open.
After a storm, the need to replace a roof quickly can clash with the permit and inspection cadence. It helps to choose a contractor who can manage the submittal package and schedule inspections promptly, but also understands that municipal sign-off may introduce a short lag. Have a contingency plan for work stoppages caused by heavy rains, freezing nights, or wind advisories typical for this region. If a temporary cover is needed to protect interior spaces while awaiting an inspection, ensure the plan complies with the permit stipulations and is approved by the building department to avoid jeopardizing the permit status.
Because the area sees periodic hail and wind events, insurers commonly expect a documented pre-loss condition record, current damage photos, and a detailed scope before approving full replacement. Start gathering clear shots of the entire roof line, gutters, and any visible fascia or soffits. Focus on color areas, moss or algae growth, and any prior patches. Keep the file organized by date and angle, so you can show a logical sequence if the claim is questioned after a freeze-thaw cycle. If you can, add a quick video walk-around that highlights suspect areas rather than relying on a single static shot.
On-site adjuster coordination is a normal part of roof replacement in this market, so homeowners should expect contractor-adjuster meetings rather than a purely desk-reviewed claim process. Plan for an in-person visit during which your contractor can point to specific damage, compare it to the pre-loss record, and discuss a practical replacement scope. If timing is tight due to weather windows, request a joint inspection appointment and keep notes of what is discussed, including any proposed scope changes or contingencies.
In this market, documenting collateral storm indicators such as gutters, metal accessories, and soft metals can be important when roof damage is borderline and freeze-thaw wear may otherwise be blamed for the condition. Photograph metal edges, flashing, and fasteners for signs of impact or looseness. Note mismatched fasteners or bent galvanized components around the roof perimeter. If gutters show hail impact marks or enamel chipping, capture those details as supporting evidence that the roof system has been stressed beyond ordinary wear. This thorough trail helps distinguish true storm damage from aging or environmental effects that could complicate approval for replacement.
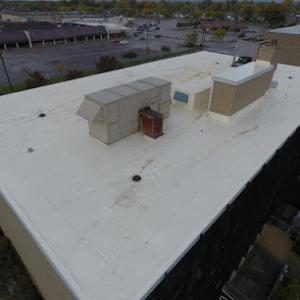
In this market, the contractor mix includes a notable commercial segment, which makes low-slope roof service more available than in many small Ohio residential spots. That depth of experience can help when dealing with membrane details, edge terminations, and flashing transitions on residential projects that touch a porch, sunroom, or attached garage. The practical upshot is access to crews familiar with fast turnaround without compromising material quality or warranty terms.
Winter snow load combined with spring moisture creates a sharper edge to maintenance on homes with porches, additions, or mixed-slope sections. Drainage paths can diverge from a main roof line, and snow berms at transitions often hide slow-draining areas. Before replacement, map out all drainage routes, including under-eave gutters and scuppers if present. Pay attention to seam condition in low-slope areas, where degradation or loose fasteners can lead to leaks once the thaw cycle starts.
Freeze-thaw cycles and humid summers both stress low-slope assemblies. Humidity can drift into underlayment and membrane seams, while freeze-thaw can widen gaps at detailing around penetrations. For attached garages or additions, care should be taken with the membrane's edge details at transitions from roof to wall and from roof to flashing into the gutter system. Plan for a thorough inspection of seam tapes, fastener patterns, and the condition of any ballast or insulation components that sit near the membrane.
Transition flashing must be treated as a critical control point on mixed-slope roofs. In New Philadelphia, these areas often reveal the first signs of wind-driven uplift or water intrusion after a heavy storm. During a replacement, confirm that flashing at vents, skylights, and wall transitions is corrosion-resistant, continuous, and properly sealed with compatible sealants. If porches or additions share a roof deck, ensure flashing continuity from the main roof to the new section to prevent recurring leaks.
Develop a targeted inspection checklist for the replacement window: assess snow load impacts, verify drainage paths are maintained, and recheck seams after any thaw events. A neighborly, methodical approach helps ensure the low-slope system remains water-tight through New Philadelphia's freeze-thaw winters and humid summers.
Find specialists in TPO, EPDM, and built-up flat roofing systems for residential and commercial properties.
RightMark Roofing
(330) 275-0088 rightmarkroofing.com
327 Stonecreek Rd NW, New Philadelphia, Ohio
4.8 from 74 reviews
Hicks Industrial Roofing
(330) 364-7737 www.hicksroofing.com
2162 Pleasant Valley Rd NE, New Philadelphia, Ohio
4.6 from 15 reviews
Monarch Commercial Roofing Systems
(740) 605-7872 www.monarchroofingsystems.com
Serving
5.0 from 8 reviews
Storms in the Tuscarawas Valley bring pressure to move fast, but the local market also moves on cleanup and affordable re-roofs. When a contractor answers quickly, that's good, but make sure the initial visit clearly outlines the scope-shingle type, attic ventilation, underlayment, and any needed decking work. In a small city where neighborhoods talk, a contractor who documents decisions in writing and revisits questions promptly tends to keep projects on track through freeze-thaw cycles.
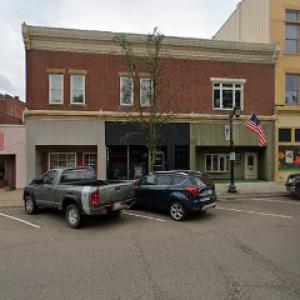
New Philadelphia hosts a meaningful share of long-established and family-owned contractors. Reputation in this market travels by word of mouth and local referrals. Ask for recent job sites you can visit or neighbors you can call who had similar materials and roof lines. Look for consistency in completed projects, not just the fastest response. A contractor who has earned repeat business and local recommendations is more likely to handle surprises calmly during cleanup and replacement, not just the installation day.
Because insurance work is common, verify that the roofer regularly handles adjuster meetings, supplement requests, and final inspection closeout. The best local teams are comfortable coordinating with insurers, presenting clear documentation, and following through on any required change orders. If the adjuster is involved, confirm the contractor will attend the meeting and bring the needed photos and measurements to keep the claim moving.
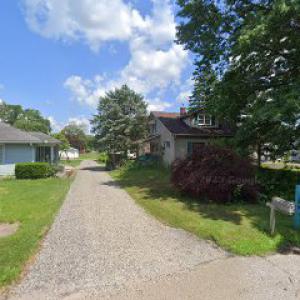
Winter conditions in the valley can stall work or complicate material delivery. A reliable New Philadelphia contractor will outline a realistic timeline that accounts for weather windows, potential delays, and staging space on the driveway or yard. Expect a plan that balances quick start with thorough preparation, so there is no rush to cut corners as temperatures swing.
Ask about post-install inspections, warranty handling, and who to contact for future maintenance or minor fixes. Local contractors who follow up after the job tend to address shading, flashing, and gutter integration promptly, preventing small issues from becoming big headaches during the next freeze-thaw cycle.