Roofing in Ohio
Last updated: Feb 28, 2026
In Ohio, weather isn't just weather—it's a rooftop test. Freezing winters, sizzling summers, and frequent spring storms all conspire to wear shingles, flashings, and gutters faster than you might expect. The freeze-thaw cycles can pry loose fasteners, snow loads matter on steep pitches, and summer hail can ding protective coatings. Humidity also invites mildew on shaded roof surfaces, while our varied architecture—from Cleveland brick-and-stone homes to Columbus bungalows—shapes what you'll need from materials and ventilation. As a local roofer who's helped neighbors from Lakewood to Gahanna and beyond, I know the practical costs you'll feel and the small maintenance details that make a roof last here.
On this Ohio page, you'll find practical, trustworthy guidance tailored to our conditions. Here's what to expect:
- Local climate considerations that influence material choices and maintenance
- Recommended roofing materials for Ohio that balance durability, insulation value, and cost
- Popular roof styles and architectural trends you'll see across the Buckeye State
- A realistic look at average roofing costs in Ohio, with notes on seasonal price swings
- Permits and local regulations you may encounter in your city or township
- Common roofing problems in Ohio and practical, field-tested solutions
- Maintenance and repair tips you can do yourself to extend life between pro visits
- Clear guidance on when to repair vs. when to replace
- Red flags for when it's wise to hire a professional
All advice here is anchored in Ohio's conditions and backed by local resources—regional suppliers, code offices, and contractor networks that understand our weather patterns, soil conditions, and ordinance quirks. You'll find checklists, cost ranges, and notes that reflect what homeowners around Columbus, Cincinnati, and northeast Ohio actually experience, so you don't have to guess at what works.
With that context in mind, let's start with what makes Ohio's climate unique and how it shapes your roof choices.
Local Climate & Its Impact on Roofs
Four-season pattern in Ohio
Ohio experiences distinct seasons that continuously test roofs. Expect cold, snowy winters with freezing rain and occasional ice dams, warm and humid summers, and rapid spring thaws. Local rainstorms and strong wind episodes are common, especially in spring. These swings drive how roofs age, how fast shingles degrade, and how gutters and ventilation perform.
Snow, ice, and load considerations
- Snow buildup and freeze-thaw cycles are constant considerations. Wet, packed snow on a roof can add significant load, even when air temperatures rise later.
- Ice dams form when warm attic air melts roof surface near the eaves, and refreezing at the colder lower edge prevents drainage. This can back up water under shingles and into soffits or ceilings.
- Proper attic insulation and ventilation are critical. Inadequate insulation lets heat escape to the roof deck, accelerating ice dam risk.
- Hail and strong thunderstorms occasionally strike Ohio roofs, causing granule loss on asphalt shingles or denting metal surfaces.
- Standards and snow-load requirements are set by local codes, but you should expect crews to plan for region-specific loads.
Summer heat, humidity, and UV exposure
- Hot spells and high humidity accelerate shingle aging, membrane drying, and expansion/contraction cycles. Darker shingles absorb more heat, potentially shortening life in areas with long, sunny summers.
- Storm-driven winds can peel back shingles or blow off edge flashings if gutters and soffits are compromised.
- UV exposure can dry out and weaken roofing materials over time, especially where attic ventilation is poor.
Severe weather risks and seasonal hazards
- Spring and early summer bring thunderstorms, hail, and the possibility of wind-driven damage. Keep an eye on shingles, flashing, and vents after severe weather.
- Ice and snow can slide off gutters, fascia, or low-slope sections in heavier snow years. Falls from ladders or rooftops during snow removal present a real safety danger—never work alone on a slick roof.
Practical prevention steps (start with these)
1. Inspect twice a year and after major storms.
2. Ensure attic insulation is up to par and air leaks are sealed.
3. Maintain proper attic ventilation (soffit, ridge, or powered vents as needed).
4. Keep gutters and downspouts clear of debris; ensure proper drainage away from the foundation.
5. Use roof rake tools from the ground to remove loose snow when safe; avoid climbing on a slippery roof.
6. Check flashing around chimneys, valleys, and skylights for corrosion or gaps.
7. Consider impact-resistant or Class 4 shingles in hail-prone areas and evaluate metal roofing for durability in windy Ohio summers.
8. If you notice leaks, obvious sagging, or repeated ice dam problems, call a professional promptly—delays can lead to structural damage.
Quick-start checklists
- Fall: verify shingles are intact, flashing is sealed, attic insulation is adequate, and ventilation paths are clear.
- Winter: observe for ongoing ice dam formation on eaves; avoid walking on icy roofs; keep paths to the house clear if you must remove ice from the ground with a long roof rake.
- Spring: look for shingle granule loss, damaged gutters, and any new leaks after heavy rains.
- Summer: monitor for exposed nails, loose flashing, and gutter clogging after major storms.
Warnings and safety reminders
- Do not work on a roof when it's wet, icy, or steep. Falls are a leading cause of roofing injuries.
- After hail or strong storms, have a professional assess hidden damage, especially on older roofs.
- If you're unsure about insulation, ventilation, or snow-dam prevention, contact a licensed roofer for a detailed assessment.
Official resources for further guidance
- National Weather Service – Winter safety and general storm advisories:
- NOAA – Climate and weather resources:
- Ohio Emergency Management Agency:
- Ohio Administrative Code – Building standards and code information:
- General roofing safety and best-practice guidance: (safety pages)
Recommended Roofing Materials for Ohio

- Overview: The go-to choice for many Ohio homes. Durable, affordable, and easy to install. Architectural (dimensional) shingles offer better wind performance and a more layered look than standard 3-tab.
- Pros:
- Low upfront cost and good value
- Wide color and profile options
- Easy to find local install crews
- Cons:
- Lifespan typically 15–30 years depending on quality and climate
- Can be vulnerable to ice damming and wind uplift if not installed with proper underlayment and nailing
- Ohio tips:
- Opt for impact-resistant (Class 3–4) shingles in hail-prone areas
- Use a reliable ice-and-water shield along eaves, valleys, and penetrations
- Ensure attic ventilation and proper insulation to reduce ice dam risk

- Overview: Standing-seam or corrugated metal works well in Ohio's mixed climate. Excellent longevity and weather resistance, especially against hail and heavy snow.
- Pros:
- Long service life (often 40–70 years)
- Superior wind uplift resistance and snow shedding
- Lightweight and fast installation
- Cons:
- Higher upfront cost
- Dents possible with hail on softer metals; can be noisy without insulation
- Ohio tips:
- Choose steel or aluminum with a factory-backed coating to prevent corrosion
- Favor concealed fasteners (standing-seam) for better weatherproofing
- Pick reflective colors to reduce heat gain in summer

- Overview: Durable and highly fire resistant; stays cool in heat but is heavy and requires a strong structure.
- Pros:
- Very long life with proper maintenance
- Excellent for hot summers and Mediterranean-inspired looks
- Cons:
- Heavy; may require structural reinforcement and a reinforced deck
- Susceptible to cracking in cold snaps and freeze-thaw cycles if not properly installed
- Ohio tips:
- Only install if the roof structure can handle the weight
- Pair with a high-quality underlayment and proper ventilation
- Consider impact-rated tile options in hail zones

- Overview: Premium, natural material with extraordinary durability and curb appeal, but with substantial cost and weight.
- Pros:
- Virtually lasts a lifetime with proper care
- Very high fire resistance and distinctive aesthetic
- Cons:
- Very high upfront cost and heavy; requires skilled installation
- Repairs can be challenging and expensive
- Ohio tips:
- Verify roof structure can support the weight
- Use slate compatible underlayment and secure fasteners designed for slate
- Overview: Rustic, natural look; good insulation and a good match for certain architectural styles.
- Pros:
- Warm, authentic appearance
- Good natural insulation when well maintained
- Cons:
- Higher maintenance (rot, splitting, moss), shorter if untreated
- Fire risk without treated or code-compliant fire resistance
- Ohio tips:
- Apply preservative treatments and keep clear of shade-dense areas where moss grows
- Consider synthetic or treated options if you want lower maintenance
EPDM and Other Rubber/Synthetic Low-Slope Roofing
- Overview: Common on flat or low-slope garages and additions; cost-effective and durable.
- Pros:
- Excellent waterproofing and flexibility
- Lightweight and relatively easy to repair
- Cons:
- Limited aesthetics; not ideal for visible main roofs
- Ohio tips:
- Use high-quality seams and ensure proper edge detailing against ice buildup
Synthetic Shakes and Slates
- Overview: Man-made options that mimic natural materials with better impact resistance and lower maintenance.
- Pros:
- Weight closer to asphalt, often Class A fire-rated
- Consistent quality and broader warranty options
- Cons:
- Depending on brand, can be pricier than standard asphalt
- Ohio tips:
- Look for products with proven performance in freeze-thaw cycles
Best-practice considerations for Ohio roofs
- Ice and water shield: Install at eaves, around chimneys, valleys, and penetrations.
- Attic ventilation and insulation: Critical to minimize ice dams and temperature swings that stress roof edges.
- Snow guards and proper fasteners: Helpful in heavy snowfall areas to reduce ice movement and wind uplift.
- Color choice: Lighter colors reflect heat and can improve summer comfort; darker colors hide stains but may heat up quicker.
Steps to pick the right material
1) Assess roof slope, structural capacity, and local wind/ice risks
2) Weigh initial cost against expected lifespan and maintenance
3) Consider energy efficiency and aesthetics for your home
4) Talk to a local contractor about warranty, installation practices, and code requirements in your area
Popular Roof Styles & Architectural Trends in Ohio
Common Roof Styles in Ohio
- Gable roofs: The workhorse of Ohio homes. They shed snow well and are affordable to install, but require thoughtful ice-and-water protection at eaves to reduce dam formation during harsh winters.
- Hip roofs: Durable in gusty conditions along Lake Erie and hillside neighborhoods. They resist wind uplift and traffic-heavy snow loads, though they offer less attic space without dormers.
- Cross-gable and Dutch gable: Popular for adding interior daylight and architectural interest on Colonial, craftsman, and modern homes. Plan for adequate ventilation and drainage to keep attic temperature stable.
- Dormer-equipped designs: Gable dormers or shed dormers increase headroom and usable space in attic spaces, a smart move for aging homes or second-floor bedrooms in snowy climates.
- Gambrel (barn style): Seen in rural and farmhouse-inspired homes; provides generous upper-level space but requires careful structural planning and insulation to handle temperature swings.
- Shed and low-slope roofs: Common in contemporary renovations or additions, particularly with metal or single-ply membranes. They're cost-efficient and versatile but require precise drainage planning.
- Flat or near-flat: Favored for modern, urban homes and some commercial properties. These need high-quality waterproofing and regular maintenance to handle Ohio's freeze-thaw cycles.
- Clipped or jerkinhead options: A stylistic twist that helps with wind resistance while preserving traditional rooflines on Craftsman and bungalow styles.
Roofing Materials Popular in Ohio
- Asphalt shingles (architectural preferred): The workhorse material in Ohio, balancing cost, variety, and reliability. Look for Class 4 impact resistance in hail-prone zones.
- Metal roofing: Standing-seam and other metal profiles are gaining traction for longevity, snow shedding, and a clean, modern look—especially on farmhouses and contemporary homes.
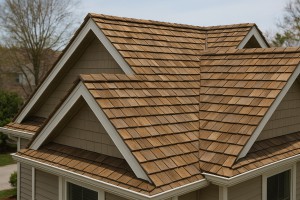
- Cedar shakes: Aesthetic appeal for traditional or cottage-style homes; maintenance is higher and fire code considerations may apply locally.
- Slate and natural stone: Premium options offering exceptional durability and classic looks, best on high-end remodels or historically styled houses; heavier and pricier.
- Tile (concrete/clay): Rare in the Midwest but used on select Mediterranean or Southwestern-inspired designs; weight and climate considerations matter.
- Flat-roof membranes (EPDM, TPO, PVC): Common on modern remodels and commercial buildings; require careful seam work and edge detailing to endure Ohio winters.
Architectural Trends Shaping Ohio Homes
- Historic preservation with a modern edge: Many neighborhoods preserve original rooflines on Colonial, Victorian, and early 20th-century homes while updating underlayers and insulation for energy efficiency.
- Farmhouse revival and craftsman influence: Wide porches, exposed rafter tails, and metal or asphalt-interchangeable roofings complement this trend across suburbs and rural areas.
- Mixed materials and tonal palettes: Combinations of shingles, metal, and siding create varied textures; grays, charcoals, and muted blues are popular for curb appeal and resale value.
- Energy-efficiency upgrades: Cool roofs and lighter-colored shingles reduce heat gain on attic spaces; solar-ready layouts and roof penetrations are increasingly planned during replacement projects.
- Rooflines that invite daylight: Dormers, skylights, and strategic window placements in gables or jerkinheads boost natural light without sacrificing weather protection.
- Low-maintenance, durable finishes: Homeowners lean toward longer-lasting materials and stronger underlayments to withstand freeze-thaw cycles and ice dams.
- Green and resilient features: Occasional forays into green roofs or partial living roofs on accessory structures; emphasis remains on durable, repair-friendly systems in Ohio's climate.
Climate-Responsive Design Considerations
- Snow loading and ice-damming mitigation: Ice-and-water shield at eaves, proper attic ventilation, and insulation are essential.
- Weather resistance: Wind uplift protection in exposed areas near lakes and open plains; hinge on quality fasteners, underlayment, and vented ridges.
- Drainage and drainage spacing: Adequate gutters, downspouts, and roof pitch choices prevent standing water and ice buildup.
- Seasonal color choices: Medium to light charcoals and blues reflect sunlight better on hot days; darker tones can absorb more heat in certain microclimates.
Practical Tips for Ohio Homes
- Prioritize Class 4 shingles or metal in hail-prone zones.
- Plan dormers or skylights with ventilation in mind to minimize heat buildup in summer and ice dams in winter.
- Pair a durable underlayment with a weatherproof flashing strategy for long-term performance.
- Work with a local roofer who understands Ohio's freeze-thaw cycles and typical wind patterns.
Average Roofing Costs in Ohio
Typical cost ranges by roofing material
- Asphalt shingles (3-tab): Installed cost about $3.50–$5.50 per square foot ($350–$550 per 100-sq ft square). For a typical 2,000 sq ft roof (20 squares), that's roughly $7,000–$11,000.
- Architectural/dimensional asphalt shingles: $4.50–$6.50 per sq ft ($450–$650 per square). A 2,000 sq ft roof runs about $9,000–$13,000.
- Metal roofing (steel or aluminum): $7.00–$12.00 per sq ft ($700–$1,200 per square). A 2,000 sq ft roof often falls in the $14,000–$24,000 range.
- Cedar shakes/shingles: $6.50–$9.50 per sq ft ($650–$950 per square). Expect roughly $13,000–$19,000 for 2,000 sq ft.
- Concrete tile: $10–$18 per sq ft ($1,000–$1,800 per square). A 2,000 sq ft roof can be $20,000–$36,000.
- Slate: $15–$25+ per sq ft ($1,500–$2,500+ per square). A 2,000 sq ft roof may run $30,000–$50,000+.
- Flat roofs (TPO/EPDM): $5–$9 per sq ft ($500–$900 per square). For 2,000 sq ft, about $10,000–$18,000.
- Old roof tear-off and disposal: add about $1–$2 per sq ft, often included in bids as Tear-Off or Disposal.
Ohio-specific cost drivers
- Roof pitch and complexity: steep or multi-gable designs raise labor, safety gear, and equipment needs.
- Ventilation and insulation upgrades: adding attic vents or extra insulation typically adds $500–$2,000.
- Flashing, chimneys, skylights, and penetrations: each feature adds flashing work and integration costs.
- Permits and inspections: expect $50–$500 depending on city and project scope.
- Local labor markets and supply costs: urban areas can be higher, rural areas may be lower but travel fees apply.
Regional and architectural differences
- Northern Ohio (Great Lakes influence): higher snow load considerations, often prompting stronger underlayment and higher-quality shingles; costs lean toward the upper end of typical ranges.
- Central Ohio: mix of historic homes and newer builds; material choices and colors can shift cost by a few hundred dollars.
- Southern Ohio and hilly areas: access challenges and additional safety measures can push costs up, especially on multi-story or steep lots.
- Style impact: traditional colonial or craftsman homes commonly use standard asphalt shingles; modern or flat-roofed homes favor TPO/EPDM membranes or metal, which changes the price profile.
Quick planning steps
1. Measure roof area and note slope to estimate the number of squares and labor intensity.
2. Pick a material level: basic 3-tab, architectural/asphalt, metal, tile, or slate.
3. Check for existing issues: removal, deck repairs, or structural work may add costs.
4. Factor add-ons: ventilation, gutters, flashing, skylights, and local permit requirements.
Permits & Local Regulations
Do you need a permit?
- In Ohio, roofing permits are issued by your city or county's building department. There is no universal statewide roofing permit, so requirements vary by jurisdiction.
- Most areas require a building permit for roof replacement or any work that involves altering the roof structure, decking, ventilation, or flashing. Some places may allow a simple reroof without a permit if there are no structural changes, but many municipalities still require approval.
- Even if your insurer or the contractor says a permit isn't needed, you should verify with your local building department. Operating without a required permit can lead to fines, a stop-work order, or trouble when you sell the home.
Where to check (quick-start)
- Local building department website or office (city or county).
- Search terms: “Ohio building permit roof [your city],” or “code enforcement [your municipality].”
- If you're in a tax district or special district, check with that authority as well.
- Ask your contractor to confirm; ensure they're on the permit as the responsible party.
Typical permit process (step-by-step)
1) Identify the permit type
- Most projects: Building permit for roof replacement or structural work.
- Some cases: If you're changing roof pitch, modifying skylights, or altering ventilation, plan review may be required.
2) Prepare information
- Property address and owner contact.
- Contractor name, license/registration status (if your locality requires it), and proof of insurance.
- Short description of scope: materials, square footage, any decking or vent changes, and wind/ice barrier details.
3) Submit the application
- Complete the permit application and pay the permit fee.
- You may need a simple schematic or drawing showing roof dimensions and components.
4) Plan review (if required)
- The department may review for code compliance, ventilation, attic access, load path, and flashing/underlayment details.
- Some jurisdictions accept standard roofing details; others request a basic roofing plan.
5) Permit approval and start
- When approved, you'll receive permit documents to display on-site.
- Start date must align with inspector availability and weather.
Inspections to expect
- Rough-in/underlayment stage: some jurisdictions require inspection after tear-off and underlayment installation but before shingles go on.
- Final installation: inspector verifies fasteners, nailing pattern, flashing, attic ventilation, and overall code compliance.
- Possible mid-project inspections if you're making structural or ventilation changes.
- Keep a record: approved plans, inspection approvals, and any notes from the inspector.
What to submit and keep on hand
- Completed permit application and payment receipt.
- Contractor license/registration documentation (if required locally) and proof of insurance.
- Roofing plan or brief sketch showing materials, underlayment, flashing, venting, and wind-rated components.
- Proof of property ownership and any HOA or historic district approvals, if applicable.
HOA, historic districts, and special zones
- Some HOA covenants restrict roofing materials, colors, or style. Obtain HOA approval before starting.
- Historic districts may require additional approvals or adherence to specific standards.
- If your home sits in a special zoning or preservation area, you'll likely need extra permits or reviews.
Quick tips to avoid delays
- Start with the local building department to confirm permit needs before bidding.
- Have all documents ready: address, contractor info, insurance, and a simple roof plan.
- Schedule work to align with inspections; avoid advancing between stages without inspector clearance.
- Use a licensed or registered local contractor; check references and confirm they're listed on the permit if required.
- If plans change during the project, submit amendments to avoid noncompliance.
Special Ohio considerations
- Codes: Ohio generally adopts the International Residential Code (IRC) through local amendments. Your jurisdiction may require weather protection, proper underlayment, and ventilation compliance.
- Weather windows: Ohio's seasons can affect inspection scheduling; plan with your permit timeline in mind.
- Debris and disposal: Some municipalities require disposal plans or trash containment for roofing debris as part of the permit conditions.
Common Roofing Problems in Ohio & Solutions
Ice Damming and Ice Build-Up
- Causes: freeze-thaw cycles, warm attic air melting snow at the roof edge, poor insulation or ventilation.
- Symptoms: icicles along eaves, damp or stained ceilings, moisture in soffits or attic.
- Solutions:
1) Improve attic insulation to reduce heat transfer (aim for the Ohio-relevant range; upgrade to an effective R-value).
2) Seal gaps around attic outlets, ductwork, and the attic hatch to stop air leaks.
3) Enhance attic ventilation with a balanced system of soffit intake vents and a ridge or gable vent.
4) Clear snow from the roof edge with a long-handled roof rake—from the ground, never from a ladder.
5) Consider installing an ice-and-water shield along eaves in new or repaired sections.
6) For persistent problems, have a pro install or evaluate heated cables at the eaves per local code.
Wind Damage and Loose Shingles
- Causes: Ohio's spring storms and microbursts can lift or damage shingles.
- Symptoms: lifted tabs, missing granules, exposed underlayment, or visible nails.
- Solutions:
1) Safely inspect from the ground or with a ladder, noting any loose or missing shingles.
2) Replace damaged shingles and reseal with proper roofing nails and sealant.
3) Check nearby flashing and sealants; reseal or replace as needed.
4) For widespread damage, consider a partial or full roof replacement to restore wind resistance.
Hail Damage
- Causes: hailstones from severe storms common in Ohio can dent or crack shingles.
- Symptoms: bruised or dented shingles, hairline cracks, accelerated granule loss.
- Solutions:
1) Document damage with photos for insurance claims.
2) Have a roofer perform a professional inspection, especially on the far side of the house and near skylights.
3) Replace damaged shingles and reseal flashing; inspect gutters for granule washout.
4) If roof age is near end-of-life, plan a broader replacement rather than piecemeal fixes.
Moss, Algae, and Roof Debris
- Causes: persistent moisture, shade, and slow drainage promote growth.
- Symptoms: dark streaks, green or black patches, slippery or spongy feel on shingles.
- Solutions:
1) Remove debris and clean the roof carefully with a non-bleach, low-pressure approach.
2) Install zinc or copper strips along the ridge to inhibit new growth.
3) Improve drainage and sunlight access by trimming nearby branches.
4) Consider a professional cleaning and protective coating if growth recurs.
Poor Attic Ventilation and Condensation
- Causes: inadequate intake or exhaust vents, insulation blocking airflow.
- Symptoms: sweaty rafters, musty odor, and higher energy bills in winter.
- Solutions:
1) Assess and improve ventilation: add soffit vents, baffles, and ridge or exhaust vents.
2) Ensure insulation sits above the framing without blocking vents.
3) Use an attic fan or smart controls to manage humidity during shoulder seasons.
4) Schedule a pro evaluation if condensation persists after adjustments.
Flashing Failures Around Chimneys, Vents, and Skylights
- Causes: aging metal, loose fasteners, or improper flashing installation.
- Symptoms: recurring leaks at joints, dark stains, or damp wall areas inside.
- Solutions:
1) Inspect flashing for cracks, rust, or gaps; reseal or replace compromised sections.
2) Reinstall properly integrated flashing with compatible sealants and counter-flashing.
3) Verify surrounding shingles are intact to prevent further water intrusion.
4) For complex penetrations, rely on a roofer to re-flash and guarantee watertight seams.
Gutter and Downspout Problems
- Causes: clogging, sagging, or improper slope; ice buildup in cold months.
- Symptoms: water spilling over the sides, fascia staining, or ice on gutters.
- Solutions:
1) Clean gutters and downspouts regularly; ensure a clear 1/4-inch per 10 feet slope toward downspouts.
2) Add guards or micro-milters if debris is persistent.
3) Extend downspouts away from the foundation to direct water run-off.
4) Check for loose hangers and secure or replace as needed to maintain proper drainage.
General notes for Ohio homeowners
- Regular inspections twice a year (before winter and after heavy storms) catch problems early.
- Document changes with photos and keep records for insurance or warranties.
- When in doubt, lean on a local, licensed roofer to assess safety, code compliance, and long-term performance.
Maintenance & Repair Tips for Ohio
Seasonal Maintenance Checklist
- Schedule a professional inspection at least once a year, ideally in the fall, to catch issues before winter.
- Clean gutters and downspouts twice a year and after heavy storms; remove leaves, sticks, and shingle grit to prevent backups.
- Inspect the roof surface after any major storm for damaged shingles, lifted edges, or broken flashing.
- Check attic insulation and ventilation; ensure a continuous air barrier to minimize heat loss and ice dam risk.
- Look for moss, algae, or mold on shingles and trim branches that overhang the roof to reduce moisture buildup.
- Test flashings around chimneys, vents, skylights, and edges; reseal with compatible sealant if you spot gaps or cracks.
Ice Dam Prevention & Snow Handling
- Clear snow along eaves with a roof rake from the ground to prevent ice dam formation.
- Ensure attic insulation is sufficient (R-38 or higher in many Ohio homes) and address air leaks around soffits, vents, and the attic access.
- Keep attic exhaust vents clear and consider baffles to maintain proper airflow to the roof deck.
- Use approved roof de-icing methods: avoid salt on shingles; if necessary, use calcium chloride in a sock or mesh bag placed on the roof edge away from delicate surfaces.
- Consider heat cables only if needed and installed by a pro; improper installation can damage roofing or create fire risk.
Common Ohio Roof Problems & Fixes
- Missing or damaged shingles: replace individual shingles, check for underlying damage, and reseal with matching sealant under the tab. Ensure the new shingle has proper nailing placement.
- Damaged flashing around chimneys, vents, or skylights: reseal or replace flashing, apply roofing cement and flashing tape as needed; ensure steps are watertight at joints.
- Leaks at valleys: inspect for lifted metal valleys or damaged underlayment; repair or replace damaged sections and reseal seams.
- Poor ventilation or attic moisture: add or adjust soffit vents, ridge vents, or turtle vents; improve insulation and seal air leaks to stop condensation.
- Hail-damaged shingles or dented metal: document damage for insurance, consider replacement if the loss is extensive or underlayment is compromised.
Gutter & Drainage Maintenance
- Clean gutters and downspouts regularly; ensure a minimum 2-inch clearance between shingles and the gutter bottom.
- Direct water at least 3–4 feet away from the foundation with downspout extensions or splash blocks.
- Install gutter guards or micro-mesh screens to reduce debris buildup; inspect and clean guards seasonally.
- Repair leaks with proper sealants or replacement sections; check for loose hangers and tighten as needed.
DIY vs Pro Repair Guidelines
- DIY-friendly tasks: replacing a single damaged shingle, resealing flashing with compatible sealants, cleaning gutters, and minor attic insulation tweaks.
- When to call a pro: widespread shingle lift or missing granules, extensive flashing failure, persistent leaks, structural deck damage, hail damage, or if you're uncomfortable working on a roof or near electrical components.
- Safety reminders: always use a stable ladder, wear non-slip shoes, have a helper, and avoid working on the roof in wet, icy, or windy conditions.
Post-Storm & Seasonal Inspection Tips
- After a major storm, inspect from the ground first; look for raised edges, visible gaps, or new dark stains on siding near the roofline.
- Check all flashings and sealants around joints; look for lifted shingles or exposed underlayment.
- In spring, inspect for wind-driven damage and reseat any loose flashing or shingles promptly to prevent leaks during rainier months.
Signs It Might Be Time for a Roof Replacement
- More than 20–25% of shingles show significant wear or curling, or the roof is approaching its expected lifespan for Ohio materials.
- Repeated leaks despite multiple repairs, or widespread underlayment failure.
- Sagging sections or visible structural damage, which require professional assessment and potential replacement.
When to Repair vs. Replace
Key factors to consider
- Age of the roof: Asphalt shingles often last 15–25 years in Ohio; other materials vary. If the roof is near or past its expected life, replacement becomes more sensible.
- Extent of damage: Small, localized issues are usually repairable; widespread damage or multiple leaks point toward replacement.
- Leaks and water intrusion: A few leaks that are isolated may be patched; persistent leaks or damage in the decking signals larger questions.
- Structural concerns: Sagging, loose or soft decking, or visible framing issues mean repairs may be insufficient.
- Cost comparison: If repairs would add up to more than a sizable portion of a new roof, replacement is often the better long-term value.
- Warranties and insurance: Warranties and potential insurance coverage can influence whether repair or replacement makes more financial sense.
Ohio-specific climate impacts
- Freeze–thaw cycles: Ohio winters can cause micro-cracks and accelerated wear. Repairs that don't address underlying moisture can fail quickly.
- Ice dams and snow load: Poor insulation or ventilation increases ice dam risk; fixing ventilation and insulation may affect the repair vs. replace decision.
- Storms and hail: Severe spring storms can cause widespread shingle/masonry damage; extensive storm damage often warrants replacement rather than piecemeal repairs.
- Humidity and attic moisture: Proper attic ventilation matters in Ohio to prevent hidden rot; repairs without addressing moisture sources may be short-lived.
- Typical lifespans: Asphalt shingles commonly reach 15–25 years; metal roofs can last 40–70 years with proper maintenance, influencing when replacement is prudent.
When to repair
- Damage is limited to a small area: 1–2 missing shingles, minor flashing issues, or localized moss/algae damage.
- No active leaks or only minor seepage: If the roofing deck remains solid and dry after a repair, patching is reasonable.
- Quick, cost-effective fix is viable: If a repair can buy several years of service and you're not planning to move soon, repair is sensible.
- You're not ready for a full replacement: If you're budgeting or awaiting better weather, a targeted repair can stabilize the roof.
- The rest of the roof is in solid condition: When the remaining life of the roof is substantial and repairs don't compromise decking or structure.
When to replace
- Large-area damage or multiple leaks: If damage spans a large portion of the roof or leaks recur after repairs, replacement is usually wiser.
- Structural concerns or decking damage: Sagging sections or soft, rotten decking are signs that a full replacement is needed.
- Roof age and diminishing returns: If asphalt is near 20–25 years in Ohio or performs poorly in recent winters, replacement outpaces ongoing repairs.
- Recurring repairs with diminishing impact: If frequent repairs become more costly than a new roof, replacement makes financial sense.
- Insurance or warranty considerations: Major hail or wind damage often qualifies for replacement; newer warranties may cover substantial failures after a full roof replacement.
- Energy efficiency goals: A new roof can improve insulation, ventilation, and overall energy costs, which may justify replacement.
Quick decision steps
1. Inspect the roof or have a professional inspect for area size, decking condition, and moisture issues.
2. Gather 2–3 quotes for both repair and replacement, including warranty details.
3. Compare the long-term costs: frequent repairs vs. one replacement investment.
4. Consider timing: choose a dry, milder Ohio window to minimize disruption and complications.
5. Check insurance coverage and any local permitting requirements.
Maintenance tips after decision
- Schedule annual inspections, especially after winter storms and heavy snows.
- Keep gutters clear and check attic ventilation to prevent moisture buildup.
- Address tree overhang and clear any debris that can damage the roof edge or shingles.
- If you replace, invest in proper underlayment, ventilation, and a durable warranty to maximize lifespan.
When to Hire a Professional
Signs you need a pro right away
- Active leaks or water stains showing up in the attic or ceiling after rain.
- Missing, curling, buckling, or blistered shingles that expose the underlayment.
- Sagging or soft decking, indications of structural moisture, or a roof that feels spongy.
- Ice dams, excessive icicles, or visible moisture near flashing and vents.
- Significant hail damage evident on shingles, gutters, or vents.
- A roof age that's near the design life of its materials (often 15–25 years for asphalt, older for metal or tile) and widespread damage or wear.
Weather and Ohio climate realities
- Ohio winters bring freeze–thaw cycles, heavy snow loads, and ice dam risk. A pro can recommend proper underlayment, ice and water shield at eaves and penetrations, and proper attic ventilation to prevent long-term damage.
- Scheduling matters: aim for mild, dry weather. Pro projects in late spring, summer, or early fall tend to move along faster with fewer weather delays. In an emergency or after a damaging storm, temporary patches may be needed before a full replacement.
When to repair vs. replace
- Minor damage (a handful of shingles, localized flashing) and a roof in good overall condition may be repaired.
- If more than about 20–30% of the roof is damaged, or the roof is approaching the end of its expected life, replacement is usually the smarter, longer-lasting option—especially in Ohio where winters accelerate aging.
- Structural decking damage, persistent leaks after repairs, or signs of widespread moisture in the attic call for a professional assessment.
Permits, licensing, and safety in Ohio
- Ohio does not have a universal state roofing license, but many cities/counties require permits and licensed contractors. Always verify local requirements with your city or county building department before starting work.
- Ensure the contractor carries proper insurance: general liability and workers' compensation. Ask for a current Certificate of Insurance (COI) and contact the insurer to verify.
- Safety matters: working on steep roofs or near power lines requires fall protection, proper ladders, and PPE. A reputable pro will follow OSHA-recommended practices and have a fall-arrest system if needed.
Environmental and staging considerations
- If you live in an older home (pre-1978), discuss lead-safe work practices if renovation or debris may involve lead paint; insist on containment and cleanup measures.
- For multi-day projects, confirm a plan for material storage, waste disposal, and debris containment to protect your landscaping and driveway.
How to evaluate a roofing contractor in Ohio
- Local climate competence: ask about experience with Ohio winters, snow loads, and ice dam prevention.
- Credentials: verify municipal permits (if required), license status where applicable, and insurance coverage (COI for general liability and workers' compensation).
- Manufacturer certifications: factory-trained installers often meet warranty requirements and deliver higher-quality workmanship.
- References and portfolio: request at least 3 Ohio-area references and follow up about performance in freeze-thaw conditions.
- Written estimate: compare scope, materials, tear-off, disposal, permit handling, start/end dates, and total costs.
- Warranties: workmanship warranty, material warranty, and what each covers (leaks, installation defects, flashing, underlayment).
- Payment terms: avoid paying the full amount upfront; a common approach is a small deposit with milestone payments and a final settlement on completion.
- After-sales support: ask about service calls, leak repairs, and follow-up inspections.
Quick, practical steps to hire a pro ( Ohio-focused)
1) Protect your property: tarp leaks, clear gutters to prevent further damage.
2) Gather at least 3 written estimates from local contractors familiar with Ohio climates.
3) Verify licenses/permits required by your municipality and confirm insurance coverage.
4) Check references and view recent Ohio projects similar in scope.
5) Confirm who pulls permits and coordinates inspections.
6) Review the written contract for scope, materials, warranties, timeline, and payment terms.
7) Ensure a clear warranty and a plan for after-sales service, including potential leak repairs.
Putting A Lid On It: Roof Maintenance, Repair, and Replacement in Ohio
Ohio's climate puts your roof through a real seasonal gauntlet—from brutal winter freeze-thaw cycles to hot, humid summers and sudden storm activity. This means shingles, flashing, gutters, and attic ventilation all face more varied stress than in milder regions. Regular maintenance isn't flashy, but it's the steady shield that prevents leaks, ice dams, and hidden damage from turning into big, costly problems. A well cared-for roof also helps keep your home comfortable and energy-efficient through every season.
To keep everything in good shape, think of maintenance as a simple ongoing routine. A few careful checks and timely repairs go a long way in Ohio's environment. Use the calendar as a guide, not a chore list, and involve a professional when you're unsure.
- Spring: clear debris from the roof and gutters, inspect for curling or missing shingles, and look for signs of leaks in attic spaces after the winter. Check flashing around vents and chimneys and ensure attic insulation is dry and intact.
- Summer: after major storms, recheck for loose shingles and damaged flashing. Trim branches that rub or whip against the roof, and watch for moss or algae in shaded areas. Maintain proper attic ventilation to prevent heat buildup.
- Fall: clean leaves and debris from gutters, reseal penetrations, and verify insulation and air sealing in the attic are doing their job. Prepare for heavier snow by ensuring proper drainage and addressing any minor issues before winter.
- Winter: monitor for ice dams and water intrusion. If you must clear the roof, use safe methods and avoid aggressive scraping that can damage shingles. Consider a professional assessment after severe weather events.
Repair vs. replace: know the signs. Small, localized leaks or isolated damaged shingles can often be repaired. Widespread curling, significant granule loss, widespread flashing failure, or a roof approaching the end of its expected life usually signals a replacement. Cost, material choice, and roof age all matter—balance short-term fixes against long-term protection and energy efficiency.
Consulting a qualified roofer when you notice leaks, sagging, or persistent moisture is wise. Look for licensed, insured professionals with local references and clear warranties. Getting a couple of estimates helps you understand options and build confidence.
Together, you and your Ohio roof can stand strong for years to come. With proactive care, a well-maintained roof not only protects your home but also adds to the neighborhood's curb appeal and warmth. Here's to a roof that remains dependable, beautiful, and built to last—for you, your family, and the community you call home.