Last updated: Apr 19, 2026
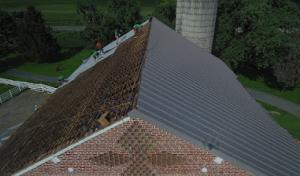
Cold, snowy winters here bring repeated freeze-thaw stress that actively tests shingle tabs, flashing edges, and eaves. When a heavy snow sits on the roof, daytime sun or warm spells melt some of that snow, and overnight temperatures plunge again, you get ice backing up at the roof edge. That cycle-melting, refreezing, and re-melting-pushes against gutters and underlayment, creating ice dams that trap meltwater behind a dam of ice. The result can lift shingles at the edges, drive moisture under flashing, and drip inside at soffits or attic vents. This isn't theoretical: a Carlisle winter pattern often lines up exactly with this melt/refreeze rhythm, especially after big snow events followed by sharp freezes. If you notice ice forming along the eaves or icicles hanging well beyond the edge, that's a signal to slow the process before more damage occurs.
Shingle tabs that have started to curl or lift are particularly vulnerable when the roof experiences freeze-thaw cycles. Edges of flashing around chimneys, vent pipes, and valley intersections are high-risk zones; accumulated ice and water can lever flashing out of place or drive moisture into vulnerable seams. Eaves and overhangs bear the brunt of standing meltwater, so underscoring the importance of proper underlayment and ventilation. In a borough where inspections scrutinize ventilation and underlayment details, a roof that's not drawing cold air to the attic or that lacks a robust vapor barrier becomes a magnet for moisture backup. If attic insulation is thin or gaps exist around soffits, heat from upstairs can worsen the problem, melting snow from above while the attic remains warm enough to push that melt toward the upper edge. In practice, the first signs appear as damp spots in the attic ceiling, stained plywood along rafters, or frost on the underside of roof sheathing during cold snaps.
Mitigate the freeze-thaw stress by prioritizing ventilation and underlayment quality as the foundation for winter resilience. Ensure there is a clear path for dry air to circulate through the attic; this reduces heat buildup that accelerates melt near the eaves. Check for sufficient insulation in the attic floor to limit heat transfer upward, which otherwise feeds ice dam formation. When inspecting flashing, look for tight seams and secure fasteners; loose edges invite water to creep behind metalwork as ice forms. Consider upgrading underlayment to a moisture-impermeable layer that can tolerate progressive thaw cycles without permeating moisture into the decking. If your roof has flat or low-slope sections, add or repair ice and water shield in those critical areas to give a second line of defense where water is most likely to back up. For homes with metal flashing, ensure it extends adequately past the shingle line and overlaps properly with the underlayment to channel meltwater away from the fascia. In snowy winters, proactive clearing of roof surfaces should be done carefully and conservatively to avoid damage to shingles and the flashing-never when the roof is still icy or dangerously slick.
Before a heavy snow season settles in, schedule a focused exterior inspection aimed at winter readiness. Confirm that all vent boot seals are intact, that attic vents provide continuous intake and exhaust paths, and that any observed curling or lifting of shingles near the eaves is addressed. A small improvement in eave flashing or a targeted underlayment upgrade can have a meaningful impact when the next thaw turns into a nighttime freeze. In this climate, you want the roof to shed water efficiently and for that water to remain behind a secured, well-ventilated barrier rather than finding its way into the attic or along internal joints. Acting now reduces the risk of water intrusion once the next storm cycle hits.

Casillas Contracting
(302) 983-9796 casillascontracting.us
Carlisle, Pennsylvania
4.9 from 104 reviews
"Casillas Contracting Roofing Professionals are proud to offer quality service in the tri-state areas to help best serve you: Residential Roofing, Commercial Roofing Service, Roof Replacement, Roof Repair, Gutter Replacement, siding, interior painting etc. Casillas Contracting Roofing Professionals are extremely experienced roofers that prides ourselves on quality work and our priority is the customers satisfaction. We’re committed to providing homeowners with accurate information and quality work. We know that your home is one of your biggest investments so going above and beyond for our clients is a must. That's how we show our appreciation for choosing us to work on your home.
Strickland Brothers Construction, LLC & Roofing
(717) 226-4781 stricklandroofing.net
13 Goodyear Rd, Carlisle, Pennsylvania
4.9 from 169 reviews
YOUR GO-TO CONTRACTOR IN Cumberland County, PA. Rely on us for a top-notch Residential or Commercial roof installation When you want to install a new roof for your home or business in Cumberland County, PA, you need a residential/commercial roofing company you can depend on. At Strickland Brothers Construction, we work closely with you to determine your roofing needs. From there, we'll use top-of-the-line materials to protect your property and boost its curb appeal. Reach out to us today to learn more about our process for Residential/Commercial roof replacements and new construction roofing installations. We're happy to answer any questions you might have.

Marroquin Exteriors
(717) 462-6341 marroquinexteriors.com
17 E High St #103, Carlisle, Pennsylvania
4.9 from 115 reviews
Central PA’s full service exterior solutions contractor. Specializing in Metal & Asphalt roof replacement, Gutters, Siding, Replacement Windows & Doors, & Fencing. We use specialized crews for your project to maintain a high level of quality you’d expect to protect your investment in your family & home. We look forward to helping you better your home. **Free In-Home Consultation **100% Financing Available **Locally Owned Small Business
Cgg Roofing & Contracting
(610) 316-4840 cggsolution.com
Carlisle, Pennsylvania
4.9 from 19 reviews
CGG is a roofing and general contractor operating in Philadelphia and the immediate tri-state area. We serve homeowners and commercial property owners as well as residential and commercial builders. We always strive to achieve customer satisfaction and praise in all of our projects, no matter the job size.
DMD Roofing
(717) 278-8582 dmdcommercialroofing.com
Carlisle, Pennsylvania
4.7 from 44 reviews
Don’t leave your commercial & Residential roofing to just anyone. DMD Roofing provides customized roofing solutions at an affordable price. We specialize in asphalt, metal roofing restoration, EPDM roofing, spray polyurethane foam, and single ply membrane roofing. Our team is made up of industry experts who are up-to-date on the latest roofing products and techniques. Give us a call today to see the DMD difference.
Domar Contracting
(610) 586-1910 www.domarcontracting.com
Carlisle, Pennsylvania
5.0 from 2 reviews
Family-owned and operated since 1997, Domar Contracting serves Delaware County and the surrounding areas as a trusted roofing and construction contractor. Our commitment to customer satisfaction is unwavering, ensuring each project is managed with the utmost care and precision. We specialize in all types of roofing solutions, catering to both residential and commercial properties. From repairs to replacements, Domar Contracting provides exceptional craftsmanship, free estimates, and unmatched expertise. Choose us for a reliable and professional roofing experience.
Narvon Construction
(717) 989-2026 www.narvonconstruction.com
Carlisle, Pennsylvania
3.0 from 8 reviews
Narvon Construction, offers new construction services as well as renovations. From new roofs, siding, soffit and facia to windows, doors and outdoor spaces! We are based in Lancaster County and serve customers in all surrounding areas including Harrisburg, Reading, York, Philadelphia and parts of Maryland.
Roof Maxx of Mechanicsburg, PA
(717) 487-8752 midpennroofsavers.com
Serving
5.0 from 43 reviews
Roof Maxx® Mechanicsburg is a local, independent dealer of Roof Maxx®, a scientifically formulated, and 100% safe, plant-based roof rejuvenating spray treatment that was developed by the world’s largest private research and development company. Roof Maxx® can extend the life of an asphalt roof by five years. Depending on the age and condition, some roofs can be treated every five years, extending the lifespan for 15 years. Some roofs may not qualify for Roof Maxx® due to age and condition, so we also do BOTH repair work and full replacements and never try to sell our clients something they don’t need. Our free roof inspection lets you know the exact condition of your entire roofing system and the best way to extend the life of your roof.
Biniek Specialty Contractors
(717) 486-7530 choosebiniek.com
Serving
5.0 from 112 reviews
For over 29 years, Biniek Specialty Contractors has been a trusted Contractor in Central Pennsylvania, serving Chambersburg, Harrisburg, York, Lancaster, State College, Mechanicsburg, Camp Hill, Carlisle, Dillsburg, and nearby areas. We work in General contracting, carpentry, residential and commercial roofing, roof repairs, gutters, chimney repointing and siding. Customers rely on us for quality work, strong warranties, and affordable financing. Contact us your dependable Carlisle & South Central PA Contractor for a free estimate!
Roof Maven
Serving
5.0 from 14 reviews
Here at Roof Maven our motto is “We’ve got you covered” and our goal is to provide you with the most reliable and professional roofing installation, repair or replacement service on the East Coast! We have been in the commercial and residential roofing industry for the better part of a decade and have over 30 years of combined experience in the roofing industry. Our focus is on commercial properties as well as residential homes, and we are here to help with any roofing system challenges you may be facing.
Crain Roofing
(717) 574-2652 www.crainroofing.com
Serving
4.9 from 154 reviews
Crain Roofing, established in 1984, is a trusted roofing and siding contractor based in Mechanicsburg, PA. We specialize in providing top quality roofing and siding solutions tailored to meet the unique needs of our customers. Known for our commitment to excellence, we use premium materials, industry-leading techniques, and a customer-focused approach to ensure every project is completed on time and within budget. Whether you need a roof replacement, repair, or siding upgrade, Crain Roofing delivers durability, style, and peace of mind for your home.
DePalma Construction
(717) 638-1131 depalmaconstruction.com
Serving
4.9 from 484 reviews
DePalma Construction has been in business for over 20 years. We’re proud of the reputation we’ve built up in the residential roofing and construction business over the years. Unlike other shingle roofing companies, our clean-up is always flawless. Our insurance is beyond general liability to cover the homeowner as well as ourselves in case of an accident. Nothing is more important than knowing we’ve provided our customers with good quality roofing that will last for years to come.
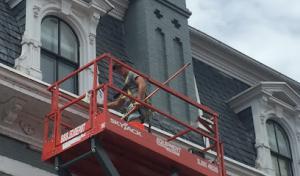
When spring storms roll through, wind-driven rain can slip into the roof system at flashing transitions, along ridge caps, and where older shingle seals have begun to fail. In Carlisle's mix of aging homes and newer builds, those vulnerabilities show up quickly as storm winds push water under roofing seams or over improper seals. The combination of Cumberland Valley's freeze-thaw cycles and humid summers means any small edge gap can turn into a larger leak after a heavy shower or hail event. Treat these storms as a real, immediate threat to your attic and living space, especially if your roof is several years old or has experienced prior wind or hail exposure.
Right after a storm, you want to check around the flashing transitions, at vent pipes, along the chimney, and across ridge caps for loosening, lifting, or gaps. Pay attention to areas where sealants have dried out or where shingles appear cupped, cracked, or blistered. In homes with visible sagging roofing or dark streaking inside the attic, you could be looking at moisture intrusion that will worsen if not addressed promptly. In Carlisle, the combination of local asphalt shingle wear and occasional hail impact makes these edge areas especially vulnerable. Do not postpone a careful exterior and attic check, even if no water shows on ceilings yet.
Storm damage and insurance-claims specialties are a common line you'll see among Carlisle-area contractors, reflecting how insurers weigh roof age, material type, photos, and attic condition. After a significant storm, document everything in detail-date and time of the event, visible damage on the roof surface and around flashing, and any attic condensation or staining. Take clear photos from multiple angles, including close-ups of flashing seams and ridge caps. If you notice moisture or staining in the attic, flag it immediately and preserve the attic access and any debris that could help an adjuster. Your goal is to create a precise, timestamped record while the damage is fresh, so claims processing moves without delay.
Locally, you'll find specialists who understand how spring ice and thaw cycles interact with Carlisle's typical roof lines and material choices. When selecting a contractor, ask for references that demonstrate successful storm repairs, especially around flashing, ridge caps, and underlayment. Verify that the contractor shops and stores materials properly to prevent further weather exposure during repair, and confirm that flashing and underlayment details will be inspected as part of any recommended fix. Quick, decisive action limits secondary damage and sets a clearer path for insurance coverage, so you can get back to a dry, secure home as the season shifts.
Find local contractors experienced in assessing and restoring roofs after hail, wind, and severe weather events.
Casillas Contracting
(302) 983-9796 casillascontracting.us
Carlisle, Pennsylvania
4.9 from 104 reviews

Marroquin Exteriors
(717) 462-6341 marroquinexteriors.com
17 E High St #103, Carlisle, Pennsylvania
4.9 from 115 reviews
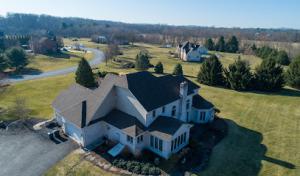
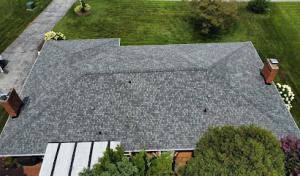
In Carlisle, asphalt shingles dominate replacements because they fit the area's mainstream residential housing stock and the local market has clear contractor specialization in asphalt work. The paneling is familiar to local crews, the installation details line up with common ceiling and attic ventilation patterns, and the repair cadence aligns with typical winter freeze-thaw cycles. When considering asphalt, prioritize roof lines that allow for proper sealing at flashing and a solid underlayment layer. A well-ventilated attic helps curb ice dam risk, so expect crews to confirm soffit intake and ridge exhaust are balanced during work. If snow piles up on the eaves, asphalt systems paired with synthetic underlayment and well-seated drip edge reduce moisture penetration as temperatures swing.
Metal roofing is a meaningful local option in Carlisle, reflecting demand for snow-shedding performance and durability through humid summers and winter temperature swings. Metal panels shed ice more readily than standard shingles, which can help limit ice dam development along eave lines. For winters, look for systems with standing-seam or interlocking panels and a factory-sealed flashing strategy to resist wind-driven moisture. In humid summers, metal's wider color and coating options can mitigate surface heat gain, but verify finish warranties against prolonged sun exposure and local shade patterns. The ideal metal choice pairs a solid underlayment and careful ridge ventilation to vent melt-water efficiently without inviting condensation hotspots in attic spaces.
Tile, wood, and synthetic roofs exist in the market but are more specialized in Carlisle, with fewer contractors signaling tile expertise than asphalt or metal. Clay and concrete tiles demand careful attic structure evaluation and precise flashing details to resist freeze-thaw cracking in winter. Wood shingles and shakes require close attention to off-gassing and moisture control, as wood is sensitive to humidity fluctuations in the summer and winter balance. Synthetic shingles offer design versatility and composite resilience, but installation accuracy matters as underlayment and flashing must be matched to the chosen profile. When selecting these options, prioritize contractors with demonstrated experience in Carlisle's climate and a track record of integrating appropriate ventilation and thermally compatible flashing.
A practical approach is to align material choice with existing housing stock, local contractor strengths, and how the roof handles winter weight and ice. Begin by evaluating attic ventilation and the condition of flashing, then weigh the expected maintenance and repair cadence for each material. In this climate, the goal is a roof system that minimizes ice dam risk while sustaining performance through humid summers and temperature shifts.
In Carlisle, planning a roof replacement starts with solid material cost ranges that reflect local stock and climate realities. Asphalt shingles typically run 350 to 650 per square, metal between 600 and 1100, clay tile from 1000 to 2100, concrete tile 900 to 1900, wood shingles or shakes 700 to 1300, and synthetic or composite shingles 700 to 1200 per square. These figures anchor your budget as you compare bids from Carlisle-area crews.
Winter ice dam risk and freeze-thaw cycles shape the order of work and the scope you'll be quoted for. In Carlisle, the cold months test attic ventilation, underlayment choices, and flashing sequences. A replacement that neglects proper underlayment or fails to address attic venting often leads to rework after a heavy freeze-thaw stretch. Expect contractors to factor higher labor hours in for protective measures against winter weather during installation.
Material choice should balance long-term performance with Carlisle's seasonal demands. Asphalt shingles stay common for cost and ease, but heavy snows and ice can highlight the value of upgraded underlayment and better ice-guard at eaves and valleys. Metal roofs resist wind and ice build-up, yet installation details and panel laps in cold weather matter more here than elsewhere. Tiles (clay or concrete) offer durability but require precise substrate preparation; missteps show up quickly under freeze-thaw pressure. Wood shingles and shakes bring a traditional look but can shrink and warp with moisture changes, which complicates flashing and ventilation considerations. Synthetic or composite shingles provide varied aesthetics and good performance, often at a middle price, with easier handling during cold snaps.
Expect scheduling pressures to tighten after spring wind or hail events. Storm-driven demand spikes can affect labor availability for quick-response re-roofing, so building a cushion into your timeline and budget helps. When you receive bids, compare not just per-square costs but also scope: underlayment type, attic venting plan, flashing details at valleys and chimneys, and the contractor's plan for snow and ice management during the installation.
Finally, think through long-term maintenance in Carlisle's climate. A roof replacement is not only about the first season but about how the chosen system handles repeated freeze-thaw, humidity, and summer heat. A well-detailed bid that covers ventilation, flashing integrity, and underlayment quality tends to pay off over multiple winters.
Don't let upfront costs delay a critical repair - these contractors offer payment plans to fit your budget.
Marroquin Exteriors
(717) 462-6341 marroquinexteriors.com
17 E High St #103, Carlisle, Pennsylvania
4.9 from 115 reviews
In Carlisle, most full roof replacements require a building permit from the local building department rather than being handled as permit-free maintenance. The process can feel like one more step in a project, but it is a reliable safeguard against future issues that commonly pop up after a harsh winter or a humid summer. The contractor typically submits the permit application, so understanding that paperwork and scheduling implications become a key hiring factor. A contractor who knows the borough's pace and oversight will align the project timeline with the permit review and inspection windows.
When selecting a roofer, confirm that they will initiate the permit in a timely manner and that they understand Carlisle's inspection cadence. The permit package usually includes drawings, a scope of work, and ventilation and flashing details that reflect the local climate realities. Expect the building department to request documentation related to ventilation adequacy, underlayment type, and flashing procedures, all of which tie directly to performance in freeze-thaw cycles and potential ice dam risk. It helps to establish a clear start date and a realistic schedule that accounts for any seasonal backlog. Keeping the permit active through the project's critical milestones reduces the chance of delays at the end.
Carlisle inspections commonly verify ventilation, underlayment, flashing, and final roofing installation, so workmanship details are likely to be reviewed before closeout. Ventilation checks ensure attic air is circulated to minimize condensation and thermal stress on roof sheathing. Underlayment verification confirms a continuous, well-secured barrier against moisture, which is especially important when snow and ice accumulate and then melt. Flashing scrutiny targets transitions around chimneys, vents, dormers, and along eaves where ice dam formation is most probable. The final inspection confirms that the installed roof matches the permit plan and that all components are properly integrated with the home's ventilation and drainage systems.
Before work begins, request a written timeline, a list of permit-related milestones, and a pre-installation checklist that ties to the approved drawings. Ask the contractor to provide documentation of ventilation calculations or strategies and a clearly labeled sequence for flashing installation, underlayment, and shingling. During the project, maintain access for inspectors and ensure any temporary roof protections meet local code expectations. After installation, arrange a final walkthrough with the contractor to address any notes from the closeout inspection, ensuring all permit stipulations are satisfied.
When a hail or wind event hits, insurers commonly weigh the roof's age, the material type, and recent weather history before deciding a claim. In this market, a late-winter freeze-thaw cycle can compound damage that isn't obvious from the ground, so the adjuster may expect a careful, comprehensive evaluation. Knowing that your shingles or panels have aged with Carlisle's seasonal swings helps you understand why a claim might be recommended for upgrade or replacement rather than a quick patch.
Adjusters in this market may request attic and underlayment access to verify leakage patterns and roof deck conditions. Homeowners should preserve interior evidence of leaks and avoid discarding damaged materials too quickly, since the inside is often a key part of the puzzle. If water marks or stained ceilings appear after a storm, document them promptly with dates and photos. Keeping intact any damaged underlayment or flashing until inspection is completed can prevent disputes later.
Pennsylvania claims handling rules and case law affect how hail and wind losses are reviewed, making documentation especially important in storm seasons. In a climate where freeze-thaw cycles stress materials, a thorough file-photos, contractor notes, and a storm history log-helps support the claim when the insurer reviews roof performance over time. Be prepared to explain how consecutive storms contributed to the overall condition, not just the most recent event.
Coordinate with your insurer and your chosen roofer to time inspections for when there is minimal ongoing leakage. Have a simple, dated record of weather events and any temporary mitigation efforts. If a dispute arises, clear, organized evidence that ties exterior damage to documented interior signs can streamline the process and reduce ambiguity during settlement.
Skylight failures show up often enough in the Carlisle market to indicate recurring homeowner concern around leak-prone roof penetrations. The combination of freeze-thaw cycles and humid summers means seals age unevenly and the surrounding roof deck moves with temperature shifts. Look for tired sealant beads around the curb, cracked glazing caulk, and mismatched flashing where the skylight meets the roof plane. In winter, ice buildup can push against the curb and lift flashing slightly, creating a path for water to travel down the interior side of the curb.
Wind-driven spring rain and winter ice backup in Carlisle make flashing transitions around skylights, chimneys, and wall intersections especially vulnerable. Pay attention to the apron flashing along the lower edge of the skylight and to any step flashing where it overlaps between roof planes. If the roof deck under the skylight shows signs of moisture staining, that is a warning that the flashing, not just the glass, is letting water in. When replacing a skylight, insist on continuous, properly folded flashing that extends onto the shingles with a cap or sealant-free junction. Flashing should be integrated with the underlayment and valley systems, not tacked on as an afterthought.
Because local inspections emphasize flashing quality, Carlisle homeowners should treat skylight and penetration detailing as a major part of any replacement scope. Demand high-quality curb support, a well-sealed nailing fin, and a continuous layer of synthetic underlayment beneath all penetrations. Have the contractor verify that ridge and soffit ventilation remain unobstructed after installation, and specify drip edges at all penetrations to channel runoff away from the curb. If a skylight is being swapped, request a raised curb design or proper pan-flashing that directs moisture toward the outer roof edge rather than into the interior. Regularly inspect after snow melts and early spring rains to catch creeping leaks before they threaten ceilings.
Find contractors experienced in skylight installation, flashing, and leak repairs to bring natural light into your home.
Marroquin Exteriors
(717) 462-6341 marroquinexteriors.com
17 E High St #103, Carlisle, Pennsylvania
4.9 from 115 reviews
Flat-roof specialization exists in Carlisle but is not dominant, suggesting that low-slope guidance is more relevant to select homes, additions, and mixed residential-commercial properties. In neighborhoods where additions or converted garages meet existing shingles, the emphasis shifts toward reliable drainage, edge detailing, and long-term seam integrity rather than pure flat-roof aesthetics. You'll encounter a mix of membrane-centric approaches on commercial-adjacent houses and on multi-use structures, but most single-family homes still balance attic assembly and traditional sloped roof considerations with careful attention to drainage and ventilation.
A tight seal around penetrations, proper edge flashing, and durable underlayment are non-negotiables for Carlisle winters. In Carlisle, inspectors often focus on how the roof transitions from low-slope areas to higher-slope sections, where ice dam risk can transfer from gutters and eaves onto seams and penetrations. That means prioritizing a continuous, well-seamed membrane, compatible flashings at parapets, and a robust drain strategy. Ventilation of the underlying attic or mechanical space remains crucial, as trapped heat and moisture invert the effectiveness of any membrane over time.
For homes with low-slope or mixed roof segments, schedule autumn and spring checks that emphasize drainage paths, clogged scuppers, and perimeter flashing. After heavy snows or thaw cycles, inspect for raised seams, pooled water, and membrane corners that may have shifted. In communities with dense development, accidental foot traffic near edge details can damage seals; consider restricting access or reinforcing walk areas. Backup plan ensure that any temporary repairs are compatible with the primary membrane system to avoid cascading failures during freeze-thaw cycles.
Roof coatings appear only minimally in the Carlisle market, indicating restoration coatings are a niche solution rather than a mainstream replacement path here. For low-slope sections where coatings are considered, choose products proven for freezing environments and compatible with existing substrates and flashings. Coatings can extend life in select situations, but the broader strategy remains focused on robust initial installation, meticulous flashing, and dependable underlayment to combat winter stress and ice dam-related issues. In practice, expect coating options to support maintenance cycles rather than serve as a stand-alone remedy in harsher seasons.
Find specialists in TPO, EPDM, and built-up flat roofing systems for residential and commercial properties.
Carlisle homeowners are hiring heavily around quick response, re-roofing, affordability, and cleanup, which reflects a market shaped by storm calls and replacement demand. Look for contractors who have maintained work in the same neighborhoods over multiple winter seasons, not just fast responses after a single event. A local desk of references who can speak to long-term results matters as much as a quick response window.
In a town where winter ice damming and freeze-thaw cycles stress roofs, the ability to schedule a follow-up inspection after initial work is essential. Ask how the roofer handles post-storm items such as debris removal, yard protection during work, and thorough cleanups. A genuine Carlisle outfit will document visit windows, confirm weather-related safety plans, and communicate expected timelines clearly, not just promise a next available slot.
Drone inspections and manufacturer-certified credentials appear in the market but are not universal, making them differentiators rather than baseline expectations in Carlisle. Request examples of drone use for ventilation, flashing, and underlayment checks, especially after a heavy snow season. Confirm that the crew includes experienced installers for the chosen roof type and that manufacturer-approved methods are followed for warranty integrity.
A reputable contractor prioritizes proper ventilation details, flashing at hips and dormers, and appropriate underlayment for freeze-thaw resilience. Expect a thorough on-site assessment that translates into a plan addressing heat loss, moisture risk, and gutter management. If a bid feels rushed, or if the firm avoids discussing long-term performance, note that caution and seek a second opinion.
Long-established contractors have a visible presence in Carlisle, so tenure is a meaningful local trust signal alongside responsiveness. Verify that the crew can align the storm-related work with your home's typical climate stressors, ensuring your replacement stands up to Cumberland Valley winters for years to come.