Last updated: Apr 19, 2026
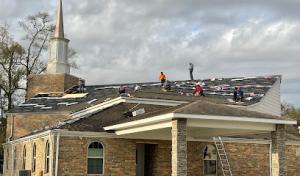
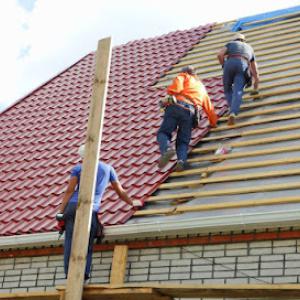
Vidor sits in Southeast Texas near the Gulf weather corridor, so roofs endure not only the everyday pounding of local thunderstorms but also inland wind and rain from tropical systems. The coppery mix of piney-woods moisture and seasonal heat pushes shingle and underlayment wear faster than you might expect. When a storm rolls in, rain can arrive with surprising intensity and wind-driven gusts that lift edges, pry flashing, and test transitions at walls. This isn't a hypothetical threat-it's a repeat pattern that shows up the moment the sky darkens and the air turns humid.
Late-summer to fall is a hard deadline window for emergency repairs, tarping, and full replacements across Orange County and the Beaumont area. Storm tracks don't care about your calendar, but the supply chain and crew availability do. If a hurricane season surge hits, you'll see backlog on tarps, rapid patchwork, and scheduling bottlenecks that stretch into weeks. Plan ahead for inspections while the weather is calmer and use the lull to reset, not scramble when the first bands hit.
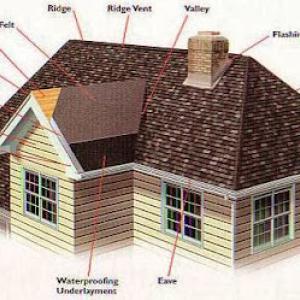
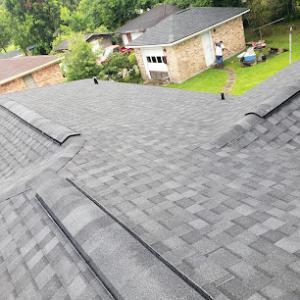
Wind-driven rain makes flashing, underlayment laps, ridge lines, and roof-to-wall transitions the battleground. In this climate, you want a tight, continuous seal along every edge and seam. Pay close attention to valley jacks, step flashing at all openings, and the junctions where the roof meets the chimney, vents, or skylights. If a storm has just passed, check for curling shingles, displaced granules, or any seepage around soffits and eaves. Those details aren't cosmetic-they're the first line of defense against interior damage when the next system rolls through.
Keep gutters clear and downspouts aimed away from the foundation to reduce overflow pressure on fascia and soffits. Trim overhanging branches that could strike the roof during high winds. Ensure attic ventilation remains balanced; poor venting compounds condensation and rot, especially with the Gulf's humidity. If water stains appear after a storm, don't delay in addressing the source; small breaches become bigger leaks fast as winds shift and rain intensifies.
Document any damage with photos from multiple angles, including close-ups of flashing, ridge caps, and wall transitions. Note the date and the exact locations of leaks or wind-driven gaps. Your file should show the sequence of events leading to escalation, as insurance will want a clear narrative. If tarping is needed, secure temporary protection quickly and photograph the setup to prove proactive steps were taken to mitigate further damage. When calling for a repair, reference the most vulnerable areas-valleys, edges, and transitions-so fast, targeted work can restore the roof's integrity without unnecessary delays.

AllPhaze Roofing & Construction
(409) 769-3516 www.allphazebuilt.com
1320 N Main St, Vidor, Texas
4.6 from 24 reviews
Family owned and operated for 25 years. We serve the Southeast Texas and Southwest Louisiana areas. We are licensed and bonded. Our services include Roof replacement, roof repairs, metal roofing, siding, carports, and patios! We provide a free estimate, roof report and roof inspection reports for insurance providers.
Woods Roofing
Serving
4.9 from 80 reviews
Whether you need a new residential or commercial roof, roof repairs, carpentry work, gutters, or siding, we are your guys! We can guarantee top-notch work with architectural shingles, 3-tab 20 year or 25 year shingles, high-end shingles, GTA flat roof systems, and more! We offer FREE ESTIMATES, have a licensed adjuster on staff, are bonded and fully insured, and our roofs are Texas Windstorm Insurance Association (TWIA) approved.
Dutchmark Roofing Beaumont Tx
(409) 799-7663 dutchmarkcontractors.com
Serving
5.0 from 130 reviews
With over 27 years of experience, Dutchmark Roofing provides the highest quality materials and craftsmanship at competitive prices. We pride ourself on our Lifetime warranty on both labor and on GAF Shingles! We offer a 15 year unlimited windspeed warranty! We have an Insurance Specialist on staff to assist with insurance claims to help you get full compensation for wind or hail damages. We do both Commercial & Residential and work with Shingle and Metal. Call Our Office Today and lets schedule a free inspection!
Able Roofing
(409) 898-6348 www.ableroofingusa.com
Serving
3.8 from 16 reviews
Able Roofing is the trusted roofing contractor for realtors, homeowners, and property managers in Beaumont, Texas. We specialize in roof repairs, roof replacements, and home sale inspections, helping realtors close deals faster. Need a professional, reliable roofing service? Call us today at (409) 898-6348 for a free estimate!
5 Star Roofing & Remodeling
Serving
5.0 from 35 reviews
At 5 Star Roofing & Remodeling, your trusted roofing and remodeling specialist. Our skilled and passionate team provides top-notch services to enhance the aesthetic and functionality of your property. Get a precise assessment with our free estimates, no strings attached. We pride ourselves on using first-rate materials and expert craftsmanship to deliver the highest quality results at a price that accommodates to your needs. Our mission is simple — better homes, accessible pricing, and a commitment to exceptional service. Elevate your living space today. 5 Star Roofing and Remodeling — Quality is always our priority. !!!CALL NOW!!!
Roofing On Demand
(409) 965-5555 roofingondemand.com
Serving
4.9 from 39 reviews
We are a locally owned Storm Restoration company focused on Roofing, Siding, Gutters and Patios for Residential and Commercial customers based out of Beaumont, TX. We serve primarily the Southeast Texas and Houston areas. We take pride in the quality of work we have done and continue to do. No matter the condition of your residence or commercial property, trust us to provide a long lasting solution on a budget. We can assure you durability, affordability and quality through the roof! Financing options available.

Fresh Era Roofing Beaumont
(346) 443-5413 fresheraroofing.com
Serving
5.0 from 38 reviews
At Fresh Era Roofing Beaumont, we deliver dependable roof repair services for homeowners and businesses throughout Beaumont, TX. A strong, well-maintained roof is essential for protecting your property, and our skilled team specializes in fast, reliable repairs that restore both safety and durability. From minor leaks to storm-related damage, missing shingles, or aging roof issues, we provide long-lasting solutions using quality materials and proven methods. Our experts carefully inspect each roof to detect hidden problems, preventing small issues. With years of local experience, we understand the challenges of Beaumont’s weather and tailor our repair services to keep your roof performing at its best year-round.

M&M Roofing, Siding & Windows - Beaumont
(409) 727-8327 mmroofsiding.com
Serving
4.9 from 237 reviews
Trusted since 1983, M&M Roofing, Siding & Windows is the Golden Triangle's premier exterior expert. As a certified GAF Master Elite® and Owens Corning Preferred contractor, we rank in the top 2% of roofers nationwide. We specialize in hurricane-proofing homes with high-wind rated Shingle, Metal, and TPO roofing, as well as complete storm damage restoration and insurance claim assistance. Beyond roofing, we protect homes with James Hardie® siding, impact-resistant windows, and seamless gutters. We proudly serve Beaumont and the entire area—from Nederland, Port Arthur, and Groves to Vidor and Pleasanton. Family-owned and dedicated to "Peace of Mind" with lifetime labor warranties and flexible financing. Call today for a free inspection!
Cool Roofs - Beaumont
Serving
5.0 from 47 reviews
Welcome to Cool Roofs - Beaumont, Premier Roofing Contractor! 🏡🛠️ Specializing in residential and commercial roofing, we excel in roof installations, repairs, replacements, and emergency restorations. We're the go-to for new roofs, repairs, and replacements in Jefferson County, Orange County, and Central Texas. As the top among roofing companies in Beaumont, we offer quality services, including roof inspections and replacements. Cool Roofs proudly supports our Veterans & Military. Trust us for the best in roof installations, repairs, and replacements. Contact us for expert contractors and top-notch service!
Abshire Roofing
(409) 722-1965 www.abshireroof.com
Serving
5.0 from 7 reviews
🏡 Abshire Roofing is your trusted expert roofing team for 36 years! We're proud to hold a prestigious AAA Better Business Bureau rating, reflecting our commitment to quality, reliability, and homeowner satisfaction. You're choosing a legacy of excellence in the roofing industry. Let us protect your investment and provide peace of mind through our unparalleled roofing services. Contact us today for a free consultation and experience the difference that 36 years of dedication makes!
RoofEx
Serving
5.0 from 4 reviews
Protect your largest investment with our reliable roofing services. We are a locally owned and operated roofing company currently serving Beaumont, TX and surrounding communities. If you want to make your roof last as long as possible, it is vital that you never put off a roof repair. Small issues with roofing become big issues in a hurry. No matter how major or minor the repair you need, we are here to help. We offer roofing contracting, roof replacement, and roof installation.
ABCO Roofing & Construction
(409) 835-2226 www.abcoroofingtx.com
Serving
4.2 from 20 reviews
ABCO Roofing & Construction provides roofing services in the Beaumont, TX area.
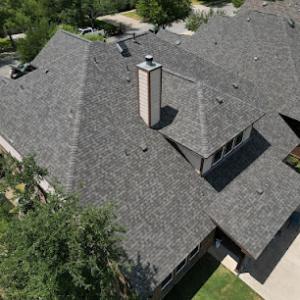
Asphalt shingles are common in Vidor because they fit the area's residential housing stock and price expectations, but prolonged heat, humidity, and storm exposure can shorten appearance life and accelerate granule loss. When you choose this route, look for architectural or dimensional shingles with a higher wind resistance rating and consider reflective or cool-grain options to curb heat buildup. Regular inspection after heavy storms helps catch lifted tabs or granule loss early, before moisture finds its way under the laps. In humid months, check for mildew or dark staining on shaded sections and treat promptly to maintain aesthetic life.
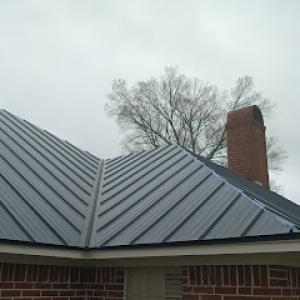
Metal roofing has strong local relevance in Vidor because it handles heavy rain shedding well and is frequently marketed in this storm-prone Southeast Texas market. If you gravitate toward metal, plan for robust underlayment and a well-sealed ridge cap to minimize wind-driven leaks, especially where older homes meet new metal choices. Metal's longevity is attractive, but fasteners and flashing matter just as much as the panels themselves. Ensure a seasoned installer addresses the transitions around valleys, chimneys, and vents, since storm-spread moisture can exploit minor gaps quickly. Regular leaf and debris clearance around roof edges helps sustain the metal's performance during the wet season.
Tile and heavier systems may trigger extra local inspection attention for fasteners, underlayment, and flashing, which matters in a city where tropical weather performance is scrutinized. Clay and concrete tiles provide excellent durability under moderate winds when correctly installed, but their weight and brittleness under sudden temperature swings demand careful framing checks. Underlayment should be a high-quality, tear-resistant layer, and flashing around penetrations must be continuous and corrosion-resistant. In hurricane-season patterns, verify that hip and ridge lines are properly countersunk and that caulking at corners remains flexible enough to accommodate movement without cracking.
Synthetic or composite shingles offer a balance between cost, weight, and durability, often featuring good resistance to moisture and UV exposure. They can mimic more premium materials while staying lighter on the roof deck. For any composite choice, ensure the product is rated for high humidity environments and that the installer uses compatible fasteners and sealants to prevent moisture trapping at joints. In homes with shading trees or dense canopy, select products with color stability to minimize fading and keep the roof looking uniform after several storm seasons.
No matter the material, proper attic ventilation and a solid underlayment strategy are essential to performance in humid, storm-prone conditions. Look for a crew that prioritizes weatherproof detailing at valleys, penetrations, and transitions. In homes with older framing, insist on a thorough inspection of the existing deck to ensure the new roof has a solid base. When choosing materials, focus on compatibility with your existing fascia and gutters to maintain efficient rain shedding during Texas downpours.
Provided local pricing ranges run about $350 to $700 per square for asphalt shingles, $700 to $1200 for metal, $1100 to $1800 for clay tile, $900 to $1500 for concrete tile, $650 to $1100 for wood shingles or shakes, and $550 to $1000 for synthetic or composite shingles. These bands are typical for storm-impacted seasons, when supply chains tighten and crews are booked up after a big thunderstorm or tropical event along the Southeast Texas coast. In practice, you'll see the higher end when a roof needs more than just shingles-upgraded underlayment, improved flashing, and a fastening pattern designed to satisfy insurance wind and hail expectations.
Storm-driven demand spikes can push pricing and wait times higher after major weather events. If a hurricane spillover or a series of tropical storms hits the area, you'll likely encounter longer lead times for material and scheduling. Plan for potential delays when you're coordinating an exact replacement date, especially if you're dealing with a roof that requires more than a straightforward shingle swap. If you're working with an insurer, the timeline may stretch further as adjusters review damage and scope before the build starts.
Costs can rise locally when homeowners upgrade underlayment, flashing, and fastening patterns to satisfy insurer expectations in a wind- and hail-active coastal Texas insurance environment. If your roof already has an older deck or lacks continuous underlayment, upgrading can add to the base per-square price but reduce the risk of hail damage and wind-driven leakage later. Upgrades commonly include a more robust synthetic underlayment, upgraded metal flashing at valleys and chimneys, and a fastener pattern designed for higher wind zones. If you plan to stay in the home for a long stretch, investing in these upgrades can pay off in reduced claim friction and faster post-storm recovery.
Start by calling two to three local roofers for written estimates based on an on-site inspection. Ask each for a breakdown of per-square material costs, waste disposal, underlayment, flashing upgrades, and wind-rated fasteners. If a contractor notes extra charges for attic ventilation or deck repairs, get a separate line item and a forecasted impact on total time. Document pre-existing damage with photos, especially from the attic and roof edges, to support insurance documentation. Finally, confirm lead times and whether the roofing crew can align installation with any anticipated storm windows, so you're not left waiting in a vulnerable season.
Get a clear picture of your project costs upfront - no commitment required.
AllPhaze Roofing & Construction
(409) 769-3516 www.allphazebuilt.com
1320 N Main St, Vidor, Texas
4.6 from 24 reviews

A building permit is typically required for a full roof replacement in this area, and the contractor or homeowner is responsible for applying through the City of Vidor Building Department. Before planning materials or a start date, confirm that the project scope and address are in the Building Department's system so that inspection scheduling aligns with your timeline. Because weather and storm exposure are persistent concerns around the Gulf Coast spillover, the permit process often includes documenting materials, venting, and underlayment choices that will perform well under humid, windy conditions. Have the contractor prepare a project description that notes the roof type, ice-dam protection where applicable, and the anticipated sequence of work so the department can quickly review and issue the permit.
Inspections in this area are conducted during and after installation to verify workmanship and weather-resistant components, rather than treating reroofing as a no-touch administrative process. Expect on-site checks as the layers go down-from deck integrity and underlayment installation to fastener patterns, flashing details, and overall roof-to-wall transitions. The inspector will verify that ventilation is adequate and that required opening protection around penetrations (such as vents and plumbing stacks) is correctly sealed. After the roofing is installed, a final inspection confirms that the completed system meets local code requirements for weather resistance and structural adherence. Scheduling is typically coordinated through the Building Department and your contractor, with possible rechecks if any issues are flagged.
Tile and metal projects may receive added attention for fasteners, underlayment, and flashing details, reflecting the city's focus on weather performance. For tile, inspectors look for proper batten spacing, correct setting bed use, and edge-finishing that resists wind uplift. For metal roofs, expect scrutiny of seam tolerances, fastener type and spacing, and flashing at joints and roof-to-wall connections. In areas with frequent thunderstorms and hurricane spillover, inspectors emphasize secure edge detailing and proper leak barriers at penetrations. If you anticipate work that involves substantial flashing changes or retrofit of existing roof edges, coordinate with the inspector early to confirm that the chosen products meet local weather resistance expectations and will pass final review.
Storms that sweep inland from the Gulf bring a steady drumbeat of wind-driven rain and hail, and carriers in this coastal Texas environment keep a close watch on roof age and condition. When a claim comes after a thunderstorm, expect questions about the roof's life left, how it held up during the latest event, and whether preexisting wear played a role. The age of your roof can influence the claim's outcome, so understanding how your system has aged-tile, shingle, or metal-helps you speak the truth when adjusters arrive with their photos and measurement tools.
Adjusters in this market may ask for a full trace of activity: pre-work and post-work photos, plus detailed notes from the roofer who inspected the roof. In a place where hail can leave pinpoint bruises and wind can peel shingles, documentation isn't cosmetic-it's a practical record of what stood up to the last storm and what didn't. Take clear pictures fromground level and from the attic, showing both the exterior surface and any interior signs of moisture. Have the roofer's notes ready as a second layer of evidence, including a simple explanation of damage type, location, and suspected cause. When storms strike, this stack of images and notes can shorten the back-and-forth, helping you move toward a fair assessment rather than a drawn-out dispute.
Some carriers serving this region may require wind-rated underlayment or retrofit-style upgrades when files are processed. That can shift the scope of repairs or influence what is considered necessary work for wind resilience. If a claim triggers these questions, you could be looking at upgrades that improve long-term performance but change the immediate project plan. Before work starts, have a frank conversation with the adjuster about what constitutes an acceptable proof of need and how those retrofit steps integrate with the existing roof system. This isn't about fear-mongering-it's about ensuring that the roof you end up with can withstand the kind of Gulf Coast weather that tends to show up with little warning.
After the last round of weather passes, walk the edges of the property with a critical eye. Note any lifted shingles, flashing gaps, or dented fasteners, and mark suspicious spots for a roofer's inspection. If a claim is filed, organize the documentation into a logical bundle: photos, notes, and the roofer's assessment. Share that bundle promptly with the insurance processor, and keep a personal copy for your records. In a market where evidence matters, steady, methodical documentation helps ensure that your repair scope reflects the true storm impact rather than an interpretation of wear and tear.
Connect with contractors who help homeowners navigate the claims process from damage assessment to final approval.
AllPhaze Roofing & Construction
(409) 769-3516 www.allphazebuilt.com
1320 N Main St, Vidor, Texas
4.6 from 24 reviews

Spring in this area brings storm and hail risk, so inspections after severe weather are often more important than waiting for a leak to appear indoors. After hail or a derecho, inspect shingles, flashing, and vents for bruising, denting, or loosening sealant. In the days following a storm, check attic insulation for moisture and look for any new stains on ceilings or walls. Scheduling a stout post-storm inspection can catch issues before they migrate into larger leaks or interior damage, especially on roofs that show aging signs from the humid piney-woods climate.
Summer heat and humidity can slow production and make attic conditions harsher, even though work continues through much of the season. Plan for longer days if metal or composite crews are on the clock, and anticipate slower curing of sealants when July humidity spikes. If an attic feels oven-hot, consider temporary ventilation or delaying nonessential tasks until a cooler window. Expect weather interrupts from afternoon storms, and coordinate with the contractor for a rain-call policy that minimizes wasted material and rework.
As autumn approaches, the risk of sudden weather shifts grows and a reroof can align with drier, more predictable days. Begin scheduling ahead of the first cold fronts to secure a solid daily rhythm for tear-off and installation. Early fall can provide a comfortable balance of temperatures for asphalt or synthetic shingles, but keep a close eye on the forecast for any abrupt cool snaps that could affect sealing and shingle set.
Mild winters allow reroofing for much of the year, but occasional cold snaps can still interrupt installation timing and seal-down performance. When cold weather moves in, some materials take longer to set and seal, so talk through expected warm-up periods with the crew. If freezing nights occur, plan for temporary protection of exposed edges and see that underlayment remains dry before any sealant is applied.
Coordinate follow-up inspections after severe weather, especially if a leak remains unseen. Maintain a flexible schedule to accommodate storm-driven delays, and establish a written plan with the contractor for sequence and material delivery during peak humidity periods. This approach reduces the chance of moisture-related complications and keeps the project moving in the normal shoulder seasons.
In Vidor, persistent moisture from the humid piney-woods climate can quietly erode a roof's resilience. Algae staining, decking moisture, and flashing deterioration creep in when ventilation and drainage details are weak. You may notice dark streaks on shingles long after installation, along with softness in the decking where moisture sits. Good ventilation and a clear drainage path matter more here than elsewhere.
Storm season compounds these issues. Frequent thunderstorms push water under the edges, lift shingles, and expose fasteners to the elements. When fasteners back out or nails work loose, leaks become a recurring post-storm headache. If gutters clog or downspouts fail to shed water quickly, the problem compounds, feeding rot and increasing the risk of interior damage from wind-driven rain.
Wind-driven rain from Gulf Coast systems can reveal weaknesses that looked fine after a dry spell. Valleys, chimneys, wall flashings, and ridge terminations are prime trouble zones. Even a roof that seemed serviceable before a storm can show new leaks once rain arrives at high velocity. Remember that missing or aged seals around penetrations, improper flashing installation, or insufficient sealing can turn a minor flaw into a recurring leakage situation after the next squall.
Shingle and pebble loss often accompanies these forces. In growth-heavy climates, surface granules can shed prematurely, leaving aging shingles more susceptible to wind uplift and hail impacts. If flashing has not been upgraded to handle rising moisture pressures, small gaps turn into sizable pathways for water. Regular inspections after heavy weather help identify those weak spots before they escalate into interior staining, warped decking, or widespread roof-to-ceiling problems.
If a storm hits, expect to see telltale signs along ridges and perimeters first. Keep a close eye on valley intersections, penetrations, and edge details, and address any abnormal movement, lifted edges, or damp spots quickly to limit further damage.
Find specialists in TPO, EPDM, and built-up flat roofing systems for residential and commercial properties.

M&M Roofing, Siding & Windows - Beaumont
(409) 727-8327 mmroofsiding.com
Serving
4.9 from 237 reviews