Last updated: Apr 19, 2026
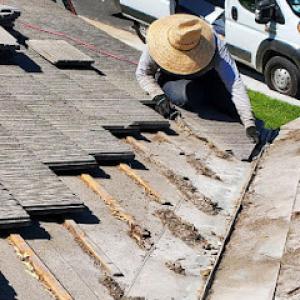
Tear-off projects in the wettest months are naturally more delicate in this foothill-edge area. Most annual rainfall arrives between November and March, so dry-in and underlayment staging must be planned with tighter margins than inland cities that see summer storms. If a complete tear-off is on the calendar, aim for a dry spell that allows several days of dry-in before any forecasted rain, and build in a contingency for an extra dry day or two in the event Santa Ana wind patterns intensify out of season. Keep the roof accessible and secure during those weeks, since winter rain can surprise without warning.
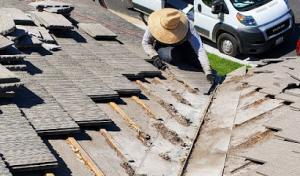
Santa Ana events can complicate a straightforward tear-off even when rain isn't forecast. Eastern San Gabriel Valley winds can pick up debris, push off-portions of underlayment, and create dusty conditions that slow crews. On a project, designate a primary debris-control plan and a secondary plan for sudden wind gusts. If a wind advisory is issued, be prepared to pause work, cover exposed materials, and secure loose equipment. These winds also affect the timing of material deliveries, so coordinate with suppliers for weather-appropriate pickup windows and avoid stacking tiles or bundles in exposed zones.
Heat in these parts can push crews to work faster or slower depending on shade and surface temperature. In mid-summer, asphalt surfaces can reach uncomfortable temperatures, which influences fastener timing, sealant curing, and the pace of shingle or tile setting. When planning a summer schedule, favor early-morning starts, especially for dark asphalt systems that absorb heat. If the home has limited shade exposure, consider scheduling more intensive stages (like tear-off and setting) for cooler hours to reduce worker fatigue and surface wear on materials. Communicate heat-related pace expectations to the crew and factor in short, planned water breaks and sun protection for everyone on the roof.
Begin with a dry forecast window that includes a buffer for wind disruption and a rain-forecast update. If winter rain materializes, you'll need a plan for rapid-deck underlayment inspection and load-ready materials once the sequence resumes. In spring and fall, use milder days to tackle underlayment staging and tile or shingle layout without the pressure of peak heat. When Santa Ana conditions are forecast, have a wind-rollback plan: secure loose edges, cover exposed conduits, and stage materials away from open gutters or valleys where gusts can cause damage or misalignment.
La Verne jobs benefit from a tidy, wind-aware housekeeping routine. Keep debris nets and toe boards in place and inspect for wind-blown debris after gusts. If the sky looks unsettled or the wind picks up unexpectedly, pause and reassess access points and staging. A well-ordered site reduces risk for crews and minimizes the chance of wind-driven damage to newly installed components. In sum, align your schedule to dry-in-friendly windows, anticipate Santa Ana disruptions, and tailor each phase of work to the season to keep the reroof on track.
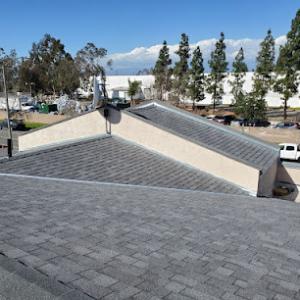
The foothill-edge heat and Santa Ana winds create a demanding environment for roof assemblies. In this setting, the appearance of tile can be appealing, but the long-term performance hinges on how the roof is fastened and flashed, not just the surface material. Asphalt shingles dry out faster in the inland sun and can require more robust underlayment and wind-rated components to resist lifting. Tile roof systems-whether clay or concrete-offer durable, long-lived glamour, but their performance depends on proper batten spacing, high-quality underlayment, and meticulous flashing around penetrations and abutments. In short, the surface you see matters less than the build quality beneath, especially when Santa Ana winds gust weekly and the winter rains demand reliable sealing.
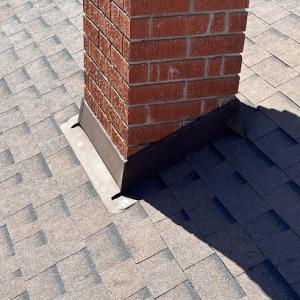
Reroof timing in this market often hinges on underlayment life and flashing details rather than tile color or shingle grain. In a hot inland valley climate, you should prioritize a roofing system with an advanced synthetic underlayment, a drip edge that protects eaves, and flashing that resists wind-driven infiltration around chimneys, vents, dormers, and transitions to walls. Tile surfaces can still look pristine after a season or two, but if the underlayment is compromised or flashings are marginal, leaks can show up during the rainy months. For asphalt shingles, a high-quality protective membrane beneath the shingles paired with wind-resistant fastening patterns helps counteract uplift in Santa Ana events. When sizing up a reroof, you'll want to confirm that the chosen system has proven performance in windy conditions and that the flashing around roof-to-wall transitions is continuous and well-sealed.
Clay tile delivers classic curb appeal and good long-term durability when the roof deck is properly prepared to carry the weight. Concrete tiles often provide similar aesthetics with a slightly different weight profile and manufacturing tolerances; both require a capable structural frame and precise installation sequences to ensure proper alignment and fastening. In homes with pitched roofs, the decision often comes down to weight, span, and the ease of integrating appropriate underlayment and flashing for the chosen tile. If a tile roof is not properly vented or if the underlayment laps are not weather-tight, you may experience issues during the winter rain period. For some properties, a mixed approach-tile on visible elevation planes with more wind-resistant shingles where wind exposure is highest-can balance curb appeal with robust performance.
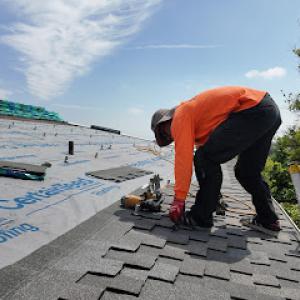
Asphalt shingles remain common for quick reroofing and strong wind resistance when installed with appropriate nailing patterns and a compatible underlayment. Metal roofing, with its high wind uplift resistance, can be a strong choice on exposed facades or where bold rooflines catch the eye. Wood shakes and shingles offer a natural aesthetic but require meticulous maintenance and careful ventilation to avoid moisture accumulation under the surface. Synthetic or composite shingles bring color stability and improved impact resistance, often with lower maintenance than natural wood. Across these options, the tying thread is how well the system accounts for sun exposure and wind: edge details, fastener type and spacing, and the integrity of flashings around penetrations.
A reroof in this climate benefits from a window when the roof deck and underlayment can dry quickly after rain, yet before the next storm sets in. Start by ensuring the roof deck is dry and structurally sound, then confirm the selected system's installation sequence minimizes time exposed to the elements. If clay or concrete tile is chosen, plan for weather windows that allow for careful, methodical setting of tiles, battening, and flashing without rushing around corners or over openings. For asphalt shingles and metal, look for installation blocks that protect vents and valleys from moisture during a stretch of dry days. In any case, the weather forecast should guide the pace: long dry spells followed by targeted, shorter panels of work when rain is anticipated help keep the reroof on track without compromising the assembly.
AMC Pro Roofing
(909) 737-3817 amcproroofing.com
La Verne, CA
5.0 from 7 reviews
AMC Pro Roofing INC, safeguarding homes and businesses in Cedar Glen and Lake Arrowhead with expert roofing services. We bring reliability and quality craftsmanship to every project, ensuring your property is protected from the elements. Discover peace of mind with our commitment to excellence, where expertise meets the unique needs of our mountain communities. Learn more about how we can help you maintain a secure and beautiful roof over your head.
Northwood Roofing
(626) 482-2455 www.northwoodroofinginc.com
1518 Arrow Hwy, La Verne, California
5.0 from 5 reviews
At Northwood Roofing, our founder brings over 30 years of experience to every roofing service we provide, setting a standard for quality and reliability in La Verne, CA. Founded in 2014, our approach is rooted in values of integrity and punctuality, distinguishing us from competitors with a family-operated structure and a dedication to maintaining pristine work sites.

Bottom Dollar Roofing
(909) 596-7663 www.bottomdollarroofers.com
3379 Logan St, La Verne, California
4.4 from 10 reviews
Bottom Dollar Roofing provides premium roofing products and top quality installations. Our service area included the San Gabriel Valley, Inland Empire and Orange County. We are experienced replacement and repair roofers for residential, commercial and industrial. From leaks to floods - if your roof is the problem we will fix it!
Manna Roofing Company
Serving
5.0 from 6 reviews
Manna Roofing Company is a family owned and operated business located in Riverside, California servicing the majority of the Southern California area. We specialize in complete roof installs as well as roofing repairs and wood replacement. We have three generations of roofing and construction experience in residential and commercial properties. Call today to receive an appointment for a on property inspection and quote.
Dowd Roofing
(626) 857-1070 dowdroofing.com
Serving
5.0 from 39 reviews
Since 1979, Dowd Roofing has provided residential and commercial roofing, roof repair, and much more to Glendora, CA and the surrounding areas. Dowd Roofing takes integrity and dependability very seriously when it comes to your projects, from whole roof replacements to storm damage maintenance. We work on asphalt roofing, concrete tile roofing, spray coating, leak plugging, inspections, and more. With over 35 years of experience, you know we are still in business for a reason, Call us today to schedule an estimate, or contact us through our website.
West Meridian Roofing
Serving
5.0 from 44 reviews
West Meridian Roofing is a family owned business, formerly known as Oshcon, now rebranded as West Meridian Roofing. Still run by the same great team: Jeremiah, Eli Estrada and David Kauffman. We have crews to service the commercial and residential roofing projects as well as decks, porches, and patio structures. Our quality and customer service is reflected in our projects and customer reviews! We’re also partnered with a couple American based Solar Companies and have great options for solar/roof finance packages, call us for a free estimate.
Competition Roofing
(909) 599-6270 www.competitionroofingco.com
Serving
4.8 from 49 reviews
Competition Roofing is a full-service roofing company in Upland, California, We specialize in Composition, Tile & Flat Roofs. We service Residential, Commercial, Industrial & HOA's.

Built Services
(818) 740-7140 www.deltabuilt.com
Serving
5.0 from 2 reviews
If the roof of your commercial property is starting to show signs of age, it might be time to look at your roofing options. Delta Built Services, Inc. has 46+ years of industry knowledge and specializes in commercial roofing. Your contractor will expertly: provide honest roof assessments, create customized roofing installation options that fit your budget, and give expert advice for maintaining your newly-installed roof. Delta Built Services, Inc. is the San Fernando Valley’s premier commercial roofing expert for a reason. We happily work with our customers to make sure they are getting exactly what they want, at a price they can afford. Call today for a free estimate!
ND Roofing
Serving
5.0 from 9 reviews
ND Roofing is distinguished by its commitment to excellence and customer satisfaction. For 15 years, we have provided high quality roofing and construction solutions, prioritizing trust, professionalism and meeting the highest standards on every project.
A-MRK Roofing
(909) 314-1185 roofinguplandca.com
Serving
5.0 from 8 reviews
A-MRK Roofing provides dependable residential and commercial roofing services backed by skilled craftsmanship and honest service. From roof repairs and replacements to new installations and inspections, our licensed and insured team delivers long-lasting protection for your property. We use premium materials and proven techniques to ensure every project meets the highest quality standards. Whether you’re dealing with leaks, storm damage, or planning a full roof upgrade, trust A-MRK Roofing for reliable solutions and clear communication every step of the way. Call today for your free roof estimate.
The Roofing Company
(909) 333-5415 theroofingcompanyoc.com
Serving
5.0 from 16 reviews
The answer is yes, now whats the question? Want advice on roofing? we can help. Our business is to help you. advice and estimates are always free. Don't want to risk it? We'll do it for you!
Micasa Pro Roofers - Upland
(909) 294-7600 www.uplandroofer.com
Serving
4.6 from 19 reviews
As a family owned roofing business based in Upland, you can trust us to provide quality services at fair prices, all without cutting any corners. We make the whole process easy to understand, and share your warranty options with every estimate so that you can stay informed. With every job, we provide contracts, share photos of the progress, and lay protective tarps to keep everything nice and tidy. After we finish, you’ll receive a certificate that outlines your warranty for both materials and our workmanship. Our hardworking team is skilled in installing all types of roofs, including flat roofs, shingle roofs, asphalt roofs, metal roofs, clay or concrete tiles, and more. Get started on your roofing project.
Typical local pricing runs about $400-$900 per square for asphalt shingles, $700-$1400 for metal, $1000-$1800 for clay tile, $900-$1600 for concrete tile, $600-$1100 for wood shingles/shakes, and $800-$1400 for synthetic/composite shingles. These ranges reflect the foothill heat that fuels rapid aging of roof surfaces, plus the region's Santa Ana wind exposure that tests fasteners and sealants. When you're pairing a reroof with a longer-term plan, you can expect asphalt to stay the most budget-friendly entry point, while tile roofs-especially clay-bring higher material and installation complexity that shows up in the total.
Costs in La Verne can rise when older tile roofs need underlayment replacement, flashing updates, or careful tear-off and reset work rather than a simpler shingle replacement. If a roof has multiple penetrations, valleys, or signs of moisture damage, the reroof bill climbs because crews take extra care to restore proper alignment and water shedding. In practical terms, a tile roof that requires additional underlayment or flashing updates will push the project toward the upper end of the tile ranges or beyond, compared with a straight shingle replacement on a similarly pitched roof.
Seasonal demand can push pricing and scheduling when winter rains expose leaks or when wind events create a short-term surge in repair and dry-in requests across the eastern Los Angeles County foothill area. In practice, that means you'll often see tighter windows and higher bids after a series of strong Santa Ana winds or during the onset of the rainy season. If you're planning a reroof right before winter rains, line up a project window early and be prepared for a quicker turn once you're in the wet months.
If heat and wind have aged your roof unevenly, consider the trade-off between underlayment-heavy tile work and a modern asphalt or synthetic panel upgrade. A concrete or clay tile roof that's decades old may benefit from underlayment refresh and flashing updates even when the visible surface looks serviceable. For most homeowners, the choice hinges on long-term durability, local weather exposure, and the tolerance for seasonal project windows. When you're comparing bids, ask each contractor to itemize underlayment, flashing, tear-off, and restart labor so you can see where costs are coming from and plan for the most robust, weather-ready result.
Get a clear picture of your project costs upfront - no commitment required.

When you plan a reroof, a permit is normally required, and the city's Building and Safety department handles the review rather than an unincorporated county office. This means the process is tied to local codes, inspections, and the city's review timeline, not a broader regional system. You should anticipate a formal submission, plan review, and a defined path to permit approval that aligns with La Verne's calendar and weather window. If your project includes any structural work or changes to venting or drainage, be prepared for additional checks early in the process.
inspections in this market commonly occur at multiple stages and end with a final inspection to close the permit, so homeowners should expect more than a single sign-off visit. The schedule often tracks the progression from tear-off and underlayment installation through flashing, venting, and surface installation. Because the city experiences Santa Ana winds and the heat of summer, inspectors may schedule observations to confirm details that aren't obvious from the ground. A common pitfall is assuming a single morning visit will suffice; plan for several appointments and potential adjustments between them.
Inspectors in La Verne verify underlayment, flashing, nailing patterns, and California Building Code compliance, which is especially relevant on reroofs where the visible surface may not reveal the most important work. The underlayment must be correctly installed to resist wind-driven rain and heat, while flashing around chimneys, vents, skylights, and transitions must be integrated with the chosen roof system. Nailing patterns are checked for proper spacing and alignment to hold up under Santa Ana gusts and summer heat. Even if the surface looks complete from the ground, the inspection process targets the sequence of installation and attachment methods that ensure long-term performance.
The inspection schedule can be influenced by winter rain timing and the need to complete work before seasonal storms. In practice, this means coordinating reroof activities so the critical water-control layers are installed during dry periods, with inspections that confirm weatherproofing before the next rain. If a rain event is forecast during a planned inspection, communication with the Building and Safety department becomes essential to adjust timing and avoid delays that ripple into the rest of the season.
To minimize delays, keep a clear record of permits, inspection appointments, and any required corrections noted by inspectors. Have access to the approved plan set, and ensure that installers are aware of the specific nailing patterns and flashing details required for the chosen roof system. Understanding that multiple sign-offs are standard helps avoid frustration and keeps the project moving toward a compliant, durable reroof.
Hot summers, Santa Ana winds, and the winter rain pattern in this foothill-adjacent area all shape how you approach a reroof. The wildfire risk in the region means insurers will scrutinize roof age and the materials you choose, as well as how well the roof is maintained. A roof that looks aging or shows surface wear can raise red flags for underwriting, trigger higher deductibles, or affect eligibility for certain discounts. When planning a replacement, consider how resistant your chosen system is to wind-driven debris and embers, and how it stands up to the heat that quickly accelerates aging of some materials. The goal is a roof that holds up through Santa Ana events without inviting additional risk, while not signaling preventable failure to carriers.
Carriers commonly ask for roof-age documentation and updated photos after replacement, which matters for homeowners trying to preserve coverage terms or support future claims. In practice, gather a clear timeline of the roof's life-from prior replacements to last maintenance-and keep copies of all relevant documents. Updated photos taken after installation help verify the new roof's condition if a claim is ever evaluated years down the line. In La Verne, where heat and wind stress can accelerate wear, showing a well-installed, compliant roof with modern underlayment and fasteners can influence how a claim is viewed if damage occurs during a Santa Ana event.
Adjusters may compare replacement cost to policy limits when processing claims, so owners should keep permit records, invoices, and post-install photos together rather than relying only on contractor statements. Store these materials in a durable, organized file or digital folder that is easy to share with an adjuster. If the roof has a documented replacement, make sure the insurer has a recent appraisal or confirmation of the current dwelling value and the specific roof system installed. This reduces back-and-forth during a claim and helps ensure the coverage response aligns with the actual replacement.
Snow-free, dry periods ahead of the rainy season reduce the odds of weather-related delays, but in this region the wind and heat can still affect scheduling. When setting dates for reroofing, align timing not just with convenient installation windows but also with a clear plan for secure documentation before, during, and after work. If a claim is anticipated later, having a robust packet now-photos, receipts, and a detailed work scope-helps protect coverage terms and supports any future inquiries about the roof's integrity.
Connect with contractors who help homeowners navigate the claims process from damage assessment to final approval.

In homes with clay or concrete tile, the field tile often looks intact from curb appeal, but the real trouble hides beneath. Leaks frequently trace to aged underlayment, compromised flashings, and penetrations-where vents, chimneys, and skylights meet the roof deck. When the tile holds up visually, these failure points quietly degrade, letting water work its way in. In La Verne, where roofs age with the neighborhood's mix of tile and shingle homes, a careful interior inspection is essential after every rain event. Don't assume the tiles are the culprit; the path of water often starts at the edges and penetrations.
Winter rain after long dry spells unmask deferred maintenance that summer winds and heat hid. Valley metal, pipe flashings, and transition details can hide corrosion or loose seals until a cold wet spell stresses them. After a dry season, the first substantial rain acts like a spotlight-water shows up where it wasn't expected. This is when homeowners notice slow drips or damp ceilings, signaling that maintenance on flashings and valley gutters can't wait. Plan proactive checks for these components just before the first winter storms to minimize urgent repairs mid-season.
Occasional hail and wind-driven rain in the region can puncture or loosen vulnerable roof accessories, even when the main roof covering looks sturdy from the street. Vented vents, decorative ridge caps, and hip-to-valley transitions take the brunt of wind gusts and hail impact. When wind-driven rain sneaks into these weak points, leaks appear quickly and loudly. If you've experienced sudden indoor moisture after a storm, inspect accessory seals first, then retrace any hail marks on metal details to prevent repeat incidents.
Find contractors experienced in skylight installation, flashing, and leak repairs to bring natural light into your home.

Even on predominantly pitched homes, additions, patio covers, porch sections, and garage transitions can create low-slope areas that age differently from the main roof. In La Verne, these transitions often blend into the house with modest slopes that catch more heat and more runoff irregularities. Plan for these spots as separate roofing problems, not just minor extensions of the main surface.
These mixed rooflines become more vulnerable during the November-to-March rain season because drainage and flashing details matter more on low-slope sections than on the steeper tile or shingle fields beside them. When inspecting the house, look at flange seals, parapet transitions, and valley conditions where a shallow grade can trap water. Consider installing discrete, properly sloped drainage paths and reinforced flashing at every transition to the main roof. If a low-slope area ties into a gutter system, ensure the gutter slope and downspout health align with the roof's new edge conditions.
La Verne's contractor market shows meaningful flat-roof specialization, reflecting real local demand for homes and buildings with low-slope problem areas rather than purely steep-slope reroofing. For these sections, choose materials with robust seam integrity and proven performance in mixed installations. When discussing options with a contractor, emphasize edge detailing, membrane compatibility at transitions, and the feasibility of discrete drainage channels that preserve the integrity of the higher-slope fields nearby.
Regular inspections in the dry season help catch algae, debris buildup, or edge lift before winter rains intensify seepage risk. Schedule a targeted check of low-slope corners after heavy Santa Ana wind spells, when blown dust and occasional shingle or tile fragments can settle into the flashing zones. Keep visible edges clear of debris to maintain uninterrupted drainage paths and reduce the chance of moisture migration into joints.
Find specialists in TPO, EPDM, and built-up flat roofing systems for residential and commercial properties.
Northwood Roofing
(626) 482-2455 www.northwoodroofinginc.com
1518 Arrow Hwy, La Verne, California
5.0 from 5 reviews