Last updated: Apr 19, 2026
San Dimas experiences hot, dry summers that speed up UV aging on any roof, and the Santa Ana winds can accelerate wear on exposed edges. Your roof system should resist sun-driven degradation without sacrificing long-term performance. Materials that hold color, resist sun-fade, and keep interior attic temps reasonable tend to hold up better here. A reflective or light-colored surface can shave a few degrees off attic heat, reducing gutter and fascia stress and delaying insulation fatigue. In a canyon-influenced climate like this, the roof deck and underlayment choice matters as much as the surface layer, so don't overlook proper ventilation and a weather-tight underlayment matched to your chosen material.
Santa Ana winds create gusty uplift forces that test fasteners and edge details, especially on lower slopes or roofs with wide overhangs. In this area, a reliable attachment system and edge-to-edge sealing matter more than average. You'll want a roof that's designed with wind performance in mind-whether that's through engineered fasteners, integrated underlayment, or a tile or metal design that resists blowing debris and edge lift. When planning roof replacement, inspect ridge and hip details, eave connections, and metal drip edges or counterflashing that can help keep the wind from seeping under the roof assembly.
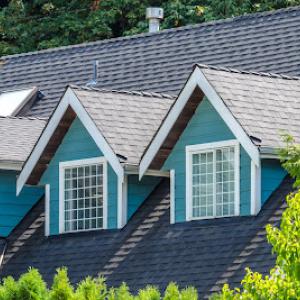
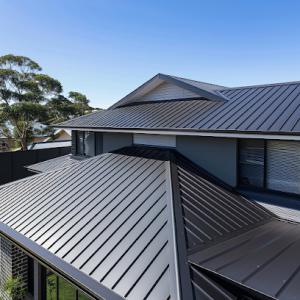
San Dimas homeowners balance heat resistance, wind performance, and wildfire-era insurance considerations when choosing between tile, shingle, metal, and composite systems. Clay tile and concrete tile excel in heat resistance and long-term durability, but clay can be heavier and may require additional framing or structure checks. Concrete tiles offer strong wind performance when properly installed, yet can be more brittle in freeze-thaw cycles or with certain roof pitches. Metal roofing handles uplift well and often cools more efficiently under sun exposure but can present design considerations in terms of appearance and compatibility with nearby vegetation. Asphalt and synthetic shingles provide straightforward installation and good wind resistance when rated for uplift and installed with proper nailing patterns. Wood shakes or shingles deliver a traditional look but may demand more maintenance and firewise considerations in wildfire-prone areas. Synthetic/composite shingles can blend heat resistance with lighter weight and wind performance, though longevity and surface wear depend on the specific product and installation.
Focus on a balanced package: heat durability, wind resistance, and the way the system interfaces with the home's attic ventilation. For tile options, verify that the roof structure can handle the weight and that fastener patterns are designed for uplift in Santa Ana conditions. If choosing shingles, opt for a high-quality Class A fire-rated option with a wind rating suitable for your home's exposure. For metal, inspect panel seams and underlayment compatibility with the local climate; ensure color and coating choices minimize heat buildup. For any material, ask about warranty coverage that addresses UV exposure and wind uplift in this foothill zone. In all cases, ensure proper installation details around penetrations, skylights, and chimney flashing, since those are common failure points in windy, sun-exposed climates like this one.
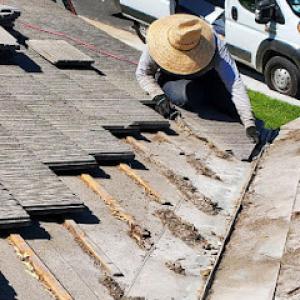
Two distinct seasonal disruptions shape reroofing and repairs in this foothill area: winter rain delays and Santa Ana wind periods that complicate tear-off, dry-in, and material handling. The calendar matters, because wet winter days stall climbs, delay tarping, and extend exposure of underlayment. When the Santa Anas arrive, crews face gusts that can pry loose tiles, blow debris into vents, and turn a planned replacement into a scramble to protect the interior. Plan for flexible scheduling that prioritizes safe teardown and rapid dry-in once winds ease to avoid repeated weather-related setbacks.
The local contractor signal mix shows strong prevalence for emergency repair and storm damage work, which fits a market where wind-driven tile displacement, exposed underlayment, and sudden leak response are recurring homeowner concerns. Tile roofs common to this area are particularly vulnerable to gusts that catch edges and ridge caps. When a storm pushes tiles out of alignment, rain can follow quickly into the underlayment, flashing corners, and vent penetrations. Insurance-driven attention often inventories visible damage first, but the hidden damage beneath can be worse if the tear-off is delayed during windy periods. Immediate stabilization after a wind event matters as much as the replacement itself.
Summer heat and wildfire smoke can also disrupt crew logistics in San Dimas, so urgent leak stabilization and tarping matter when full replacement cannot start immediately. Heat limits the pace of shingle or tile removal and raises worker safety concerns, while smoke can complicate respirator use and ventilation on steep roofs. In practice, this means temporary fixes-tarps, fasteners, and sealant patches-should be ready to deploy the moment leaks are detected. The goal is to minimize interior water intrusion until a crew can return with dry conditions and a reliable, uninterrupted work window.
When a leak is detected and a full replacement cannot begin right away, focus on containment. Cover openings with sturdy tarps fastened to the roof deck, seal flashing penetrations, and protect new interior surfaces from moisture exposure. Keep an emergency contact list handy for swift mobilization after a wind event or a sustained rain spell. If tiles are displaced, avoid stepping on loose areas and call in professional help promptly to prevent cascading damage during the next storm.
A practical approach centers on securing a window with stable weather, ideally avoiding the height of Santa Ana seasons and the peak of wildfire season. Prioritize sequencing that protects the roof deck and interior during inclement periods, then advance to a full tear-off and dry-in when winds are calmer and days are reliably dry. In this market, readiness and rapid response trump a delayed, ideal schedule-while still aligning with seasonal weather cycles and the realities of the region's roofing stock.
When you can't wait, these contractors offer fast response times to stop leaks and prevent further damage.


Tile roofing remains a strong signal in this housing mix, signaling homeowners are often dealing with clay or concrete tile reroofing rather than simple shingle replacements. In tracts around the foothills, tile roofs can dominate the skyline, and that means your replacement choices aren't just about color or texture-they're about long-term performance under heat, wind, and wildfire-era insurance pressure. The goal is to restore a roof that looks right on established homes while delivering dependable waterproofing for decades.
In San Dimas, projects frequently hinge on whether the visible tile can stay while waterproofing layers beneath get refreshed. This is especially true as underlayment ages faster under prolonged heat exposure and Santa Ana conditions. If the tile itself is structurally sound and the fasteners and flashing show solid metal, a carefully designed re-layment can save time and preserve the curb appeal. However, if tile cracks or loosened tiles are common in areas with high wind gusts, full tile removal and reinstallation may be the safer path. A qualified roofer should test for hidden leaks and check the roof deck for rot or delamination before deciding to leave the tile in place.
The waterproofing layers beneath tile matter just as much as the surface you see. In this climate, the underlayment needs to handle heat cycling and Santa Ana exposure without breaking down. The typical approach is to remove aging underlayment, repair any deck damage, and install a high-quality, heat-tolerant membrane. Proper ventilation and deck drainage must be considered to prevent moisture pooling that can undermine tile fasteners over time. If the existing deck shows signs of water staining or sagging, a re-deck might be part of the plan. The decision to re-lay beneath a tile roof should be guided by the extent of heat exposure and the condition of the substrate after the tiles are removed.
The city's reroof-heavy contractor landscape means homeowners are often catching aging systems on well-established homes. Planning ahead for the hottest part of the year can help avoid timing bottlenecks and provide room for a careful teardown and rebuild sequence. Since tile work can include discrete steps-tile removal, deck repair, underlayment installation, and tile re-layment-coordination with a contractor who understands local weather patterns and wind exposure is crucial. Expect discussions about wind-rated flashing, tile-fastener choices, and sealant compatibility with dry Santa Ana air to feature prominently in a well-executed project.
The choice to stay with clay or concrete tile versus transitioning to a different roofing type should reflect both the home's architectural rhythm and climate realities. Concrete and clay tiles perform well in sun-drenched months and can resist wind when properly fastened and kept watertight. When the visible tile is retained, attention must focus on matching the existing profile and color where feasible, to preserve neighborhood aesthetics. If transitioning away from traditional tile, ensure the new material can accept the local wind loads and heat without sacrificing the visual language of the tract. In all cases, discuss sealants, flashing materials, and edge details that accommodate Santa Ana gusts and summer heat to keep the roof durable through the coming years.
Find contractors who specialize in clay and concrete tile roofs, known for their durability and curb appeal.
Dowd Roofing
(626) 857-1070 dowdroofing.com
Serving
5.0 from 39 reviews
Since 1979, Dowd Roofing has provided residential and commercial roofing, roof repair, and much more to Glendora, CA and the surrounding areas. Dowd Roofing takes integrity and dependability very seriously when it comes to your projects, from whole roof replacements to storm damage maintenance. We work on asphalt roofing, concrete tile roofing, spray coating, leak plugging, inspections, and more. With over 35 years of experience, you know we are still in business for a reason, Call us today to schedule an estimate, or contact us through our website.
Northwood Roofing
(626) 482-2455 www.northwoodroofinginc.com
Serving
5.0 from 5 reviews
At Northwood Roofing, our founder brings over 30 years of experience to every roofing service we provide, setting a standard for quality and reliability in La Verne, CA. Founded in 2014, our approach is rooted in values of integrity and punctuality, distinguishing us from competitors with a family-operated structure and a dedication to maintaining pristine work sites.
Ruiz Roofing Corporation
(626) 533-8848 ruizroofingcorp.com
Serving
4.7 from 55 reviews
Small and well-stablished roofing contractor specializing in quality full re-roof project. Financing available, Owens Corning Certified, Licensed and bonded. CSLB #1076100
Fast Track Roofing Repair Service West Covina
(626) 548-2620 fasttrackroofingllc.com
Serving
5.0 from 19 reviews
Reliable Roofing in West Covina, CA At Fast Track Roofing, we make protecting your home or business simple. Serving West Covina, CA, we handle everything from quick leak repairs to full roof replacements with speed and precision. Our team uses durable materials and proven techniques to deliver strong, long-lasting roofs. Whether it’s residential or commercial, you can count on expert service and lasting results.

Bottom Dollar Roofing
(909) 596-7663 www.bottomdollarroofers.com
Serving
4.4 from 10 reviews
Bottom Dollar Roofing provides premium roofing products and top quality installations. Our service area included the San Gabriel Valley, Inland Empire and Orange County. We are experienced replacement and repair roofers for residential, commercial and industrial. From leaks to floods - if your roof is the problem we will fix it!
The Roofing Company
(909) 333-5415 theroofingcompanyoc.com
Serving
5.0 from 16 reviews
The answer is yes, now whats the question? Want advice on roofing? we can help. Our business is to help you. advice and estimates are always free. Don't want to risk it? We'll do it for you!

Pomona Roofing Group
(909) 365-2295 rooferspomonaca.com
Serving
5.0 from 9 reviews
Pomona Roofing Group works closely with property owners throughout Pomona, CA to address everyday roofing needs and long-term roof care. Our roofers take on roof repair, roof replacement, roof installation, roof inspections, commercial roofing projects, and emergency roof repair for homes and commercial buildings. Having worked on properties across Pomona, our team is familiar with local construction styles, inland climate conditions, and the types of roof systems common in the area. We provide roofing services across Pomona, CA with a practical, detail-focused approach to maintaining reliable roof performance.
ND Roofing
Serving
5.0 from 9 reviews
ND Roofing is distinguished by its commitment to excellence and customer satisfaction. For 15 years, we have provided high quality roofing and construction solutions, prioritizing trust, professionalism and meeting the highest standards on every project.

Custom Roof Company
(909) 623-7753 www.customroofcompany.com
Serving
4.7 from 17 reviews
Custom Roof Company has been providing professional roofing in Pomona and surrounding areas for 25 years. We are one of the most established and trusted name for roofing services in Pomona, and are accredited by the Better Business Bureau as an A+ roofing contractor. We offer some of the best roofing warranties in Pomona, because we stand behind the quality of our work. In the unlikely event that you need to utilize your roof’s warranty, you can rest easy knowing we’ve been in business for over 25 years, so we will still be around to make sure your home or business is protected. If you need roofing installation, roof leak repair, roofing maintenance, commercial roofing, industrial roofing or residential roofing, call us today!
Mountain Pacific Roofing
(626) 364-9844 www.mountainpacificroofing.com
Serving
5.0 from 13 reviews
Welcome to Mountain Pacific Roofing, your number one roofing company in West Covina, CA and the surrounding area. We're a full-service company that specializes in commercial roofing and residential roofing. You can depend on our experts when it comes to repairing and installing a new roof system. There is no job too big or small for us to handle! With several years of industry experience, our family-owned and operated business is dedicated to providing the residents and business owners of West Covina with the best solutions to repair or replace their roofing. Our mission is to provide our clients with the same high level of service and quality that we expect ourselves.
Alpha Roofing
(909) 347-5324 pomonaroofingcontractor.com
Serving
5.0 from 13 reviews
Alpha Roofing is where your roofing dreams take flight! Unleash the potential of your property with our premium services. Elevate aesthetics and resilience with our meticulous Roof Installation, ensuring a solid foundation overhead. Transform your space with the allure of Metal Roofing or the timeless elegance of Asphalt Shingle Roofing. Discover the epitome of durability through our expert Roof Replacement and swift Roof Repair services. For commercial ventures, our cutting-edge Commercial TPO Roofing solutions redefine protection and style. Whether embarking on New Construction Roofing or seeking the sleek simplicity of Flat Roofing, Alpha Roofing is your trusted partner, delivering excellence, reliability, and a roof over your dreams!
Mighty Roofing
(626) 727-9229 azusaroofingcontractor.com
Serving
5.0 from 11 reviews
Welcome to Mighty Roofing, where excellence meets expertise in every shingle! Elevate your property with our stellar services. Need a roof that withstands the test of time? Our skilled craftsmen specialize in Roof Installation, ensuring durability and style. Upgrade confidently with our Roof Replacement service, tailored to your aesthetic preferences. Did you get leaks or damage? Fear not! Mighty Roofing excels in Roof Repair, restoring your peace of mind. Explore innovation with our sleek Metal Roofing options or opt for classic charm with Asphalt Shingle Roofing. For commercial spaces, trust our expertise in Commercial TPO Roofing. Whether it's New Construction or rejuvenating a Flat Roof, Mighty Roofing has you covered!
Prices in this local market reflect San Dimas's reroof-heavy landscape and the mix of tile-heavy suburban homes. Typical local pricing runs about $350 to $650 per square for asphalt shingles, $600 to $1100 for metal, $700 to $1300 for clay tile, $650 to $1200 for concrete tile, $700 to $1200 for wood shingles or shakes, and $400 to $750 for synthetic/composite shingles. When planning a replacement, you'll often see these ranges shift based on the project scope, disposal logistics, and how much existing structure or underlayment needs upgrading. For tile roofs, expect higher costs if a full tear-off is required rather than a cap-and-go re-cover, and be prepared for longer timelines if multiple inspection stages are involved.
Hot Santa Ana conditions can stress underlayment and flashings during a replacement, especially on older homes with original decking. In practice, this means scheduling dry-in windows where possible and choosing materials that tolerate rapid temperature swings. If a wind event coincides with work, crews may need to pause for safety and to secure loose materials, which can add days to the schedule and a modest bump in cost. For tile roofs, wind-driven debris can damage underlayment progress, making a meticulous dry-in and secure jobsite even more essential in peak season.
Wildfire-era insurance scrutiny remains a factor in San Dimas. Material choices tied to insurance outcomes often lean toward durable, fire-rated options and systems with solid wind resistance. That consideration can influence whether asphalt or synthetic shingles are chosen versus tile or metal, particularly when underlayment upgrades or secondary moisture barriers are in play. Costs can rise where insurers require additional tests or specific underlayment assemblies, or where a roof has to be upgraded to meet fire-resistive standards beyond the basic replacement.
Because the local market is heavily reroof-oriented and many contractors emphasize cleanup, quick response, and affordability, homeowners should expect pricing differences tied to disposal logistics, dry-in urgency, and how much existing roof structure or underlayment work is needed. Weather delays during winter rain and Santa Ana wind periods are not unusual, and they can shift both timing and the final bill. If there is a need for tear-off and re-nail or a total underlayment refresh, plan for a higher figure within the ranges above.
Get a clear picture of your project costs upfront - no commitment required.
In this foothill edge town, a full roof replacement is not something you plan around in theory-you need to line up a valid permit as a core step in the process. A permit is typically required in San Dimas for a full roof replacement, making permit status a central part of planning rather than an afterthought. If you skip or delay the permit, you risk delays, fines, or even a stop-work order that could disrupt a high-temperature summer schedule when timing matters most.
Local reroof work is commonly inspected at multiple milestones, and understanding these checkpoints helps prevent trouble later. Inspections are typically conducted before underlayment is covered, after roof installation, and at final completion. Each milestone serves a concrete purpose: the first confirms the framing and roof plan meet structural and drainage expectations, the mid-point verifies the material layout and fastener pattern align with local code and wind considerations, and the final ensures overall workmanship, flashing, and venting are correctly completed. If any issues arise during these inspections, some or all of the work may need to be opened back up for corrections, which can be costly and extend timelines, especially during the hot season when materials can behave differently under sun and heat.
Timing can be unpredictable in this area, and inspection schedules can shift with department workload. If the department is backlogged, you may face longer waits between milestones, which can push your project into peak heat and Santa Ana wind periods. Coordinate your contractor's schedule with the city's inspection calendar, and build in buffer days for potential re-inspections or corrections. Inspections are not a formality; they are a practical safeguard to ensure the installation can withstand the local climate, including high summer heat and gusty winds that stress roof edges and penetrations.
Inspectors may require confirmation that the contractor is properly licensed and that the installation meets code requirements. This is not just bureaucratic rigor-it's a verification that the chosen materials and methods align with wind-rated performance and fire-safety expectations that insurers increasingly scrutinize. Be prepared to present your permit, licensed contractor details, and a clear scope of work before any inspection. If a project drifts from the approved plan, expect adjustments or a revised permit to ensure continued compliance.
Finally, keep communication open with your roofer and the city's building department. When weather windows become tight or wildfire-season insurance considerations influence material choices, timely permit approvals and orderly inspections become not just a regulatory box to check, but a practical safeguard for a durable, compliant roof you can rely on through Santa Ana winds and the summer heat.
In this foothill community, carriers have tightened underwriting and coverage options because wildfire risk looms larger every season. That tightening isn't just about the structure of a policy; it shapes what options are available when a roof ages, or when a claim is on the horizon. Homeowners should expect insurers to scrutinize roof age, condition, and material type more closely, especially if a home carries prior claims or sits in a higher-risk foothill-adjacent setting. The consequence is that replacement decisions are increasingly influenced by what the insurer is willing to accept, not just what looks best physically on the home.
When a roof needs attention, the question often becomes: will the carrier approve a certain replacement path? In practice, that means choosing materials and installation approaches that align with insurer preferences, such as those that demonstrate durable performance against Santa Ana winds and intense summer heat. It pays to be proactive in documenting the roof's current state and the rationale for the chosen path. If the insurer expresses concerns about age or past claims, presenting a thoughtful, code-compliant plan that showcases modern wind resilience and fire-safety features can help preserve coverage stability.
Photos, receipts, and a detailed scope of work are not just housekeeping items; they're part of the risk narrative insurers evaluate when adjusting premiums, renewing coverage, or reviewing a roof-related claim. In this market, confidence matters. Keep a running file that captures pre-work and post-work conditions, material specifications, and installation steps. When a carrier asks for documentation, you'll find that an organized record can smooth the path to timely decisions and reduce back-and-forth that stalls renewal or claim processing.
Connect with contractors who help homeowners navigate the claims process from damage assessment to final approval.

Flat-roof work is notably active in this market, meaning you may encounter low-slope sections on patios, additions, garages, or mixed-roof homes alongside the traditional tile or shingle main roof. This mix requires a practical mindset: plan for both roof types in one project so the entire elevation seals and drains properly.
These low-slope areas are especially vulnerable during winter rain events when dry summer conditions give way to periodic storms. Drainage must be reliable and flashing details must be continuous from the main roof to the low-slope surface. Pay particular attention to transitions and penetrations where water could back up or seep beneath membranes.
When a home has tile or shingles on the main roof and a low-slope section elsewhere, replacement planning often needs to address multiple roofing systems in one project. Your contractor should map out drainage paths, shared edge conditions, and compatible flashing designs so replacements on one portion don't create leaks on another.
Start with a thorough inspection of existing conditions: assess the slope, any transitions between roof planes, and the condition of gutters and downspouts tied to the low-slope area. Have the roof plan reviewed for proper substrate support beneath the low-slope surface, and verify that insulation and ventilation meet the demands of both roof types.
Choose a flat-roof system with durable flashing at terminations, penetrations, and transitions. Ensure the chosen membrane or low-slope assembly is compatible with the main roof materials, and specify color and texture to minimize heat buildup on the entire roofscape. A coordinated schedule helps minimize exposure risk between roof sections.
Find specialists in TPO, EPDM, and built-up flat roofing systems for residential and commercial properties.
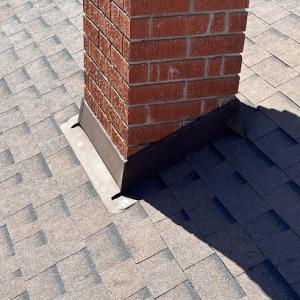
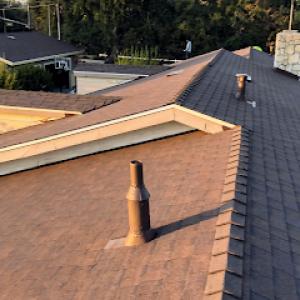
Skylight-related roofing work appears often enough in the local contractor mix to matter for reroofing on older homes with existing penetrations. The foothill heat and Santa Ana wind exposure mean you'll see flashing and sealant wear show up sooner around skylights and other penetrations, especially after a long dry spell followed by winter rain. The neighborhood mix of tile-heavy roofs and older builds means penetrations aren't all uniform, and a careful plan matters in San Dimas.
Before any tear-off, have the roof evaluated for each penetration point-skylights, vent stacks, and skylight flashings included. Note where the flashing has L-metal or step-flashing that may have been overwhelmed by wind-driven rain or heat cycles. If the existing flashing looks weathered, plan for replacement or re-flashing as part of the reroof. Because leak complaints spike when winter rain returns after dry spells, address potential weak spots around penetrations proactively rather than reacting after a leak develops.
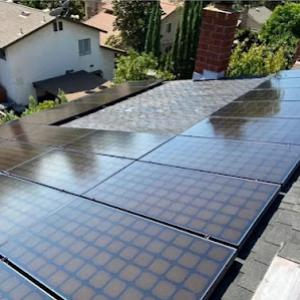
Solar-integrated roofing is present but not dominant, so homeowners with existing or planned solar should verify how reroof sequencing will be handled before tear-off begins. If panels are already on the roof, confirm with the installer how panel mounting, flashing updates, and any roof deck repairs will align with the new material and flashing details. If solar is planned after reroof, ensure the contractor coordinates the mounting rails and sealants so penetrations won't be left exposed during the transition.
Start with a thorough inspection of all penetrations and note any compromised sealants. Use color-matched sealants and compatible flashing materials that suit hot summers and Santa Ana gusts. When replacing skylight flashings, choose a multi-flash design if the roof slope is variable, and verify slope compatibility for any solar mounts. Finally, schedule the work to minimize exposure of bare decking to winter rains, especially on older homes where insulation and ventilation around penetrations may influence moisture control.
Find contractors experienced in skylight installation, flashing, and leak repairs to bring natural light into your home.