Last updated: Apr 19, 2026
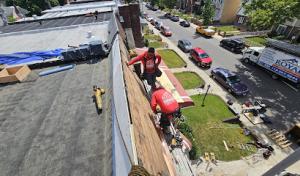
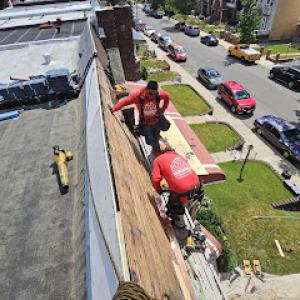
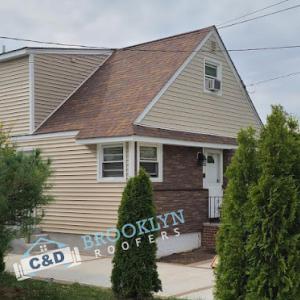
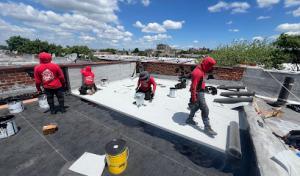
This neighborhood is defined by attached rowhouses, brick homes, and small multifamily buildings that frequently use flat or very low-slope roofs. Those rooflines can look simple, but the drainage pattern is the real driver of performance here. In winter, snow can pile up on a broad, shallow plane, then melt and refreeze at the edges, creating hidden ice dams that push water toward parapets and flashing transitions. The common design approach-parapet walls, shared gutters, and rear extensions-adds layers of potential failure points that a straight gable-roof checklist can miss. The practical takeaway is to treat flat and low-slope roofs as systems: the surface, the drainage paths, and every intersection where water can linger need equal attention.
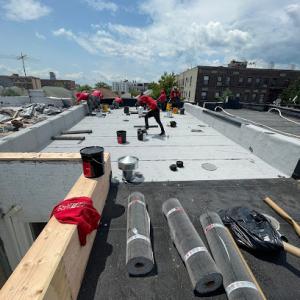
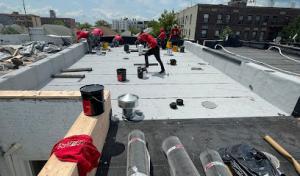
Low-slope roofs drain toward scuppers, internal drains, and transitory gutters. In this climate, standing water after a snow event is not a theoretical concern; it can sit through a thaw and then freeze again, stressing seals and flashing. For routine care, verify that each drain is free of debris and that any screen or cap sits securely without obstructing flow. Inspect scupper outlets for corrosion or cracks, and confirm that flashing at the parapet is continuous and well-sealed along its entire length. Where roof sections meet a parapet wall or a chimney stack, look for misaligned counterflashing or gaps that can channel water into concealed joints. Remember that a single compromised seal can compromise a larger zone, especially where two or more roof planes converge.
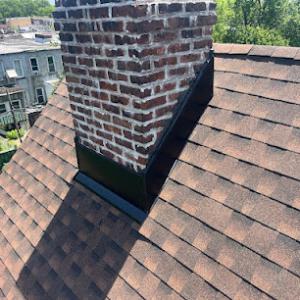
Many Astoria homes blend flat roof areas with parapet walls, brick chimneys, and rear additions. Those junctions are not simply cosmetic features; they are potential leak pathways if not correctly flashed. Parapet-to-roof transitions must be backed by continuous sealant or sheet flashing that remains flexible through freeze-thaw cycles. Chimney step flashing should be reviewed for hairline cracks and uplift pockets, especially where the brickwork carries moisture from seasonal rains into the roof deck. Rear extensions often introduce a change in slope or a secondary gutter line that may be neglected during seasonal checks. The practical approach is to inspect these transitions at least once per season, paying close attention to sealant joints, metal flashings, and any signs of movement or settling in the parapet ties.
A straightforward inspection plan yields meaningful results. Each fall, check the perimeter edge details, scuppers, and any exposed fasteners for corrosion or loose components. After heavy snowfall, conduct a post-storm review of drainage outlets and flashing transitions to ensure no ice buildup has created new blockages or uplift. In spring, verify that the roof surface shows no feathered edges or coating wear that could expose the underlying membrane to UV or moisture. If a flat roof has a gravel or ballast layer, assess its coverage and identify any bare patches where sun or wind could erode the surface. For midblock and end-unit assemblies, extend the cadence to include rear extensions and any shared roof segments where water can migrate from one occupancy to another.
Winter conditions demand vigilance around drains and parapets; freeze-thaw cycles can exploit small flaws and expand them into major leaks. Summer heat and humidity test the integrity of edge seals and any rubberized membranes, which may become brittle or soften with prolonged sun exposure. In Astoria, it helps to know which areas routinely show evidence of moisture or staining along flashing lines, then address those zones promptly to prevent gradual deterioration. When planning replacement or repair, prioritize systems that preserve continuous drainage across all connected roof planes, especially where parapets meet chimneys or rear modules. In these tight rowhouse environments, attention to detail at each junction makes the difference between a durable roof and recurring leaks.
When temperatures swing from freezing to above freezing, ice damming can quickly become a hazard along the edge of flat and low-slope roofs and around drainage paths. In this neighborhood, insulation and ventilation are often uneven in older housing stock, creating cold spots that encourage snow to melt and refreeze at the eaves. Those ice build-ups push water back under shingles or flashing, leaking into into ceilings and walls where a single unit's leak can spill into multiple adjacent spaces. Recognize that attic vents and soffit intake play a crucial role here: if airflow is restricted or insulation gaps exist near perimeter walls, the risk climbs. Proactively inspect for ice dams after a heavy snowfall and after thaws, particularly near dormers, skylights, or roof edge transitions that have seen patching or imperfect flashing.
Astoria experiences repeat thaw-refreeze cycles that stress flashing, sealants, and deck surfaces. Older roofs with patched areas or visible ponding history are especially vulnerable. When snow melts, water sits and then refreezes at joints, around penetrations, and along seams. Over time, this cyclic freezing can pry up metal flashings, crack sealant joints, and loosen fasteners. A compromised flashing at a valley or drip edge becomes a direct conduit for water to enter the structure during a thaw event or heavy rain following a snowfall. Keep an eye on any visible cracking or lifting around flashings, vents, and chimney terminations, as those are common entry points during winter.
Attached rowhouses and small multifamily layouts amplify risk: a single roof failure can send water into several units or shared spaces. If you notice fresh staining on ceilings, bulging drywall, or damp spots along interior walls after a snowfall or thaw, treat it as an emergency. Gas, electrical, and living spaces are all at risk when water intrudes through roof penetrations. In the event of a leak, act quickly: locate the nearest responsible shutoff for the affected area to minimize further damage, and capture the water with towels or a container to keep it from spreading. Photograph the leak site for records, and contact a qualified local roofer immediately to assess flashing, deck integrity, and penetration sealants. If multiple units share a ceiling or wall cavity, inform building management or co-owners right away, since a single failure can impact several residences.
Begin with a rapid, do-it-yourself check before the next big freeze or warm spell: look for ice along eaves, gutters, and drain outlets after a snowfall; inspect for obvious ponding on roof surfaces; and note any staining or bulges inside the attic or upper rooms. Clear lightweight debris from gutters and ensure downspouts discharge away from walls, but do not attempt to dislodge solid ice blocks yourself-this can damage roof edges or cause a sudden collapse of a weakened area. If you see a potential leak path where water enters near a vent or flashing, do not delay in arranging a professional inspection. A licensed roofer who understands older Astoria roofs can evaluate insulation gaps, ventilation adequacy, and the condition of flashing at valleys, chimneys, and around skylights, then tailor a targeted fix to prevent repeat incidents. In the meantime, place temporary waterproofing measures on the interior-tarps or plastic sheeting taped to walls and ceilings-to slow the spread of water while awaiting permanent repair.
When you can't wait, these contractors offer fast response times to stop leaks and prevent further damage.
N.V. & Roman Commercial Roofing Brooklyn
(917) 440-1800 commercialroofingbrooklyn.com
Serving
5.0 from 97 reviews

After major regional storms, insurers in this area will often scrutinize roof age and maintenance records more closely than you might expect. For Astoria homeowners, the pattern is familiar: carriers want to see not just what happened, but the throughline of care and prior condition that led up to the event. If a roof shows signs of advanced wear or chronic leaks, claims can be denied or reduced. A documented history of timely inspections, reputable repairs, and a clear installation date can make a tangible difference when a claim lands on a desk.
Documentation you gather now can save days of back-and-forth after a storm. Immediately after a weather event and before any temporary patchwork, take comprehensive photos that show the roof from multiple angles, the condition of flashing, seals around joints, and any exterior damage to siding or settling gutters. If possible, obtain a dated contractor estimate or inspection report that describes the roof's pre-storm condition. When the claim arrives, insurers will request before-and-after images, estimates, and a record of the roof's installation date. Having these ready in a single folder speeds the process and reduces the chance of misinterpretation about what existed before the event.
In Queens, spring and early summer storms bring a mix of wind-driven debris and heavy rain that can infiltrate even well-maintained low-slope roof systems common on rowhouses and small multifamily buildings. The timing matters. Prompt documentation after a storm helps ensure damage is attributed to the event rather than to long-term wear or aging components. If a contractor is called in for temporary repairs to prevent further interior damage, make sure those repairs are clearly temporary and properly documented. Photos and notes should show what was addressed and what remains outstanding as soon as the weather allows.
Communicating with the insurer in a calm, precise manner helps keep a claim on track. Focus on objective details: when the storm occurred, the specific areas affected, and the visible signs of damage such as lifted shingles, damaged flashing, or roof decking exposure. If a claim involves a flat or low-slope roof, point out areas where ponding or membrane wear might have contributed to leaks, as these observations support the argument that the event worsened pre-existing conditions rather than created them from nothing. In dense neighborhoods, where nearby trees can contribute debris, include exterior yard photos that show seasonal conditions and any claims history for the same property. This helps establish a credible timeline for the insurer.
Finally, retain a concise log of all communications with the insurer and the contractor. A local, reputable contractor who has experience with Astoria-style homes can provide the installation date, prior repairs, and any underlying issues that might influence a claim. A clear, well-documented file not only streamlines the claim process but also helps ensure the roof's protection remains intact as the neighborhood moves through the rest of the storm season.
Find local contractors experienced in assessing and restoring roofs after hail, wind, and severe weather events.
Astoria Roofing
(718) 285-6273 www.astoriaroofingny.com
30-29 30th Ave., Astoria, New York
5.0 from 78 reviews
George's Roofing
(718) 747-4954 www.georgesroofing.com
38-11 Ditmars Blvd, Astoria, New York
4.8 from 38 reviews
Astoria Roofing
(718) 285-6273 www.astoriaroofingny.com
30-29 30th Ave., Astoria, New York
5.0 from 78 reviews
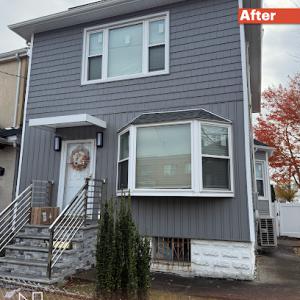
For over three decades, Astoria Roofing has been a reliable roofing contractor servicing Queens, Brooklyn, and the greater NYC region. With an unwavering commitment to excellence, our skilled professionals specialize in residential and commercial projects, expertly handling various services such as roof replacements, leak repairs, flat roofs, waterproofing, and professional maintenance. Utilizing top-grade materials, our licensed and insured team provides durable and long-lasting solutions, ensuring superior protection for your property and peace of mind. For exceptional customer service, fast response times, and honest communication, Contact us today for a free estimate and see why New Yorkers trust Astoria Roofing.
George's Roofing
(718) 747-4954 www.georgesroofing.com
38-11 Ditmars Blvd, Astoria, New York
4.8 from 38 reviews
For over three decades, George's Roofing has been a family-owned and operated business dedicated to providing top-tier roofing solutions. Based in Astoria, our expertise extends beyond simple repairs to include comprehensive new roof installations, meticulous masonry work, and professional pressure washing services. We take pride in our commitment to quality, ensuring every project, big or small, is completed with the highest level of craftsmanship. Trust our seasoned professionals to protect and enhance your home, guaranteeing exceptional results that stand the test of time.
Skyward Roofing
(646) 568-4399 www.skywardroofing.com
Serving
5.0 from 80 reviews
Skyward Roofing is a leading roofing company specializing in high-quality residential and commercial roofing services. With years of experience in the industry, we are committed to delivering top-notch roofing solutions that exceed customer expectations. Our highly skilled and knowledgeable professionals prioritize safety, efficiency, and customer satisfaction in every project. We offer various services, including roofing installation, repair, and maintenance for all types of roofing systems. Whether it's a small repair or a complete roof replacement, we guarantee timely and efficient completion with the best materials and techniques. We take pride in our work and strive to provide exceptional craftsmanship, reliability, and affordability.
Neat Services
(718) 880-4080 www.neatservicescorp.com
Serving
5.0 from 143 reviews
Neat Services is a licensed roofing and siding contractor in Queens, NY, serving Maspeth, Jackson Heights, Astoria, Forest Hills, and Brooklyn. We specialize in roof replacement, roof repair, siding installation, and window replacement with premium materials (GAF, CertainTeed) and a 25-year workmanship warranty. Bilingual team (English/Español), Directorii-backed, BBB A+, and 143+ five-star Google reviews. Need a roofing contractor near me or siding contractor near me? Call Neat for fast estimates, clear communication, and clean, professional work done right.
Goldenberg Roofing NYC
(718) 489-3999 bestroofingnyc.com
Serving
4.8 from 66 reviews
Goldenberg Roofing NYC, established in 1988, is the preeminent roofing contractor in New York City, specializing in commercial and residential roofing projects, from minor repairs to complex renovations. Our team of roofing experts, gutter specialists, siding contractors, and masonry professionals has 30+ years of experience in exterior renovations, delivering unparalleled craftsmanship and tailored solutions for every project. Whether it’s flat roofing, EPDM, TPO, torch down, SBS single-ply membranes, skylights, dormers, roof hatches, coping, parapet walls, masonry, or exterior siding repairs, Goldenberg Roofing has your roofing and siding needs covered. Call us today for a fast & free estimate on your commercial or residential project.
C&D Brooklyn Roofers
(718) 557-9199 expertconstructionguys.com
Serving
4.9 from 166 reviews
If you're in Brooklyn and looking for a solid solution to your roofing problem, we are the roofers to call. We specialize in new roof installations, siding installation, and window installation and can help you now . Lets get full control of that roofing/siding/windows issue - call us now - we are the top roofers of Brooklyn!
Eagle Express Contractor
(347) 362-0008 eagleexpresscontractor.com
Serving
5.0 from 82 reviews
At Eagle Express Contractor, we pride ourselves on delivering top-notch roofing services with a commitment to excellence and customer satisfaction. With extensive experience in the roofing industry, our skilled team is equipped to handle projects of all sizes, from minor repairs to large-scale installations. We believe no job is too big or too small for us, and we take every project seriously, ensuring high-quality results every time. Our motto, "One call does all," reflects our dedication to providing comprehensive solutions for all your roofing needs. Contact us today to experience the Eagle Express difference!
N.V. & Roman Commercial Roofing Brooklyn
(917) 440-1800 commercialroofingbrooklyn.com
Serving
5.0 from 97 reviews
Established in 1987, N.V. & Roman Commercial Roofing Brooklyn has been the premier choice for professional roofing services across New York City. As a fully licensed, insured, and bonded team of experts, they specialize in top-rated commercial roof installations and comprehensive property management solutions. Their commitment to quality and unmatched expertise ensures every project is completed to the highest standards, providing reliable and durable roofing for businesses throughout the five boroughs.
TOP 1 Expert Home Improvement
(347) 925-7622 www.top1expert.com
Serving
5.0 from 348 reviews
With decades of experience in delivering top-quality roofing services, TOP 1 Expert Home Improvement is a family-owned and operated business proudly serving the greater New York and metropolitan area. Our skilled team is committed to offering the highest level of service and craftsmanship in the region.
Brooklyns Best Roofing Williamsburg
brooklynsbestroofingwilliamsburg.com
Serving
5.0 from 121 reviews
Brooklyns Best Roofing Williamsburg delivers exceptional roofing solutions for homes and businesses. As a trusted leader, we are dedicated to providing top-quality residential and commercial roofing services in NYC. Our commitment to excellence shines through in every project, ensuring durability and complete customer satisfaction. From expert installation to meticulous repairs and ongoing maintenance, our skilled team uses only the best materials and provides reliable craftsmanship tailored to your specific needs. Choose us for roofing projects done right, every time.
Royal Roofing & Siding Bronx
(718) 395-5061 www.nycrenovators.com
Serving
4.9 from 76 reviews
Royal Roofing Bronx, a division of Royal Renovators, is a trusted roofing company proudly serving homeowners, landlords, and businesses throughout the Bronx. We specialize in roof replacement, leak repair, flat roofing, shingles, siding, gutters, and emergency roof service—always with licensed, insured, and experienced crews. As part of one of NYC’s most respected roofing contractors, we combine local Bronx expertise with the resources of a citywide leader. Our mission is simple: provide honest estimates, top-quality workmanship, and lasting protection for every property we service. With an unparalleled commitment to excellence and customer satisfaction, the reputation speaks for itself. Call today for a free estimate quote!
Royal Roofing & Siding NYC
Serving
4.9 from 96 reviews
Royal Roofing & Siding NYC is Manhattan’s trusted roofing contractor, serving homeowners and businesses throughout Manhattan and the greater New York City area. Since 1988, our family-owned and operated, BBB Accredited, licensed and insured roofing professionals provide expert residential and commercial roofing services. We specialize in flat roof repairs tailored to dense urban properties, brownstone roof replacements, and EPDM, TPO, & SBS flat roofing systems. We also provide professional masonry, siding, and gutter services, as well as repairs to skylights, parapet walls, coping, and cornices. From condo skyscraper buildings to Manhattan townhomes, we do it all. We offer emergency services for urgent leaks and storm damage. Contact us.
In this market, a full re-roof typically requires a permit through the New York City Department of Buildings rather than a separate village or town building office. Before any Hoffmann-style work begins, you should confirm the project scope with your contractor and file the DOB permit package early in the process. The permit covers the roof assembly, any underlying decking work, and venting changes, ensuring a formal record with the city. Starting the permit process well ahead of material delivery helps prevent delays that push projects into adverse weather windows or winter slowdowns.
DOB inspections in this market commonly focus on decking condition, flashing, and ventilation compliance during and after installation. A common pitfall is assuming decking is sound without a professional inspection, especially on older rowhouse structures where framing can hide prior compromises. Your inspector will look for solid deck connections, proper drainage details, and that flashing around walls, chimneys, and dormers is continuous and properly sealed. Ventilation must meet current code expectations to prevent moisture buildup in attic spaces and to maintain the longevity of the roof assembly. Plan for the inspector to visit at multiple stages: pre-deck, mid-install, and final completion, so any issues can be corrected before the next phase.
Projects in Astoria can take longer to clear when structural changes are involved or when the roof uses less common materials that require closer review. If the plan includes extending or altering roof geometry, adding a skylight, or choosing non-standard materials, expect additional code checks and potential design reviews. Communication with the building department is key: provide shop drawings, product data, and engineering details as requested, and respond to any questions promptly to minimize back-and-forth. Scheduling with their field inspectors can help you anticipate weather-related hold-ups and align inspections with your contractor's milestones. In dense rowhouse blocks, coordinating with neighboring properties for scaffolding and access is a practical step to keep the process moving smoothly.
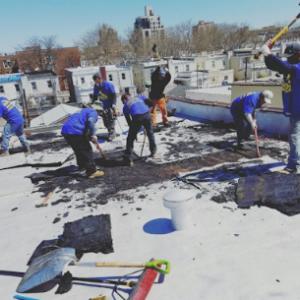
In this part of Queens, labor and logistics drive more of the price than you might expect. Narrow, tree-lined streets and dense frontage mean crews often need careful staging around attached buildings, with materials hauled through tight backyard routes or overhead alley access. Debris handling becomes a bigger job when multiple homes share gutters and parapets, and parking restrictions can slow down scheduling. All of this nudges routine tear-off timelines and waste disposal costs upward, especially on rowhouses where there's little room for a dust-free work zone. If your project site has nearby scaffolding, crane lifts, or limited curb space, you should expect some extra maneuvering fees and a longer coordination window during the work week.
Older Astoria homes frequently hide issues beneath the surface. When tear-off begins, expect the possibility of uncovering compromised decking or sections of failed underlayment, particularly where moisture intrusion has lingered around parapets, chimneys, or transitions for low-slope areas. In low-slope zones, decking rot and fastener corrosion can compound labor time and material needs, pushing budgets beyond initial estimates. You should budget for a thorough inspection of roof decking and ensure a plan for any necessary repairs before final sealing. If there is previous patchwork or mismatched patching over the years, the discovery of uneven decking or software-style flashing failures can complicate the repair scope and extend labor hours.
Replacement timing tends to run more favorably from late spring through early fall in this market, because winter conditions complicate tear-off, sealing, and inspection scheduling. Cold mornings slow adhesive cures and can impact ventilation during tear-off, while freeze-thaw cycles threaten early moisture intrusion if a tight seal isn't achieved promptly. Planning ahead for shoulder-season windows can help you avoid weather-induced delays and allow crews to stage materials with less congestion around busy blocks. If you can align the project with drier months and calm winds, you're more likely to see smoother scheduling and fewer surprise adjustments to your budget.
Don't let upfront costs delay a critical repair - these contractors offer payment plans to fit your budget.
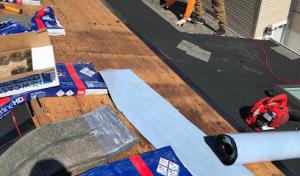
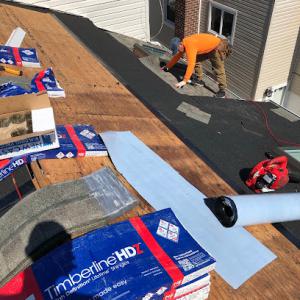
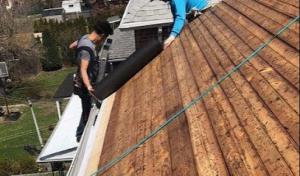
On Astoria's pitched roof sections, asphalt shingles are a familiar sight among rowhouses and small multifamily buildings. In the humid summers and freeze-thaw winters here, lower-grade shingles tend to age faster, with heat and moisture accelerating granule loss and edge curl. When choosing a product, look for higher fire-resistance ratings and mid- to premium Granular asphalt blends that hold up better against the summer moisture and occasional coastal salt in the air. Pay attention to nail sealing and proper attic ventilation to minimize heat buildup under the shingle line, especially where roofs transition to low-slope portions or crown moldings that catch lingering heat.
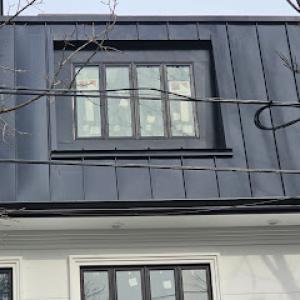
Metal appears in the market but must be detailed carefully around urban penetrations, chimneys, and mixed roof geometries common in Astoria homes. Flat or low-slope sections may benefit from metal for longevity, but the city's dense footprints mean every chimney boot, vent stack, and skylight becomes a point of detail. Choose panels with closed valleys or treated integral flashing, and plan for continuous seam detailing where multiple roof planes meet. Corrosion resistance matters in coastal air, so consider galvalume or stainless components for long life. Metal works best when integrated with precise flashing and careful sealants at all roof penetrations.
Clay tile, concrete tile, slate, and synthetic slate are relevant mainly where architectural style or historic appearance matters, but their weight and detailing can complicate work on older New York City structures. Clay and concrete tiles demand structural assessment for live loads, while slate and synthetic slate require exacting underlayment and rafter spacing. For Astoria homes with historic character, ensure alignment with existing roof lines and ornamentation, and plan for specialized flashing around dormers and skylights to preserve both appearance and performance on the long term.
Chimney-related roof work is especially relevant in Astoria because many homes have masonry chimneys that intersect older flashing systems. When repairing or replacing flashing, you may encounter cracked mortar joints, missing counterflashing, or improper step flashing where the chimney meets the roof plane. In rowhouses with low-slope roofs, a small failure at the chimney can lead to interior leaks that sneak through ceiling joints, especially after a heavy rain or thaw cycle. Expect to reflash the chimney base with a continuous, compatible sealant and to seal any cracked masonry promptly to avoid repeated water intrusion.
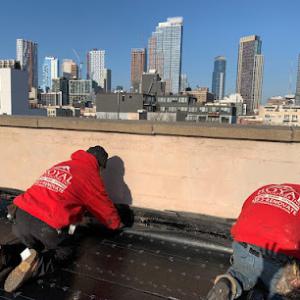
Parapet walls and roof edge transitions are common leak points on attached and low-slope buildings, especially after repeated freeze-thaw exposure. Astoria's winters create shifting transitions where masonry parapets meet the roof deck, often hiding hairline cracks or loose coping stones. A proactive approach is to verify that coping caps are bedded properly and that upstands remain watertight around parapet penetrations. When existing edge flashing shows signs of lifting or corrosion, plan for a careful resealing or flashing replacement that extends well onto the roof plane to reduce capillary seepage during storms.
Skylights are a meaningful local service category and need careful curb and flashing integration on both low-slope and pitched sections. In tight rowhouse footprints, skylight curbs can become bleed points if not flashed in with a continuous seal against the curb, deck, and glass. Ensure drainage around the skylight is unobstructed and that the membrane folds smoothly onto the curb with reinforced corners. Improper curb flashing invites water migration into the interior roof-to-ceiling junctions.
Keep an eye on dark streaks along parapets, spalling masonry, or loose coping. Interior indicators like stained ceilings near ceilings or attic condensation can betray slow leaks at chimneys or edge transitions. Regular, careful inspections focusing on these areas can catch trouble before it escalates into costly repairs.
Find contractors experienced in skylight installation, flashing, and leak repairs to bring natural light into your home.
George's Roofing
(718) 747-4954 www.georgesroofing.com
38-11 Ditmars Blvd, Astoria, New York
4.8 from 38 reviews

Choosing a roofer in this dense block environment means weighing speed of response and how well debris is controlled. Astoria homeowners notice when crews keep streets clear and use dumpsters or containment tarps rather than letting litter drift onto sidewalks. The local market leans toward firms that specialize in re-roofing and know how to work around occupied rowhouses, attached homes, and older roof assemblies without turning common areas into a construction zone.
Before you hire, verify credentials, portfolio, and references from projects similar in scale and age. Ask for proof of license and insurance, and request a written safety plan that covers stair access, protective barricades, and edge protection for low-slope sections. Look for crews with experience navigating shared walls and fire-rated assemblies, where proper sealing and ventilation matter more than speed alone.
During the job, insist on a single point of contact, daily cleanup, and a clearly posted schedule. In a rowhouse setting, debris control matters for neighbors on both sides, so confirm that bins, tarps, and netting will be used on roof valleys and parapets. If access is through a common hallway or narrow staircase, require protective mats and weather protection for interior spaces.
Ask for a step-by-step plan: material deliveries staged to minimize street congestion, a written sequence for roof removal, installation, and cleanup, and a contingency plan for rain or heat. Schedule a mid-project check-in to confirm that ventilation, flashing, and drainage meet the building's specific needs and that neighbors are informed of any disruptive work.
Solar-integrated roofing is a smaller specialty in Astoria than core re-roofing and leak repair work. This means finding the right installer who understands both the specific roof geometry common here and the way a solar-equipped roof ages in our freeze-thaw winters and humid summers. In rowhouses and small multifamily buildings, the roof deck often overlaps with parapets, bulkheads, and firewalls, which can complicate array placement and waterproof detailing. The benefit is a clean, integrated look when a membrane or metal roof is designed to host solar panels or solar shingles, but the feasibility hinges on precise detailing at transitions and edges.
Astoria's mixed roof shapes and attached-building layouts limit where solar-related roof work is practical. Flat or near-flat sections on low-slope roofs adjacent to party walls can work well, but parapets, eyebrow dormers, and vent stacks create shaded zones and setback requirements. A compact, edge-mounted design may avoid overhang conflicts with neighboring properties, while central skylights or HVAC curbs require careful sealing to maintain water control. In buildings with multiple units, the shared layout means one roof plane might serve many tenants, so the solar plan should align with common-area maintenance and stormwater routing.
Evaluate potential shading from taller neighbors or overhead wires across the street, and verify that the chosen system complements the existing roof material-whether asphalt, metal, or tile-without introducing cold-weather ice-dam risks. Seek installers with demonstrated experience in our climate and NYC-style workmanship, and request a detailed warranty map that covers both roof material and solar components. Expect a careful review of penetrations, flashings, and edge details to maintain long-term waterproof performance.
Maintenance and longevity In Astoria, solar roofs require inspections after winter storms and summer humidity. Look for cracks around flashings, loose mounting hardware, and creep of the roofing sealant at edges. A proactive maintenance plan helps catch issues before leaks, preserving energy gains and the roof's waterproof integrity.
Find contractors who integrate solar panels or solar shingles into your roof for long-term energy savings.
Skyward Roofing Contractor - Bronx
(718) 736-2553 www.skywardroofing.com
Serving
4.9 from 69 reviews