Last updated: Apr 19, 2026
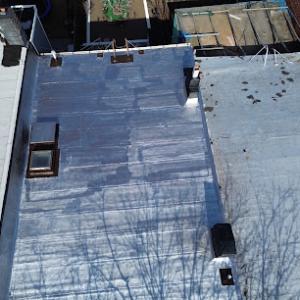
Flat and low-slope roofs sit atop attached rowhouses, multifamily buildings, and mixed-use blocks in this area. The tight lot lines and shared parapets mean water has fewer places to go and more chances to spread, especially at joints where two roofs meet or where an extension steps into the parapet. In practice, that means drainage planning isn't a luxury; it's a daily necessity. Pay close attention to the slope, or lack thereof, across the entire roof plane. If you notice any plateaus or low spots near party walls, plan for targeted drainage upgrades rather than expecting natural flow to handle it.
Ponding-standing water after rain-is more than a nuisance on flat or very low-slope roofs. Over time, water weight, UV exposure, and freeze-thaw cycles can accelerate deck delamination, membrane wear, and insulation saturation. In dense western Queens blocks, ponding often forms near parapet intersections or edge transitions where wind-driven rain tends to collect. Inspect after storms for water depth lingering 24 hours or more, and map these zones. If you find consistent pooling in the same spots, that signal should drive a targeted plan to rework slope, add internal drains, or adjust scuppers and gutters to improve rapid removal.
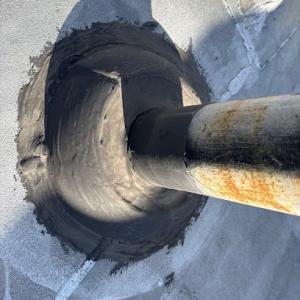
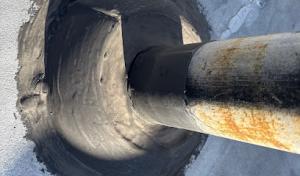
Edges and parapet walls are the pressure points on low-slope roofs. The wind funneled from the East River side channels water toward roof penetrations and flashing transitions, making these areas the most vulnerable to leaks. Flashing failures often show up as rusted or displaced metal, loose sealant, or corrosion at seams where roof membrane meets parapet cap. In buildings with shared walls, even small gaps can become persistent leak paths during wind-driven rain. Regularly inspect chimney and vent flashings, joint seals around curbs, and the perimeter edge flashing. When planters or rooftop equipment occupy the parapet top, ensure sealant compatibility and trap-free drainage at all interface points.
Edge details, coping, and parapet geometry demand careful attention. A common overlook is coping that traps moisture at the face of the wall, then wick it back into the roof membrane during freeze-thaw cycles. Parapet penetrations for skylights, antennas, or HVAC curbs require precise sealant management and scupper or drip-edge design that accommodates wind-driven rain without allowing backflow. If buildings share a single parapet, the edge must accommodate thermal movement from wider temperature swings without cracking or opening seams. In practice, consider upgrading or preserving edge metal with a coating that resists corrosion and a sealant system rated for wind-driven moisture.
Your best defense is a disciplined maintenance rhythm. After heavy storms, perform a focused roof walk to confirm drainage lines remain clear, scuppers aren't blocked, and edge flashings haven't shifted. Schedule seasonal checks in late fall and early spring to catch seasonal damage before it accelerates. Keep a simple map of known ponding zones and flashings, and assign a responsible party for frequent touch-ups to sealant joints and restore edge protection. On long-term projects, prioritize reworking drainage paths or adding secondary drainage to keep water moving away from critical intersections rather than letting it stagnate near the parapet.
When planning upgrades, prioritize improving drainage reliability and flashing resilience more than cosmetic changes. Consider installing or upgrading internal drains to remove water quickly from low spots, and pair this with robust, compatible flashing materials designed for commercial flats and mixed-use roofs. If you're replacing a roof section, align the new system with the existing parapet geometry to minimize transitional weaknesses. In dense blocks, a well-designed drainage and edge system can meaningfully extend the life of the roof system and reduce the frequency of emergency repairs after wind events or heavy rainfall. For properties with shared walls, coordinate with neighbors to ensure that all transitions meet the same performance standards, since a weak point on one side can impact the entire parapet edge.
Fall nor'easters and spring wind events are a recurring scheduling and leak risk in the New York City area, especially where older flashing is already stressed. In dense rows and mixed-use blocks, roofs sit under pressure from close-by towers and wind corridors that funnel gusts toward the flashing lines and penetrations. When a storm arrives with rain wrapped in a sharp east-to-northeast push, you'll notice leaks forming near chimneys, skylights, and roof-to-wall junctures long before a carefree shower passes. The practical result is that moisture travels along the top edge, finds the weakest seal, and shows up inside faster than you expect.
Wind-driven rain is a bigger practical concern in this neighborhood than inland-only weather because roofs sit near the East River corridor and among taller surrounding structures. Those wind bursts press rain horizontally against flat or low-slope surfaces, wringing out weak seals around flashing, fasteners, and sealant joints. Flat roofs in this setting often reveal compromised areas after a single storm where you'd hoped for a dry ceiling. The effect compounds on older builds with aging sealants, deck membranes that have de-laminated, or countersunk penetrations that were never properly flashed for wind. If a leak surfaces after a gusty rain, treat it as a warning that a larger section of roof is at risk.
When a leak starts, time matters. Photograph the scene from multiple angles as soon as it's safe to do so-the overall roof condition, flashing corners, intersections, and penetrations. Capture the interior impact too: ceiling stains, drips, and any staining around light fixtures or vents. These images matter quickly for insurers, and the neighborhood history of a roof's performance helps a contractor prioritize the exact spots to seal or re-flash. If you can access the roof safely, note any blown or lifted flashing, loose fasteners, or torn membrane edges. Do not delay securing the interior-place containment, towels, or buckets to minimize water damage while arranging a fix.
Create a simple, annual pre-storm check focused on high-risk zones: parapet corners, roof-to-wall joints, booted penetrations, and any area with a history of leaks. Keep a small, weatherproof kit on hand in the top unit or utility closet-film or photo documentation, a spare sealant tube, and a basic flashlight for attic or crawl space checks after dark. If a leak has appeared, prioritize a temporary repair that covers the flashing seam and any visible gaps until a full flashing replacement can occur. In this environment, acting quickly and documenting thoroughly makes the difference between a minor drip and a ceiling full of damage.
Find local contractors experienced in assessing and restoring roofs after hail, wind, and severe weather events.
N.V. & Roman Commercial Roofing Brooklyn
(917) 440-1800 commercialroofingbrooklyn.com
Serving
5.0 from 97 reviews

Chavez & Sons Roofing & Construction
(551) 292-7000 chavezsonsroofingconstruction.com
Serving
4.8 from 78 reviews
N.V. & Roman Commercial Roofing Brooklyn
(917) 440-1800 commercialroofingbrooklyn.com
Serving
5.0 from 97 reviews
Established in 1987, N.V. & Roman Commercial Roofing Brooklyn has been the premier choice for professional roofing services across New York City. As a fully licensed, insured, and bonded team of experts, they specialize in top-rated commercial roof installations and comprehensive property management solutions. Their commitment to quality and unmatched expertise ensures every project is completed to the highest standards, providing reliable and durable roofing for businesses throughout the five boroughs.
Astoria Roofing
(718) 285-6273 www.astoriaroofingny.com
Serving
5.0 from 78 reviews
For over three decades, Astoria Roofing has been a reliable roofing contractor servicing Queens, Brooklyn, and the greater NYC region. With an unwavering commitment to excellence, our skilled professionals specialize in residential and commercial projects, expertly handling various services such as roof replacements, leak repairs, flat roofs, waterproofing, and professional maintenance. Utilizing top-grade materials, our licensed and insured team provides durable and long-lasting solutions, ensuring superior protection for your property and peace of mind. For exceptional customer service, fast response times, and honest communication, Contact us today for a free estimate and see why New Yorkers trust Astoria Roofing.
Brooklyns Best Roofing Williamsburg
brooklynsbestroofingwilliamsburg.com
Serving
5.0 from 121 reviews
Brooklyns Best Roofing Williamsburg delivers exceptional roofing solutions for homes and businesses. As a trusted leader, we are dedicated to providing top-quality residential and commercial roofing services in NYC. Our commitment to excellence shines through in every project, ensuring durability and complete customer satisfaction. From expert installation to meticulous repairs and ongoing maintenance, our skilled team uses only the best materials and provides reliable craftsmanship tailored to your specific needs. Choose us for roofing projects done right, every time.
Skyward Roofing
(646) 568-4399 www.skywardroofing.com
Serving
5.0 from 80 reviews
Skyward Roofing is a leading roofing company specializing in high-quality residential and commercial roofing services. With years of experience in the industry, we are committed to delivering top-notch roofing solutions that exceed customer expectations. Our highly skilled and knowledgeable professionals prioritize safety, efficiency, and customer satisfaction in every project. We offer various services, including roofing installation, repair, and maintenance for all types of roofing systems. Whether it's a small repair or a complete roof replacement, we guarantee timely and efficient completion with the best materials and techniques. We take pride in our work and strive to provide exceptional craftsmanship, reliability, and affordability.
Paragon Chimney & Roofing
(646) 844-2022 www.paragonchimneyandroofing.com
Serving
5.0 from 806 reviews
Since 1994, Paragon Chimney and Roofing has been Brooklyn’s premier choice for expert home exterior and heating solutions. With a skilled team of professionals, they specialize in a full range of services, including meticulous chimney sweeping, masonry work, and comprehensive roofing installations. Paragon is committed to delivering unparalleled craftsmanship and reliable service on every project, whether it involves a shingle, metal, or flat roof. Trust their proven expertise to enhance the safety and integrity of your home's most vital systems.
S. Elite Roofing & Construction
(718) 255-5254 www.seliteconstructionllc.com
Serving
5.0 from 69 reviews
Company providing roofing and waterproofing services.
Williamsburg Roofing
(718) 690-7084 www.williamsburgroofingny.com
Serving
5.0 from 55 reviews
Williamsburg Roofing proudly serves Brooklyn NY and surrounding areas with expert roofing solutions built to last. With over 30 years of experience, we specialize in all types of roof replacements, flat roofs, leak repairs, waterproofing, and routine maintenance for both residential and commercial properties. Our licensed and insured team delivers high-quality craftsmanship using premium materials designed to withstand NYC’s tough weather. Whether you're dealing with storm damage or planning a full roof upgrade, we offer fast turnaround times, honest pricing, and free estimates. Trust Williamsburg Roofing for reliable service and results you can count on—done right the first time. Call us today for a free estimate!
Royal Roofing & Siding NYC
Serving
4.9 from 96 reviews
Royal Roofing & Siding NYC is Manhattan’s trusted roofing contractor, serving homeowners and businesses throughout Manhattan and the greater New York City area. Since 1988, our family-owned and operated, BBB Accredited, licensed and insured roofing professionals provide expert residential and commercial roofing services. We specialize in flat roof repairs tailored to dense urban properties, brownstone roof replacements, and EPDM, TPO, & SBS flat roofing systems. We also provide professional masonry, siding, and gutter services, as well as repairs to skylights, parapet walls, coping, and cornices. From condo skyscraper buildings to Manhattan townhomes, we do it all. We offer emergency services for urgent leaks and storm damage. Contact us.
Eagle Express Contractor
(347) 362-0008 eagleexpresscontractor.com
Serving
5.0 from 82 reviews
At Eagle Express Contractor, we pride ourselves on delivering top-notch roofing services with a commitment to excellence and customer satisfaction. With extensive experience in the roofing industry, our skilled team is equipped to handle projects of all sizes, from minor repairs to large-scale installations. We believe no job is too big or too small for us, and we take every project seriously, ensuring high-quality results every time. Our motto, "One call does all," reflects our dedication to providing comprehensive solutions for all your roofing needs. Contact us today to experience the Eagle Express difference!
Neat Services
(718) 880-4080 www.neatservicescorp.com
Serving
5.0 from 143 reviews
Neat Services is a licensed roofing and siding contractor in Queens, NY, serving Maspeth, Jackson Heights, Astoria, Forest Hills, and Brooklyn. We specialize in roof replacement, roof repair, siding installation, and window replacement with premium materials (GAF, CertainTeed) and a 25-year workmanship warranty. Bilingual team (English/Español), Directorii-backed, BBB A+, and 143+ five-star Google reviews. Need a roofing contractor near me or siding contractor near me? Call Neat for fast estimates, clear communication, and clean, professional work done right.
George's Roofing
(718) 747-4954 www.georgesroofing.com
Serving
4.8 from 38 reviews
For over three decades, George's Roofing has been a family-owned and operated business dedicated to providing top-tier roofing solutions. Based in Astoria, our expertise extends beyond simple repairs to include comprehensive new roof installations, meticulous masonry work, and professional pressure washing services. We take pride in our commitment to quality, ensuring every project, big or small, is completed with the highest level of craftsmanship. Trust our seasoned professionals to protect and enhance your home, guaranteeing exceptional results that stand the test of time.
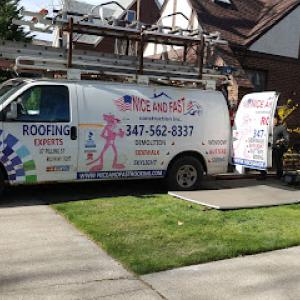
Nice & Fast Construction
Serving
4.9 from 63 reviews
Jaime J Duchi has been working as a local New York roofing contractor installing new roofs, vinyl siding, replacement windows and seamless gutters for over14 years. We have a great reputation for high quality workmanship, and also install roofing products with a lifetime warranty. Your roof protects your home, all of your personal belonings and most importantly your family so don't take any chances, call Nice and fast construction today!
Residential roof replacement work in Queens falls under the New York City Department of Buildings. That means every project must navigate a formal permit process, and the permit must be visibly posted on site during the entire duration of the work. On dense blocks with tight urban lots and sidewalk-facing facades, keeping the permit in a clearly visible location-such as a sturdy posted notice on the front façade or near the scaffold base-helps avoid encounters with inspectors and neighbors who rely on seeing official documentation. If the sidewalk is crowded or the fence line is tight, coordinate with the contractor to place the notice in a spot that remains legible and protected from wind, rain, or accidental removal.
Rough and final inspections are integral to the local process. Before any work begins, ensure the contractor has the proper license and is registered with the DOB, and that all subcontractors are likewise in good standing. The rough inspection typically catches framing, flashing, and drainage details, while the final inspection confirms completion and code compliance. In a rowhouse neighborhood with mixed-use blocks, it's common for inspectors to request access to attic spaces, inner roof cavities, and any added penetrations for vents or skylights. Plan for temporary access arrangements and clear routes for inspector attendance during the build window. Delays or re-inspections can occur if access is obstructed by scaffolding, debris, or parked vehicles.
Contractors performing roof replacements must be licensed and registered with the DOB. This requirement isn't cosmetic-unlicensed work can trigger fines, hold-ups in permit closure, and potential liability if inspections reveal noncompliant installations. In a high-density setting, where neighboring properties share party walls and close setbacks, a licensed contractor is more likely to adhere to wind uplift, waterproofing, and drainage standards that are critical for low-slope roofs. Verify the contractor's DOB details before signing a contract, and keep a copy of the license and registration on site for quick reference during inspections.
On a tightly built block, the permit becomes a practical element of the daily schedule. Scaffold plans, material deliveries, and debris containment must align with permit conditions. Inspectors may require proof of weatherproofing strategies and drainage work tied to the new roofing system, especially where East River exposure introduces freeze-thaw cycles and wind-driven stresses. Communicate anticipated inspection dates to the HOA or building manager if applicable, and make sure the site has a safe, clearly marked path for pedestrians during work hours. A visibly posted permit, ready access for inspections, and compliant licensing help keep the project moving and reduce the risk of costly hold-ups in a neighborhood where every square foot and every alley corner counts.
For asphalt shingles, the local range runs from 350 to 650 USD per square. Metal roofs sit between 600 and 1100 USD per square. Clay tile projects typically run from 900 to 1700 USD per square, while concrete tile lands around 850 to 1500 USD per square. Wood shingles or shakes are usually priced from 700 to 1200 USD per square, and synthetic or composite shingles come in roughly 420 to 800 USD per square. These figures reflect Long Island City material choices on dense, urban blocks where curb appeal must meet weather exposure and building layout realities.
Pricing in a dense urban setting is driven by constrained staging space, sidewalk protection needs, and more complex debris handling than in suburban areas. Staging and material holds often consume the limited curb appeal real estate, and crews may need extra time to work around narrow walkways, scaffolding, and adjacent stoops. Each of these factors can push the final price above a simple material-plus-labor calculation, especially on tight blocks with frequent pedestrian traffic or limited curbcuts.
Costs can rise when attached buildings, parapets, chimneys, skylights, and mixed roof geometries require more flashing and hand-detail work common in older Queens housing stock. Flat and low-slope roofs frequently demand extra waterproofing, edge detailing, and specialized flashing strategies to handle wind uplift from east-to-southeast coastal storms and winter freeze-thaw cycles. In practice, expect higher labor intensity on multi-void roofs, shared party walls, and buildings with irregular footprints.
If you're weighing materials, start with the raw per-square ranges above and add a modest premium for staging, debris handling, and additional flashing on shared facades. For attached rowhouses with parapets or chimneys, budget for extra flashing and careful edge work. On clay and concrete tiles, factor in the heavier handling and potential need for more secure ballast or underlayment details on windy days. Synthetic or composite shingles can offer favorable cost-to-durability balance where wind exposure and maintenance cycles are top concerns.
In LIC, the total project price is not just the material tick box. Urban logistics, complex roof geometry, and the presence of parapets or many penetrations consistently push costs upward from the basic material ranges. Plan for a thoughtful balance of durability, ease of installation, and long-term performance given the area's coastal exposure and dense housing stock.
In Western Queens, the climate delivers cold winters with repeated freeze-thaw cycles that stress roof systems year after year. Shingles, flashing around chimneys and vents, and sealants at roof penetrations bear the brunt of those cycles, especially on low-slope and flat profiles common on rowhomes and mixed-use buildings. When water seeps into small gaps and then freezes, that water expands, prying apart seams and loosening fasteners. Over multiple seasons, you can notice more cupping, cracking, or lifted edges on asphalt or synthetic shingles, along with diminished effectiveness from deteriorated sealants that were supposed to keep edges watertight. In a dense urban setting like Long Island City, with frequent wind-driven spray and occasional wind-driven debris, flashing joints can fail where attic access is limited and roof penetrations are frequent.
Hot, humid summers accentuate wear on asphalt shingles and underlayment, particularly on darker roofs that absorb more heat. When attic ventilation is limited, heat builds up under the roof deck, accelerating dehydration of underlayment and accelerating asphalt aging. That combination can lead to faster granule loss, reduced reflectivity, and softer composite layers near eave and corner flashings. In these neighborhoods, the balance between insulation and ventilation matters just as much as the roof's composition. If attic runners or soffit vents are blocked by stored items or insulation that sits low, the roof system cooks from above and from below, shortening the life of shingle overlays and increasing the risk of blistering on low-slope faces.
Most major replacement work is scheduled from late spring through early fall because that window best avoids winter installation problems and late-fall storm delays. That timing aligns with drier, more predictable weather; it also minimizes the risk of concrete or underlayment freeze-related issues during installation. For crews working on dense, multi-unit blocks, a planned spring start reduces the chance of weather-driven delays and helps ensure that flashing details-around dormers, skylights, and planters-are properly sealed before the next freeze. If a project runs into shoulder seasons, expect longer drying times and a tighter window for interior protection.
Regular, proactive maintenance pays off. Schedule inspections after the peak freeze-thaw season and again after heavy summer storms to verify sealant integrity and flashing continuity. Check attic insulation and ventilation to keep the deck cooler in summer and drier in winter. For flat or low-slope roofs, ask about reflective or lighter-colored cap sheets and flashing upgrades that resist heat creep and wind uplift. On dark roofs, consider coatings with solar reflectance to reduce heat absorption while ensuring compatibility with the existing shingle or membrane system. A focused repair strategy on seals and detail work around penetrations often yields the most durable improvements between full roof replacements.
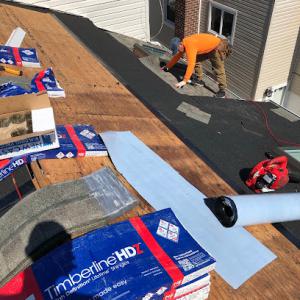
Asphalt shingles remain a dominant option for sloped sections on one- and two-family homes in long island city, but many local buildings also include low-slope rear or top roof areas that need different detailing. For typical rowhouse profiles, keep a straightforward two-layer approach: durable underlayment, a solid ice-dam barrier at eaves, and uv-stable products that tolerate winter freeze-thaw cycles and wind-driven rain. In dense blocks, careful attic ventilation and ridge venting help prevent heat buildup that can warp shingles and shorten life.
Low-slope rear or top roof areas are more exposed to gusts from the East River and to pooling water after heavy showers. In those sections, flat- or low-slope membranes with seam-free installation reduce leak risk. Pay attention to perimeter flashing where the roof meets brick parapets or masonry. In LIC, it helps to specify a compatible flashing detail that matches the chosen membrane and accounts for brick expansion and movement over seasons. Regular checks after major storms ensure any coarse debris or pooled water is addressed before it corrodes seams.
Clay and concrete tile appear in the broader market but are less forgiving on older urban structures where added weight and specialized flashing details can complicate replacement. If choosing tiles, ensure the structure can bear the weight and that a qualified installer designs the rafter and support transitions. Synthetic/composite products can appeal where homeowners want the look of premium materials with less structural burden and easier maintenance in a dense city setting. They often provide consistent performance across both sloped and flat sections, with more forgiving installation details and faster serviceability during mid-winter fixes.
Start with assessing the balance of sloped versus low-slope areas on the building. Match the primary material to the most protected, higher-traffic zones, then pair with a second solution for rear or top surfaces exposed to wind and pooling. Prioritize products with proven wind resistance and compatible flashing systems to simplify replacements in a tight urban footprint. Plan for integrated drip edge and gutter strategies to manage frequent coastal moisture shifts.
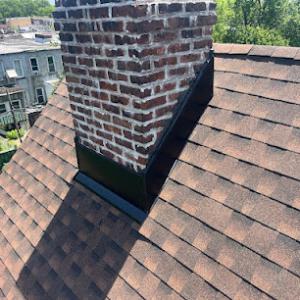
Chimneys are a frequent local concern, reflecting how common chimney-related contractor work is across Queens. In dense rowhouses and mixed-use blocks, the intersection where brickwork meets roof decking creates several vulnerable seams. As winter winds press in from the river and freeze-thaw cycles bite, mortar gaps, crown details, and step flashing around the chimney can fail first. A small crack or loose cap often lets water travel far before it becomes obvious on ceilings. Regular inspection of the chase and flashing, especially after storms, helps catch drips before they become stains or mold.
Skylights are a meaningful specialty locally, and on roofs with flat or low-slope design they sit within complicated assemblies where curb flashing quality determines leak risk. In Long Island City, skylights tucked into parapets or adjacent roof planes may rely on narrow counter-flashing and sealant joints that degrade from sun exposure and thermal cycling. When aging sealants pull back or when curb flashing shifts with building movement, leaks often track along the curb line. Pay close attention to membrane seals around skylight flanges, and verify proper drainage away from the curb to avoid ponded water.
Parapet walls and transitions between adjoining roof sections are common weak points on attached Long Island City buildings. Water can migrate from one roof plane to another through poorly sealed step joints, deck penetrations, or compromised counter-flashing at the parapet base. In windy seasons, wind-driven rain can press under coping caps or through gaps at the parapet-to-deck interface. Regularly checking coping integrity, sealant performance, and the condition of joints where two roofs meet helps prevent cascading leaks across multiple units or exposures.
Because many roofs sit in tight, high-velocity wind corridors, small flaws grow quickly under pressure from storms and freeze-thaw cycles. Develop a cadence for targeted inspections after winter thaws and after major storms, focusing on flashing transitions, chimney chase seals, skylight flanges, and parapet interfaces. Early intervention keeps local roofs drier and reduces interior damage while preserving the long-term performance of these urban assemblies.
Find contractors experienced in skylight installation, flashing, and leak repairs to bring natural light into your home.
N.V. & Roman Commercial Roofing Brooklyn
(917) 440-1800 commercialroofingbrooklyn.com
Serving
5.0 from 97 reviews
Chavez & Sons Roofing & Construction
(551) 292-7000 chavezsonsroofingconstruction.com
Serving
4.8 from 78 reviews
Paragon Chimney & Roofing
(646) 844-2022 www.paragonchimneyandroofing.com
Serving
5.0 from 806 reviews
The local insurance environment often involves wind and hail-related roof claims after storms in the New York City area. In dense rowhouse blocks and mixed-use buildings, low-slope or flat roofs are especially exposed to wind-driven rain and freeze-thaw cycles, which can drive claim conversations. When a storm hits, expect the process to move quickly through the outer sender of notices to on-site evaluations, with adjusters familiar with multi-story and flat-roof nuances.
Insurers commonly ask for photos, material specifications, and prior roof history, so Long Island City homeowners benefit from keeping dated maintenance and repair records. Start a file that includes recent roof invoices, prior repair notes, and any manufacturer data for the existing roof system. When a claim is filed, organize color photos showing the entire roof, plus close-ups of seams, flashing, drain paths, and any visible damage. Having a concise material spec, including membrane type, slope, and insulation, helps the adjuster verify scope without returning for multiple visits.
Adjusters may coordinate closely with contractors to verify damage and scope, making documentation quality especially important before temporary repairs obscure evidence. If temporary patches are necessary to prevent further water intrusion, photograph the site before and after any patch, and keep all receipts. On a typical LIC project, ensure any proposed repairs align with existing roof geometry and drainage, so the scope remains clear and auditable during the claim review.
Once the claim settles, review the settlement against observed conditions and the documented history. If any discrepancy emerges between the observed damage and the approved scope, request a reinspection promptly. Clear, dated records from prior years help anchor discussions and expedite resolutions after storms.