Last updated: Apr 19, 2026
Pacific Northwest winter rainfall keeps roof surfaces damp for long stretches, and that moisture obsession shows up fast. In Gresham, the repeated shifts between wet days and cool nights push leak risk right into flashing, valleys, and roof penetrations. If your roof hasn't drained and dried properly between storms, those trouble spots become magnified weak points. A lifted shingle corner, a loose valley seam, or a cracked boot can become a fast track for water intrusion once the rain returns. This is not a once-in-a-season risk-it's a long, damp season pattern that compounds with every storm.
In established neighborhoods with tall trees and shaded roof planes, moss and algae thrive in the damp microclimates that hang around the eaves and rakes. Wet debris, pine needles, and fallen leaves trap moisture and hold it against the surface longer than you expect. When shading blankets parts of the roof, those areas stay damp well into the day, accelerating fastener corrosion and sealant breakdown. The combination of moss clinging to shingles and wet debris keeping flashing joints wet is a recipe for accelerated decay at critical edges and junctions. You'll notice dark streaks, slick surfaces, and small but persistent leaks near penetrations where moss bridges gap seams.
Water finds the path of least resistance, and during long wet spells, that path often runs along flashing joints, valley intersections, and around vents or skylights. In a damp climate, sealants lose elasticity, screws loosen, and flashing metals corrode when they sit under consistent moisture. Freeze-thaw swings during colder periods compound this damage after the roof has already been saturated by repeated winter storms. When temperatures dip, any lingering moisture can freeze and expand, widening gaps and stressing previously sound joints. If you've delayed resealing or re-flashing those areas, you're inviting slow leaks that can suddenly become active at the worst time.
First, clear gutters and downspouts of wet debris so water can shed rather than linger near the fascia. Next, inspect around penetrations for moss growth and remove it safely with a soft-bristle brush and gentle cleaner; never power-wash vulnerable flashing or delicate seals. Pay special attention to valleys-look for any visible gaps, lifted edges, or flashing laps that reveal rust or corrosion. If you can access the attic, check for condensation-driven staining on sheathing or signs of active leaks around vent stacks. Treat shaded, moss-prone areas with a moss-resistant approach next dry season, and plan a targeted inspection of flashing, seals, and valley joints before the next wet stretch hits. In Gresham, this proactive habit is the difference between a minor damp patch and a full roof failure caused by moisture seeping through critical junctions.
Late spring through early fall is the preferred reroofing window in Gresham because it reduces weather delays compared with the city's wet winter pattern. Plan to start after the last hard freeze and before the first heavy autumn rainstorms, aligning with a stretch of dry, predictable days. This is the time when crews can move efficiently, stay on schedule, and minimize moisture exposure of the interior after tear-off.
Winter storms and heavy rainfall in the Willamette Valley routinely interrupt tear-off schedules and can expose decking longer than planned if work starts in poor weather. If a winter start becomes necessary, build in extra day-for-day buffers and consider staged, partial tear-off to keep decking guarded while the rest of the roof cures. In practice, a careful calendar guardrail helps prevent prolonged exposure of vulnerable sheathing and attic spaces during wet months.
Extended dry summers improve installation conditions but also increase UV exposure on aging roofs that are already near replacement. When setting a start date, pick a window that allows a thorough inspection of the existing underlayment and flashing. Prolonged sun can accelerate asphalt shingle aging and stress underlayment, so aim to complete critical, moisture-control steps early in the season and protect newly installed components from direct sun during the hottest weeks.
Confirm a consecutive stretch of dry days for the bulk of tear-off, roof deck preparation, underlayment application, and shingle or panel installation. If forecasts show a sharp heat wave or a chance of late-season rain, plan to compress or extend the schedule accordingly so decking remains dry and fasteners stay within their acceptance window. In Portland metro-adjacent climate, a small rain event can quickly derail progress, so use short, clear milestones and frequent weather checks.
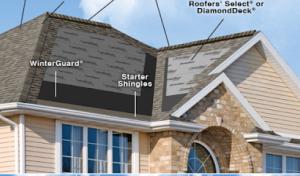
With a wetter climate pattern, prioritize decking protection and proper underlayment sequencing. On a late-spring to early-fall project, ensure that underlayment is continuous at edges and penetrations, with robust sealing around chimneys, vents, and skylights. If peeling or curling underlayment signs appear during prep, address them before full tear-off to minimize hidden moisture risk. A careful, methodical approach to flashing and drip edge installation pays dividends once the roof cap goes on.
As summer ends, schedule a final inspection to confirm no moisture pockets or minor fastener issues arose during installation. Extended dry periods demand attention to UV damage on aging components, so consider protective coatings or ventilation checks after completion to sustain roof life through the next wet season. In short, the best window blends reliable dry weather with a controlled, moisture-first workflow that keeps decking protected from first cut to final cap.
Get a clear picture of your project costs upfront - no commitment required.
New Generation Roofing
(503) 519-6421 www.newgeneration-roofing.com
122 NW 14th Pl, Gresham, Oregon
5.0 from 39 reviews

Fox Roofing & Construction
(503) 660-6225 foxroofingpdx.com
21891 SE Ash St, Gresham, Oregon
5.0 from 110 reviews
Discover the Fox Roofing and Construction difference in Gresham, Happy Valley, Clackamas, and Portland. We’re not just any contractor; we’re your partners in maintaining your sanctuary. With us, you're choosing respect, quality, and integrity. Unlike others, we never call to pressure or harass you; we inform and empower. Our certified team specializes in personalized roofing and exterior solutions, ensuring your needs and budget are front and center. Experience stress-free service with a family-owned company that puts you first. Join our family of satisfied customers and see why we're the trusted choice for your roofing needs. Be aware that there are other companies with similar name with a bad reputation. Trust our 5 Star Reviews.
AA Rite-Way Roofing
(503) 669-3712 aarite-wayroofing.net
24307 SE Stark St, Gresham, Oregon
4.8 from 341 reviews
We are family owned and operated Roofing Company, in business since 1994 in Oregon. We do full roofs and repairs. We do residential & commercial roofs, pitched roofs & flats roofs.
RBB Roofing & Contracting
3803 SW 9th Ct, Gresham, Oregon
4.9 from 121 reviews
RBB Roofing provides residential/commercial roofing, siding, painting, gutter, and repair services in the Portland OR, Area.
Rainy City Roofing
(503) 577-2176 rainycityroofing.com
2204-8 NW Birdsdale Ave, Gresham, Oregon
4.9 from 61 reviews
Rainy City Roofing: Premier roofing company Portland & Vancouver Metro Areas trust for quality and reliability! 🔨 Since 2008, Rainy City Roofing has been providing top-rated roofing Portland solutions across Portland and the greater Vancouver metro areas. Our team of skilled Portland roofers specializes in roof installation, replacement, leak repair, moss removal, gutter cleaning, and maintenance. As a leading Portland roofing company, we serve both residential and commercial properties, ensuring durable and aesthetically pleasing roofs. Our unwavering dedication to quality means every project is handled with precision and attention to detail, delivering exceptional results every time.
New Generation Roofing
(503) 519-6421 www.newgeneration-roofing.com
122 NW 14th Pl, Gresham, Oregon
5.0 from 39 reviews
A Gresham roofing company, providing high-quality residential roofing services including installation, replacement, repair, and maintenance since 2021. New Generation Roofing is a local, family-owned and operated business with a team of experienced installers ready to go above and beyond to get the job done right. We proudly stand behind our work with warranties for both labor & materials for a minimum of 10 years and go the extra mile to ensure a clean job site, making us one of the most highly rated Gresham roofing companies. Trust your Gresham roof replacement & repair needs to our skilled team, dedicated to customer satisfaction at a reasonable price point. Contact us today to schedule your inspection and get your free roofing estimate!

Blue Moon Roofing & Gutters
(971) 272-8812 www.bluemoonroofs.com
530 NE Liberty Ave A, Gresham, Oregon
5.0 from 29 reviews
At Blue Moon Roofing and Gutters, we deliver elevated care that’s oh-so rare. Based in Portland, OR, we specialize in high-quality residential roof replacements, repairs, gutter installations, and skylight upgrades. Our expert team combines craftsmanship, clear communication, and exceptional service to make the roofing process smooth and stress-free. Whether you're looking to protect your home, boost curb appeal, or increase energy efficiency, we offer premium products, third-party inspections, and long-term warranties to give you peace of mind. Discover a better roofing experience—one that’s built to last. CCB #256565

Gresham Roofing
(503) 492-7663 www.greshamroofing.com
Serving
4.8 from 128 reviews
Gresham Roofing and Construction is fully licensed, bonded and insured, and we hold one of the best safety records in the industry. We are also a manufacturer-approved installer for most major brands, and all our roof installations include a full warranty and manufacturer guarantee. Whether you need a full roof replacement or simply require a few patches here and there, our experienced roofing contractors and construction experts are here to help. We offer a full range of services, including: Residential Roofing, Commercial Roofing, Maintenance & Repairs and Construction Services.
Galvanized Roofing
(971) 803-1781 pdxcityroofing.com
2121 SE Scott Ave, Gresham, Oregon
5.0 from 1 review
Roofing, repairs, shingles, presidential,

Roofing Rain OR Shine
(503) 839-9222 www.roofingpdx.com
Serving
5.0 from 32 reviews
A roof must protect your home and keep it looking sharp through every season. At Roofing Rain OR Shine, we provide trusted residential roofing in Portland, OR, with skilled work. Our services cover full roof replacement, roof installation, and repair to match each need. From metal roofing to asphalt shingles, every job is built for style and strength. We also provide gutter installation in Portland, OR, to direct water away with care. Our crew installs new gutters, repairs weak lines, and offers reliable cleaning to prevent blockages. Each project is done with focus and detail. Contact us today and let us guard your home from roof to base.

HOMEMASTERS Portland East
(503) 766-3912 homemasters.com
Serving
4.7 from 95 reviews
Homemasters Portland East is your reliable expert for roofing, gutters, siding, windows, and solar solutions. Serving homeowners across East Portland, Oregon City, Clackamas, Gresham, Happy Valley, & Damascus, our skilled team is dedicated to delivering high-quality craftsmanship and outstanding customer service. We understand the region’s unique weather challenges and provide durable, energy-efficient solutions to protect and enhance your home. Whether it’s repairs, installations, or maintenance, Homemasters Portland East ensures every project is completed with precision and care. Trust us to keep your home strong and beautiful.
Innovators Construction
(503) 766-8021 www.innovatorsconstruction.com
Serving
4.7 from 19 reviews
At Innovators Construction, LLC, we are committed to providing our customers with the highest level of quality, honesty, and commitment in every project we undertake. We take pride in our work and strive to exceed your expectations with our expertise and attention to detail.
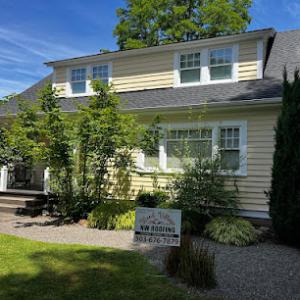
Wood Village NW Roofing
(503) 676-7879 woodvillagenwroofingllc.com
Serving
5.0 from 10 reviews
At Wood Village NW Roofing, our story is paved with over 14 years of commitment to excellence in the roofing industry. Based in Wood Village, OR, we have grown from a humble beginning to become a leading name in roofing services. Our journey is marked by a relentless pursuit of quality, innovation, and customer satisfaction. Each member of our team brings a wealth of experience and a passion for roofing, making us a formidable force in the field. We understand the importance of your home or business's roof, and we work tirelessly to ensure it provides the protection and aesthetic appeal you deserve. Our dedication to our craft is evident in every project we undertake, making us a trusted partner in your roofing endeavors.
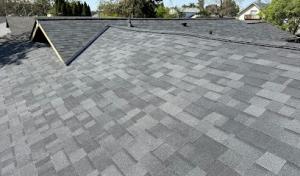
In Gresham, asphalt shingles are a dominant choice because they fit the area's large re-roofing market and broad range of residential home styles. They handle the mixed weather of the Columbia Gorge foothills and the east Portland metro well, especially when paired with a solid underlayment and proper flashing details. If moisture is a primary concern, look for shingles with longer warranties and a good granule surface that resists algae and moss growth on shaded facades. A key practical step is to ensure the overhangs and drip edges direct rainwater away from walls and foundations, since long wet seasons demand dependable drainage around corners, valleys, and penetrations.
Metal roofing is locally relevant for homeowners prioritizing rain shedding and durability during wet winters, but detailing at flashing and penetrations matters in freeze-thaw conditions. In this climate, metal roofs can perform exceptionally well when installed with continuous through-roof ventilation and well-sealed risers, skylights, and vent pipes. Pay special attention to the transition between metal panels and vent stacks, chimney bases, and wall interfaces; a small lapse in flashing can become a moisture pathway in days of constant rain. Metal shines where shade is persistent and moss growth is a concern, provided maintenance-such as clearing debris from valleys and ensuring proper sealants at panel seams-is kept up, since moisture can linger in gaps if neglected.
Clay tile, concrete tile, synthetic/composite shingles, and fiber cement all appear in the market, but heavier systems can raise structural and labor considerations on older east metro homes. If choosing heavier materials, verify roof structure is rated to handle the extra dead load, especially on older homes with smaller or uneven floor joists. For moisture control, consider a roof with a robust underlayment system and intentional slope; flat or shallow pitches can trap moisture and accelerate deterioration in valleys and around penetrations. In shaded portions of the roof where moss tends to cluster, regular inspection and proactive cleaning help maintain ventilation and reduce moisture retention under tiles.
Regardless of material, the long wet seasons demand meticulous installation details that prioritize moisture management. Ensure proper attic ventilation and an effective barrier between the interior and roof deck to minimize condensation. Roofing in this climate benefits from continuous eave and soffit ventilation, well-sealed penetrations, and strategic flashing that mitigates slow leaks in corners, valleys, and overhangs. When evaluating options, consider how each material handles freeze-thaw cycles, wind-driven rain, and seasonal moss growth, and pair the choice with a durable underlayment and consistent maintenance routine to keep moisture at bay.
Asphalt shingles remain the most common choice for homes in this area, especially where a practical, cost-smart reroof is desired. Expect prices in the lower end of the overall range, but be aware that wet-season scheduling pressure can push contractor calendars tight, which may lift daily labor costs or require careful sequencing to avoid rain delays. If moisture damage is found during tear-off, costs rise quickly due to plywood or decking replacements and extra roofing waste handling, so budget a contingency for that scenario. In practice, you're looking at roughly 420 to 860 USD per square, depending on shingle quality, underlayment, and waste disposal.
Metal offers durable protection against persistent moisture and moss-prone shade, but the upfront price is higher. In tighter weather windows, skilled metal crews may command a premium for efficient sequencing and roof access, especially on multi-story or steep pitches. If moisture damage is revealed during removal, expect additional decking work and flashing replacements that drive up the bill. Metal generally runs about 750 to 1500 USD per square, with higher-end profiles or thicker gauges pushing toward the top of that range.
Clay tile is a long-term option that handles damp winters well, yet it requires careful handling during tear-off to avoid cracking. Scheduling pressure during wet months can extend project duration, potentially increasing labor costs. If moisture issues are discovered, tile removal and reinstallation become more complex and costly due to weight and the need for specialized fasteners and underlayment. Expect prices from roughly 1000 to 2100 USD per square, depending on tile shape, thickness, and the labor mix.
Concrete tiles balance durability and price, often offering a good mid-range choice for weather resilience. The wet-season window can affect access and staging, so plan for possible delays. Moisture-related discoveries during tear-off can raise costs due to additional underlayment, fasteners, and potential deck repairs. Concrete tiles typically run about 900 to 1500 USD per square, influenced by tile weight and installation complexity.
Synthetic or composite options provide a moisture-tolerant, lightweight alternative with decent longevity. Scheduling during the wet season remains a factor, but these crews often execute quickly, helping offset some calendar risk. If moisture damage is uncovered, costs rise with decking and flashing needs. Expect about 600 to 1100 USD per square, depending on the specific product and warranty terms.
Fiber cement shingles offer good rot resistance and can mimic heavier materials without extra weight. Wet-season work can mean longer project timelines, which may translate to higher labor charges. If tear-off reveals moisture intrusion requiring deck or underlayment updates, costs can climb. Prices typically fall in the 700 to 1250 USD per square range, shaped by shingle profile and installation technique.
Don't let upfront costs delay a critical repair - these contractors offer payment plans to fit your budget.


A full reroof in Gresham typically requires a permit through the City of Gresham Building Department. Knowing this upfront helps avoid delays that can push work into the next wet season and create moisture exposure risk inside your attic or ceiling. The permitting process is designed to ensure that the roof system handles the area's winter rain and wind loads, so skipping steps can bite you later with moisture-related failures. Start the conversation with your contractor about what documents are needed and who will pull the permit, so you aren't surprised by follow-up requests.
City inspection focus centers on underlayment, flashing, and venting, which aligns closely with the moisture-management issues that drive roof failures in this area. The inspector will verify that the underlayment and decking have no gaps that allow water intrusion during heavy rains, and that flashing around chimneys, skylights, and transitions is properly integrated with the new material. Venting is checked to ensure attic moisture does not condense and back up into the roof system, a common pitfall during long wet seasons. If any of these elements aren't up to code, a rework may be required before approval, extend the project timeline, and increase exposure risk to the interior.
Permit fees and turnaround vary with project value, so homeowners should confirm timing before scheduling tear-off during the short dry-season work window. Weather in this region can shift quickly, and consecutive rain days can halt work, forcing you to extend the project and face moisture exposure in exposed roof decks. Coordinate with the contractor to align permit submission, material delivery, and crew scheduling so that the critical underlayment and flashing phases are completed during a dry spell. Keep a close eye on any required amendments or additional inspections, and factor in a contingency for weather-related delays to minimize moisture-related setbacks.
In Oregon, roof claims commonly involve adjuster site visits and documentation, and this matters in Gresham after winter wind and hail events affecting the Willamette Valley. When a claim is opened, expect the adjuster to request a clear picture of the roof's condition as it stood before the most recent storm, plus notes from a recent inspection if available. Insurers may ask for recent roof-condition records and prior photos, which is especially important when damage appears after a long wet season rather than a single obvious event. Be prepared for a coordinated review that weighs both visible damage and latent moisture indicators.
Keep a chronological log of weather events and any corresponding roof changes. Gather at least a few recent photos from different angles, ideally including attic or underside views where moisture is detectable. Store documents in a single, organized folder or cloud drive you can share with the adjuster. If previous roof work was done, locate receipts, warranties, and any inspection notes; these can help demonstrate ongoing moisture management needs and construction quality relevant to the Willamette Valley climate.
As soon as a storm is passed, initiate contact with the insurer and request an inspection window. After a visit, obtain the adjuster's report and compare it with your own documentation for gaps. Schedule follow-up photos if incidental moisture signs emerge during the drying period. In cases where moisture shows up after a long wet season, having a robust set of prior records can streamline the review and reduce back-and-forth between you and the insurer.
Connect with contractors who help homeowners navigate the claims process from damage assessment to final approval.

Fox Roofing & Construction
(503) 660-6225 foxroofingpdx.com
21891 SE Ash St, Gresham, Oregon
5.0 from 110 reviews

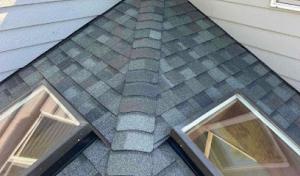
Skylights in this region are a frequent source of leaks because long stretches of wet season moisture sit right at the ceiling line of living spaces. The skylight framing ages differently from the roof surface, and sealants can crack when temperatures swing or when moss migrates into the nailing flange. In practice, a minor drip at the edge of a skylight is often a symptom of flashing that has deteriorated or a sealant that's dried out. Regular inspection after the wet season ends helps catch hairline cracks before they sap energy and cause interior staining. Expect to see moss-friendly shade around skylights that can keep flashing damp for extended periods, accelerating gasket wear and mullion seams.
Chimneys sit through yearly cycles of moisture with flashing that can loosen, bend, or corrode where it meets the chimney side or counterflashing. In older homes, the flashing is sometimes tucked behind siding or masonry, which makes deterioration hard to detect until a leak is visible inside. The first sign is often a damp ceiling near the hearth or a dark streak along the brick joint. Given the local mix of aging roofs and frequent winter rain, expect that chimney-related roofing work will return as flashing ages, shifting with seasonal movement and temperature changes.
In this climate, penetrations such as skylights, chimneys, and vents are common first-failure locations when flashing ages or sealants crack. A practical approach is to perform targeted visual checks after heavy rain: look for staining around flashing seams, dried sealant at corners, and any movement or gap along metal counterflashing. If a leak is suspected, focus on the connector joints and the intersection where the roof deck meets the opening. Early resealing or flashing replacement at these points can prevent larger, messier repairs later.
Find contractors experienced in skylight installation, flashing, and leak repairs to bring natural light into your home.
Fox Roofing & Construction
(503) 660-6225 foxroofingpdx.com
21891 SE Ash St, Gresham, Oregon
5.0 from 110 reviews
Rainy City Roofing
(503) 577-2176 rainycityroofing.com
2204-8 NW Birdsdale Ave, Gresham, Oregon
4.9 from 61 reviews
New Generation Roofing
(503) 519-6421 www.newgeneration-roofing.com
122 NW 14th Pl, Gresham, Oregon
5.0 from 39 reviews
Low-slope and flat roofs are a visible specialty in the local market, often seen on additions, garages, and some commercial-style structures. In this climate, drainage control is the defining challenge, and the reliability of every seam, edge, and penetration matters for long-term performance. The steady demand for maintenance on these surfaces reflects how even a small ponding spot can become a moisture problem across an entire season of wet weather.
Gresham's long rainy season makes ponding more consequential on low-slope sections than on steeper residential roofs. Water that sits for days, or leaves debris that traps moisture, increases the risk of edge or flashing failures, membrane degradation, and moss growth in shaded zones. The effect is cumulative: slow drainage can lead to leaks under flashing, deteriorated coatings, and accelerated wear on any roof assemblies that rely on gravity-assisted drainage. Prioritizing clear pathways for water off the surface is essential, especially on additions or garages that may not have the same roof pitch as the main house.
Roof coatings appear as a smaller but active local specialty, suggesting some owners pursue restoration on low-slope surfaces instead of full replacement. Coatings can extend life on surfaces that still have sound substrate, help reflect heat, and improve ponding performance when applied with proper prep. For surfaces showing early signs of wear, a well-chosen coating can buy time while addressing underlying drainage or flashing concerns. When choosing coatings, verify compatibility with existing membrane types and plan for staged applications to ensure uniform adhesion and curb ponding issues.
Regular, seasonally timed inspections focus on ponding areas, scuppers, edge details, and any changes in drainage patterns after storms. Clean debris from gutters and lower-edge drains, test the effectiveness of flashing seals, and note any soft spots or blisters on low-slope membranes. If ponding persists after maintenance, or if moss and staining appear near flashings, bring in a roofing pro to assess membrane integrity and coating readiness. In Gresham, proactive care keeps moisture from becoming a longer-term problem.
Find specialists in TPO, EPDM, and built-up flat roofing systems for residential and commercial properties.
AA Rite-Way Roofing
(503) 669-3712 aarite-wayroofing.net
24307 SE Stark St, Gresham, Oregon
4.8 from 341 reviews
Rainy City Roofing
(503) 577-2176 rainycityroofing.com
2204-8 NW Birdsdale Ave, Gresham, Oregon
4.9 from 61 reviews

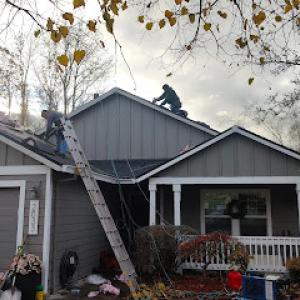
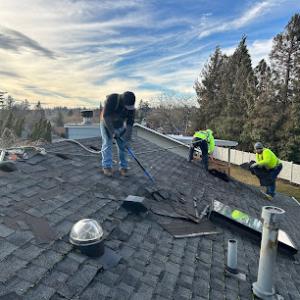
In this market, crews with proven tear-off, cleanup, and weather-protection routines matter more than flashy new-construction experience. Look for a crew that can document a controlled tear-off sequence, containment to minimize mold and debris, and a thorough weather plan that protects your home during every stage of a long wet season. Ask for a written process outline and recent job photos showing tarps, waste containment, and ventilation strategies. Local homes have mixed shingles and older underlayment; a crew that anticipates moisture points and tests for roof deck dryness before re-nailing will save headaches down the line.
Access to dry, workable weather windows is tight here. Choose a crew that commits to prompt on-site arrival, clear temporary protection during forecast rain, and fast, meticulous cleanup at the end of each day. You will value a crew that treats your property like a workshop: ground covers under work zones, careful nail and shingle removal, and a plan to prevent debris from drifting toward your yard or neighbors. If leaks are active, the ability to cap a risk area without delaying the whole project is a practical measure of reliability.
Long-established, family-owned and locally owned firms are well represented in this market, and that stability matters when warranty follow-through and post-install service are on the line. Favor crews with verifiable local references, a track record of completed re-roofs, and a clear aftercare option for inspections and minor touch-ups. A local firm is more likely to understand neighborhood moisture patterns, seasonal backup options, and how to handle stubborn moss-prone eaves without compromising shingles. Inquire about who will be the point of contact during and after the project, and confirm that the crew adheres to a thorough, documented cleanup and protection plan that outlasts the final shingle laydown.