Last updated: Apr 19, 2026
In the Willamette Valley's damp climate, roof replacements run best during late spring through early fall. Winter and shoulder-season rain can wipe out dry-in windows, leaving you with leaky houses and crews stuck under tarps longer than expected. The practical pattern in this area is to line up a tear-off and new roof for a stretch when moisture levels are lower and daytime drying conditions are more predictable. Start planning before the wet season loosens its grip, and coordinate with a contractor who understands how frequent showers can slip into late summer and early autumn, pushing schedules in unpredictable ways.
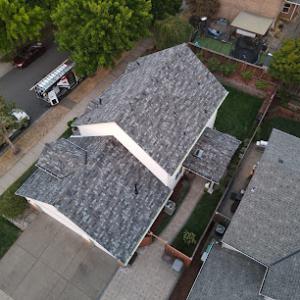
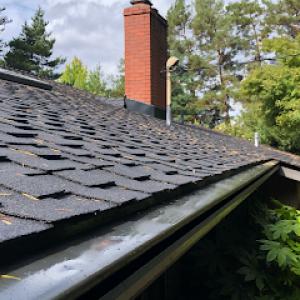
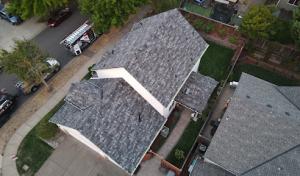
Consistent moisture in this part of the northwest Oregon coast range accelerates moss and algae on aging roofs. Older roofs can show visible green or dark staining sooner than you'd expect, and the growth is more than cosmetic in this climate. When moss and algae become established, lifting shingles, trapping moisture, and compromising underlayment is more likely. Treating the roof to curb growth may extend life briefly, but biological buildup often becomes the practical signal that replacement is warranted rather than a purely cosmetic decision. Look for slippery shingles underfoot, persistent staining, and patches that refuse to respond to routine cleaning.
A practical approach is to target a replacement decision after a series of wet seasons have revealed the roof's performance under sustained moisture. If you've endured multiple heavy rain years with recurring moss, curling shingles, or recurrent leaks, plan for a replacement window that avoids the wettest months. A steady, dry stretch in late spring through early fall creates the best environment for a successful tear-off, new underlayment, and proper insulation detail without the disruption of mid-winter rain. If a roof shows advanced deterioration or widespread moss-driven damage, treat it as a reliability issue that benefits from a timely, moisture-managed replacement rather than waiting for a perfect window that never arrives.
Before scheduling, confirm the roof's condition and the attic's ventilation to support a dry-in. A roof deck with good ventilation helps shed moisture quickly after tear-off, reducing the risk of rapid condensation on new materials. Ensure gutters and downspouts are prepared to handle the work cycle so water diversion remains effective during replacement. Contractors should plan for a minimum number of dry-weather days in a row to complete tear-off, lay synthetic or other underlayment, install flashing, and finish with shingles or chosen roofing material. In Tualatin, a flexible plan that absorbs occasional rain events without derailing the entire project is a practical necessity.
Winter storms, heavy rainfall, and intermittent spring or autumn rain can derail progress, so build in contingency time. Schedule with a window rather than a fixed date if possible, and request a rolling plan that adapts to the forecast. Communicate with neighbors about potential interruptions and debris management, since soggy ground can affect access and cleanup. Have a plan for temporary protection if a late-season rain front arrives mid-project, and confirm the contractor's ability to pause and resume efficiently without compromising underlayment integrity or warranty conditions.
After replacement, establish a maintenance cadence aligned with the wet season's pressure. At the start of each wet period, inspect for moss regrowth, shingle lift, or flashing signs of wear around chimneys and vents. A proactive clean-and-inspect routine helps catch moisture-driven issues early, before they necessitate a full replacement again. In this climate, timing isn't only about a dry stretch; it's about preserving the integrity of a new installation through the repeated damp cycles that characterize the Willamette Valley.
In this damp climate, persistent roof moisture can shorten service life by keeping shingles, wood products, and flashings wet for long periods compared with drier inland Oregon markets. You may notice aging that isn't about heat or sun-drenched cracking but about how long moisture lingers on every surface. Moss and algae thrive when roofs stay damp, and their presence isn't just cosmetic-it signals moisture that can seep into underlayment, roof decks, and flashings. When upper surfaces stay damp, granules loosen, fibers swell, and the natural shedding cycle slows, accelerating wear. In practice, that means roof life is often dictated less by the first snowfall and more by how consistently wet your two-story eaves, hips, and valleys remain across multiple wet seasons.
The city's roofing concerns are less about sun-baked cracking and more about water shedding, underlayment integrity, flashing performance, and keeping debris and biological growth from trapping moisture. Moss and algae not only hold moisture against shingles; their tangled mats can lift edges where granules begin to shed and where flashing joints meet the deck. Left unchecked, those issues can progress into slow leaks, especially where drainage paths converge or where gutters clog with organic debris soaked during heavy rains. In practice, aging roofs often show a telltale pattern: a persistent green or dark staining along valleys and shingle edges, paired with widespread loosening at rake edges or around vent penetrations. The consequence is not just a damp dark stripe on the roof, but more rapid deterioration of the protective layers beneath.
Drainage becomes a central concern when moisture sticks around longer than it should. A well-draining system moves water quickly from the roof to gutters and downspouts, but in Tualatin, where wet seasons stretch out and frequent storms are common, even small drainage bottlenecks matter. Look for sediment buildup in gutters after a rain, degraded flashing at corners and intersections, and biological growth at the eaves where water lingers. If debris sits on the roof long enough to form damp mats, moisture can migrate under the shingles and into the underlayment, especially around hips, ridges, and around protrusions. Proactively cleaning gutters and assessing downspout outlets to ensure they emit away from the fascia can prevent ponding near walls, which can wick moisture back toward the roof deck.
Older roofs in Tualatin commonly need replacement timing evaluated around moss or algae buildup because damp-season growth can mask underlying wear and complicate leak tracing. If the underlayment shows widespread swelling, tears, or soft spots, or if flashing around chimneys and vents shows recurrent leaks during late fall and winter storms, replacement becomes a prudent consideration. A roof that consistently takes on moisture during the wet season not only ages faster but can fail in places where you least expect it, masking the true extent of deck or fascia damage. When addressing moss and algae, prioritize options that improve shedding and reduce surface moisture-before the next wet season tightens its grip.

Exterior Care Pdx
(503) 925-3907 www.exteriorcarepdx.com
10290 SW Tualatin Rd Unit # DM-5, Tualatin, Oregon
5.0 from 91 reviews
Exterior Care Pdx provides roof replacement, repair and maintenance, deck services, concrete services and pressure cleaning and 24-hour emergency service to the Tualatin, OR area.
Affordable Roofing & Gutter Company
(503) 575-7267 affordableroofingandguttercompany.com
8215 SW Tualatin-Sherwood Rd suite 200b, Tualatin, Oregon
4.7 from 121 reviews
Affordable Roofing and Gutter Company in Tualatin provides professional roofing and gutter services. We specialize in roof installation, new roofing, gutter installation, and leaf guard systems to keep your home well-protected and looking great. Our team also offers thorough gutter cleaning and repair services to prevent water damage and ensure your gutters work efficiently year-round. With a focus on quality and reliability, we’re dedicated to delivering excellent results that enhance your home’s durability. Whether you’re in need of a new roof or routine gutter maintenance, we’re ready to help. Contact us today for professional care you can count on!
Skyline Roofing
(503) 927-8912 www.skylineroofing.org
Tualatin, Oregon
4.9 from 28 reviews
Skyline Roofing is a trusted roofing contractor serving both commercial and residential clients. With over 15 years of experience, we are committed to delivering top-quality roofing solutions tailored to meet your specific needs. Our skilled team of professionals is equipped to handle all aspects of roof installation, repair, and maintenance, ensuring the utmost precision and durability. We take pride in our attention to detail, using only the highest quality materials and employing industry-leading techniques. Whether you need a new roof for your commercial property or repairs for your residential roof, you can rely on Skyline Roofing for reliable, efficient, and long-lasting results. Contact us today for a free consultation and ex
Columbia Roofing & Sheet Metal
18525 SW 126th Pl, Tualatin, Oregon
5.0 from 3 reviews
Since 1996, building owners and facility managers across Oregon and Washington have grown to trust Columbia Roofing & Sheet Metal for its quality and commitment to excellence. Columbia Roofing & Sheet Metal operates in Oregon, Washington, Idaho and California with a year around staff of over 60 people. Columbia provides 24/7 leak repair service, full commercial replacement and recovers, sheet metal work and roofs, plus commercial repairs and maintenance. Our crews bring decades of roofing experience to your building, providing unparalleled expertise when installing or servicing your roof. Safety is a top priority at Columbia. Our service technicians and crews undergo rigorous safety training to ensure your jobsite is safe and secure.
Powerful Roofing & Construction
Serving
5.0 from 66 reviews
Powerful Roofing & Construction is a local family owned and operated business in Wilsonville, Oregon. Powerful Roofing is owned by Maria Vega and Diego Arechiga who both are dedicated and driven individuals. Their goal is to provide excellent facilitating customer service and quality work. Their hopes are to continue to connect with the community and demonstrate that Powerful Roofing is mastered in Interior/ Exterior construction services. If you are in the process of looking for a local contractor to guide you through a roof replacement or a home repair, Powerful Roofing Family is prepared to help through this process. Powerful Roofing is ready to provide a complimentary assessment.

Nations Roof
(503) 885-8080 nationsroof.com
19660 SW 118th Ave, Tualatin, Oregon
3.7 from 6 reviews
Nations Roof delivers commercial roofing services with the scale of a national provider and the care of a local partner. Serving Tualatin and surrounding areas, we offer preventive maintenance, repairs, replacements, and emergency service. Our certified crews work on all roof systems without voiding manufacturer warranties. With 24/7/365 support from our National Service Center and a proven safety culture backed by a 0.47 EMR, we help protect your people, property, and peace of mind. Call our 800 line for emergencies!
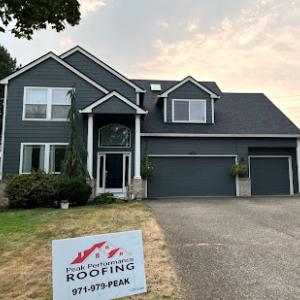
Peak Performance Roofing
(971) 979-7325 peakperformanceroof.com
Serving
5.0 from 206 reviews
Peak Performance Roofing is a local, family-owned business specializing in full replacements of roofing, siding, and windows, as well as exterior painting. We proudly serve Portland and it’s surrounding areas.
Reliance Roof Pros
(503) 303-7180 relianceroofpros.com
Serving
4.9 from 80 reviews
A ROOFING COMPANY DESIGNED BY HOMEOWNERS FOR HOMEOWNERS. Based on interactions and feedback from hundreds of homeowners like you, you told us that you oftentimes felt uncomfortable dealing with salespeople. You didn’t really know if you could trust the salesperson you were dealing with because of the inherent conflict of interest that occurs when the salesperson gets paid based on how much you buy. You also told us that you were uncomfortable with much of the hidden agendas and the lack of transparency. We have designed systems to ensure transparency and give you the process you described to us-- with friendliness, professionalism and quality.

Guardian Roofing, Gutters & Insulation
(503) 299-1260 www.guardianroofing.com
Serving
4.9 from 427 reviews
Since 2005, Guardian Roofing, Gutters & Insulation has been the trusted partner for top-of-home solutions in Wilsonville, OR, and throughout the Pacific Northwest. With nearly two decades of experience, our award-winning team specializes in roofing, roof repair, gutter installation and repair, K-Guard clog-free gutter systems, masonry, and attic insulation. As an Owens Corning Platinum Contractor—an honor held by only 1% of roofing contractors nationwide—we offer unmatched craftsmanship and extended warranty protection for the life of your roof. Every project is driven by honesty, precision, and a commitment to doing it right the first time. Schedule your service today and experience the Guardian difference!
Fisher Roofing
(503) 227-7663 www.fisherroof.com
Serving
4.8 from 238 reviews
Fisher Roofing has the most experienced roofing crews in the Portland area. We never use roofing subcontractors and hold to the highest levels of professionalism.

Prime Exteriors NW
(503) 679-8915 primeexteriorsnw.com
Serving
4.7 from 150 reviews
Prime Exteriors NW is the leading Oregon roofing company, servicing the Tigard OR and surrounding Portland Metro Area regions; our company reaches Tigard, Tualatin, Beaverton, Hillsboro, Lake Oswego, West Linn, Oregon City, Gladstone, Milwaukie, SW Portland, NW Portland and SW Washington neighborhoods. Prime Exteriors NW roofers specialize in roof repair, installing architectural, presidential, flat, and metal roofing systems; however, our team of contractors also perform exceptional siding, window, and gutter replacements. Our company strives to provide the finest experience possible through exceptional quality of products and customer service.
Interstate Roofing
(503) 755-5183 www.interstateroofing.com
Serving
4.8 from 718 reviews
Established in 1988, Interstate Roofing has grown into a distinguished, award-winning company, catering to the Portland-Vancouver metro area's roofing needs. Interstate Roofing prides itself on a strong community commitment, treating customers and staff like family, and aligning closely with customer needs to ensure exceptional service and project outcomes. They’ve also earned a reputation as the go-to commercial roofing contractor in the Portland-Vancouver metro area, specializing in both steep-slope and low-slope large-scale projects, from churches to schools, multi-family apartment complexes, and more. Interstate Roofing emphasizes environmental sustainability, recycling roofing debris from their projects, instead of adding to landfills.
Asphalt shingles remain a dominant choice in Tualatin because they fit the area's large re-roof market and broad range of suburban home styles while staying below tile and metal price points. In a city shaped by long, wet seasons, their simplicity and ease of repair make maintenance scheduling predictable. Look for a granular, algae-resistant compound and a shingle that provides solid dimensional stability in frequent cool, damp cycles. A well-sealed installation with proper valley and flashing details matters just as much as the shingle color; darker tones may absorb more moisture and stress under persistent drizzle, while lighter colors can help with heat management inside the attic, even in a consistently moist climate. Asphalt remains forgiving for homes with varied roof pitches, but moisture-driven aging is the key factor to watch: edges curling, granule loss, and lift around penetrations signal it's time to evaluate replacement before leaks form.
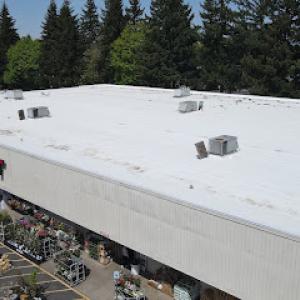
Metal roofing is relevant here not for heat resistance but for long-term water shedding and durability in a rainy Pacific Northwest environment. In Tualatin, metal can outrun frequent moisture-related wear when the installation is properly sealed and ventilated. Standing-seam configurations excel at shedding frequent showers without relying on adjacent sealants as aggressively as some other materials. If choosing metal, pay attention to seam design, coatings that resist moss and mildew, and the roof's slope access for snow or heavy rain events that occasionally crest the thresholds of Portland metro neighborhoods. The payoff is a roof that resists edge-saturation and minimizes the risk of interior water intrusion during the wet season, provided moss control and routine cleaning are part of annual maintenance.
Clay tile and concrete tile all appear in the Tualatin market, but their performance has to be judged against persistent moisture exposure rather than severe hail or coastal salt spray. Clay tends toward a traditional tile appearance and strong longevity, yet its porous nature can become a liability if fasteners and underlayment aren't meticulously maintained. Concrete tiles handle moisture more robustly in damp climates, but crack patterns and pinching around eaves can accumulate if the roof isn't properly vented and supported. For both, ensure underlayment is rated for wet conditions and that roof penetrations are carefully flashed to prevent moss colonization in the shaded, rain-soaked corners of homes with mature trees nearby.
Wood shakes bring a distinctive texture to homes in this market, yet moisture is the driving factor in performance. Regular cleaning to remove moss and lichen, plus timely treatment or replacement of boards showing rot or splitting, will extend life. In the wet season, wood can absorb more moisture, making it essential to verify proper drainage, attic ventilation, and drip edge integrity. If the home has a canopy of trees or is shaded, plan for more frequent inspections to prevent moisture buildup behind weathered surfaces, which accelerates aging.
Synthetic or composite shingles offer a balance between cost and performance in heavy-rain environments. They can mimic the appearance of other materials while often delivering improved moisture resistance and reduced maintenance needs. For a Tualatin home, look for products with proven algae resistance and a core designed to handle prolonged exposure to moisture without warping. Proper installation details-especially around hips, ridges, and skylights-help ensure that the roof remains watertight across many wet seasons.
In this market, full re-roofing is common, and homeowners are often comparing established crews rather than small patch-only operators. That dynamic carries a premium in workmanship consistency and warranty expectations, especially after a long wet season that leaves roofs softer and more brittle. Wet-weather scheduling pressure compounds this: reliable installation windows cluster from late spring through early fall, when contractor demand is strongest. If a project slips into peak summer heat, crews can push costs up due to overtime, crews juggling multiple jobs, or rain-related delays that cascade into scheduling and material hold times. Planning around those windows helps stabilize a bid and reduces the chance of mid-project price edits.
The price landscape in Tualatin tracks Portland-metro norms, with full-tear-off projects carrying more consistent pricing for complete replacements. Asphalt shingles sit in a lower-to-mid range, while metal, clay, and concrete tiles bring higher per-square figures and longer lead times, especially in a busy season. Wood shingles or shakes and synthetic/composite shingles offer mid-range options when moisture management remains a priority. If a tear-off reveals the deck is compromised by moisture, moss, or substrate rot, expect the project to shift into higher-cost territory as repairs and substrate remediation are needed to ensure a solid, long-lasting install.
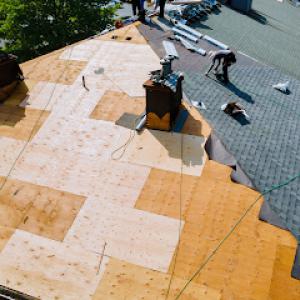
In older roofs, tear-off days can uncover moisture-related deck repairs, flashing replacement, or skylight tie-ins that were not visible from the surface. Each of these adds to the total job cost and can extend the schedule, especially if scaffolding, containments, or moss remediation is required to protect new layers. Moss issues don't just slow work; they can necessitate extra substrate cleaning, underlayment prep, and sometimes additional fasteners or sealants to guarantee a watertight finish. In Tualatin, these contingencies are common enough to influence bids early in the process, so ask for a clearly itemized quote that separates material costs, labor, moisture-related repairs, and any moss-control treatments.
Expect material and labor ranges to reflect Portland-metro conditions, with full re-roofs commanding the most attention from bidding crews. Budget for the potential of moisture-related deck repairs and flashing work if the tear-off reveals hidden rot or substrate issues. When shopping, favor established crews with recent local experience, clear warranties, and transparent schedules. That clarity helps keep the project on track through the peak late-spring to early-fall window and reduces the risk of price surprises due to weather-driven delays.
Get a clear picture of your project costs upfront - no commitment required.
Guardian Roofing, Gutters & Insulation
(503) 299-1260 www.guardianroofing.com
Serving
4.9 from 427 reviews

A building permit is commonly required for full roof replacements in this area, and the City of Tualatin Building Division handles both permit issuance and inspection scheduling. Before any work begins, you'll want to confirm the scope of your project with the building department and pull the proper permit. This process helps ensure that the roof substitution aligns with local code, drainage, and neighborhood standards, especially given the long, wet season that influences moisture management strategies. Keep in mind that the permit timeline can be affected by how quickly plans are reviewed and by coordination with any neighboring property requirements.
Inspections in this jurisdiction typically occur during tear-off or installation and again after completion. The focus of inspections includes underlayment condition, flashing details around chimneys and vents, and compliance of the chosen roof material with local code and permit specifics. Since moisture control is a priority in this climate, inspectors will look closely at the insulation interface, eave drainage, and proper venting as part of the overall roof assembly. Having clear, labeled access to attics, crawlspaces, and roof edges speeds the process and reduces the need for re-inspection trips.
Because the permit process is tied to staged inspections, roofing timelines depend not only on weather but also on inspection coordination with the city. Wet-season delays can push certain milestones if crews must pause to address underlayment or flashing concerns raised during a prior inspection. It's prudent to plan for potential pauses between tear-off, installation, and the final inspection, and to arrange lead times for material delivery that accommodate any inspection hold-ups. Stay in close contact with your contractor about upcoming inspection dates, required documentation (such as product data, warranty details, and roof venting plans), and any city-specific forms that may be requested to keep the project moving smoothly through the review process.
In the Portland metro insurance environment that includes Tualatin, carriers generally want clear damage documentation, photos, measurements, and a defined scope of work before approving roof-related claims. Gather close-up shots of missing shingles, granule loss, and any membrane exposure, plus wider views that show the roof's overall condition and potential interior signs of water intrusion. Create a simple diagram or note of affected sections, and include a dated weather history if storms just occurred. A concise scope of work helps the claim proceed without unnecessary back-and-forth.
Tualatin homeowners dealing with storm-related roof issues should expect adjusters to focus on documented damage rather than age alone, especially in a market where wet-weather wear can look gradual instead of sudden. Prepare to explain recent moisture events, winter leakage, or moss-induced edge wear, and connect them to any visible damage. The adjuster will compare reported damage to the roof's expected performance under your current climate, so precise matching of roof type, surface condition, and prior repairs matters.
Higher-cost materials and certain endorsements can affect premiums or claim handling in this region, so material choice in Tualatin can influence both replacement cost and insurance strategy. If you anticipate a replacement, note that metal, concrete tile, or synthetic options may shift coverage expectations and evaluation timelines. Ensure the replacement plan aligns with documented need, not just aesthetic preferences, to keep the claim moving smoothly.
With long wet seasons shaping decisions, time matters. Delays can lead to hidden damage or secondary moisture issues inside the attic and ceiling. Coordinate with the insurer to schedule assessments during dry gaps between storms when possible, and keep a running record of any interior effects, such as stains or musty odors, that tie back to roof performance.
Connect with contractors who help homeowners navigate the claims process from damage assessment to final approval.
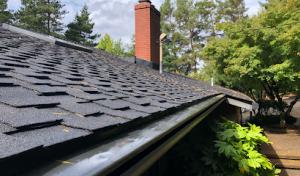

In Tualatin's rainy climate, leak-prone transitions around skylights and chimneys deserve extra scrutiny because flashing failures show up quickly under repeated wet-season exposure. You'll notice small drips or dark staining at fasteners, surroundings of flashing boots, or where skylight curb meets the roof plane. The trick is to treat these areas as ongoing maintenance points, not one-and-done fixes. Even a seemingly minor flashing misfit or a hairline seam can become a channel for moisture if left unaddressed through a couple wet seasons.
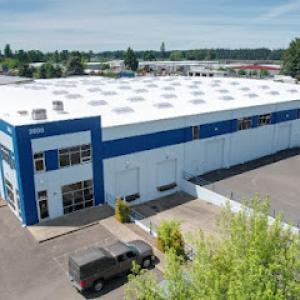
The low-slope sections demand particular attention, since standing water and slow drainage amplify any deficiency in flashing, pea-sized gaps, or improper membrane laps. When a roof is re-covered rather than newly built, those penetrations and transitions carry extra risk. Look for mismatched sealants, worn edge metal, or drain terminations that don't shed water cleanly. In practice, you should expect near-constant scrutiny during the first few wet months after a re-roof, with proactive resealing or re-flashing as a sensible precaution rather than a convenience.
The local contractor market shows meaningful demand for skylight work and flat-roof expertise, indicating that many homeowners are not just replacing field shingles but also dealing with penetrations and low-slope problem areas. If a project includes multiple penetrations or a re-roof over an existing low-slope deck, insist on a dedicated detail plan that covers flashing, drip edges, and membrane overlaps. The consequences of skimping on these details show up as moisture tracks that travel downstream and complicate interior repairs.
Repeated rain makes detail work at roof transitions more consequential than in drier climates. Develop a routine that prioritizes those transition zones after storms: check around skylights, chimneys, and the upslope edge of low-slope sections for pooling moisture, fastener loosening, or sealant deterioration. Addressing issues promptly reduces the risk of long-term water intrusion and the broader aging questions that moisture-driven roofs face in this market.
Find contractors experienced in skylight installation, flashing, and leak repairs to bring natural light into your home.

In this part of the metro, the contractor market leans toward quick-response crews who focus on cleanup and getting a roof over a wet season as fast as possible. Homeowners often differentiate bids by warranty clarity and execution reliability rather than by whether a contractor offers roofing at all. When you compare bids, look for explicit language about what is covered, for how long, and what the contractor will do if leaks show up after a heavy rain.
Warranty language should spell out both materials and workmanship coverage, with timelines that reflect Tualatin's long wet seasons. Ask for a written, itemized warranty that names each material component (underlayment, flashing, fasteners) and explains what constitutes a covered defect. Confirm whether the warranty transfers if you sell the home, and whether there is a requirement for annual inspections or maintenance visits to keep coverage active. Understand what limits apply to flashing and underlayment-areas where moisture tends to linger-and whether there is a dedicated process for repair after a leak is reported mid-winter.
Moisture management is the main challenge here. In practice, that means you should expect crews to demonstrate careful attention to underlayment installation, flashing around chimneys and vents, and the joints at eaves and rake edges. A bid that emphasizes a strong, clearly described sequence for attic or crawlspace moisture protection and a robust cleanup plan often performs better than one that promises only a fast install. The company's track record on following through with cleanups and addressing incidental moisture issues after rains is equally telling as the shingle choice itself.
Long-established and family-owned firms have a visible presence in this market, which matters to homeowners who want a company likely to be around for follow-up service after a wet-season leak appears. Look for references or local projects you can verify, and ask about who will be on-site for the project and who handles post-installation questions. In practice, the most reliable option balances a transparent warranty, a clear plan for moisture and flashing care, and a team with a proven history in this neighborhood.