Last updated: Apr 19, 2026
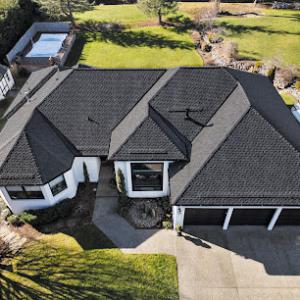
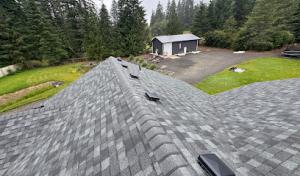
In this area, the wet winters and dry summers mean roof systems spend long stretches dealing with persistent moisture rather than short, dramatic freeze-thaw cycles. This shifts the risk from sudden cracking to gradual deterioration driven by continual dampness, moss growth, and hidden rot. Shaded roof planes in many neighborhoods stay damp longer, especially on the north-facing slopes and under mature oaks or maples. The result is moss that can anchor into shingles and underlayment, creating micro-pockets of moisture that creep into edges, valleys, and flashing. Understanding this pattern helps you plan inspections, cleaning, and replacements so moisture doesn't sneak up on you during a rainy season.
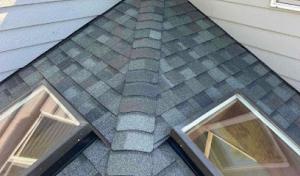
Moss thrives when shade and moisture overlap. In Clackamas, moss isn't just an aesthetic issue; it acts like a sponge, holding moisture against the roof surface and deteriorating protective coatings over time. Look for these signs: dark, damp streaks along the roof plane, moss clusters that look dense in shaded areas, and granule loss near moss patches. If moss becomes thick or extends into valleys and near eaves, the underlying underlayment and flashing can suffer from prolonged exposure to moisture. Spot-check visible intersections where shingles meet vents, chimneys, or skylights, since these joints are common entry points for dampness to travel inward if the protective layers have weakened.
Late spring through early fall is the preferred replacement window in this area because dry conditions reduce installation interruptions and help underlayment and flashing details stay protected during work. The goal is to complete critical moisture control steps in a season with predictable dryness, so the roof can seal properly before another wet season begins. If a full replacement isn't feasible, consider major repairs in this window that address active leaks, venting adjustments, and moss removal plans that minimize residual moisture exposure to fresh materials.
Begin with a careful moss assessment in late winter or early spring. If moss is light, a non-pressure wash followed by soft-bristle brushing can remove surface growth without damaging shingle texture. For heavier moss, hire a professional to apply a moss-safe treatment that neutralizes spores and slows regrowth, then schedule cleaning during the milder part of late spring to avoid trapping moisture behind new flashing. Keep gutters clear to prevent meltwater from pooling near eaves, which compounds dampness on the roof deck. Trim overhanging branches to reduce shade and allow more sun to reach damp areas, accelerating drying.
Coordinate a targeted inspection after the wet season ends but before the hot, dry months peak. Pay close attention to valleys, intersections, and any area where moss has been present. Address micro-leaks promptly with flashing adjustments or resealing, as these small failures compound moisture exposure over another winter. If replacement is considered, plan for roofs that favor moisture management: systems with robust flashing, corrosion-resistant hardware, and materials that resist moss adherence.
Shaded roof planes deserve a proactive strategy. In practice, this means scheduling moss control as part of a preventive maintenance plan, prioritizing repairs in the shaded zones first, and coordinating moisture-control measures with ventilation improvements where feasible. By sustaining a dry, well-sealed roof in the damp Willamette Valley foothills, you reduce the long-term aging impact of moss and extend the life of the entire roof assembly.
Sunnyside Roofing Services
(503) 883-8430 sunnysideroofingservices.com
14841 SE 82nd Dr, Clackamas, Oregon
5.0 from 148 reviews
Roofing services in Portland, Oregon. Residential roofing contractors. New roofing installation, roof repairs, tear-offs, reroofing, skylight installation, skylight repair, and more. Locally family owned & operated. Fully licensed & insured. Providing fair and honest pricing with superior craftsmanship. Contact us for a free estimate today!
Bliss Roofing
(971) 265-6417 www.blissroofing.com
14430 SE 98th Ct, Clackamas, Oregon
4.9 from 833 reviews
Bliss Roofing is a third-generation family operated roofing contractor built on over 50-years of referrals and satisfied customers. Bliss Roofing specializes in pitched residential roofing in Oregon & SW Washington. Our services extend to include multifamily dwellings as well as commercial projects. Our primary focus is residential roofing, providing an experienced staff to handle and coordinate almost any re-roofing or new construction project. We have extensive experience in installing composition shingles, metal, slate, tile, TPO, wood shakes, and more! Every job is inspected to meet the highest standards in the industry.
Greater Purpose Construction LLC - Portland Roofing
(503) 512-9054 www.gpurpose.com
15875 SE 114th Ave suite h, Clackamas, Oregon
5.0 from 110 reviews
Meet a top trusted local residential and commercial roofing company, specializing in shingle roofing, metal roofing, TPO roofs, slate, and shake. We deliver a superior experience to families and communities in Oregon and Washington. With over 10 years of experience, we are a company that builds quality roofs.

Western Pacific Roofing
(503) 659-7663 www.westpacroofing.com
9318 SE Church St, Clackamas, Oregon
4.9 from 101 reviews
Best Clackamas roofing company! Our expert roofing contractors in Clackamas specialize in top-quality Clackamas roof repair, installation, & roof replacement services for both residential & commercial Clackamas area properties. As your trusted Clackamas roofers, we offer detailed Clackamas roofing services, including metal roofing, asphalt shingles, and flat roofing solutions. Our Clackamas roofing contractors are available for emergency roof repair, ensuring your home or business in Clackamas is protected. We provide detailed Clackamas roofing estimates & thorough roof inspections to keep your roof in top shape. Choose our sustainable roofing solutions & experience exceptional roof maintenance from your local roofing company in Clackamas.
Integrity Roofing Company
(503) 742-0864 www.integrityroofingco.com
15814 SE 114th Ave Ste 101, Clackamas, Oregon
5.0 from 21 reviews
Roofing company serving the greater Portland metro and and Southern Washington. Residential roofing contractor. Contact us today for a free estimate and or inspection.
Jimmy's Roofing
(503) 966-3106 jimmysroofing.com
14775 SE 82nd Dr, Clackamas, Oregon
4.7 from 12 reviews
Since 2001, businesses have trusted Jimmy’s Roofing for reliable service, accurate diagnoses, and quality workmanship. Experienced with a wide range of roofing systems—including shingle, metal, tile, PVC membrane, TPO membrane, BUR roofing, and more—Jimmy’s Roofing is fully licensed and certified to handle projects of any size or complexity. The company is BBB Certified, a GAF Master Elite Contractor, and fully licensed, bonded, and insured. We are available for emergency repairs seven days a week, and all roofing professionals are background-checked and drug-tested for reliability. Jimmy’s Roofing is also a manufacturer-certified installer for GAF, Duro-Last, Versico, Johns Manville, and Owens Corning, ensuring high-quality service.

M Brothers Roofing
(503) 381-6409 mbrothersroofingllc.com
Serving
5.0 from 53 reviews
🔨 At M Brothers Roofing, we’re more than just a roofing company — we’re your trusted partners in protecting what matters most. With a team of skilled and passionate professionals, we deliver top-tier roofing solutions using premium materials and proven techniques to ensure lasting results. We understand that your roof is a critical part of your home or business, and we treat every project with the care, attention, and excellence it deserves. Our commitment to honesty, integrity, and reliability is reflected in every detail of our work. From your first consultation to the final inspection, we believe in clear communication and a seamless experience — keeping you informed every step of the way. Whether it’s a minor repair or a complete

Allen Exterior Remodeling
(503) 693-1948 www.allen-exterior.com
Serving
4.8 from 19 reviews
Allen Exterior Remodeling serves the Portland metro area and SW Washington. We handle all types of roofing including residential, manufactured homes, and small commercial. Specializing in flat and low-sloped roofs and single-ply membrane. We offer comprehensive exterior services such as roof repairs and replacements, skylights, gutter installation, awnings, siding, windows, and dry rot. If man can build it, we can tear it apart and make it better. CCB #212076 || WA ALLENER842O3
River City Roofing Portland
(503) 970-5005 roofrivercity.com
Serving
4.9 from 185 reviews
River City Roofing is a residential and commercial roofing contractor in Portland, Oregon. We install residential, multi-family and commercial flat roofing membranes, coatings, shake, shingles and metal roofing systems.

French Roofing
(971) 376-8722 www.frenchroofing.com
Serving
4.8 from 37 reviews
French Roofing, located in Damascus, OR, is your top choice for expert roofing services in the greater Portland metro area. As a leading roofing contractor, we specialize in comprehensive roof inspections, repairs, and installations, using only the highest-quality materials to combat Oregon's climate. Founded by Sean French, our fully licensed and insured team is committed to hard work, honest communication, and exceptional roofing services. Whether it's roof repair, roof maintenance, or a full roof replacement, we ensure every project meets industry standards, offering competitive pricing and transparent communication. Contact us today at (971) 376-8722 or (503) 730-4050 for a free roof inspection.
SaveRoofs
Serving
4.4 from 22 reviews
SaveRoofs is an informational platform for users to better navigate the task of how to SaveRoofs. With decades of experience gathered from working alongside family Roofing Company, several local contractors, attending manufacturers onsite seminars and keeping close relations with suppliers.
Klam Construction
(503) 387-6929 klamconstruction.net
Serving
5.0 from 119 reviews
KLAM Construction is a trusted roofing company in Happy Valley, OR, specializing in asphalt shingle, metal, and full roof replacement services. With over 20 years of experience, we’re your local choice for residential roofing, storm damage roof repair, and roof replacement. Homeowners across Happy Valley and the greater Portland metro area count on us for roof installation, competitive pricing, free roofing estimates, and 10-year workmanship warranties. When it comes to finding reliable roofing contractors near you, KLAM Construction delivers quality that lasts
Spring storms and windy periods in Clackamas can interrupt tear-off and dry-in sequencing, which matters more in a market already working around a narrow dry-season install window. When heavy gusts roll through the foothills, crews may have to pause work to prevent shingles from shifting or sheets from billowing. That pause can push a project from a tidy, week-by-week schedule into a weather-frayed timeline, leaving unfinished roofs exposed to rain. You need to plan for irregular progress and have a clear mitigation plan with your contractor: set the brutal reality on timing, confirm weather hold procedures, and agree on a target dry-in date that accommodates those storm windows. In practice, that means identifying a backup dry-in plan, securing temporary weather protection, and ensuring rapid re-sequencing once skies clear.
Winter rains in this area commonly extend project timelines, so homeowners often need temporary protection plans if replacement starts near the rainy season. The risk isn't just water intrusion; prolonged moisture can aggravate underlying moss and wood rot, especially in shaded neighborhoods where dampness lingers. If a replacement begins late in the season, you should expect periodic leaks and plan for temporary shield measures-heavy tarps, bucket-ready drainage, and reinforced glazing around skylights or vent penetrations. Have a concrete plan for quick cover-up in downpours, and coordinate with the crew on how to stage materials so they can be secured fast during sudden squalls. This is not a "nice to have"; it's a practical safeguard against incremental damage during a long wet spell.
The local contractor market shows especially strong demand for quick response and emergency repair, matching homeowner concern about active leaks during prolonged wet weather. In practical terms, that means you should establish a fast communication line with your chosen crew and a trusted backup option for after-hours leaks. If a leak appears mid-project, prioritize temporary leak stopping methods that can be implemented quickly-temporary patching on penetrations, sealing around flashing, and targeted tarping to canalize water away from the interior. Keep a detailed log of every storm event affecting your roof and share it with your contractor so repairs can be prioritized when rain windows open. For homes with moss-prone roofs, treat exposed areas promptly after storms to prevent moss irrigation from accelerating moisture intrusion; quick checks after heavy rain help catch slow leaks before they become widespread.
You should have a ready-to-activate protection plan: a sturdy tarp system that works with typical Clackamas gables, reinforced fasteners for windy days, and a clear escalation path to expedite emergency responses. Confirm with your contractor who is responsible for securing temporary protection during weather holds, and ensure you have a simple calendar that marks likely storm pockets so work can resume as soon as conditions allow. In neighborhoods where shade and persistent moisture are the rule, a proactive moisture management mindset-paired with rapid response-can save interior damage and slow moss-driven aging. Keep communication tight, document weather-related delays, and treat spring as a high-alert window rather than a routine install phase.
Find local contractors experienced in assessing and restoring roofs after hail, wind, and severe weather events.

Sunnyside Roofing Services
(503) 883-8430 sunnysideroofingservices.com
14841 SE 82nd Dr, Clackamas, Oregon
5.0 from 148 reviews
Bliss Roofing
(971) 265-6417 www.blissroofing.com
14430 SE 98th Ct, Clackamas, Oregon
4.9 from 833 reviews

Western Pacific Roofing
(503) 659-7663 www.westpacroofing.com
9318 SE Church St, Clackamas, Oregon
4.9 from 101 reviews
Asphalt shingles dominate the local market because they fit the area's large re-roofing opportunities and are practical for replacing aging roofs in a wet-winter climate. In shaded neighborhoods where moss thrives, a tightly sealed asphalt shingles system with a quality granule layer helps resist moisture intrusion and provides a forgiving substrate for underlayment. When choosing asphalt, look for classes that emphasize algae and moss resistance, plus a warranty that covers wind and impact in hillside settings. A key practical tip is to pair asphalt with a high-quality breathable underlayment and proper flashing around chimneys, skylights, and transitions to minimize moisture buildup under shingle edges during the wet season.
Metal roofing is also common in Clackamas, offering a locally relevant option for faster water shedding during long rainy periods. Metal panels or shingles tend to shed moisture quickly, which reduces the dwell time of damp moss and minimizes surface staining that can accelerate aging. If you choose metal, consider panel profiles that promote clean runoff and reduce horizontal water pockets where moss can take hold. Seams should be carefully sealed, and fasteners should be corrosion-resistant given the damp climate. Metal can be an excellent match for mid-century homes or accessory structures with retrofit needs, and it often pairs well with zoned insulation strategies to keep attic temperatures more even through wet winters.
Clay tile, concrete tile, synthetic/composite shingles, and slate are all present in this market, so material choice spans from standard suburban reroofs to heavier premium systems that may affect structural and installation planning. Clay and concrete tiles offer durability and a distinctive finish, but they add weight and require a reinforced roof deck and careful flashing details to handle both rain and moss-prone shading. Slate delivers timeless aesthetics and excellent longevity, yet it demands a robust structure and meticulous installation to manage moisture-driven stress points. Synthetic or composite shingles provide a balanced option, delivering Moss resistance, color stability, and lighter weight compared with natural stone or clay, while still offering good performance in a wet-winter pattern. When selecting heavier tile or stone-like materials, consult a local contractor about deck reinforcement and rafter spacing to ensure the structure can support the load in the long term.
Clackamas roofs contend with persistent moss growth in shaded neighborhoods, especially on north-facing slopes or overhang-dense homes. Whatever the material choice, proactive moss management becomes part of the standard maintenance routine. Consider a roof system that includes a moss-resistant coating or protective granule technology, paired with a regular cleaning and inspection schedule during dry spells. Ensure the installation promotes robust drainage: clean gutters and downspouts, properly pitched surfaces, and flashing that channels water away from seams and joints. In wetter seasons, plan drainage upgrades or enhancements in conjunction with roof replacement to reduce lingering moisture that accelerates aging.
In this climate, roof longevity hinges on moisture control during and after installation. Pay attention to ventilation and underlayment choices that deter condensation within the attic space, and ensure that roofs with heavier coverings have appropriate reinforcement for seismic and wind loads common in hillside areas. For any material, insist on meticulous flashing details around skylights, roof penetrations, and transitions to walls. Regular inspections after heavy rainfall or winter storms help catch moss encroachment early, allowing timely maintenance before it affects sheathing and supports. Align color and surface texture with neighborhood homes to maintain curb appeal while balancing performance under a wet-winter regime.
Clackamas homeowners generally get the best replacement conditions from late spring to early fall, when dry weather lowers the risk of rain intrusion during tear-off. This window gives you a more predictable work pace and reduces the chances of moisture seeping behind new underlayment. Aiming for a stretch that avoids the peak heat of midsummer helps the crew manage materials more safely and keeps shingles from expanding or curling in the sun. In practice, narrow your schedule to a two- to three-month period with consistently dry forecasts.
Summer heat in this foothill climate can affect installation pace and material handling, so the driest months are not automatically the easiest scheduling period. Intense afternoon temperatures can cause shingles to soften, making alignment and nailing tricky. Early morning start times help crews stay on track without pushing equipment to risky heat. On the backside of summer, lingering dry periods can give you window opportunities, but heat waves can still slow progress if hours are extended. Expect the crew to faire through days with shade along the eaves or overhangs, using staging areas that minimize walking on newly laid membranes.
Trying to replace in fall can be risky locally because returning moisture and moss-friendly conditions can complicate both installation timing and post-install roof cleanliness. Wet, moss-prone neighborhoods often see sudden damp spells that disrupt tear-off and reveal-in planning. If a fall replacement is necessary, you'll want to schedule earlier in the season while overnight humidity is manageable and surface dryness remains more reliable. Keep in mind that fallen leaves and early autumn rain can create additional clean-up tasks and may require more vigilant debris management around gutters and valleys.
Coordinate a window of dry days with predictable footing for ladders and access. Favor consecutive dry days rather than a single dry day between heavy storms. Have a contingency plan for a brief rain delay that doesn't push into the next weather pattern, since back-to-back wet spells can set back underlayment curing and membrane sealing. When choosing a start date, consider current moss activity; a dry stretch that precedes the heaviest moss-prone months helps keep the roof dry as work progresses.
Get a clear picture of your project costs upfront - no commitment required.
Sunnyside Roofing Services
(503) 883-8430 sunnysideroofingservices.com
14841 SE 82nd Dr, Clackamas, Oregon
5.0 from 148 reviews

Integrity Roofing Company
(503) 742-0864 www.integrityroofingco.com
15814 SE 114th Ave Ste 101, Clackamas, Oregon
5.0 from 21 reviews

In this part of the Willamette foothills, rain and damp springs repeatedly push crews off the roof and into sheltered workspaces. That means a replacement project often runs longer than a dry-season install, even when the work itself is straightforward. Budget for weather-related scheduling inefficiency by adding 10-20 percent to your expected labor hours and a corresponding contingency in the timeline. Shaded, moss-prone neighborhoods tend to hold moisture longer, which can slow teardown, tear-off, and reinstallation tasks as crews need to manage moisture at every stage.
Typical cost ranges reflect a ladder of complexity and required workmanship. Asphalt shingles remain the most economical option, with a per-square price that lands in the mid-to-upper range for many local jobs. When moving into metal, clay tile, concrete tile, synthetic/composite shingles, or slate, costs rise materially because specialized crews, longer detailing runs, and quality control become critical. For planning, use the following local ballpark: asphalt shingles from the lower end of the range to the mid-range; metal roofing and more decorative or heavier tile systems near or above the upper end. The added complexity of a steep pitch, extensive detailing, or moss remediation can push quotes higher even within the same material category.
Moss-driven aging accelerates some sections of the roof, especially in shaded zones with persistent moisture. Expect more careful surface prep, energized underlayment decisions, and perhaps more extensive flashing work when you're replacing an older roof in Clackamas's damp climate. This means higher upfront costs in some cases, but the long-term payback is better moisture control and longer service life. Planning should account for the possibility of needing more ventilation considerations and precise drainage detailing to reduce future moss growth and water infiltration.
Start with several bids from reputable local roofers who understand the valley climate and moss dynamics. If you're considering higher-end materials, set aside a larger contingency for labor and detailing. Expect some waste disposal and staging costs, and build in a cushion for weather-driven delays. For a clear comparison, request itemized quotes that separate teardown, underlayment, flashing, ventilation, and final finish, so you can see where weather and material choices influence the total.
Don't let upfront costs delay a critical repair - these contractors offer payment plans to fit your budget.
Bliss Roofing
(971) 265-6417 www.blissroofing.com
14430 SE 98th Ct, Clackamas, Oregon
4.9 from 833 reviews

In this area, full roof replacements typically require a permit through Clackamas County, making permit status a real planning issue rather than a formality. That means you should treat the process as part of the project timeline, not an afterthought. A permit helps ensure the work meets local energy codes and windload considerations, especially on the foothill homes that bear the brunt of our wet winters and moss-prone shading.
The local building department commonly inspects during and after installation, with attention to venting, flashing, and underlayment compliance. Venting must accommodate your attic's moisture flow without creating cold spots or ice dam risk, a common concern in our damp winters. Flashing around chimneys, skylights, and transitions should be continuous and sealed to prevent water intrusion on moss-prone slopes. Underlayment should be appropriate for a wet climate, and the inspector will check that it's properly installed and protected from nails and penetrations.
Homeowners should expect some processing time and a short plan-check step when roof details are more complex than a straightforward like-for-like reroof. If your project includes vent upgrades, roof-to-wall transitions, or unusual roof geometry, expect the plan-check to be a bit more thorough. This is not a delay to fear, but a necessary step to avoid issues during and after installation, especially in shaded, moss-prone neighborhoods where moisture management is critical.
Align your project start with a window of dry days to minimize moisture exposure during work, but also plan ahead for the inspection dates that follow completion. Keep an organized set of roof specifications, venting diagrams, and flashing details ready for the plan-check-it speeds the process and reduces back-and-forth. If the permit status is unclear, contact the county early to confirm required steps, so weather won't force a rushed, subpar job when moisture is highest.
In Oregon, insurers commonly evaluate roof age, material, and prior claims, which matters when many projects are re-roofs rather than first-time installations. In a wet Willamette Valley foothill climate with moss-prone shaded neighborhoods, the condition of the underlayment, gutters, and flashing plays a big role in claim outcomes. A roof that shows long-term water intrusion or moss-driven wear can raise flags about future leaks, even if a recent storm caused the visible damage. Understanding this helps you frame what your insurer will consider before settlement.
Clackamas homeowners should be prepared to provide photos, estimates, and sometimes a roof condition report before claim settlement, especially when damage is tied to storms or long-term water intrusion questions. Gather dated photos from multiple angles, including attic moisture indicators if available, and keep a concise log of when you noticed leaks or moss growth that affected performance. Estimates from reputable local roofers that detail material and labor specifics help demonstrate the scope of work needed to restore reliability.
Because coverage varies by insurer and policy, Clackamas owners need to document leak timing and visible roof condition carefully when winter rain or spring storm events are involved. A clear timeline that links a storm event to new damage, paired with consistent notes on moss spread and shingle or tile degradation, strengthens the claim narrative. Keep correspondence organized, and avoid delaying photos or reports after a rainfall sequence. Your documentation becomes the bridge between weather-driven surprises and written policy language.
Connect with contractors who help homeowners navigate the claims process from damage assessment to final approval.
Sunnyside Roofing Services
(503) 883-8430 sunnysideroofingservices.com
14841 SE 82nd Dr, Clackamas, Oregon
5.0 from 148 reviews
Western Pacific Roofing
(503) 659-7663 www.westpacroofing.com
9318 SE Church St, Clackamas, Oregon
4.9 from 101 reviews
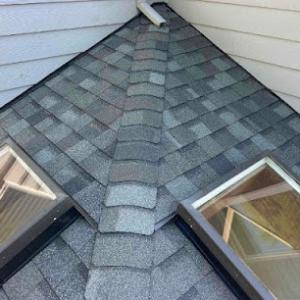
County inspections in Clackamas specifically emphasize flashing compliance, making penetrations and transitions a higher-stakes part of reroof projects. In a rainfall-heavy climate, a small seam or misaligned flashing can turn into a recurrent interior drip after a wet spell. This section focuses on practical steps to keep skylights and other penetrations from becoming long-term trouble spots.
The local contractor market shows meaningful skylight and chimney activity, which aligns with homeowner concern about leak-prone roof penetrations in a rainy climate. Start with a careful eye on skylight flanges, curb mounting, and the surrounding shingle-to-flash interface. Look for hairline gaps where sealant has aged, and check the rubber flashing boot for any cracking or deformation. In shaded, moss-prone neighborhoods, moss can hide edge deterioration, so use a scraper or plastic putty knife to inspect the flashing from a safe metal ladder position. Replace compromised sealants promptly, and ensure the skylight frame itself remains square and watertight.
Flashing around skylights and along chimney transitions is where moisture usually enters first. Expect to see issues at transitions from vertical to horizontal planes, around pipe boots, and where step-flashing meets counter-flashing. In a wet-winter climate, even minor bends or gaps can channel water inward during a sustained downpour. A practical approach is to verify that counter-flashing extends far enough over the shingles and is sealed with an elastomeric or silicone-based sealant compatible with asphalt or metal roofing. Never rely on old, single sealant lines in mossy or shaded zones; reapply with a fresh bead after cleaning the surface and surface dry time permits.
Proactive maintenance reduces the chance of interior leaks during the rainy season. Schedule a seasonal dry run to test all penetrations, especially after heavy storms. Clean moss growth from around skylight bases and chimney bases to prevent moisture retention at critical edges. If a roof replacement is due, plan for integrated flashing that slopes slightly toward the exterior to shed water, and verify that all penetrations receive continuous, corrosion-resistant flashing underlayment. In persistently damp conditions, small flashing deficiencies deserve quick attention to prevent larger leaks when winter rains persist.
Find contractors experienced in skylight installation, flashing, and leak repairs to bring natural light into your home.
Sunnyside Roofing Services
(503) 883-8430 sunnysideroofingservices.com
14841 SE 82nd Dr, Clackamas, Oregon
5.0 from 148 reviews
Bliss Roofing
(971) 265-6417 www.blissroofing.com
14430 SE 98th Ct, Clackamas, Oregon
4.9 from 833 reviews
Western Pacific Roofing
(503) 659-7663 www.westpacroofing.com
9318 SE Church St, Clackamas, Oregon
4.9 from 101 reviews
In this area, warranties are most meaningful when they reflect both factory defects and the realities of moisture management. A solid warranty will specify what is covered by the manufacturer for underlayment, flashing, vent seals, and roof deck integrity, and what the contractor guarantees for workmanship, including proper installation of those moisture-sensitive transitions. A practical clue: in Clackamas the first failures tend to show up at flashing joints, vent penetrations, and underlayment transitions, which are common inspection points during county reviews. When evaluating options, map out who is responsible for each leak point after heavy rains - a gap here often becomes a yearly headache.
The local market features a meaningful presence of warranty-offering contractors, giving homeowners a real basis for comparing coverage rather than treating warranties as a rare add-on. Look for a dual warranty arrangement: a manufacturer's coverage that protects against material defects for a defined period, and a contractor workmanship warranty that covers installation flaws, including sealing and alignment of shingles, metal flashing, and vent closures. In a climate with long rainy periods, the interaction between these coverages matters most when leaks appear after a wet season. Some issues may be caused by improper flashing or incorrect underlayment transitions rather than a simple material failure, and those are typically addressed under workmanship warranties rather than manufacturer terms.
Ask for written details that state how claim disputes are handled, the expected response time for weather-related leaks, and the process for documenting moisture intrusion after storms. Request a sample claim form and a clear, staged remedy plan that includes inspection timelines and repair limits. Since these decisions can hinge on how well a contractor documents the roof's vulnerable points, insist on a pre-installation inspection report that highlights flashing, venting, and underlayment transitions. This is where Clackamas homeowners often find the most value in a warranty conversation.