Last updated: Apr 19, 2026
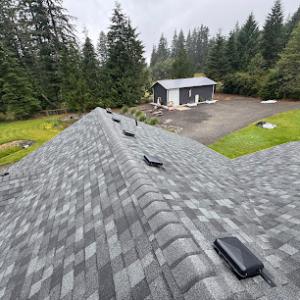
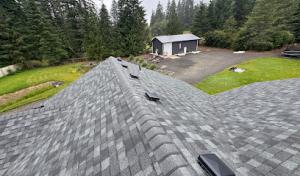
The winter winds and frequent storms up in the Clackamas foothills push water intrusion into the roof line faster than many flat-city neighborhoods. A reroof project isn't just about new materials; it's about how the weather interacts with tear-off, deck work, underlayment, and the dry-in phase. In this area, rain can begin earlier and end later than folks expect, so planning around the wet season reduces the chance of lingering leaks or weather-caused delays. The slope of many homes here also directs runoff in tighter patterns, making prompt drainage assessment and gutter protection during reroofing essential. The goal is to lock in a window with consistently dry days and air that can move moisture out of the decking and underlayment without sitting on the roof.
Replacements are commonly scheduled from late spring through early fall to avoid the wetter winter period. This is when the chance of consecutive dry days is highest, and crews can stage materials, complete tear-off, install underlayment, and finish edge flashing without the mud and damp that slow progress in colder months. For a homeowner, this means coordinating with the contractor to identify a block of favorable weather in May, June, or September, when historical precipitation patterns tend to spare crews from the worst wet spells. Planning for a longer dry stretch also helps align delivery of long-lead products, especially for mixed-material roofs where different components require careful sequencing.
Winter storms and prolonged rain in the area raise active leak risk and can interrupt tear-off and dry-in sequencing. A typical Monday-to-Friday workweek can quickly stall if a storm pushes through with heavy rainfall or high winds. In practice, that means your project should include buffer days for rain delays and a contingency plan for rescheduling critical tasks like deck preparation and ice-and-water shield installation. If a storm system comes in, crews may suspend tear-off to prevent decking damage and exposure of the interior; this interruption then compresses the remaining dry window, increasing the risk of not achieving a proper dry-in before wet season winds return.
Spring brings alternating cycles of warm days and sudden freezes at night, which can affect adhesive curing and the performance of roof coatings. When a freeze occurs, underlayment and ice barriers need time to set, and any sudden thaw followed by rain can create moisture pockets under shingles or tiles. Fall, with its wet spells and lingering moisture, also shortens workable installation windows. In practical terms, this means a homeowner should expect tighter scheduling in shoulder seasons. If a fall project must proceed, the crew will prioritize sequences that minimize exposed decking and ensure an accelerated dry-in before winter moisture returns. A thoughtful contractor will build in padding for these transitions, so the plan remains achievable even when a storm sneaks in or a dry spell ends abruptly.
To fit the window effectively, align with a contractor who tracks local weather patterns and provides a realistic, staged plan. Start with a precise teardown date and a defined rain-free period for deck prep and underlayment. Ensure the plan includes sequential steps: debris removal, deck inspection, underlayment installation, flashing at valleys and chimneys, and final shingle or tile installation with proper nailing patterns and wind protection. In hillslope housing, drainage assessment should be part of the initial pre-roof inspection. Check gutters and downspouts for proper alignment to prevent water from pooling near the fascia during the tear-off. The most reliable reroofs in this zone are those that anticipate a few extra dry days and can pivot quickly if a late-season storm appears.
First, identify a target period within late spring to early fall when long-range forecasts anticipate the most stable weather. Second, build in a flexible schedule with 5-to-7 extra days of contingency time to absorb potential rain delays. Third, confirm that the crew will perform a full dry-in sequence promptly after tear-off, including ice barriers where appropriate and secure edge flashing to manage late-season wind-driven rain. Fourth, arrange for debris containment and cover materials so that any residual moisture on the deck won't compromise stages of the install. Finally, establish a communication cadence with the contractor to receive timely weather updates and to adjust the plan before a wet spell takes hold. This approach keeps the project moving and preserves roof performance once completed through the typical winter start-up period.
In this elevated foothill setting, wet-season roofing problems come from repeated rain exposure, not hail-driven loss patterns you might hear about in other regions. Shingle edges soften, flashing seams seep, and tiny drips become steady leaks after steady moisture weeks. The effect stacks when your roof sits under a canopy of mapped drainage-long rakes, shaded valleys, and interconnected penetrations where water can pool and back up. If a small issue sits ignored through December and January, it won't stay small for long.
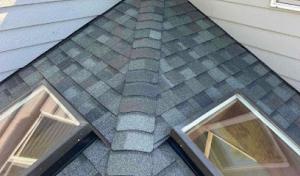
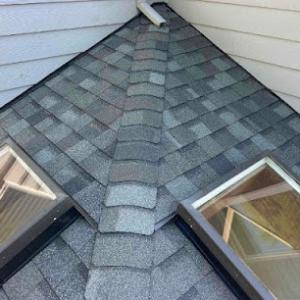
Homes in newer hillside subdivisions frequently rely on intricate rooflines, multiple valleys, and numerous penetrations for venting, skylights, and chimney connections. Each break in the surface adds a potential weak point for water to find its way inside after a heavy stretch of rain. The long rainy season elevates the risk that a minor misalignment in a valley seal or a marginal shingle edge becomes an interior problem within days. In practice, that means your seasonal check should zero in on where slope meets slope, where metal flashing overlaps, and where roof planes intersect.
Leak urgency rises in winter because heavy rain can turn small flashing or shingle failures into interior damage before a full replacement slot opens. That timing reality makes proactive triage essential: identify suspect flashing, recalcitrant joints, and worn shingle tabs before the sky opens wide for weeks on end. A single week of heavy downpour can overwhelm marginal protections near dormers, chimney legs, and vent boots, turning a visible drip into soaked insulation and damp ceilings.
Start with a rapid walk of the exterior after a rainstorm, focusing on valleys, hips, and transitions where two roof planes meet. Look for lifted shingles, curled edges, or dark staining along flashing seams-these are the first red flags that water has found a path inward. Inside, check ceilings under suspect areas for the telltale combination of a damp odor and small, darkened circles near corners and along seams. If you identify any active leaks or consistent wet spots during ongoing rain, treat the situation as urgent and arrange a temporary mitigation-iodine-colored sealant at the seam or plastic roofing tape for a quick stopgap-while you plan a more durable fix.
Because the dry season is brief, you cannot delay essential repairs that address repeated water intrusion during the wet months. Prioritize projects that close off common water entry points first-valleys, penetrations, and flashing details-before committing to a full reroof. A careful sequence, timed to minimize exposure, can preserve interior spaces and prevent escalating damage when winter returns.
Find local contractors experienced in assessing and restoring roofs after hail, wind, and severe weather events.

Klam Construction
(503) 387-6929 klamconstruction.net
8502 SE Hinkley Ave, Happy Valley, Oregon
5.0 from 119 reviews

Klam Construction
(503) 387-6929 klamconstruction.net
8502 SE Hinkley Ave, Happy Valley, Oregon
5.0 from 119 reviews
KLAM Construction is a trusted roofing company in Happy Valley, OR, specializing in asphalt shingle, metal, and full roof replacement services. With over 20 years of experience, we’re your local choice for residential roofing, storm damage roof repair, and roof replacement. Homeowners across Happy Valley and the greater Portland metro area count on us for roof installation, competitive pricing, free roofing estimates, and 10-year workmanship warranties. When it comes to finding reliable roofing contractors near you, KLAM Construction delivers quality that lasts
Bliss Roofing
(971) 265-6417 www.blissroofing.com
Serving
4.9 from 833 reviews
Bliss Roofing is a third-generation family operated roofing contractor built on over 50-years of referrals and satisfied customers. Bliss Roofing specializes in pitched residential roofing in Oregon & SW Washington. Our services extend to include multifamily dwellings as well as commercial projects. Our primary focus is residential roofing, providing an experienced staff to handle and coordinate almost any re-roofing or new construction project. We have extensive experience in installing composition shingles, metal, slate, tile, TPO, wood shakes, and more! Every job is inspected to meet the highest standards in the industry.
Greater Purpose Construction LLC - Portland Roofing
(503) 512-9054 www.gpurpose.com
Serving
5.0 from 110 reviews
Meet a top trusted local residential and commercial roofing company, specializing in shingle roofing, metal roofing, TPO roofs, slate, and shake. We deliver a superior experience to families and communities in Oregon and Washington. With over 10 years of experience, we are a company that builds quality roofs.
Lion Roofing & Exteriors
Serving
5.0 from 22 reviews
CCB#224679 Residential General Contractor
Integrity Roofing Company
(503) 742-0864 www.integrityroofingco.com
Serving
5.0 from 21 reviews
Roofing company serving the greater Portland metro and and Southern Washington. Residential roofing contractor. Contact us today for a free estimate and or inspection.

Sunnyside Roofing Services
(503) 883-8430 sunnysideroofingservices.com
Serving
5.0 from 148 reviews
Roofing services in Portland, Oregon. Residential roofing contractors. New roofing installation, roof repairs, tear-offs, reroofing, skylight installation, skylight repair, and more. Locally family owned & operated. Fully licensed & insured. Providing fair and honest pricing with superior craftsmanship. Contact us for a free estimate today!

Western Pacific Roofing
(503) 659-7663 www.westpacroofing.com
Serving
4.9 from 101 reviews
Best Clackamas roofing company! Our expert roofing contractors in Clackamas specialize in top-quality Clackamas roof repair, installation, & roof replacement services for both residential & commercial Clackamas area properties. As your trusted Clackamas roofers, we offer detailed Clackamas roofing services, including metal roofing, asphalt shingles, and flat roofing solutions. Our Clackamas roofing contractors are available for emergency roof repair, ensuring your home or business in Clackamas is protected. We provide detailed Clackamas roofing estimates & thorough roof inspections to keep your roof in top shape. Choose our sustainable roofing solutions & experience exceptional roof maintenance from your local roofing company in Clackamas.
Armadas Exterior
Serving
4.9 from 168 reviews
Armadas Exterior is a premier home improvement contractor specializing in James Hardie fiber cement siding, roofing, gutters, and exterior renovations. With a commitment to quality craftsmanship and exceptional customer service, we help homeowners enhance their property’s durability and curb appeal. Our expert team ensures precision installation, using industry-leading materials to deliver lasting results. Trust Armadas Exterior for your next siding or exterior renovation project!

French Roofing
(971) 376-8722 www.frenchroofing.com
Serving
4.8 from 37 reviews
French Roofing, located in Damascus, OR, is your top choice for expert roofing services in the greater Portland metro area. As a leading roofing contractor, we specialize in comprehensive roof inspections, repairs, and installations, using only the highest-quality materials to combat Oregon's climate. Founded by Sean French, our fully licensed and insured team is committed to hard work, honest communication, and exceptional roofing services. Whether it's roof repair, roof maintenance, or a full roof replacement, we ensure every project meets industry standards, offering competitive pricing and transparent communication. Contact us today at (971) 376-8722 or (503) 730-4050 for a free roof inspection.
Tonys Roofing
(503) 415-0438 tonysroofingllc.com
Serving
4.9 from 127 reviews
Tonys Roofing is the leading Portland roofing contractors servicing residential roofing. Roof repairs, roof replacements, roof cleaning, re-roofs, roof inspections, moss removal, roof installations, and all residential roofing. Get a free quote today.
River City Roofing Portland
(503) 970-5005 roofrivercity.com
Serving
4.9 from 185 reviews
River City Roofing is a residential and commercial roofing contractor in Portland, Oregon. We install residential, multi-family and commercial flat roofing membranes, coatings, shake, shingles and metal roofing systems.

KVN Portland Roofing
(503) 438-7767 www.kvnconstruction.com
Serving
5.0 from 174 reviews
KVN Portland Roofing are top roofers in Portland, OR specializing in roof repair, replacement, and installation services. As Portland roofing contractors, our licensed, insured team is a certified Malarkey contractor exclusively using premium Malarkey roofing products & shingles that protect your home year after year. We specialize in residential roofing services, skylights, and storm damage repairs. Experience the KVN difference with honest, family-owned services with personalized attention for every roof we touch. From roof inspection to cleanup, we deliver superior craftsmanship for Portland area homes backed by 20+ years of experience. Free estimates. Contact Portland's most trusted roofing company.
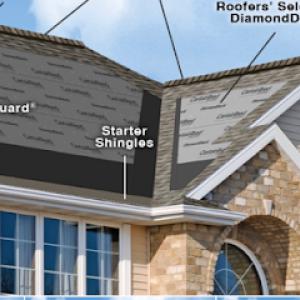
Asphalt shingles remain the dominant practical choice on most homes in this area, but metal, clay tile, concrete tile, wood shakes, and synthetic products all have active local markets. Each material brings different performance traits that matter in this foothill setting. When choosing, consider how the roof interacts with neighboring homes and the slope patterns common to Happy Valley subdivisions, where proper drainage and rapid shedding of moisture can help curb winter wear.
Happy Valley's mix of wet winters and dry summers drives a focus on moisture shedding, ventilation, and summer heat management. A roof should quickly shed rain in the winter to minimize standing moisture, while a well-ventilated attic space helps temper summer heat and reduce condensation risk. Sloped rooflines should be coordinated with eaves, overhangs, and underlayment choices that promote effective drainage and airflow. In practice, this means prioritizing products and installation details that emphasize consistent seams, robust ventilation strategy, and durable flashing at hips, valleys, and penetrations.
There are locally heavier tile systems present, so reroof planning should account for whether the existing home was built for tile or is transitioning from a lighter system. If the structure was originally designed for tile, continuing with a comparable weight can help preserve framing loads and ensure long-term performance. If switching from asphalt or lighter options, verify that the roof deck, fascia, and fastener plan can accommodate the added weight without compromising roof stability. For many homes in the area, matching or reinforcing the framing to tile or stone-coated options is a prudent step to avoid unexpected reinforcement needs after removal and during reinstallation.
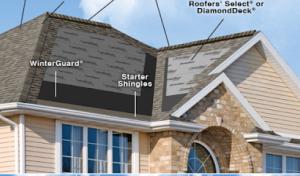
With moisture management as a central concern, the underlayment and fastener strategy should align with local wet-season exposure. In clay and concrete tile systems, ensure solid deck preparation and high-quality fasteners that resist corrosion in damp winters. Metal roofs benefit from well-sealed panel laps and ridge venting that maintains attic air exchange without creating thermal bridges. Wood shakes and synthetic composites demand careful moisture control and appropriate surface protection against UV and freeze-thaw cycles. In all cases, prioritize products with proven performance in extended wet periods and hot, dry summers.
When evaluating candidates, focus on how well each option handles drainage, ventilation, and heat during the typical year here. Consider the home's existing structural compatibility, the long-term maintenance profile, and how the chosen roof will age with the neighborhood aesthetic. Remember that a well-planned reroof addresses not just initial appearance, but the ongoing interplay of rain, sun, and seasonal shifts that define a durable roof in this hillside suburb.
In this hillside corridor with mixed housing stock, you'll see two clear value tracks: budget-oriented asphalt systems and premium options like tile, metal, and synthetic composites. Asphalt shingles sit in a broad range, aligning with many neighborhood homes that were built with practicality in mind. Premium metal roofs, clay and concrete tiles, and high-end composites answer steeper pitches and multi-plane layouts common in the area, but they come with noticeably higher installed prices. When you're pricing, expect asphalt to land on the lower end of the spectrum and tile, metal, or heavy composites toward the upper end. Typical ranges to plan around are asphalt shingles from the low to mid hundreds per square, and metal, tile, or composite options well into the upper hundreds or beyond per square.
Scheduling work into the dry season is a top consideration here. The wet winters and late fall rains shrink the window for a clean, efficient reroof, which tightens contractor calendars and can push up short-term demand. If a project sits near the end of the dry window, crews may incur premium labor costs or require longer hold times between weather events. Off-season planning can yield better availability but might come with longer lead times before the crew can start, especially for higher-demand materials like premium metal or tile. Weigh your urgency against how much you're willing to accommodate potential schedule shifts and fluctuating material lead times.
Steeper suburban roof designs and multi-plane layouts are common in subdivision patterns here. That geometry increases labor time, staging needs, and cleanup effort, which can elevate the installed price versus simpler ranch-style roofs. Expect higher daily crew hours for material handling, protection, and fall-prevention measures. For premium materials, these factors compound with processing time for layout, underlayment, and precise flashing at valleys and transitions. If you're choosing clay, concrete, or metal, you'll want a contractor who has experience navigating those steeper, multi-plane configurations to minimize on-site downtime and warranty concerns.
Start with a realistic estimate of your roof size in squares and map it to the material you're considering. Remember asphalt sits at the budget end, while tile, metal, and composites command a premium. Build a contingency of 5-10% for weather-related delays in the wet months and a bit more if the roof layout is highly complex. When bidding, ask how crews schedule around the dry season and whether material lead times might affect your start date. Finally, verify that the contractor's crew capacity aligns with your roof's pitch and planes to ensure timely completion and thorough cleanup.
Don't let upfront costs delay a critical repair - these contractors offer payment plans to fit your budget.

In this area, reroof projects generally require a building permit. The process is straightforward, but skipping it can lead to stop-work orders, fines, and delays that ripple through the project timetable. The local building department expects establishing a clear scope, material types, and safe access during the permit application, especially when working on steep roofs and close neighbors. Expect a quick plan check, but know that any missing documentation or ambiguities push the permit review into longer cycles. Having drawings and product specs ready helps keep the project moving.
The local building department typically performs inspections at rough-in, mid-stage, and final for reroof work. Rough-in confirms roof decking and underlayment are installed correctly and that temporary fall protection meets code. Mid-stage checks verify underlayment continuity and proper flashing around penetrations, vents, and chimneys. The final inspection ensures all work is completed to code and that any required weatherproofing details pass muster. Scheduling these inspections requires coordination with the crew's progress and the inspector's availability, which can be sensitive to weather-related delays.
Plan review is usually relatively short, but inspection scheduling can still be pushed by weather delays during the rainy season. Wet, cold days slow material handling, adhesive performance, and temporary shelter setup, which in turn can shift inspection windows. A tight dry-season install window can feel rushed if rain sneaks in or if crews fall behind; plan for contingency days and potential rescheduling. Clear communication with the city inspector and notifying them early about anticipated weather risks helps keep the permit timeline realistic.
Coordinate permit submission early in the project to avoid last-minute scrambles, especially when rain forecasts threaten the install window. If a permit sits in review while reroofing materials sit on the ground, you risk weather-driven delays that can stretch the schedule and complicate coordination with subcontractors. Missing an inspection or altering timelines without notice can trigger rework or fines. Treat the permit and inspection steps as crucial milestones that shape the project's ability to finish safely and on time.
The topography and exposed ridgelines around Happy Valley mean wind events that blow through in winter can create more long-lasting roof issues than flashy hail storms. Shingle edges peel, flashing lifts, and even well-installed roofs can suffer blow-off areas after sustained gusts. In this market, claims are often driven by wind- and storm-related surface damage, not sudden hail catastrophes. When a storm rattles through, the priority is to assess wind-driven leaks and track where wind exposure would have compromised underlayment and any nearby penetrations.
Oregon insurers commonly expect photo documentation, damage records, and an adjuster review before approving a full roof replacement. Photos should capture wind-stripped shingle edges, damaged flashing, and any visible gaps or sagging in the decking. Keep a dated log of when leaks are noticed, which rooms are affected, and how rain patterns change after a storm. If a claim progresses, an adjuster will likely request access to the attic and roof line for inspection. Having a consistent file with receipts for temporary protections and a clear history of storm events can help expedite the process.
Active leaks after storms demand quick action to limit interior damage while paperwork unfolds. Use tarps or heavy plastic to cover exposed roof sections, especially over damaged valleys or penetrations, and ensure attic ventilation remains adequate to reduce condensation. If a temporary patch is used, document the area and date, as this supports the claim trail. Remember that temporary measures are for mitigation, not a final fix, so plan for a professional assessment as soon as weather allows.
Reroof timing in this neighborhood hinges on winter moisture and the tight dry window between storms. Delays in weather or weeks-long claim reviews can push replacement work into the spring, compounding leak risk. Coordination among homeowner, insurer, and a trusted local roofer is essential to balance protection, documentation, and a durable, wind-resistant roof when the window finally opens.
Connect with contractors who help homeowners navigate the claims process from damage assessment to final approval.

In this hillside setting, additions, porches, and attached structures often feature flatter roof lines than the main residence. The rainy season concentrates runoff and debris on these surfaces, and a flat or low-slope section that doesn't shed water efficiently can create leaks that travel toward living spaces. The practical approach is to treat each low-slope area as a separate water-control system, with its own drainage path and flashing details that tie into the primary roof without creating a weak seam.
When replacing the main roof, inspect the low-slope portions as a distinct project within the job. Failure patterns on these sections differ: membrane wear, edge flashing deterioration, and clogged drain lines tend to show up earlier than on steeper surfaces. Check for consistent pitch assumptions, as some low-slope bays rely on integrated gutters or concealed drainage that isn't compatible with every main-roof layout. Ensure that any new roofing assembly for the low-slope area can accommodate both the water load from heavy winter rain and the occasional snowmelt, if appropriate for the site.
Choose a system that provides reliable water shedding and long-term seam integrity. In addition to the main roof materials, plan for a compatible low-slope membrane or metal transition that resists pooling and wind-driven rain. For additions, specify flashing that connects neatly with existing parapets or walls, with sealing that remains flexible through temperature cycles. Consider color and texture continuity only after the functional requirements are met, especially where overhangs or clerestory elements influence drainage patterns.
Winter weather in the hills narrows the install window, so coordinate the low-slope portion early in the reroof schedule whenever possible. Prioritize dry-day forecasts for any permeable underlayment and flashing work, and ensure temporary protection is in place if a portion of the main roof must remain open during the low-slope work. This coordination helps prevent storm-driven setbacks and preserves drainage reliability through the season.
Find specialists in TPO, EPDM, and built-up flat roofing systems for residential and commercial properties.
Greater Purpose Construction LLC - Portland Roofing
(503) 512-9054 www.gpurpose.com
Serving
5.0 from 110 reviews