Last updated: Apr 19, 2026
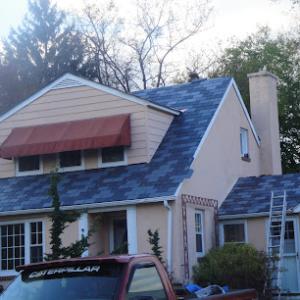
Spring storms and hail are a primary local trigger for shingle damage and leak investigations in Warrenton. The transition from winter freeze to spring hail can create unseen micro-cracks that worsen under the Piedmont's swing in weather. After a storm, you may notice damp attic spots, a sudden uptick in interior humidity, or pinhole leaks along ceilings and walls. Do not dismiss these as minor annoyances; a small breach can escalate quickly with subsequent rain or summer heat. When inspecting the roof, pay particular attention to fastener loosening, granule loss along the gutters, and dark water stains that trail from roof penetrations or valleys. If you detect any of these signs, treat it as a potential active leak and act with urgency.
Summer heat combined with frequent afternoon storms in this market can turn minor storm damage into ventilation and roof-deck moisture problems. Heat accelerates expansion and contraction of vent boots, ridge vents, and flashing, creating gaps where water can seep in under shingles. Ventilation becomes critical: a compromised attic intake or exhaust can create condensation that mirrors active leaks on hot afternoons. In practical terms, if a ceiling feels warmer than the room, if attic insulation looks damp, or if you notice a musty odor following a storm, prioritize a prompt roof and attic assessment. Waiting for a "good dry spell" can allow moisture to voyage deeper into decking, soffits, and insulation, complicating repairs and raising the risk of mold.
Virginia insurers commonly expect photo documentation, a clear scope of work, and evidence separating new storm damage from pre-existing wear before approving roof claims in this market. When you're preparing to file, start with a time-stamped photo record taken from multiple angles: the roof surface, edge details, flashing around chimneys and vents, attic daylight visible through any perceived gaps, and interior water stains with their locations mapped to a ceiling layout. Photograph layers of the roof deck if accessible: damaged shingles, lifted tabs, and any sagging or soft spots. Create a simple, dated shot list that aligns with observed leaks inside the home, including rooms affected and a rough timeline of when the damage first appeared. Your documentation should tell a concise story: storm event, visible damage, immediate symptoms, and how moisture progressed.
A clear scope of work is a shield against back-and-forth disputes and delayed payments. That scope should specify the exact roof areas to be replaced or repaired, the type and brand of underlayment, flashing repairs or replacements, vent boot material, drip edge details, and the method for addressing any rotten decking. Include an assessment of ventilation needs and any attic insulation adjustments that may be required to restore proper dryness. In a storm-impacted home, the scope should reckon with the possibility of deck degradation beneath shingles and the need to verify roof deck integrity before laying new materials. Provide a visual comparison between pre-storm conditions and proposed post-storm repairs, with a step-by-step sequence that insurers can follow easily.
Access for contractors often becomes a bottleneck during peak storm seasons. If daylight hours align with heavy rains, you may encounter delays. Plan access points to minimize interior disruption: consider staging ladders and tarps to keep weather out of sensitive rooms, and designate an interior path for workers to reduce travel across living spaces. In Warrenton, steep-slope homes and historic estate properties can complicate ladder placement and surrounding landscape protection. Communicate restricted areas and safety boundaries clearly to family members and neighbors, so the work can proceed without interruption when sunny windows appear.
Begin with a rapid assessment after the next significant storm: note signs of moisture, gather photos, and mark any areas with ongoing dampness. Then assemble the documentation packet that insurers expect: date-stamped images, a clearly scoped repair plan, and a comparison of new damage to anything pre-existing. If there is any suspicion that damage could extend beyond shingles-such as decking, insulation, or ventilation-flag those items early so the claim narrative remains coherent. In this neighborhood, the fastest path to resolution hinges on precise documentation, a transparent scope, and timely, accurate communication with the insurer. Act decisively after each substantial storm to protect the roof, the attic, and the interior living spaces from escalating damage.
Peak Roofing Contractors
(703) 753-4585 www.peakroofingcontractors.com
405 Belle Air Ln, Warrenton, Virginia
4.9 from 591 reviews
Peak Roofing Contractors is a family-owned and -operated Northern Virginia roofing and home improvement contractor that knows how to deliver outstanding customer service. From the beginning to the completion of your roofing, window, siding, gutter or other home improvement project, our professional staff will always strive to exceed your expectations. At Peak Your Quality Roof Repair & Replacement is Our Priority. Peak’s roofing professionals can come to your home or property and provide a no-hassle, no-obligation written estimate that will allow you to make an informed decision regarding roof replacement or repairs.
Stonewall Roofing
(571) 619-9033 stonewallroofing.com
Warrenton, Virginia
5.0 from 22 reviews
Stonewall Roofing is your trusted local roofing expert, providing top-quality roofing solutions for residential and commercial properties. We specialize in roof repair, replacement, storm restoration, gutters, windows, and metal roofing. With years of experience, we pride ourselves on exceptional craftsmanship, reliable service, and customer satisfaction. Our professional team delivers durable, long-lasting results to protect your home or business. Serving all cities and towns in Prince William, Fauquier, Stafford, Fairfax, and Culpeper counties, as well as Fredericksburg in Northern Virginia, Stonewall Roofing is dedicated to keeping you covered. Contact us today for a free consultation!
McGlothlin Roofing
(540) 497-0762 mcglothlinroofing.com
47 Broadview Ave, Warrenton, Virginia
5.0 from 16 reviews
McGlothlin Roofing provides roofing installations, roofing repairs, gutter services, and emergency services to the Northern Virginia area.

Mission Roofing
(703) 249-9138 missionroof.com
32 Ashby St Suite 204, Warrenton, Virginia
4.8 from 18 reviews
Mission Roofing specializes in insurance restoration, roof assessment & replacements, and gutter cleaning & replacements. Our company’s focus is simplification through automation. We utilize the newest available technology to ensure simple internal workflows which allow us to keep our focus where it matters; on our clients. With features like online quotes, automated reminders, and a customer portal to track your project, we keep things focused on saving our clients as much time as possible. Keep it simple, Go Mission.
AAA Roofing Company
8428 Lunsford Rd, Warrenton, Virginia
5.0 from 9 reviews
A company with over 50 years experience working and living in Northern Virginia. Serving Northern Virginia and surrounding areas. Family and veteran owned and operated. Licensed and insured. Always open and honest pricing. Military, fire and police department discounts starting at 5 percent. Gutter, metal wrapping and soffit work available for pricing with roof installation. Substantial savings when we are contracted for the roof.

New Generation Builders
(703) 586-8181 newgenerationbuilders.co
Warrenton, Virginia
4.3 from 23 reviews
New Generation Builders is a reliable roofing company located in Manassas, VA, serving all Northern Virginia with top-quality roofing and storm damage services. Our skilled and experienced team specializes in repairing and installing roofs of all types and sizes, ensuring that your property is protected from the elements. We use only the highest quality materials and the latest techniques to deliver exceptional results that exceed your expectations. Whether you need a small repair or a complete roof replacement, our team is here to help. Contact us today to schedule your appointment and experience the difference of working with New Generation Builders.
Water Shield
(703) 887-7262 watershieldroof.com
4257 Aiken Dr STE H, Warrenton, Virginia
3.4 from 14 reviews
For over 16 years and counting, we have had the privilege of serving homeowners with high-quality roofing and exterior services. Business owners Tony and Crystal Martinez have a passion to help people and enjoy looking at the world through a positive "just do what's right" lens, and that is how we choose to serve each and every one of our customers.
Pure Roofing
(571) 445-8032 www.pureroofingva.com
Serving
4.9 from 129 reviews
Local, family owned & operated roofing contractor
Style Roofing
(703) 754-9906 www.styleroofing.com
Serving
4.9 from 47 reviews
We are a family owned and operated business and our trade has been passed down through three generations. Our work ethic was instilled in us by our father and grandfather. We learned early on the value of honest work at a fair price. –This is the cornerstone of our success. Style Roofing’s owner, Bill Rafferty, is involved in every phase of your project and he, as well as the rest of his family are personally dedicated to your complete satisfaction.
North Star Contracting
(703) 775-0285 northstarinc.net
Serving
5.0 from 27 reviews
Restore your property and get what you are due with help from our experienced storm damage contractors in Gainesville, VA. Contact us to get started with a comprehensive evaluation of your property.
Roofing Solutions & Sheet Metal
(540) 439-4080 www.roofssolution.com
Serving
5.0 from 12 reviews
At Roofs Solution, we understand the stress and inconvenience of dealing with roofing issues. As a trusted roofing company, we are committed to providing efficient and reliable solutions to ensure your home remains safe and secure. Our experienced team guides you through every step, offering clear plans and quality workmanship. Don't let roofing problems disrupt your life—contact Roofs Solution today for a hassle-free experience and regain peace of mind.
Monterroso Improvement
(571) 991-2565 monterrosoimprovement.com
Serving
5.0 from 17 reviews
We are a licensed and fully insured home improvement company based in Bealeton, VA, we’ve been serving the DMV Area for the last 5 years. Proudly helping residents of residential properties built their dreams by performing high-quality roofing, gutter, and siding services. Our goal is to keep growing as a company to be able to reach more people and provide them with a reliable and friendly contractor who can manage their projects from start to finish, we are a hardworking team that genuinely enjoy what we do.
In Warrenton, full replacements are typically scheduled during dry, moderate spring and fall weather to improve installation conditions and long-term roof performance. The shoulder seasons offer cooler, consistent temperatures that help shingles seat properly and underlayment set without the speed pressure of peak summer heat. When planning a replacement, start with a weather-focused calendar: aim for stretches of several dry days, rarely spanning more than a weekend, to minimize the chance of mid-project rain causing delays. By aligning the project with these windows, you reduce the risk of weather-driven complications that can compromise the long-term integrity of the roof.
Winter freeze-thaw cycles in this part of Virginia raise the risk of ice dams and underlayment-related leak issues, making late-winter failures a local concern. If a roof needs replacement after a heavy fall and before spring, anticipate brief pauses for cold snaps and ensure the contractor stages heat sources or decking protection as needed. In practice, that means scheduling feasibility checks with the crew to confirm that installation work can begin only when ice and snow are out of the way and temperatures stay consistently above freezing during critical underlayment and shingle adhesion stages. A narrow winter window can still work, but it requires tighter coordination and contingency planning for deferrals caused by weather.
Fall wind events and leaf-and-branch debris are a recurring issue for flats and steep-slope roofs with mature tree cover and suburban-lot conditions. The debris buildup can complicate both removal and material preparation, so choose a start date after peak leaf drop when possible. This timing reduces cleanup time and helps protect newly installed underlayment from pine needles and leaf litter that can trap moisture. If a fall replacement is unavoidable, plan for a thorough post-install inspection to verify that gutters, downspouts, and flashings were not compromised during the debris season. Proactive scheduling also helps align with typical contractor workload in late summer and early autumn, often resulting in a smoother, more efficient project flow.
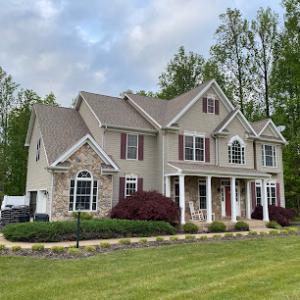
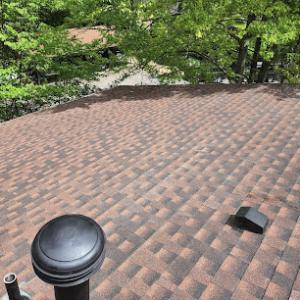
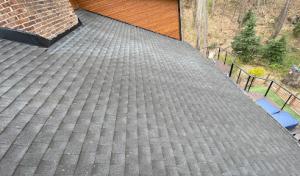
Asphalt shingles remain the dominant choice for most Warrenton homes, delivering a solid balance of value and performance for the Piedmont climate. Local hail, summer heat, and repeated wet-dry cycling contribute granule loss and accelerated aging, so look for shingles with good granule retention and a robust adhesive strip. When inspecting after a summer storm, pay close attention to granule buildup in gutters and along eaves, and check for curling edges on exposed hips and ridges. If granular loss is ongoing or flashing has visible wear, it's a sign to schedule a professional roof health check soon after each hail event. For asphalt, a well-sealed valley and properly flashed vent penetrations help prevent interior leaks during heavy downpours, which are common in late spring and summer.
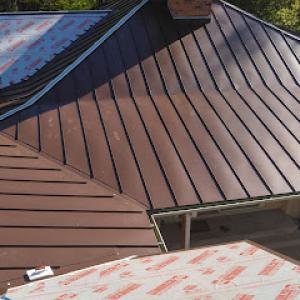
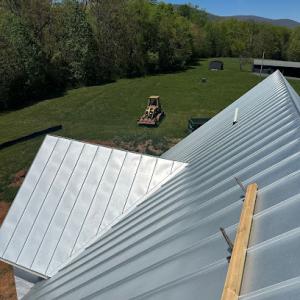
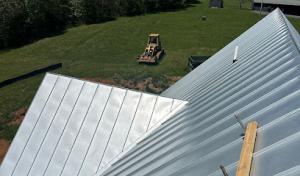
Metal is a meaningful specialty in the local market, particularly for homeowners prioritizing storm resilience and rapid water shedding during heavy rain. Panels or standing-seam metal can shed water quickly, reducing roof-soaked attic risk when storms push through in quick bursts. In Warrenton's mix of historic homes and newer estates, metal can pair well with certain architectural styles and lower the chance of wind-driven debris infiltrating the roof deck. When considering metal, verify hidden fasteners and coating longevity, as hail can dent softer alloys and degrade coatings over time. A properly installed metal roof with solid underlayment is especially advantageous for flood-prone pockets or steep slopes where debris impact is a concern.
Slate, clay tile, concrete tile, and wood shakes appear across Warrenton's diverse housing stock, from historic-style remodels to high-end estates. Slate offers exceptional longevity and a refined look, but weight, substrate requirements, and installation precision are critical in storm-prone seasons. Clay and concrete tiles provide strong weather resistance and a distinctive profile, yet initial weight and breakage potential under hail demand careful selection and professional handling. Wood shakes deliver classic texture but require rigorous maintenance to prevent rot and insect damage, especially with summer humidity and seasonal rains. When choosing these materials, match the roof's slope and structural capacity to the material's weight and expansion characteristics. Regular inspections after storms help detect fastener loosening, cracked tiles, or hairline fractures that could invite slow leaks.
After spring hail and summer storms, a quick but thorough leak check is essential. Look for interior staining, musty odors, and attic condensation as signs of buried damage. Capture photos of any impacted areas and roof surface, note missing granules, dented metal, cracked tiles, or curled edges, and keep a dated log of assessments. If a leak is suspected, limit further interior exposure by reducing attic heat build-up and rerouting interior moisture away from the affected area while a professional assessment is arranged. Insurance documentation should reflect storm timing, extent of visible damage, and any prior repairs, with clear notes on preexisting conditions for an accurate claim record. This local climate-its hail, heat, and wet-dry cycles-means timely inspection and precise material matching are key to a roof that stands up to Warrenton's seasonal swings.
When a full roof replacement is on the table, the project typically goes through Fauquier County rather than a city-only roofing office. That distinction matters because the county handles the permit review, inspections, and final sign-off that your insurer and lender may expect for the record. Knowing this early helps avoid delays from missing paperwork or a permit that sits untouched. The county's process is designed to catch issues before the new roof is installed, especially on the steeper pitches and estate-scale homes common around the Warrenton area.
During the plan-review phase, prepare to provide clear contractor information, a detailed scope of work, and specific ventilation or venting details. The plan reviewer wants to see that the chosen materials, underlayment, and attic ventilation meet current building codes and the house's existing design. In Fauquier County, incorrect or incomplete ventilation details can stall approval, since proper venting affects long-term roof performance and attic health. Have the contractor confirm attic fan usage, ridge vents, soffit intake, and any mechanical ventilation plans if applicable. If the home carries historical features or steep angles, the plan review may request notes on preserving drainage patterns and ensuring proper flashing around chimneys and skylights. Submitting complete, clearly labeled plans speeds the process and reduces the chance of back-and-forth requests.
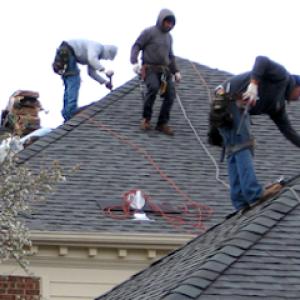
Roof work in Warrenton is typically inspected during installation and again at final completion for compliance sign-off through the county building department. The installation inspection checks that the roof is being laid according to approved plans, with proper nailing patterns, underlayment installation, and flashing details. The final inspection confirms that the work matches the permit scope and that all components meet local codes. It helps to have the inspector accompanied by a knowledgeable contractor foreman who can point out ventilation setup and any deviations from the approved plan. If the project touches accessory structures or eaves, make sure those are included in the permit record to avoid a later finding of non-compliance.
Start the permit conversation early with a licensed contractor who understands Fauquier County's expectations, especially for older steep-slope homes and estate properties. Keep a centralized file with permit numbers, plan-review approvals, and inspection dates as storms move through the season. If spring hail or summer storms trigger damage assessments, document everything with photos and notes to attach to the permit packet, since accurate records help the county quickly verify what work was approved and what remains in compliance.
Typical local pricing runs about 350 to 650 USD per square for asphalt shingles, 700 to 1300 for metal, 1100 to 2200 for clay tile, 1000 to 1800 for concrete tile, 700 to 1200 for wood shingles or shakes, and 1900 to 3400 for slate. If a roof is age- and condition-challenged, those numbers can creep higher, especially when the job calls for extra decking work, ventilation tweaks, or a specialty tear-off and disposal. The baseline is straightforward, but the climb from standard to premium is real when you're dealing with steeper pitches or compromised decking.
A common Warrenton scenario is an older home with a steep slope and a mixed roof deck. In that case, expect the project to include more decking repair or replacement, and possibly upgraded ventilation or ridge products. Those additions translate to a higher square-foot price because crews must work more carefully and use longer-lasting materials to withstand Piedmont storm swings. On estate properties with expansive footprints, the same factors apply, but the overall square footage margin can push total cost higher even before material selection is locked in.
Storm-driven demand spikes after spring hail or summer storms can tighten scheduling and labor availability in the area, affecting project timing and pricing. If a roof sustains hail damage, insurers may push quick timelines, and contractors may prioritize those emergency reversions, which can shift crew availability and pricing locally. For you, this means a need to plan a window for assessment, then a window for replacement that aligns with material lead times and favorable weather conditions.
Asphalt remains the practical baseline for many Warrenton homes, with a cost range that fits most mid-market projects. For stronger wind zones or architectural goals, metal or tile options become appealing despite higher upfront costs. Clay tile and slate bring distinct aesthetics and long-term durability, but require solid decking and careful installation, reinforcing why premium work tends to show up on steeper or older structures. When budgeting, balance the visual appeal and lifespan against the immediate realities of access, labor, and local storm cycles.
Get a clear picture of your project costs upfront - no commitment required.
McGlothlin Roofing
(540) 497-0762 mcglothlinroofing.com
47 Broadview Ave, Warrenton, Virginia
5.0 from 16 reviews
In this market, claim outcomes often hinge on having a clear, pre-storm baseline. If you can show the roof's condition before a storm, you remove ambiguity about what damage is truly new. Take timely photos from multiple angles, noting gutters, flashing, and skylights, and keep a dated file for reference when a claim lands.
Adjusters serving Warrenton commonly ask for photos, contractor estimates, and product or scope details before confirming replacement versus repair. Have a trusted local roofer prepared to provide objective, itemized notes about shingle type, underlayment, and any structural concerns. Clear documentation helps the insurer see the full scope without unnecessary back-and-forth.
Because market-wide storm activity can affect claim timing and scrutiny, Warrenton homeowners benefit from documenting damage immediately after hail or wind events. Quick, organized submissions can keep the process from stalling as adjusters rotate from one neighborhood to the next. Delays often crowd inspections, and memory fades, making precise records more valuable.
After a storm, photograph every damaged area-shingles, vent fixtures, fascia, and any interior water intrusion. Collect preliminary estimates from a couple of reputable local roofers, noting whether repairs suffice or a full replacement might be needed. Store communications and receipts in a dedicated storm-damage folder for easy access when the claim opens.
Storm seasons move quickly through Fauquier County, and adjusters will prioritize clarity and verifiable damage. If the documentation is incomplete or inconsistent, expect longer waits or a shift from repair to replacement discussions. The more you document, the smoother the path through the claim, even when the outcome isn't guaranteed.
In Warrenton, the mix of older housing and upgraded homes means leak sources aren't always just field shingles. Flashing transitions between roof surfaces, valleys, dormers, and chimney areas can fail or shift with seasonal swings and storm exposure. A rising issue is how aging underlayment or deteriorating sealants around penetrations contribute to moisture intrusion long after the obvious buckling or missing shingles are addressed. The prudent approach is to inspect around all transitions after a heavy rain or hail event, not only where shingles appear worn. Pay special attention to roofs with steep pitches or historic detailing where metal flashing may be original and corrosion-prone.
Skylight-related repair demand is active enough in the local contractor market to warrant dedicated expertise rather than treating it as a rare add-on service. Skylights introduce an extra failure point, particularly where curb mounting, flashing, and sealants meet aging roofing. If a leak appears around a skylight, don't assume resealing the curb will suffice. In most cases, the enclosure, flashing boot, and surrounding shingles require coordinated attention to prevent future seepage during spring storms or summer downpours. Seek a contractor who routinely handles skylight assemblies, not one who only occasionally tackles them.
On older homes, replacement planning often has to account for hidden deck issues revealed only after tear-off, especially after repeated storm exposure. Plywood deterioration, sagging deck boards, or concealed rot can surface once the old roofing is stripped away. Discovering these problems early is critical to avoid surprises during the rebuild. When evaluating a tear-off, insist on a candid assessment of the deck substrate and any underlying structure, so that temporary leaks don't turn into long-term moisture trouble.
Find contractors experienced in skylight installation, flashing, and leak repairs to bring natural light into your home.
Peak Roofing Contractors
(703) 753-4585 www.peakroofingcontractors.com
405 Belle Air Ln, Warrenton, Virginia
4.9 from 591 reviews
Rescue Roofing
(540) 729-1649 www.myrescueroofing.com
91-C, 91 Garrett St, Warrenton, Virginia
4.9 from 27 reviews
McGlothlin Roofing
(540) 497-0762 mcglothlinroofing.com
47 Broadview Ave, Warrenton, Virginia
5.0 from 16 reviews