Last updated: Apr 19, 2026
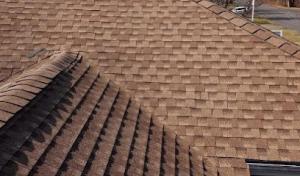
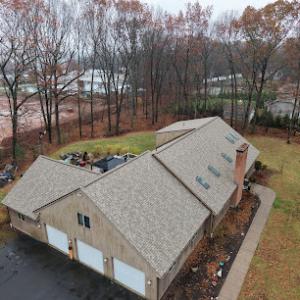
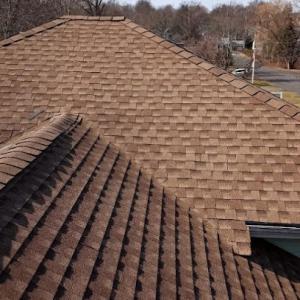
Repeated winter freeze-thaw cycling in this part of central Connecticut is not just uncomfortable-it's actively wearing out roofs. Small flashing gaps widen, shingles crack, and the heat of daily sun can dry and curl edges that once laid flat. By late winter or early spring, those tiny failures become real leaks if they've been allowed to linger. This is not theoretical in older homes with decades of wear; it's a practical, stubborn pattern that shows up year after year along eaves, valley intersections, and near vent flashing. If you've got asphalt shingles, you've probably seen granule loss and micro-cracking where ice dams would form-then melt away and refreeze, enlarging those faults.
Snow in this city doesn't just sit there. It sits heavy, then slides, then refreezes along the lower edges and gutters. Ice retention at eaves is a frequent problem, because warm rooms above push melt toward a cold roof edge. When temps swing, that water refreezes into ridges that pry shingles upward and slowly loosen fasteners. The practical effect is a roof that looks fine from the curb but hides a weakened deck and compromised flashing. In this climate, delayed winter repair scheduling compounds the damage. If crews can't reach a leak promptly or if ice damming is severe, the problem compounds, creating larger leaks by the time spring shows up and temperatures stay above freezing consistently.
Because most full replacements are scheduled from late spring through early fall, winter damage often needs a stopgap to keep water out while the weather is unfriendly to big jobs. Temporary stabilization is not cosmetic-it's a shield for the interior and a bridge to a proper repair window. Expect tarps, temporary flashing adjustments, and targeted sealants at the most vulnerable seams. This kind of stabilization buys time, but it isn't a long-term fix. If ice damming or flashing failures are severe, you'll want a plan that stops short of a full tear-off until temperatures rise enough to support a solid, lasting installation.
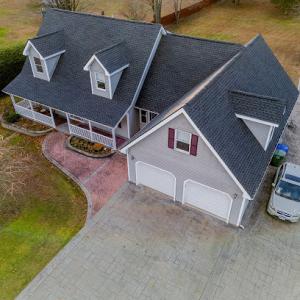
First, inspect critical zones after heavy snows or thaws: around chimneys, roof-to-wall transitions, and where the roof meets the gutter line. Look for lifted shingles, gaps in flashing, and damp spots along interior ceilings beneath these areas. If you notice staining or dampness, don't assume it will dry out on its own; winter weather will only widen those leaks in the next freeze-thaw cycle. Schedule a professional assessment that specifically targets flashing integrity and the deck condition under suspected problem areas. Ask about reinforcing edge flashing and ensuring proper ventilation and attic staging to reduce heat build-up that accelerates ice dam formation. In the meantime, minimize running water from indoor fixtures that could aggravate existing leaks and keep attic vents clear of obstructions so air can circulate and the roof can shed meltwater more evenly.
In neighborhoods with dense, older housing stock, the difference between a quick fix and a cascading leak often comes down to acting during the late-winter lull before spring projects commence. If a leak shows up or you notice stalling ice dams, treat it as urgent. The right targeted repair now protects the rest of the roof during the next freeze-thaw cycle and positions you for a smoother, safer full replacement when challenging winter weather has passed.
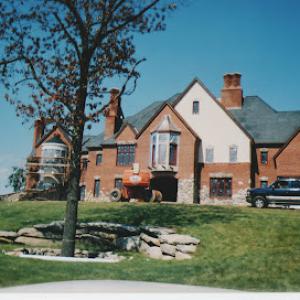
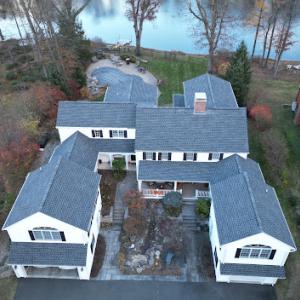
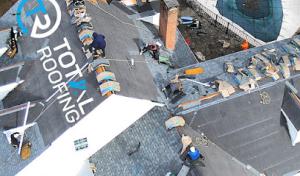
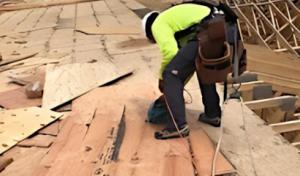
The local contractor market is dominated by re-roofing rather than new construction, which means many New Britain projects involve tear-offs, hidden deck repairs, and upgrades to aging roof details. Homes in dense neighborhoods often reveal their age in small, time-tested details-flashing transitions, vent stacks, and deck edges-that need careful attention beyond shingle replacement. When planning, expect that the crew will frequently uncover deck damage or compromised fasteners once the old roof is removed. This reality shapes both scheduling and communication with the crew, so you're not surprised by additional steps that impact your project timeline.
On older homes, inspections commonly focus on decking condition, flashing transitions, and attic ventilation rather than just shingle replacement. Before any order is placed, schedule a thorough assessment of the underlying structure. Look for softened or warped decking, curled or rusted metal flashing, and signs of past leak points around valleys, chimneys, and dormers. Attic ventilation should be verified to ensure there's enough intake and exhaust to mitigate ice damming and freeze-thaw stress during the Connecticut winter. If the decking shows moisture damage or mold, plan for repairs or replacement in the scope so the new roof has a solid, leak-free foundation.
Dense established neighborhoods increase the importance of site protection, debris cleanup, and fast turnaround during tear-off and replacement work. Protect landscaping, driveways, and sidewalks with sturdy tarps and fencing to keep debris contained in narrow streets and busy curb lines. Communicate with neighbors about expected noise and disposal logistics, since many homes share driveways or alley access. A well-sequenced plan minimizes street disruption while maintaining safety for pedestrians and vehicles. The crew should stage materials carefully to avoid overloading small yard spaces, and they should manage weather delays with a clear, updated schedule so streets remain clear after each workday.
Older homes commonly benefit from upgrades to aging roof details during a re-roof. Pay attention to improving flashing transitions around valleys, dormers, and chimneys to create continuous, corrosion-resistant seals. Consider upgrading roof vent placement or adding continuous soffit and ridge venting to improve attic airflow, which reduces frost-related wear and ice dam risk. If the roofing system includes historical features or decorative eave details, plan for careful removal and reinstallation to preserve character while upgrading performance. A thoughtful integration of new underlayment, improved deck fastening, and compatible accessories helps extend the life of the new roof in a climate that endures frequent freeze-thaw cycles.
J&R Ultimate Construction Roofing
(860) 402-7116 jrconstructionct.com
17 Lyons Pl, New Britain, Connecticut
5.0 from 15 reviews
Roofing and Gutter services. We take pride in the quality of work and customer satisfaction that we give each and every customer.
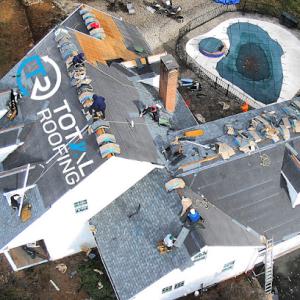
Total Roofing
(860) 269-6308 www.totalroofingct.com
Serving
5.0 from 44 reviews
At Total Roofing, we believe that a safe roof is the cornerstone of a comfortable home. With years of experience and a commitment to exceptional customer service, we're your go-to roofing experts in Connecticut. Our team consists of skilled roofing professionals who are passionate about their craft. We stay up-to-date on the latest industry trends and techniques to ensure that we deliver the best possible results. Ready to give your roof the care and attention it deserves? Contact Total Roofing today to schedule a consultation. Our friendly and knowledgeable roofing specialists are here to answer any questions and to help you find the perfect roofing solution for your home.
Artisan Building & Remodeling
(860) 759-8617 artisanroofingct.com
Serving
4.7 from 403 reviews
Artisan Building & Remodeling is Berlin, CT’s trusted roofing contractor, specializing in roof replacements, repairs, and installations. As GAF Master Elite and Owens Corning certified, we deliver top-tier craftsmanship backed by industry-leading warranties. Since 2017, our experienced team has proudly served Berlin and surrounding towns with expert roofing, siding, windows, doors, and solar shingles. We’re committed to quality, professionalism, and lasting results. Contact us today to schedule your roofing consultation.
Zaman Roofing - CT Roofing Contractors & Roof Repair
(860) 977-8042 zamanroofing.com
Serving
5.0 from 62 reviews
Looking for reliable roofing companies in CT? We’re your go-to roofer & the best roofing contractors in Connecticut. Connecticut roofing contractors for roof repair, roof leak repair. Top Roofing Contractor in Newington. As trusted CT roofing contractors, we prioritize expertise & customer satisfaction. Count on us for all your roofing needs as we stand out among roofing companies in CT. We prioritize the security and durability of your roof. Our skilled CT roofing contractors use high-quality materials & proven techniques for long-lasting results. Choose the best roofing company in CT—Zaman Roofing. Contact us for reliable CT roofing contractors providing personalized solutions for roof repair. Experience the difference with Zaman Roofing!
International Roofing
(860) 505-8506 internationalroofingct.com
Serving
4.8 from 19 reviews
International Roofing, LLC is Connecticut's premier commercial roofing company! We provide quality flat roofing services on commercial and industrial buildings throughout Connecticut. Contact us no to take advantage of our fast and free inspections and quotes today.

Carden Home Improvement
(860) 406-7294 www.cardenroofing.com
Serving
4.9 from 239 reviews
At Carden Home Improvement, we proudly serve Plainville and nearby towns like Southington, Bristol, Farmington, New Britain, Berlin, and beyond — delivering expert exterior home services backed by industry-leading warranties and unmatched speed. Whether you need a roof replacement, new siding installation, energy-efficient windows, custom entry doors, seamless gutters, professional solar panel removal, or chimney cap replacement, our local team is ready to help. As certified Tamko Diamond Contractors, we offer premium materials, a 50-year warranty, and a 1-day roof replacement guarantee that keeps your home protected without the long wait.

A1 Home Improvement
(860) 750-9472 a1roofproct.com
Serving
4.9 from 585 reviews
With over 30 years of experience, A1 Home Improvement has been the trusted choice for residential and commercial roofing in Connecticut. We specialize in roof repair, full roof replacements, and commercial roofing solutions, ensuring your home or business stays safe and protected from the elements. Whether you’re dealing with storm damage, aging shingles, or need a brand-new roof, we provide efficient, reliable, and affordable roofing solutions tailored to your needs. Additional to roofing services, we offer siding, gutters, windows, doors and now, solar panels.

J.T. Burke & Sons
(860) 289-9381 www.jtburkeandsons.com
Serving
4.9 from 389 reviews
Roofing Contractor, Vinyl Siding Contractor, Aluminum Gutters, Replacement Windows, Family Business...

First Choice Roofing
(860) 218-8770 firstchoiceroofingcontractors.com
Serving
5.0 from 44 reviews
When searching for roofing companies near me, First Choice Roofing emerges as a highly rated group of professionals you can rely on for your needs. Our team at First Choice Roofing isn’t just another crew of workers; we are a local roofing company in CT committed to safeguarding your property investment. We take pride in being a residential roofing company that CT residents count on for quality craftsmanship and lasting appeal. Look no further if you require roofing services, as we have got you covered! We are fully equipped to meet all your commercial and residential roofing needs competently and effectively.
Classic Metal Roofs
(860) 828-2050 classicmetalroofs.com
Serving
5.0 from 71 reviews
Classic Metal Roofs, LLC in East Berlin, CT offers high-quality metal roofing solutions. With over 20 years of experience, we specialize in durable standing seam roofs, stone-coated steel roofs, and more. Our environmentally friendly practices include materials with up to 95% recycled content. We provide reliable warranties and tailored solutions for "metal roofs near me.
Connecticut Roofing Solutions
(860) 245-9665 www.connecticutroofingsolutions.com
Serving
5.0 from 215 reviews
Connecticut Roofing Solutions, based in West Hartford, CT, is your dependable roofing partner, bringing together a team of seasoned experts dedicated to delivering outstanding products and unmatched service. As your go-to roofing company in West Hartford, we provide a comprehensive range of roofing services, ensuring peace of mind through extensive roof warranties and budget-friendly financing options. Our commitment to excellence is underlined by prestigious affiliations and certifications, including GAF Certification. Reach out to us for all your roofing needs and discover how we can make your next project a resounding success!
Premier Roofing Services
(860) 866-6067 premierroofsct.com
Serving
5.0 from 54 reviews
Premier Roofing Services is a top-rated local roofing company with over 25 years of experience, proudly serving Rocky Hill and homeowners across Hartford County. We specialize in roof replacement, roof repair, roof inspections, chimney and emergency storm damage restoration. Whether you're searching for roofers near me, roofing companies near me, or GAF-certified roofing contractors close to you, we're available 24/7. Our team also installs vinyl siding for enhanced durability and curb appeal. We frequently work in Newington, Wethersfield, Berlin, Glastonbury, and New Britain—delivering fast response, honest estimates, and guaranteed results. Trusted by hundreds of satisfied clients who value quality and professionalism.
Asphalt shingles remain the dominant practical choice for most re-roofs in this climate. They fit the common residential needs with broad contractor availability, quick installation timelines, and straightforward maintenance. In New Britain's freeze-thaw cycles, asphalt delivers a solid balance of performance and cost-effectiveness, handling the seasonal temperature swings without imposing excessive structural demands. Look for shingles that carry good granule retention and moisture resistance, and verify that the underlayment and flashing are designed to manage the additional cold-weather moisture that can seep under the edges during rapid freeze-thaw transitions. Proper attic ventilation and decking condition are crucial partners to asphalt's long-term performance, especially on older homes with tighter roof-to-wall interfaces.
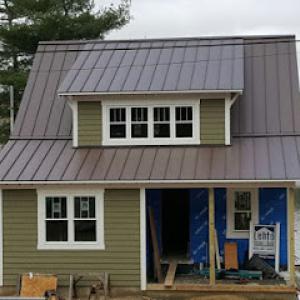
Metal roofing is present in the market and can appeal to homeowners prioritizing snow shedding and long-term durability through Connecticut winters. Metal panels or shingles can offer advantages in areas with heavy snow loads, where rapid shedding reduces ice dam formation and load persistence on the eave edges. In practice, the value comes from a well-sealed seam system, careful edge detailing, and compatible flashing that resists staining and corrosion in that damp, variable climate. Weight is often lighter than many tile options, but still requires a structural review to handle the specific panel profile, insulation setup, and potential thermal bridging. For re-roof projects on older homes, metal's reduced maintenance window can be a strong selling point if the existing deck is sound and the installation detail is executed by experienced crews familiar with Connecticut winters.
Tile, wood shake, and synthetic options exist locally but are more specialized in this area and require closer attention to structural load, detailing, and installer experience. Clay and concrete tiles carry significant weight; improper decking or inadequate support can push a roof beyond its safe limits, especially on homes that weren't originally designed for heavy coverings. Wood shakes bring natural beauty but are highly sensitive to moisture, insects, and rapid temperature shifts; decay and fire resistance become guiding concerns, particularly in denser neighborhoods where retrofits are common. Synthetic composites mimic the look of tile or shake with better impact and weight characteristics, but installation accuracy remains critical to performance. If choosing any of these, ensure a verified structural assessment, weather-rated fasteners, and an installer with documented performance in this climate. Attention to flashing transitions around chimneys, vents, and skylights matters as much as the roof covering itself.
Freeze-thaw cycles demand meticulous detailing where roof planes meet walls and penetrations. In practice, this means robust flashing that remains supple in cold temperatures, sealed joints at all penetrations, and an uninterrupted ventilation path across the attic. Decking integrity is paramount; any signs of moisture intrusion or prior rot should be addressed before a new roof is installed. The local climate emphasizes the need for a well-sealed perimeter, drip edge reliability, and a thoughtfully planned snow load strategy that aligns with the chosen material's characteristics. When choosing a material, consider how the roof line sheds snow, where ice dams may form, and how the chosen system performs in the event of a rapid thaw followed by another freeze.
Ultimately, the best choice aligns with the home's structure, the neighborhood's roofline, and the typical maintenance cadence homeowners can sustain. Asphalt offers broad compatibility and accessible service in most re-roof scenarios. Metal can win favor for snow-prone roofs and longer intervals between major maintenance. Tile, shakes, and synthetics suit distinctive architectural styles or rebuilding plans that justify higher upfront complexity. For older properties, prioritize a detailed assessment of deck condition, ventilation pathways, and flashing detail, and select an installer with proven proficiency in the local climate. This combination supports reliable performance across New Britain's seasonal cycles.
When a fast-moving spring storm rattles older homes with mixed shingles and stubborn decking, claims are often weighed against what a policy actually covers and what a home looked like beforehand. In this market, losses are commonly evaluated through a combination of photos, the roof's age, contractor estimates, and sometimes an adjuster on site. The sequence matters: photo evidence can anchor dates and visible conditions, while an estimate from a trusted local roofer translates wear into a dollar-and-sense assessment. Understanding that mix helps you navigate the process without surprises after a storm.
Spring storms and wind-driven rain in this area can push even minor vulnerabilities into real moisture problems before the main roofing season gets underway. Neatly tucked valleys, flashing against chimneys, and edges around vents in older stock are frequent flashpoints. Freeze-thaw cycles during long Connecticut winters leave gaps, cracks, and loose shingles that storms can exploit in a single event. In practice, a quick weather survey after a severe gust can reveal whether a small vulnerable area has become a larger concern, especially if missing granules or lifted tabs are present.
Detailed pre-loss condition records and line-item estimates from a local contractor are especially useful to reduce disputes about whether damage happened suddenly or was pre-existing wear. Homeowners who maintain a concise library of dated photos, attic and deck condition notes, and a recent measurement of the roof's overall state tend to move through the claim process more smoothly. If a storm hits, capturing the roof from multiple angles, including attic ventilation and decking if accessible, provides a clearer baseline and strengthens the case for necessary repairs.
Even after a claim is settled, the underlying aim remains preventing a recurrence. In this climate, repair decisions should give attention to reinforcing vulnerable channels where moisture tends to intrude, improving ventilation to balance winter humidity, and ensuring flashing around joints is sound. A careful post-storm audit helps determine if a timely reseal or partial re-roof is warranted, reducing the chance of a repeat emergency during the next unpredictable spring. This approach aligns with the practical realities of older homes in dense neighborhoods and the local expectations for thorough, durable work.
Connect with contractors who help homeowners navigate the claims process from damage assessment to final approval.

Zaman Roofing - CT Roofing Contractors & Roof Repair
(860) 977-8042 zamanroofing.com
Serving
5.0 from 62 reviews
A full roof replacement in New Britain typically requires a permit through the City of New Britain's Department of Building Services. Before anything starts, confirm the project scope with the building department and gather the required documents, including structural details and material specs. The permit process is designed to ensure decking, flashing, and ventilation meet current standards, especially for dense older housing stock common here. Have your contractor submit plans that show attic ventilation, ice and water shield placement, and flashing details around chimneys, dormers, and skylines.
After permit approval, inspections commonly verify roof decking, underlayment, flashing, and ventilation before final completion is signed off. Expect a sequence: decking and fasteners first, then underlayment and ice-dam protection, followed by flashing around penetrations and valleys, and finally proper attic ventilation or vents with baffles. In winter, inspectors pay particular attention to how the roof lines up with insulation and ventilation to prevent freeze-thaw damage. Prepare for possible interim inspections if a portion of the work progresses before the overall job is finished.
Permit fees and processing times in New Britain vary with project value, so scheduling can affect when a replacement actually starts during the busy season. Plan ahead for the spring and early summer windows when weather is favorable but demand is high. Delays can come from missing documentation, weather-related holdbacks, or a backlog at the Department of Building Services. Coordinate with the contractor to align permit issuance, material delivery, and crew availability so work flows smoothly without holding up already tight winter maintenance deadlines.
Keep copies of all permit correspondence and inspection notices in a project folder. If a revision is requested, respond promptly with the updated drawings and notes. Before work begins, mark all attic ventilation locations and ensure access is clear for inspectors and safety checks. On the day of inspection, have the roof accessible, gutters clear, and any temporary protective coverings removed only where allowed, so the inspector can see decking, underlayment, and flashing clearly. Finally, schedule the final inspection promptly after work completes to avoid any lingering holdbacks in the winter months.
When you map out a re-roof, you'll see base material ranges like asphalt shingles from about 350 to 800 per square, metal from 700 to 1200, clay tile 1200 to 2500, concrete tile 1100 to 2100, wood shingles/shakes 500 to 1000, and synthetic/composite shingles 450 to 850 per square. In dense, older housing stock you're often buying more than a sheet of shingles-the true value comes from the full system, including underlayment, flashing, and proper venting. In New Britain, those numbers are a starting point, not a final price, because twice-done roofs hit a different price curve once crews tear off and reset decking.
New Britain cost planning should account for the city's re-roof-heavy project mix, where tear-off labor and deck repair can materially change final pricing beyond base material ranges. If the deck is soft or damaged, you're looking at extra days of labor and materials to bring it to solid, clean condition before new roofing goes on. That means a mid-range asphalt job can trend upward quickly if the roof has multiple layers or compromised decking. Fire stopping, insulation checks, and careful flashing integration into existing valleys and chimneys add to the ticket as well.
Seasonal demand peaks in late spring through early fall, with higher competition for skilled crews after winter damage or spring storms. In practice, you'll see tighter scheduling and potentially higher labor quotes during those windows. Planning for a slightly longer project timeline helps you lock in crews during shoulder periods, when crews have more availability and pricing can be steadier. Think ahead about weather windows and expect a couple of days of flexibility in start dates.
Don't let upfront costs delay a critical repair - these contractors offer payment plans to fit your budget.


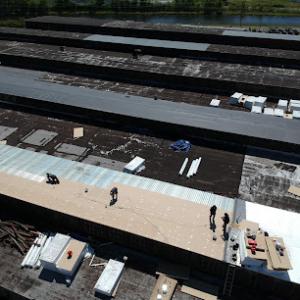
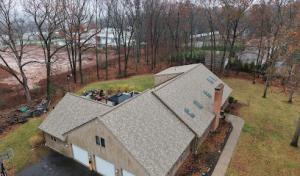
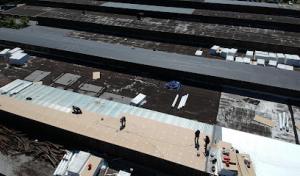
You will notice that flat and low-slope roofs are a meaningful specialty among local contractors, because slow drainage and persistent moisture are common problems after humid summers and during the city's brutal freeze-thaw cycles. When water doesn't leave quickly, small leaks become consistent leaks, and you might find damp spots forming around penetrations, edges, or along the parapet. In older buildings, you'll often see mixed roof lines where a porch or addition shares a flat section with the main roof, and that shared space tends to age differently. The result is more frequent edge repair, deck checks, and careful attention to drain paths that aren't obvious from the ground.
Low-slope sections demand different materials and installation detail than steep-slope areas. On porches and additions, a surface that fights moisture well-whether reinforced membranes or carefully chosen flashed layers-can reduce recurring trouble. Aging details matter: failed seams, worn sealant, or thirsty insulation gaps invite moisture migration into deck materials. In a neighborhood with dense, older homes, you'll see a mix of membrane types and overlay options, each with its own behavior during thaw cycles and hotter stretches.
Plan for more frequent inspections of flat sections, especially after heavy rains, early thaws, or snow events. Look for standing water, blisters, or puckering on the surface, and check flashing around vent stacks, skylights, and sidewall intersections. Parapets should be brushed and resealed as needed, since a small failure there can funnel water right into the structure below.
The combination of winter freeze-thaw and summer humidity means moisture management can deteriorate quickly if neglected. Keep drainage paths clear, inspect for ice dams, and verify that insulation and ventilation in low-slope areas support dries and air movement. When trouble shows, honest assessment and timely repair protect both the roof's lifespan and the comfort of the spaces beneath. In areas with aging deck edges, coordinate with a trusted local contractor for targeted flashing and membrane upgrades.
Find specialists in TPO, EPDM, and built-up flat roofing systems for residential and commercial properties.
J&R Ultimate Construction Roofing
(860) 402-7116 jrconstructionct.com
17 Lyons Pl, New Britain, Connecticut
5.0 from 15 reviews
Skylight penetrations are a visible specialty in this market, and homeowners frequently need repairs at the roof around the skylight rather than replacing shingles across the field. In practice, that means you should plan for targeted resealing and flashing work whenever the skylight shows signs of moisture intrusion, especially after heavy snows or rapid thaws. Look for unusual staining near the skylight curb, or condensation that appears on cold mornings. A sharp eye on the flashing details where the skylight meets the deck will save bigger leaks later.
Chimneys often drive leaks because flashing transitions around masonry are a recurring leak point. In homes with brick or block chimneys, the boot and step flashing can degrade with time, and mortar joints can shrink or crack under freeze-thaw cycles. When inspecting, check the area where the chimney meets the roof for rusted metal, loose shingles, or displaced sealant. Replacing or reworking the flashing to reestablish a watertight seal is frequently more effective than replacing surrounding shingles.
Moisture exposure during central Connecticut winters stresses skylight and chimney details sooner than the main roof covering. The combined effects of freeze-thaw movement and moisture can cause flashing pans to fatigue, sealants to fail, and fasteners to corrode. Expect these components to require attention even if the shingles themselves look solid. Prioritize flashings and seals during maintenance cycles to prevent interior damage.
During a solar or vented skylight check, inspect the curb, flashing shoe, and sealant joints first. For chimneys, trace any water marks back to flashing laps and mortar cracks. If you notice peeling around the skylight or damp-smelling insulation in the attic, address flashing issues promptly.
Plan a proactive cadence: inspect twice a year-after winter and after heavy autumn storms-and after major melt events. Keep an eye on caulk lines and metal flashings, and address minor cracks before they widen. In homes with older skylights or masonry chimneys, timely attention preserves the roof's performance longer.
Find contractors experienced in skylight installation, flashing, and leak repairs to bring natural light into your home.
Zaman Roofing - CT Roofing Contractors & Roof Repair
(860) 977-8042 zamanroofing.com
Serving
5.0 from 62 reviews
New Britain's market includes many affordable and quick-response contractors, but the right choice isn't only about who can start first. Look for a written scope that clearly spells out decking inspection, flashing installation, ventilation, and the final completion checklist. A contractor who outlines these details is more likely to spot freeze-thaw vulnerabilities and address them before they become leaks. Ask how they handle attic ventilation during colder months and how they plan to protect against ice damming. The best teams document every step, so you have a record if issues surface after a season of freeze-thaw cycles.
Long-established and family-owned firms remain a meaningful part of the local roofing scene, and that can matter when you need follow-up service after a re-roof project. In tighter neighborhoods, a familiar crew tends to respect property lines and neighbors, and they often maintain ongoing relationships with local suppliers and tradespeople. When you call for warranty work or minor repairs years later, these firms typically know your home's history and preferred materials. Ask for recent examples of similar homes and how the company handled a post-project touch-up.
Cleanup expectations are especially important in New Britain, where streets are narrow and driveways are close to neighboring yards. Request a debris-control plan that covers tarping, weekly cleanups during tear-off, and a clear method for hauling away waste without letting nails or shards scatter onto neighboring properties. Clarify how they will protect landscaping, sidewalks, and the driveway during material deliveries and material removal. A good plan reduces the risk of property damage and keeps the neighborhood peaceful during a busy project.
Finish work should include a thorough inspection with a checklist that confirms proper flashing, venting, and attic access. Confirm how long the warranty lasts, what it covers, and whether it includes workmanship versus material coverage. In colder months, confirm response times for warranty calls and how quickly weather-related issues will be addressed. A contractor who walks you through these points helps ensure a durable roof that stands up to New Britain's freeze-thaw winters.
Solar roofing exists but is not dominant in contractor offerings, so you should plan for a coordinated effort rather than a plug-and-play installation. In practice, this means timing the roof work and the solar installation in a way that minimizes disruption and ensures the roof is ready to support panels from the start. Your New Britain project may involve a few more moving parts than a standard re-roof, but a careful sequence keeps both weather resistance and energy goals in mind.
On re-roof projects and in homes with older assemblies, it is common to address decking integrity, flashing details, and ventilation channels before any solar hardware goes on. In New Britain's climate, the freeze-thaw cycle and mid-winter snow can reveal or amplify decking gaps, nail pops, or shingle-lift near the eaves and ridges. Finishing these items prior to panel mounting reduces the risk of leaks around mounting feet and ensures the roof deck can bear the additional load without compromising insulation or ventilation. A solid plan often means replacing or repairing decking, updating step and continuous flashing, and verifying attic ventilation-especially in attic spaces that serve as storage or living areas.
Older roof assemblies are common in the city, which makes a pre-solar roof condition assessment particularly important. A thorough inspection should look beyond the visible shingles to the deck condition, the integrity of underlayment, and the effectiveness of roof-to-wall transitions. If the roof is nearing the end of its service life, consider scheduling solar readiness as part of the overall replacement rather than as a separate retrofit. This approach helps ensure that the solar system has a stable foundation and minimizes future penetrations or redundancies.
New Britain's snowy winters require attention to how panel mounting interacts with snow sliding behavior and ice dam risk. Favor layouts that avoid shading of critical attic venting or existing passive ventilation paths, and coordinate with engineer or installer recommendations to preserve roof drainage paths. Pay attention to hip, valley, and crown areas where complex geometry can complicate flashing and lead to potential leakage if not planned carefully. A well-thought-out mounting plan reduces the likelihood of snow buildup under rails and minimizes winter maintenance calls.
Since solar installations are present but not dominant, you may rely on a roof contractor with proven experience in older homes and in complex flashing sequences. Clear communication between the roofing team and the solar installer is essential to align on deck access, flashing tolerances, and any required oakum or sealant work around penetrations. In practice, a shared checklist that confirms decking thickness, nail base, and vent clearance helps keep both crews aligned from day one.
Find contractors who integrate solar panels or solar shingles into your roof for long-term energy savings.