Last updated: Apr 19, 2026
Spring hail and strong-wind events are a major local trigger for roof inspections, temporary repairs, and replacement scheduling in Downers Grove. After a storm, you should plan for a prompt roof check-preferably within 48 to 72 hours if conditions allow-since hail damage can be hidden under shingles and granules. If you notice shingles curling, cracking, or exposed underlayment, don't wait for the next rain to reveal leaks. Document everything with clear photos from multiple angles and keep a dated log of any storm impacts you observe or suspect. This is the window when rapid assessment matters most for insurance decisions and for avoiding more extensive interior damage.
Because Downers Grove sits in the broader Chicago weather pattern, storm-driven demand spikes can compress contractor availability and delay both inspections and full re-roofs. When a major hail or wind event hits, expect a surge of homeowners seeking bids, and expect local crews to fill up quickly. If you wait for the "perfect" sunny week, you may miss the narrow window to secure a preferred contractor. Act decisively: contact at least three reputable local roofers within 24 hours of your storm, prioritize crews with strong insurance documentation and prior Downers Grove references, and lock in an inspection date while the storm response is still fresh in the community.
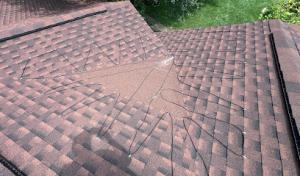
Local homeowners often need to distinguish between cosmetic granule loss and functional shingle damage after hail because insurer decisions can hinge on documented storm-related impacts. Cosmetic granule loss can still look alarming, but the critical question is whether the roof's underlying structure and underlayment were compromised. Photograph spring storm aftermath from above and at eye level, note any granule fill in gutters, and compare to pre-storm photos if available. Ask your adjuster to review both surface wear and any visible cracks, punctures, or lifted shingle tabs. If there is any doubt about water intrusion or certificate-worthy attic ventilation alignment, insist on an in-person inspection and, if needed, a second independent assessment to substantiate the claim.
Prioritize scheduling a storm inspection and a temporary repair plan within the first few days after a hail or high-wind event. If a leak is present, implement temporary measures such as tarping to minimize interior damage while you wait for a full replacement window. Keep a storm journal that pairs your photos with dates and weather notes, and provide this record to your insurer and chosen contractor. In this market, timing can determine whether a full re-roof is accepted as coverage or treated as an out-of-pocket project, so act with urgency but keep careful documentation at every step.
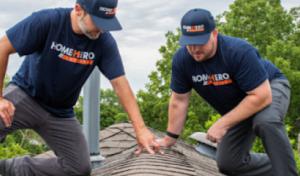
HomeHero Roofing
(630) 827-8732 homeheroroofing.com
2333 Wisconsin Ave Suite 5, Downers Grove, Illinois
5.0 from 128 reviews
HomeHero Roofing is a locally owned residential roofing company in Downers Grove, IL, serving Naperville, Hinsdale, La Grange, Elmhurst, La Grange, Oak Brook, Lisle, Woodridge, and 20+ western Chicago suburbs. We offer free, no-obligation roof inspections with a repair-first approach: if you only need a repair, that's what we'll recommend. Zero deposit required. Transparent, itemized estimates with no hidden fees. You pay nothing until the job is complete. We specialize in asphalt shingle roof replacement and repairs using Owens Corning materials, backed by a 10-year workmanship warranty and Owens Corning's Lifetime Warranty. Licensed IL roofer (No. 104.019924), BBB A+ rated, fully bonded and insured. 273+ projects completed.
Butler Roofing
(630) 480-1660 www.coveredwithbutler.com
501 Rogers St Suite 12, Downers Grove, Illinois
5.0 from 113 reviews
Seeking a licensed, highly rated, and experienced roofing & gutter contractor? Since 2006, Butler Roofing has delivered expert roof replacement/repairs/installation & gutter services. Our craftmanship guarantees quality results from full roof replacements to storm damage restoration. We also collaborate with your insurance company to streamline the process. We are proudly serving Downers Grove IL & surrounding Suburbs. Contact us for a free estimate today. Your trusted local roof contractor.

Royal Craft - Roofing, Siding, Windows & Exteriors
(630) 725-1000 royalcraftremodelers.com
1525 Ogden Ave, Downers Grove, Illinois
5.0 from 78 reviews
Royal Craft - Roofing, Siding, Windows and Exteriors in Downers Grove has been the trusted choice for exterior remodeling since 1973, offering top-quality services for windows, siding, roofing, commercial flat roofs, doors, gutters, and more. With decades of expertise and a commitment to excellence, our professional team delivers innovative designs and cutting-edge products to meet your unique needs. Whether you're upgrading your home's curb appeal or improving energy efficiency, we provide reliable solutions tailored to you. We specializes in roofing, windows, siding, commercial flat roofs, doors, and gutters, offering comprehensive exterior remodeling services.
Roof Ready Roofing Companies
(224) 856-2147 roofingdownersgrove.com
819 Plainfield Rd, Downers Grove, Illinois
5.0 from 36 reviews
Roof Ready Roofing Companies can provide the best of services to our customers. We only use the best quality of roofing materials to ensure that it will last you for years. Our company also provide hail damage restoration and storm damage restoration services. Our professional roofing contractors are always equipped with the latest tools and knowledge to provide a result that can exceed our customer's expectations. We can also handle any of your roof repairs and replacements. Our company ensures that your roof will look as beautiful and sturdy as possible. We also provide expert advice and incredible workmanship in each project that we do. Let us help you in achieving the sturdy and beautiful roof that you have always want
GZ Gutters Installation
49322 Fairview Ave, Downers Grove, Illinois
5.0 from 36 reviews
GZ Gutters Installation is the company that has been invariably providing the customers on finest quality gutter service in the Downers Grove area. As professionals, we offer the top notch gutters and giant expertise gained for years. Our installation is always carried out fluently and hassle-free. You can call our specialists also on gutter replacement and repair. For all our types of jobs, we use proper sealants that ensure your home waterproofness and safety for years. Our mission is to offer custom-fitted gutters style as they are the element of your home design. We are opened to any suggestions you have for our team. Decide on our gutter service in Downers Grove and benefit on our professionalism and best pricing.
Pointview Roofing & Public Adjusting
(708) 202-9755 pointviewroofing.com
1202 75th St Suite #230, Downers Grove, Illinois
5.0 from 35 reviews
Pointview Roofing & Public Adjusting handles both residential and commercial roofing projects in Downers Grove, Illinois, and the surrounding area. We specialize in storm restoration and can assist property owners with the public adjusting process to ensure our customers and clients receive fair compensation from their insurance company.
Berg Home Improvements
(630) 415-2873 www.bergext.com
900 Ogden Ave, Downers Grove, Illinois
4.8 from 118 reviews
Roofing, siding, windows, fascia/soffit, gutters and gutter guards, ventilation, and insulation are just a few of the services we provide. We are a reputable contractor who provides high-quality service and products at a reasonable cost. We specialize in asphalt roofing, replacement windows (vinyl and wood), vinyl siding, insulated vinyl siding, gutter guard systems, gutters, and all forms of external aluminum work in the "Chicagoland" area. Our 50-year track record of high-quality work, excellent customer service, meticulous attention to detail, and competitive price has made us a local favorite. Cook, Du Page, Kane, Kendall, Lake, Mc Henry, and Will Counties are among the counties we proudly serve. Call today! We are here for you!
JNO Roofing
Downers Grove, Illinois
4.9 from 44 reviews
JNO Roofing, a family-owned roofing contractor located in Downers Grove, IL, provides top-tier roofing services across Downers Grove, Westmont, and Lisle. With over 25 years of experience, we specialize in Roof Repair Services, Roof Replacement, New Roof Installation, and Roof Leak Repair. As leading Residential Roofing Contractors and Local Roofers, our expert team offers Tile Roofing and Affordable Roof Repair. We also excel in Roof Maintenance Services and Dak Repair to keep your roof in prime condition. Count on JNO Roofing for reliable, professional, and cost-effective solutions that protect and enhance your home or business.
Mighty Dog Roofing of Southwest Chicago
(630) 895-9075 www.mightydogroofing.com
Downers Grove, Illinois
5.0 from 28 reviews
When it comes to your home’s exterior, Mighty Dog Roofing delivers top-of-the-line services matched with the neighborly customer care our clients have come to love. Our team of skilled experts will conduct a free, detailed inspection of your home, treating it as our own. Whether your home needs a simple repair or a full roof replacement, expect to receive the transparent guidance you deserve. Whatever the case, our team will work to meet your safety and budget needs. We take pride in operating with quality materials, hiring skilled roofers, and providing our customers with a high-quality experience. See for yourself; our reviews say it all. Schedule your free, home inspection today!
Main Street General Contractors
(800) 510-1028 www.mainstreetgcinc.com
5202 Washington St #10, Downers Grove, Illinois
4.3 from 64 reviews
Since 2012, our company has assisted countless homeowners in replacing their cedar shake, tile, and asphalt roofing. We work closely with your insurance company for full coverage, and we are deeply committed to serving our community as a local business. In 2022, we ranked #2 in DaVinci Roofing Installations, and we hold a BBB Accreditation with an A+ rating.

Jeremiah Roofing
(331) 233-1377 westmontroofingcontractors.com
Serving
5.0 from 41 reviews
Looking for a reliable and professional roofing company? Look no further than our company! We offer everything from repairs to new roofs for residential and commercial properties. We have the expertise, equipment and know-how to get your roof installation, repair or replacement done right. Our commitment to quality, safety and customer satisfaction is unsurpassed in the industry. We take great pride in our workmanship and attention to detail. Give us a call today to schedule a free estimate and let us take care of your roofing needs!
3JM Exteriors
Serving
4.9 from 245 reviews
At 3JM Exteriors, we bring your vision to life with expert roofing, siding, and window solutions that add beauty, value, and lasting protection. From start to finish, we ensure a seamless, guided experience.
The western Chicago suburbs experience repeat winter freeze-thaw cycles that take a toll on roofs that have seen years of service. In older homes, the effect is most noticeable around flashing where walls meet the roof, at penetrations such as vent pipes and skylights, and along the edges of shingles. Each time water seeps into a seam and then freezes, it can pry apart fasteners and degrade sealants. In a typical Downers Grove neighborhood, that slow erosion compounds after several seasons, especially where trees shed leaves that trap moisture and shed ice along eaves. The result is a pattern of slow leaks that can sneak under layers before a homeowner spots them.
Ice can intensify moisture problems when ventilation is not up to current expectations. Older homes often rely on simpler, less robust ventilation schemes that worked when winters were milder or shorter, but can fall short under modern inspection standards that emphasize balanced ventilation and proper underlayment. When a re-roofing project is considered, the need to upgrade attic ventilation and address underlayment compatibility becomes a practical decision rather than a cosmetic one. In this climate, inadequate venting can trap humidity, promote condensation on roof decks, and accelerate the deterioration of decking materials around penetrations. That combination makes a leak more likely and more costly to repair later.
Shingle edges, especially on when the roof is older, are a common failure point after repeated freeze-thaw cycles. Fine cracks and lift at the edges create tiny openings where water can work its way under the surface, freeze, and expand. The problem is worse in Downers Grove because mature tree cover drops needles and debris that hold moisture against the roof surface during winter. Loose or misaligned nails used during previous installations can back out or corrode with time, undermining the seal. When weather warms, water trapped behind lifted edges can infiltrate underlayment, leading to wind-driven leaks during storms or rapid snowmelt scenarios.
Late fall and winter work introduces its own set of risks. Cold-weather installation conditions make brittle materials more prone to cracking and panel damage during handling and nail driving. Sealing compounds and underlayment tapes may not perform optimally when temperatures stay near or below freezing for extended periods. In practice, this means crews must plan for careful handling, use appropriate fasteners for cold metal and asphalt, and set a strict sequence for seal-down to prevent moisture from lingering under coverings during the first thaw. In this region, a careful schedule helps ensure that a roof remains watertight as soon as temperatures rise.
Storms bring sudden loads of moisture, and a rapid freeze-thaw cycle can turn a quiet drip into a noticeable leak. After a hail or wind event, inspect gutters and eaves for granule loss, and check around penetrations for hairline cracks in sealants. Inside, look for small damp spots near ceilings or walls adjacent to exterior walls, especially in rooms with roofline exposures. If moisture appears, do not delay: prompt assessment prevents hidden rot and accelerates the decision to re-roof or repair. A qualified roofer can assess flashing integrity, underlayment condition, and whether ventilation upgrades are warranted to satisfy current inspection expectations. This cautious approach protects the structure long into the future and minimizes the risk of repeated damage in future winters.
Asphalt shingles are the dominant practical choice in Downers Grove, offering a reliable balance of performance and cost for the neighborhood's older suburban stock. On higher-end projects, metal, cedar, tile, and slate appear, often tied to architecturally distinctive homes or those evolving from a classic look. In a setting with Chicago-area freeze-thaw cycles, this mix means you'll see a broader range of installation details and long-term wear patterns compared to newer developments.
Heavy materials such as clay tile, concrete tile, and slate can raise project complexity on older Downers Grove structures because framing capacity and accessory detailing matter more than on standard shingle tear-offs. Before committing to a heavy product, have a structural assessment that confirms attic framing, rafter span, and edge detailing can support the weight without costly reinforcement. If you're replacing an existing roof on a modest, mid-20th-century home, you'll typically see the most practical outcomes with asphalt or metal unless the owner has a strong architectural reason for tile or slate.
Mature neighborhood tree cover in Downers Grove makes debris shedding, moss control, and impact resistance more relevant when comparing cedar, asphalt, metal, and premium steep-slope materials. Cedar responds to shade and moisture similarly to other traditional options, but moss growth and branch impact risk can influence maintenance plans. Metal roofs offer excellent impact resistance and swift shedding, but finish durability and color match should be tested against nearby mature canopy. Premium tiles and slate bring significant curb appeal yet demand careful assessment of attic ventilation, underlayment compatibility, and potential accessory upgrades.
When a storm hits, your first move is to verify whether the roof structure itself was compromised or if exterior components bore the brunt. After hail and strong winds, asphalt shingles may show bruising or edge damage, while heavier materials can suffer localized cracking or lippage if the underlying framing flexed. If insurance timing is a factor, understand that temporary protection and prompt inspection can influence claim outcomes, but the final roof system should align with the long-term performance needs of a mature tree-dominated neighborhood.
In a hail/wind scenario, choosing a roof type should prioritize rock-solid attachment and thorough ventilation checks on full re-roofs. Metal can minimize uplift risk and shed debris quickly, yet proper seam sealing and hardware corrosion resistance matter in this climate. Cedar, while attractive, may require more frequent moss control and edge detailing to stay durable in shaded spots. Tile and slate deliver outstanding longevity and curb appeal but demand precise framing, accessories, and installation skill to avoid future water intrusion.
For most homes in this area, a practical approach is to balance immediate performance with long-term upkeep. Regular moss control, debris removal, and leaf screening protect shingles, metal, or tile from accelerated wear in dense canopy zones. When planning a re-roof, think through attic venting and underlayment compatibility as part of the project scope to ensure the system can stand up to the local freeze-thaw cycles and the season's hail exposure.
In this village climate, typical material pricing runs about 350 to 650 per square for asphalt shingles, 700 to 1200 for metal, 900 to 2000 for clay tile, 800 to 1500 for concrete tile, 500 to 900 for wood shingles or shakes, and 1700 to 3500 for slate. Those ranges reflect the local market, the age and condition of many homes, and the level of demand during peak season. When you're evaluating bids, look beyond the sticker price and compare what's included: underlayment quality, fasteners, starter and ridge products, and the crew's experience with Downers Grove roofs. On older village homes with irregular shapes, you can expect the price to tilt toward the higher end, especially if the job involves detailing around chimneys, skylights, or attic ventilation.
Costs in Downers Grove often rise after regional hail events because labor demand, scheduling pressure, and disposal logistics tighten across the Chicago suburban market. If a storm lands, installers may book out, run crews longer days, or need to haul debris to local facilities with limited capacity. Those dynamics push bids upward temporarily, even for standard asphalt projects. If you're facing a hail-season window, expect some bidding volatility, and try to lock in a schedule early to avoid last-minute premium charges.
Steeper rooflines, detached-garage combinations, chimney and skylight detailing, and ventilation corrections on older village homes can materially increase local re-roof pricing beyond base material rates. In Downers Grove, the attic and soffit-to-ventilation system often require careful integration with new underlayment and proper venting adjustments to meet neighborhood expectations and village practice. If your home has multiple penetrations or a non-uniform pitch, you'll see additional line items for flashing work, drip edge, and potential sheathing repair. Planning for these contingencies helps prevent surprises once the crew is on the job.
Storm damage creates urgency, but the insurance process adds its own tempo. Obtain three detailed bids with itemized scopes and photos of the attic and roof plane. Start the claim discussion early with your insurer, and align payment milestones with project progress. If hail or high wind is fresh, keep a short list of preferred contractors, and request references from neighbors who recently completed re-roofs in your area. A well-documented scope can keep pricing closer to base ranges even when regional demand spikes.
Get a clear picture of your project costs upfront - no commitment required.
HomeHero Roofing
(630) 827-8732 homeheroroofing.com
2333 Wisconsin Ave Suite 5, Downers Grove, Illinois
5.0 from 128 reviews
Butler Roofing
(630) 480-1660 www.coveredwithbutler.com
501 Rogers St Suite 12, Downers Grove, Illinois
5.0 from 113 reviews

A full re-roof triggers a permit in Downers Grove, and the Village issues it after a short plan check rather than allowing major tear-offs to proceed permit-free. This process helps ensure that the new roof meets local standards for ventilation, underlayment, and nailing, which are especially important given the area's freeze-thaw cycles and occasional hail. Start conversations with your contractor early so everyone is aligned on timing and documentation needed for the plan review.
Village inspections are part of the process during and after installation, with inspectors specifically verifying ventilation, underlayment, and proper nailing. Ventilation is checked to prevent moisture buildup under the new roof, which can be a frequent issue in older suburban homes with limited attic space. Underlayment quality and installation order matter for wind-driven rain resistance in a region that can experience severe storms. Nailing patterns and fastener type are inspected to ensure the roof holds up through Chicago-area wind events. Expect questions about attic clearance, soffit venting, and ridge vent placement during the review.
Inspection scheduling in Downers Grove is typically coordinated by the contractor, so homeowners should confirm who is responsible for booking and closing out the permit. Confirm from the outset who will file the permit application, arrange the required inspections, and handle any re-inspection steps if a correction is needed. It helps to have a clear point of contact on the contractor's team and a copy of the permit number and inspection dates for convenience. If your roof design includes a complex flashing detail or a mix of old and new deck conditions, discuss these with the inspector ahead of schedule to avoid delays.
Prepare a concise packet for the plan check that includes roof layout, vent locations, and a brief description of ventilation strategy and underlayment type. In mature neighborhoods with large trees, plan for additional attic ventilation if the existing soffit or ridge vents appear undersized relative to roof area. Include any local code notes or Village requirements your contractor has noted, so the plan reviewer sees a complete and compliant project. Clear communication with the contractor about permit timing can prevent interruptions to a storm-rebuild sequence.
During and after installation, expect the crew to coordinate temporary access needs for inspections and potential follow-up visits. In areas with frequent hail exposure, inspectors will check nailing at every elevation and around hips and valleys, where failure is most common after a harsh storm. Keeping a visible, accessible space in the driveway for equipment and a clear path to the attic hatch can streamline the approval process and minimize delays in storm-season projects.
Storms that sweep through DuPage County bring hail and strong winds with enough frequency to keep insurers alert. For Downers Grove homeowners, losses from those events are not unusual, and carriers often ask for roof age, maintenance history, and prior damage documentation to separate new damage from preexisting wear. The weather pattern means that a claim can hinge on whether the damage aligns with recent storms and the roof's overall condition, not just a single dent or missing shingle.
Adjuster response times can vary significantly after regional storm events, affecting the pace of final scope approval and replacement timing. When a hail or wind event hits multiple neighborhoods, local offices juggle a larger workload, and the clock on inspections and approvals can stretch. In those windows, interim mitigation and temporary protections become important to prevent further damage, even as you await a determination on coverage.
Keep date-stamped photos taken from multiple angles, ideally soon after a storm and again after any temporary repairs. Record the roof's age and any prior repairs, and preserve permit records and contractor inspection notes if they exist. Homeowners in this area should understand that claim outcomes are influenced by local storm history and individual policy terms, so thorough documentation supports a clearer case when the adjustment begins.
After a storm, communicate clearly with your insurer about known factors, including recent maintenance and visible signs of damage. If a roof replacement is approved but delayed, stay proactive about scheduling inspections and obtaining multiple contractor opinions on the scope. Honest, consistent documentation helps prevent surprises when the final decision lands.
In the weeks between event and settlement, prioritize long-term protective steps. Cover exposed sections to avert water intrusion and document any temporary measures with dated notes and photos. These records reinforce the narrative of a household taking prudent steps while awaiting a resolution.
Connect with contractors who help homeowners navigate the claims process from damage assessment to final approval.
Butler Roofing
(630) 480-1660 www.coveredwithbutler.com
501 Rogers St Suite 12, Downers Grove, Illinois
5.0 from 113 reviews
Pointview Roofing & Public Adjusting
(708) 202-9755 pointviewroofing.com
1202 75th St Suite #230, Downers Grove, Illinois
5.0 from 35 reviews
In Downers Grove, steep-slope roofs dominate, but many homes have low-slope porch, addition, or garage sections that behave differently under Chicago-area weather. Snow load, ponding risk, and freeze-thaw cycles push these transitions to the edge of typical maintenance, making the low-slope pieces a recurring weak point. When a main roof is replaced, the aging rear additions or attached garages often show up later as leaks if their low-slope sections aren't addressed.
Water can sit on a low-slope surface longer than on a steeper roof, which accelerates membrane wear and edge detailing failures. Ventilation and flashing around these transitions are critical, because trapped ice and melt water can back up into the eaves or into attic joints that exist near the garage or rear addition. Look for mismatched fasteners, seam gaps, and degraded underlayment at transitions where the main roof meets a low-slope section. These areas tally up leak callbacks after an otherwise successful roof replacement.
When planning a re-roof, map out all low-slope sections connected to the house: rear additions, porches, and attached garages. Inspect and document the condition of underlayment, flashing, and edge detailing where these sections meet the primary roof. Ensure the contractor accounts for proper drainage at the interface, including any required crickets or drainage mats to prevent ponding. If a low-slope area shows signs of aging, consider replacing or upgrading its membrane and flashings at the same time as the main roof to reduce the chance of future leaks.
During project coordination, ask for a detailed plan that covers all low-slope sections, not just visible main-roof areas. Confirm that flashing heights, nail patterns, and membrane overlaps are compatible across transitions. In Downers Grove, a coordinated approach minimizes the risk of rework after winter storms and spring thaws, helping ensure the entire roofing system remains watertight.
Find specialists in TPO, EPDM, and built-up flat roofing systems for residential and commercial properties.

Royal Craft - Roofing, Siding, Windows & Exteriors
(630) 725-1000 royalcraftremodelers.com
1525 Ogden Ave, Downers Grove, Illinois
5.0 from 78 reviews
Roof Ready Roofing Companies
(224) 856-2147 roofingdownersgrove.com
819 Plainfield Rd, Downers Grove, Illinois
5.0 from 36 reviews
You should separate manufacturer material coverage from contractor workmanship promises, especially after storm-driven replacements completed under compressed schedules. Material warranties typically cover defects in the shingles, panels, or underlayment itself, but they assume proper installation. In the village environment, where inspections scrutinize nailing patterns, underlayment installation, and ventilation on full re-roofs, the value of workmanship warranties becomes the practical backbone of protection. Verify what the contractor commits to repair or replace if a installation flaw is found within the warranty period, and confirm how long that promise lasts and what actions initiate it.
Village inspections in this market focus tightly on three areas: nailing, underlayment, and ventilation. A strong warranty culture aligns with the rigor of those checks. Expect contractors to document nail counts per shingle, ensure underlayment sheets are properly overlapped and sealed, and confirm ridge and soffit ventilation are restored to recommended levels. If you experience a storm-recovery installation, insist on a detailed installation report that maps each of these elements to the specific portions of the roof. A clear, written record helps you hold the contractor to the agreed standards and makes any future warranty claim straightforward.
Establishing a reliable cadence for post-storm work is a hallmark of reputable local contractors. Since re-roofing becomes a highly active service category after hail and wind events, you will benefit from vendors who commit to prompt communication, orderly debris removal, and timely follow-ups on any warranty concerns. Look for warranties that explicitly cover cleanup delays or residual debris and include a mechanism for rapid on-site service if wind-driven shingles or flashing loosen after installation.
Before finalizing, have the contractor walk you through how the warranty applies if hail or wind impacts the new roof again. Confirm whether the coverage transfers to new owners, what maintenance actions help sustain coverage, and how to document periodic inspections. In this climate, a well-structured warranty strengthens confidence that a storm-repair will endure the harsh freeze-thaw cycles and protect the home's interior against moisture intrusion.