Last updated: Apr 19, 2026
Westmont sits in the DuPage County hail and wind claim corridor where spring and summer convective storms commonly drive roof inspections and replacement demand. That means after a strong storm, your roof is more likely to be flagged for damage by insurers and local crews than in quieter years. The right timing can prevent small issues from turning into costly leaks. If a shingle blow-off or loose flashing appears, action within days often reduces interior damage and limits the extent of follow-up work.
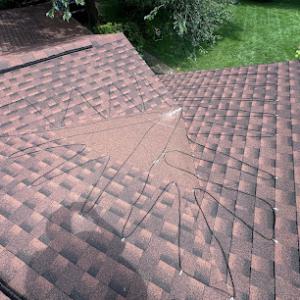
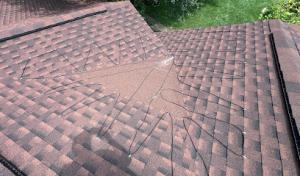
Convective storms pack wind, hail, and rapid rain, and recovery crews cluster where demand is highest. In practice, that means a spike in inspection requests and temporary patch jobs within days of a hail event. The urgency is real: even if damage seems minor, hail can compromise granules, and wind can lift edges that later weather into bigger gaps. In a neighborhood with older suburban roofing and mature tree cover, those small flaws can be masked by seasonal weather, only to reveal themselves when a late-season rain hits. If you see granule loss, lifted shingles, or dented metal, treat it as an active issue rather than a cosmetic blemish.
Cold winters in Westmont create freeze-thaw stress after storm seasons, so minor shingle or flashing damage can turn into interior leaks when snow and ice linger on roofs. Freeze-thaw cycles push cracks wider, loosening fasteners and compromising sealant over time. That means damage diagnosed in spring could worsen by the next cold snap, especially if snow piles up on a compromised slope. The best move is to address questionable flashing, exposed nails, and dented shingles promptly to slow the chain reaction into interior spaces.
Because local replacement work is concentrated in the dry late spring through fall window, storm-driven demand spikes can lengthen scheduling after regional hail events. Even if a contractor identifies urgent repairs, the next available open slots may stretch into weeks during peak season. Plan ahead by seeking qualified, licensed roofers who can perform an efficient assessment and outline a staged approach: temporary mitigation now, followed by a full rehab in the preferred window when weather is reliably dry. If a contractor recommends immediate temporary fixes, prioritize them to keep rain out while the calendar clears for a formal replacement.
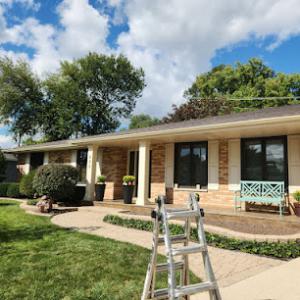
After a strong storm, conduct a careful rooftop check from the ground if safe, looking for obvious signs like missing shingles, torn flashing, or dented vents. Document damage with photos and a dated log, then contact your roofer or insurer promptly to initiate a game plan. Request a professional inspection as soon as possible, even if you don't see obvious damage-the combination of hail impact and wind can hide losses beneath the surface. If leaks appear, contain them with tarps or temporary sealing while arranging a redirect or patch, but avoid delaying a professional assessment. In this market, a proactive stance shortens the path from assessment to repair and minimizes the chance of a small issue escalating into a costly, roof-wide replacement.
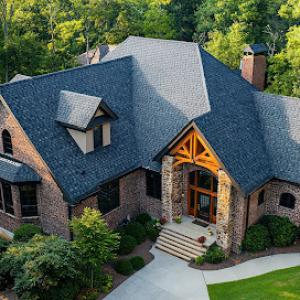
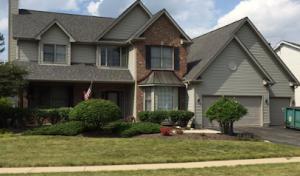
Asphalt shingles are the dominant practical choice in Westmont, but metal, cedar, clay tile, concrete tile, and synthetic products also appear on higher-end or architecturally distinct homes in the village. The mix reflects both the suburban fabric near rail corridors and the tree-lined streets that shade many roofs. Your selection will hinge on architecture, local HVAC load considerations, and how long you want any single roof to last before replacement or major repair.
Westmont's freeze-thaw winters and humid summers make ventilation, fastening, and flashing details especially important for asphalt shingle longevity. A well-vented attic helps reduce heat buildup that accelerates aging of the shingle surface and can soften asphalt under heavy summer humidity. Pay attention to fastener quality and placement; incomplete nailing or crooked rows invites wind uplift during spring storms. Flashing around chimneys, vent stacks, and valley intersections should be matched to the exposure you experience along the Chicago-style wind corridors and the frequent hail events that can bridge gaps in protective layers.
On homes with distinctive silhouettes or premium interiors, metal roofing can offer long-term value, especially where a modern profile or bold color is desired. Cedar, clay tile, concrete tile, and synthetic products appear on elevated designs or in areas with particular aesthetic goals. In Westmont, heavier tile systems bring curb appeal and durability, but they demand careful structural checks and precise installation. If your structure is older or has limited attic space, coordinate with a seasoned roofer to evaluate whether the framing can safely support added weight and whether a reinforced deck or rafter system is necessary. Synthetic products provide diversity in color and texture while staying lighter on some of the more ambitious roof lines.
Heavier tile and concrete systems can raise structural and installation complexity on older Westmont homes compared with standard asphalt re-roof projects. If your house relies on decades of plaster, lime, or mixed framing, an engineered plan may be needed to verify load-bearing capacity, especially in areas with sudden winter snow load shifts or hail-driven impacts. Expect the process to include a thorough assessment of attic access for ventilation, existing soffit details, and the ability to retrofit underlayment and flashing that align with local storm patterns. As you weigh options, talk through the sequence of roof deck prep, underlayment type, and the method of attaching weights in a way that avoids concentrated pressure points that can lead to deck spline or board failures.
In practice, Westmont homeowners see a clear link between climate and detail. Ventilation must be adequate to handle humid summers without creating condensation risks in the winter. Fastening patterns should be chosen to withstand wind exposure from regional storm paths, while flashing around roof penetrations must be continuous and corrosion-resistant for years of service. For any non-asphalt option, insist on a installation plan that addresses snow drift potential and proper valley handling, as those areas often dictate long-term performance more than the broader material choice.
Regardless of material, frequent inspections after winter and after major storms help catch micro-cracks, lifted shingles, or flashing gaps early. In neighborhoods with mature tree cover, keep filters clear and ensure proper drainage to prevent leaf buildup in valleys. A local roofer who understands how our climate swings between freeze-thaw cycles and summer hail can tailor a maintenance cadence that preserves performance for the life of the roof.
In this town, pricing is driven by Chicago-area labor rates and disposal costs, plus the wave of demand that follows hail and wind events across DuPage County. You'll see this show up as tighter scheduling windows and occasional spikes in material and crew costs after a big storm. When you talk with contractors, ask how much of the quote is tied to crew mobilization, haul-away, and disposal of damaged decking or old underlayment, not just the new shingles.
In older homes, the base price per square for materials often isn't the whole story. Tear-off, decking replacement, flashing upgrades, and enhanced ventilation can push projects above the base per-square material pricing. If your attic has limited space or you've got mature tree cover nearby, expect extra attention to ridge vent placement, soffit details, and drip-edge flashing. These items matter for long-term roof life and quiet summer rain-especially where freeze-thaw cycles stress existing joints.
Typical cost ranges reflect several common roofing options, with shingles as the most common entry point. Asphalt shingles sit in the lower-to-mid part of the scale, while metal, clay, or concrete tiles command higher numbers due to material heft and installation complexity. In Westmont, the tight resale window after storm events can influence not only price but available contractor allocations, so you'll often see a premium for expedited start times if you're aiming to complete before winter temperatures return.
When you're evaluating quotes, factor in the local labor and disposal premium that arrives after a hail or high-wind spell. A higher labor rate isn't inherently bad-skilled crews can complete faster and with better insulation and ventilation details.Look for honest breakdowns: material costs, tear-off and disposal, decking replacement, flashing upgrades, venting, and any attic insulation considerations. If a quote omits decking or underlayment upgrades, treat it as potentially incomplete. In the Metro area, crews may tier pricing by complexity, especially if your roof has multiple angles, skylights, or an interior ceiling reach that requires careful interior protection and cleanup.
In practice, plan for a project timeline that aligns with late spring through fall weather patterns. Weather windows, preferred by many crews, can compress scheduling around storm season, leading to higher short-term costs or staggered start dates. If you want to minimize total project time, you'll need to balance material selection, crew availability, and the sequencing of tear-off, decking, flashing, and ventilation work. A well-communicated plan helps you avoid last-minute changes that drive added costs and extended lead times, especially in the weeks following a damaging hail event.
Finally, consider the long-term value. A roof that incorporates upgraded ventilation and quality flashing reduces the risk of wind-driven leaks and ice damming during freeze-thaw cycles. Even when the sticker price looks higher at first glance, the lower risk of recurring damage and fewer callbacks can save money over the life of the new roof.

Jeremiah Roofing
(331) 233-1377 westmontroofingcontractors.com
52 W 65th St #2, Westmont, Illinois
5.0 from 41 reviews
Looking for a reliable and professional roofing company? Look no further than our company! We offer everything from repairs to new roofs for residential and commercial properties. We have the expertise, equipment and know-how to get your roof installation, repair or replacement done right. Our commitment to quality, safety and customer satisfaction is unsurpassed in the industry. We take great pride in our workmanship and attention to detail. Give us a call today to schedule a free estimate and let us take care of your roofing needs!

Storm Guard of DuPage
(630) 895-7848 www.stormguardrc.com
825 N Cass Ave Ste 305, Westmont, Illinois
4.5 from 82 reviews
We're a locally owned professional roofing and restoration contractor servicing DuPage, Kane, Will, Cook, McHenry & Surrounding Areas. We specialize in exterior services, including roofing, windows, siding, gutters, and painting. As your trusted contractor, we'll provide quality insurance and construction expertise that you can trust. Contact us today for a free estimate!
Butler Roofing
(630) 480-1660 www.coveredwithbutler.com
Serving
5.0 from 113 reviews
Seeking a licensed, highly rated, and experienced roofing & gutter contractor? Since 2006, Butler Roofing has delivered expert roof replacement/repairs/installation & gutter services. Our craftmanship guarantees quality results from full roof replacements to storm damage restoration. We also collaborate with your insurance company to streamline the process. We are proudly serving Downers Grove IL & surrounding Suburbs. Contact us for a free estimate today. Your trusted local roof contractor.
GZ Gutters Installation
Serving
5.0 from 36 reviews
GZ Gutters Installation is the company that has been invariably providing the customers on finest quality gutter service in the Downers Grove area. As professionals, we offer the top notch gutters and giant expertise gained for years. Our installation is always carried out fluently and hassle-free. You can call our specialists also on gutter replacement and repair. For all our types of jobs, we use proper sealants that ensure your home waterproofness and safety for years. Our mission is to offer custom-fitted gutters style as they are the element of your home design. We are opened to any suggestions you have for our team. Decide on our gutter service in Downers Grove and benefit on our professionalism and best pricing.
Giedrius Roofing Company
(630) 601-4207 hinsdaleroofing.com
Serving
4.9 from 54 reviews
Giedrius Roofing Company stands as a premier provider of residential roofing solutions. Backed by a team of seasoned and certified roofing contractors nearby Hinsdale, we prioritize exceptional workmanship and top-tier customer service. With a commitment to surpassing client expectations, we safeguard investments for the long haul. Whether it's a new installation, roof repair, or maintenance, trustGiedrius Roofing Company's expertise to deliver excellence. Reach out today for a complimentary estimate and secure your roofing needs with confidence!
Berg Home Improvements
(630) 415-2873 www.bergext.com
Serving
4.8 from 118 reviews
Roofing, siding, windows, fascia/soffit, gutters and gutter guards, ventilation, and insulation are just a few of the services we provide. We are a reputable contractor who provides high-quality service and products at a reasonable cost. We specialize in asphalt roofing, replacement windows (vinyl and wood), vinyl siding, insulated vinyl siding, gutter guard systems, gutters, and all forms of external aluminum work in the "Chicagoland" area. Our 50-year track record of high-quality work, excellent customer service, meticulous attention to detail, and competitive price has made us a local favorite. Cook, Du Page, Kane, Kendall, Lake, Mc Henry, and Will Counties are among the counties we proudly serve. Call today! We are here for you!
JNO Roofing
Serving
4.9 from 44 reviews
JNO Roofing, a family-owned roofing contractor located in Downers Grove, IL, provides top-tier roofing services across Downers Grove, Westmont, and Lisle. With over 25 years of experience, we specialize in Roof Repair Services, Roof Replacement, New Roof Installation, and Roof Leak Repair. As leading Residential Roofing Contractors and Local Roofers, our expert team offers Tile Roofing and Affordable Roof Repair. We also excel in Roof Maintenance Services and Dak Repair to keep your roof in prime condition. Count on JNO Roofing for reliable, professional, and cost-effective solutions that protect and enhance your home or business.
Rosewell Roofing
(630) 923-7673 www.rosewellroofing.com
Serving
5.0 from 71 reviews
At Rosewell Roofing, we are a family-owned roofing company with over 20 years of experience, serving both residential and commercial clients. Our commitment is to deliver durable, high-quality roofing solutions tailored to each client's needs. Whether it's a minor repair or a complete roof replacement, our skilled team ensures every project is completed with precision and care. We also specialize in storm damage assessments and assist with insurance claims to make the restoration process seamless. Our dedication to craftsmanship and customer satisfaction sets us apart in the roofing industry.
SkyShield Roofing & Gutters
(331) 249-3094 darienroofingcompany.com
Serving
5.0 from 41 reviews
SkyShield Roofing & Gutters is your reliable choice for a variety of roofing services. We specialize in high-quality installations, replacements, and repairs for residential properties. Our experienced contractors are dedicated to delivering exceptional workmanship and customer service, including shingle installation, roof hail damage repair, and flat roofing solutions. We use top-quality materials and the latest techniques to ensure your roof is durable, functional, and aesthetically pleasing. Contact us today for more information or to request a free estimate.
Main Street General Contractors
(800) 510-1028 www.mainstreetgcinc.com
Serving
4.3 from 64 reviews
Since 2012, our company has assisted countless homeowners in replacing their cedar shake, tile, and asphalt roofing. We work closely with your insurance company for full coverage, and we are deeply committed to serving our community as a local business. In 2022, we ranked #2 in DaVinci Roofing Installations, and we hold a BBB Accreditation with an A+ rating.

Royal Craft - Roofing, Siding, Windows & Exteriors
(630) 725-1000 royalcraftremodelers.com
Serving
5.0 from 78 reviews
Royal Craft - Roofing, Siding, Windows and Exteriors in Downers Grove has been the trusted choice for exterior remodeling since 1973, offering top-quality services for windows, siding, roofing, commercial flat roofs, doors, gutters, and more. With decades of expertise and a commitment to excellence, our professional team delivers innovative designs and cutting-edge products to meet your unique needs. Whether you're upgrading your home's curb appeal or improving energy efficiency, we provide reliable solutions tailored to you. We specializes in roofing, windows, siding, commercial flat roofs, doors, and gutters, offering comprehensive exterior remodeling services.
Lifetime Roofing & Restoration
(708) 314-5790 www.lifetimerestorationinc.com
Serving
5.0 from 115 reviews
Lifetime Restoration is a trusted roofing contractor in Willowbrook, IL, delivering expert roof repairs, replacements, and installations since 2010. Owned and operated by Derek, our team proudly serves homeowners and businesses across Willowbrook and the greater Chicagoland area with durable, high-quality roofing solutions. We specialize in asphalt shingles, flat roofs, storm damage repair, and complete roof replacements, backed by strong warranties and outstanding service. Known for honesty, reliability, and craftsmanship, Lifetime Restoration helps protect your property with roofing built to last. Call today for a free roof inspection in Willowbrook and surrounding communities.
A full roof replacement in Westmont normally requires a permit through the Village of Westmont Building Department. This is not just a formality; a permit helps ensure that work complies with local building codes, which are influenced by our freeze-thaw winters and hail-prone summers. Before any shingle tear-off or new roof material goes on, you'll want to confirm your project scope with the Building Department so that scheduling and inspections can proceed without delays. The department's staff can outline the exact submission requirements based on your home's age, roof pitch, and material choice, which is especially relevant for older suburban stock in close proximity to rail corridors and mature tree cover.
Applicants may need to satisfy plan review expectations and provide proof of contractor licensure and insurance before permit approval. In practice, this means your roofing contractor should be prepared to submit structural notes, underlayment details, and a material schedule that accounts for Westmont's winter conditions and storm patterns. Plan review helps verify that the chosen system can withstand freeze-thaw cycles and potential hail impact. Expect a request for current proof of liability and workers' compensation coverage. If your home has unique features-such as skylights, chimneys, or dormers-be ready to share drawings or notes that illustrate integration with the new roof.
Westmont roofing jobs commonly involve an inspection during underlayment installation and a final inspection after completion, with timing dependent on department availability. The first inspection checks whether the roof deck is sound, underlayment is properly installed, and any ventilation or drip-edge work adheres to code. This is a critical checkpoint for resilience against our typical freeze-thaw cycles and the rapid weather shifts that can accompany spring storms. The final inspection confirms that all work is finished to code, that penetrations are flashed correctly, and that the architectural details (valleys, ridges, and vents) meet local standards.
Coordinate closely with your contractor to align the permit timeline with Westmont's inspection calendar. Because availability can vary, it's wise to plan for potential back-and-forth between the field and the Building Department. Have the contractor submit complete documentation early, including any special plan review notes, to minimize delays. If weather windows compress due to hail events or wind advisories, discuss contingency scheduling for underlayment and shingle installation so that inspections can occur promptly when conditions allow.
Westmont homeowners are in an Illinois hail and wind claim environment where carriers often expect weather-date support, roof photos, and detailed damage documentation. That means the moment a storm passes, your roof isn't simply a structural concern-it becomes a documented record tied to a specific date, with a timeline that your insurer will scrutinize. If the weather shifts quickly and multiple homes around you are affected, the process compounds: deadlines tighten, and the bar for proof rises. A straightforward, well-documented claim can still encounter delays or questions unless the initial submission is precise and complete.
Adjusters working this market commonly coordinate with contractors and may require more granular damage mapping when storm activity affects many nearby properties at once. Photos should cover all angles, close-ups of obvious damage, and wide shots showing the overall roof layout, vent stacks, and edge conditions. Include timestamps if possible and note any preexisting issues you had noticed before the storm. Clear annotations that correlate visible damage with specific roof features help prevent second-guessing or disputes later. In this environment, it is not unusual for the file to grow with supplemental documentation as the review unfolds.
Because this area often experiences clustered storm activity, the interaction between adjusters and local contractors can shape the timeline of repairs. Expect requests for more detailed damage mapping or for follow-up measurements to ensure the scope aligns with what the carrier considers reasonable for the reported event. If an adjuster visits and references specific map-based damage zones, having a contractor present to translate field observations into buildable scope can prevent back-and-forth and speed the process. Clear, on-site communication is a practical bridge between the claim and the actual work.
Coverage terms and premiums can be tighter in hail-prone Illinois markets, so Westmont homeowners need to review depreciation, exclusions, and matching issues before authorizing work. Depreciation can affect how much the payout covers upfront, while exclusions may limit certain damage types or roof components. Matching issues can complicate replacements when shingles or tiles wear differently across the roof or when newer materials don't perfectly align with existing sections. Understanding these knobs ahead of time helps prevent expensive, last-minute decisions after the claim is approved.
Connect with contractors who help homeowners navigate the claims process from damage assessment to final approval.
Storm Guard of DuPage
(630) 895-7848 www.stormguardrc.com
825 N Cass Ave Ste 305, Westmont, Illinois
4.5 from 82 reviews
In Westmont, many older suburban homes pair additions, porches, garages, and mixed rooflines with the main structure. Those transitions create low-slope patches where drainage and membrane details matter more than on a simple gable roof. If the rain channels or solar screens over a dormer aren't aligned with the main roof, you get tiny pools that stress under freeze-thaw cycles. Pay close attention to where a porch roof joins a main roof, or where a flat continuation meets a steeper pitch. The membrane needs to be continuous and properly lapped, and fasteners must be sealed away from wind-driven spray. If you notice any soft spots at the transition, or a visible line where shingles butt against flashing, treat it as more than cosmetic-this is where future leaks often begin.
Snow holdover and repeated freeze-thaw cycling in winter can pressure weak flashing around skylights and roof-wall intersections. In early spring, as temps swing above and below freezing, water can creep into gaps that seemed minor in warmer months. Skylight flanges and their surrounding flashings are particularly vulnerable, especially where older residential construction uses mismatched materials or aged sealant. Inspect the perimeters of skylights after heavy snows melt, and look for hairline cracks in sealant or gaps under metal flashing. If you see frost crystals along the skylight edge or staining near the flashing, address it before the next thaw-small breaches turn into bigger leaks fast when the sun returns.
Leak complaints in this market often trace back to penetrations and transition details rather than field shingles, especially on older suburban homes. Valleys where a dormer meets the main roof, vent pipes, and chimney details can all be weak points if the surrounding membrane has aged or been damaged by previous repairs. If a leak seems to surface only after a wind-driven rain or a heavy storm, start by tracing the path to a penetration or transition detail rather than chasing the shingles themselves. A careful eye on sealant life, step flashing, and proper integration with counter-flashing can be the difference between a quick patch and a prolonged drip.
Find contractors experienced in skylight installation, flashing, and leak repairs to bring natural light into your home.
Westmont roof replacements are best scheduled for a dry late spring through fall window, when sealants cure reliably and crews can work without snowfall delaying tear-off and inspections. If a project starts in late spring, plan for a completion buffer in case a rainy spell runs longer than expected. Scheduling around dry stretches reduces the risk of blistered shingles or reseal failures and helps ensure the roof dries out quickly after tear-off.
Spring hail and wind events in this area can compress contractor calendars fast. When those storms hit, even non-emergency projects can slide back by a few weeks as crews chase detours, debris removal, and safety checks. If your roof has been flagged but isn't actively leaking, use the lull to confirm material delivery windows and confirm a backup date inside a two-week range. Have a clear plan for tarp protection if a surprise storm arrives during early-stage work.
Summer heat and afternoon thunderstorms shorten safe working hours and can force stop-start production days. Heat affects shingle handling, sealants, and mineral grit retention on exposed edges. Build a practical daily schedule that favors morning starts and early finishes, with a contingency for heat-related pauses. Ensure crew hydration plans and safety routines are in place, and set clear on-site communication for sudden weather changes. In hot months, prioritize inspections and critical reseal tasks during cooler morning periods to maintain warranty integrity and avoid thermal stress on the roof system.
Aim to wrap primary work before late fall when temperatures trend downward. A well-timed finish minimizes cold-weather impact on sealants and ensures an effective post-installation inspection while the roof is fully dry. If you face a late-season window, coordinate with a contractor who can perform a thorough, daylight inspection and address any minor touch-ups before snow arrives.
The Westmont-area contractor pool strongly skews toward re-roofing rather than niche new-construction work, matching the village's established residential neighborhoods. Homes here tend to be older, with asphalt shingle roofs that have weathered multiple freeze-thaw cycles and hail events. When evaluating options, homeowners look for firms that understand the local roof geometry, tree shading patterns, and the way snow and ice migrate across sloped surfaces. A practical choice emphasizes crews with experience handling typical suburban rooflines, attic ventilation quirks, and the need for durable underlayment that stands up to Illinois winters.
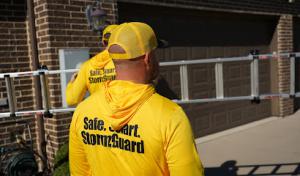
Quick response and cleanup are unusually prominent hiring signals in this market, reflecting storm-driven service calls and close-lot suburban expectations. In practice, that means responses within a business day after a hail or wind event, on-site tarp or temporary protection when necessary, and a thorough debris sweep once work is complete. Homeowners value companies that communicate a clear timeline, coordinate with insurance adjusters, and leave the yard and driveway free of nails and granules. A clean job site is not a luxury here; it's part of the standard of care that keeps yards safe for kids and pets.
Long-established, family-owned, residential-focused firms are common in the local mix. These firms often offer personalized service, long-term warranties, and hands-on project supervision. For homeowners, that translates into a single point of contact who can explain material choices, temper expectations after a severe weather event, and follow through on post-install inspections. Look for referrals from neighbors with similar roof types and tree coverage, as shared experiences are strong indicators of reliable workmanship in this community.
Free inspections appear with some frequency, and drone inspections are becoming more common, though not universal. When scheduling, choose a company that offers a transparent assessment of hail impact, wind damage, and freeze-thaw wear, plus a clear plan for repair or replacement. In a market shaped by mature trees and dense lots, careful attention to fascia, gutters, and downspouts is essential, as debris and branch impact often accompany broader roofing concerns.