Last updated: Apr 19, 2026
Storm claims in this area move quickly once hail or strong winds hit. The typical Lake Villa homeowner already knows that adjusters expect photo documentation and a detailed scope of work - not just a rough description of "shingle damage." That standard, practical evidence helps adjusters assess the severity, differentiate cosmetic wear from structural impact, and prevent delays in coverage decisions. When a storm lashes the neighborhood, the risk isn't limited to obvious dented panels; it's the hidden damage along edges, valleys, and under broken shingles that can lead to leaks down the line. The window for documenting damage is narrow, and missing steps can slow an otherwise straightforward settlement.
Local seasonal risk is not just hail; autumn wind events, winter snow load, and spring rain all affect when damage is discovered and when repairs can actually be completed. In fall, high gusts can peel back shingles or loosen flashing, leaving vulnerable spots that worsen with first heavy rain. Winter snow loads stress roof decks and connectors, potentially weakening joints that aren't obvious from ground level. Spring brings rain that can reveal latent leaks but also complicates scheduling repairs around wet conditions. This cycle means a homeowner may notice something only after a sequence of weather events, delaying a full repair plan and extending exposure to further water intrusion.
Because replacements are often scheduled in dry months, storm-driven demand surges can compress contractor availability after regional weather events in Lake County. When a major hailstorm or high-wind event happens, multiple homes sprint into the same contractor queue. The dry months attract more crews, and the best weather windows for roof work align with those periods, tightening the timetable for any urgent repairs. A homeowner should anticipate potential backlogs and plan for a staged approach: stabilize the roof first to prevent ongoing leaks, then schedule the full replacement when a clear weather interlude arrives. Waiting too long can turn a manageable repair into a full replacement that strains both budget and schedule.
Documentation matters more than ever during the repair window. Take clear, timestamped photos from multiple angles, including the roof edges, valleys, and any attic signs of moisture. A detailed scope should map out damaged components, ventilation considerations, and any high-risk areas where water could travel into the interior. The goal is to present a cohesive picture to the adjuster that aligns with observed conditions on the ground and the actual findings during an inspection. Having a written note that links weather events to observable damage can accelerate the claim and reduce back-and-forth with the insurer, especially when the weather data points to a recent storm sequence as the trigger for the claim.
Finally, plan for a phased approach to repairs. Start with temporary measures to stop active leaks and protect interior spaces, then proceed with a full replacement during a dry stretch. A staged plan helps maintain interior comfort and minimizes secondary damage while the storm's fallout is resolved. Coordinating with a contractor who understands the local climate realities-freeze-thaw cycles, windborne debris, and seasonal moisture patterns-ensures that the chosen roofing system not only meets current needs but also withstands the next round of Lake County weather.
Find local contractors experienced in assessing and restoring roofs after hail, wind, and severe weather events.
KMK Residential
(847) 752-4022 www.kmkrrinc.com
468 Park Ave Unit 6, Lake Villa, Illinois
4.7 from 107 reviews

TZ Roofing Company
36929 Deer Trail Dr, Lake Villa, Illinois
4.8 from 20 reviews
KMK Residential
(847) 752-4022 www.kmkrrinc.com
468 Park Ave Unit 6, Lake Villa, Illinois
4.7 from 107 reviews
Our Business is making the exterior of your home beautiful again. We provide new full replacement on roofing, siding, all other exterior coverings, and window installation. We are your one stop exterior contractor top to bottom of the house! Give us a call for free quote on your project whether it be Roofing,Siding,Windows, gutters, exterior trim or all of the above. We also do smaller exterior repairs and interior repairs such as drywall,painting,carpentry too!

TZ Roofing Company
36929 Deer Trail Dr, Lake Villa, Illinois
4.8 from 20 reviews
TZ Roofing Company is a leading provider of high-quality roofing in Chicago. Since day one, we have specialized in working with the most experienced and well-qualified roofing contractors to offer a full array of excellent services. Whether you’re looking for re-roofing, roofing repair, installation, or general maintenance, our roofing contractors have the know-how and the skill to get it done. Our services are more affordable than other roofing companies, as well, including our huge selection of styles and materials. Our roofing contractors will help you find exactly what you’re looking for. At TZ Roofing Company, we pride ourselves on our excellent customer service, as well.
Iconic Home Improvements
18783 Sophia Ln, Lake Villa, Illinois
5.0 from 4 reviews
Roofing, Gutter and Siding Restoration.
Sergio Esco Construction
(847) 477-0962 sergioescoconstruction.com
Serving
4.6 from 36 reviews
Sergio Esco Construction has been a trusted name in roofing, siding, windows, doors, and interior remodeling for over 20 years. Based in Round Lake Beach, IL, we proudly serve Chicago, the Northwest suburbs, and the Southwest suburbs, including Naperville, Hinsdale, and Barrington. Our expert team specializes in durable roof replacements, seamless gutters, energy-efficient windows, and custom interior renovations to enhance and protect your home. Whether you need a new roof, kitchen remodel, bathroom update, or siding installation, we deliver quality craftsmanship and unmatched customer satisfaction. We also have a 24/7 emergency line for any home damage it goes directly to our insurance claim division.
Key Roofing
19861 W Grand Ave, Lake Villa, Illinois
3.7 from 3 reviews
Key Roofing provides commercial, residential and repair roofing services to Lake, Cook and McHenry counties in Northern Il
Rogan’s Construction
Serving
5.0 from 23 reviews
cedar shake roofs Davinchi roofs, asphalt roofs , gutters, metal roofs , siding, exteriors painting, fence work , decks , windows, trims, wood flooring, tile work, snow plowing (residential)
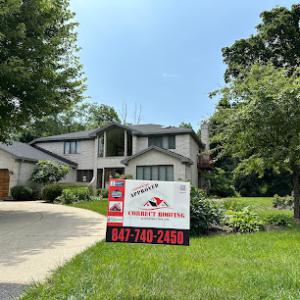
Correct Roofing & Construction
(847) 740-2450 www.correctrc.com
Serving
4.8 from 71 reviews
We are the local experts in roofing and home improvements with over 30 years of experience. We provide roofing, siding, windows, painting and more to Lake County, Cook County, McHenry County & Southern Wisconsin. Call us today for a free estimate!

Hetman Enterprises
(847) 796-8710 hetmanexteriors.com
Serving
4.8 from 67 reviews
At Hetman Enterprises, we're dedicated to providing quality home improvement services in the Gurnee area. From siding and gutters installation to window and roof replacement, we can help you get your home or business looking the way you want it. Our goal is to provide superior service at competitive rates, and we do our best to ensure that each customer's needs are met. We take pride in our ability to deliver quality work. We understand that your home is an investment and we want to ensure that it stays safe when it comes to weathering the elements. We have been trained by some of the best professionals in their field so we can offer our customers the best quality workmanship and installation available.
SkyRise Roofing Contractors
(224) 225-0454 roofingfoxlake.com
Serving
5.0 from 26 reviews
SkyRise Roofing Contractors is your top choice when it comes to your roof installation in Fox Lake. Thanks to our many years of practice, we are proud to call ourselves specialists in roofing area. We offer various kinds of roofing so as to every customer can find something proper. Shingle, Cedar Shake or Metal roofing - it depends only on you which of them will be the final choice. Our company serves you with both residential and commercial roofing in Fox Lake. Our mission is to provide you also with professional roof replacement in accordance with the highest standards. Expert roofing contractors in Fox Lake wait for your call. We are ready to serve you with any roofing job that you already need.
A&M Roofing
(844) 277-5423 www.amroofing.info
Serving
4.9 from 52 reviews
A&M Roofing provides roofing, gutters, siding, windows, and storm damage services to Southern WI and Northern IL.
Perkins All-Star Exteriors & Construction
(847) 838-9331 www.perkinsallstar.com
Serving
4.5 from 27 reviews
Perkins All-Star Exteriors & Construction is your one-stop-shop for all of your needs. Whether it is Residential or Commercial. Perkins All-Star has the professionals to complete your Roofing, Siding, remodel or even additions. Perkins All-Star Exteriors & Construction is licensed in Illinois and Wisconsin, serving the northern suburbs of IL and southern Wisconsin for over 30 years.
CasGo Roofing
(847) 922-8374 casgoroofing.com
Serving
5.0 from 31 reviews
We are a Licensed, Insured business and Certified Installers by GAF in the Chicago-land area and a full service company, trusted to meet your roofing and needs for commercial and your residential properties.
The climate in this area features cold winters with repeated freeze-thaw cycling and hot summers, so moisture resistance and thermal movement matter more here than in milder Illinois markets. When choosing roofing materials, think not only about the surface layer but how the full assembly handles trapped moisture that can appear after a thaw. Materials that tolerate expansion and contraction without cracking or delaminating keep a roof performing through multiple seasons without frequent repairs.
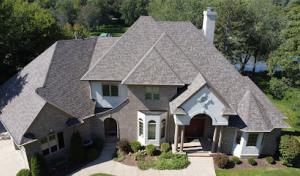
The dominant local material mix includes asphalt shingles, metal roofing, clay tile, concrete tile, wood shingles or shakes, and synthetic or composite shingles rather than a single-material market. Each has its own behavior under freeze-thaw stress, so selecting a system that matches a home's attic ventilation, insulation, and underlayment is essential. For lakefront or high-wind homes, metal and concrete tile offer notable wind performance, while asphalt shingles remain a common, versatile choice for balance between cost and durability. Clay and concrete tiles bring long life in dry, well-ventilated spaces but require careful installation to handle thermal movement in this climate.
Underlayment is more than a backup layer; it's the first line of defense against moisture migrating into the attic during rapid temperature swings. In Lake Villa, where freeze-thaw cycles are regular, a high-quality synthetic underlayment paired with a properly lapped membrane helps prevent water intrusion from minor shingle damage or wind-driven rain. Ventilation also rises to the top of the list because trapped moisture in the attic accelerates degradation of any roof system under freeze-thaw stress. Ensure soffit, ridge, and gable vents, along with appropriate intake and exhaust balance, are designed to exhaust humid air without drawing in bulk moisture from the outside.
Each material handles temperature shifts differently. Asphalt shingles move with the roof deck but rely on sealants and proper nailing patterns to stay watertight during swings. Metal roofing offers excellent wind and moisture resistance but expands and contracts; fasteners and panel overlap must accommodate this. Clay and concrete tiles resist heat and moisture well but are heavy and brittle if misaligned, so installation tolerances are critical in this region. Wood shingles and shakes bring aesthetics and natural breathability but demand moisture-sensitive detailing to prevent warping or splitting after a cold snap. Synthetic or composite options aim to blend resilience with lower maintenance, yet still require accurate underlayment and ventilation planning.
When evaluating materials, couple your choice with a comprehensive attic assessment: insulation levels, air sealing quality, and the expected vapor drive through the deck. In practice, this means choosing a roofing system where the underlayment, ventilation design, and chosen surface material work as a coordinated assembly. If a home already has limited attic space or signs of previous moisture damage, lean toward systems with robust moisture management, such as high-quality underlayment and a ventilation emphasis, even if that means adjusting the typical material preference. For many properties, a mixed approach-combining durable secondary layers with a well-ventilated, moisture-conscious deck-delivers the most reliable performance through Lake Villa's freeze-thaw cycles.
The most popular roofing material in the US. Find pros who install, repair, and replace asphalt shingles.
In Lake Villa, winter ice and snow accumulation creates a lot more moisture risk than people expect. That damp layer can sneak under shingles or through fasteners when the roof isn't fully torn off and dried in, which increases the chance of leaks forming even before you notice a problem inside. Tear-off crews have to fight through freezing temps and slick pitches, which means scheduling becomes less predictable. If a storm hits and the roof can't be opened to pre-draft a dry-in, water intrusion can linger in attic spaces, potentially complicating insulation and ventilation later on. The result is a tighter, messier path to a finished roof. Expect weather to push fits and starts rather than a clean, linear timeline.
When the snow finally gives way to a thaw, Lake Villa often sees rapid shifts between thawing sun and sudden rain. Those fluctuations matter because discovery of damage most often comes after a cold snap or thaw when moisture exposure is freshest, and the ideal replacement conditions-dry, moderate temps, and steady wind to help dry-in-aren't guaranteed. The spring pattern can create a gap between spotting damage and having a window where a tear-off and dry-in can happen without repeatedly washing away the work area with rain. Homeowners should be prepared for longer windows between identifying a problem and getting a roofer on the job, with weather-driven interruptions playing a central role. A missed storm day can cascade into a series of delays as crews wait for a dry stretch to complete the dry-in stage and to vent properly.
As heat climbs and humidity settles in, handling and installation conditions begin to tighten. Asphalt and composite shingles may become more pliable in late summer heat, which can slow removal and reinstallation if temperatures crest too high. Metal roofs respond differently, but heat can still affect panel fitting and sealant performance. Local crews often find that the most reliable project windows shrink as summer advances, with afternoon heat dictating shorter work days and the need for extra cooling and drying time for underlayment and ventilation components. If a replacement starts late in the season, the risk is pushing into autumn weather patterns that bring unpredictable rain and wind. The practical takeaway is this: the best window for a smooth, predictable tear-off and dry-in tends to be a narrow slice during the shoulder seasons, and the calendar holds less sway than the weather.
In this jurisdiction, a full re-roof is treated as a formal project requiring a permit, not informal maintenance. Before any shingles come off or new material goes on, you or your contractor must pull the permit through the local building department. That process creates a defined timeline and a paper trail for inspections, which is essential given Lake County's winter freezes and the way storm damage can accelerate a plan. Understanding that the permit is not optional helps you align the schedule with seasonal weather and the department's workload, reducing delay risk.
Typically, the contractor is the point person for submitting the permit application. They should provide a clear scope, including deck, underlayment, ventilation details, and the chosen roofing system. After issuance, the department will assign inspection windows, which can vary based on staff availability and weather. If a storm or heavy winds hits before inspections are complete, expect possible rescheduling. Keep in close contact with the contractor and the building department to track when rough and final inspections are slated, and confirm what documentation the inspector expects on site.
Rough inspections focus on the roof deck, underlayment, and ventilation plan before shingles are installed. The inspector will verify that the roof void is properly vented, that the underlayment meets code, and that fasteners and nailing patterns align with the chosen product. After shingles are installed, a final inspection will confirm the installation meets code requirements and that flashing, penetrations, and ventilation provisions are correctly finished. The timing of these inspections can shift if weather creates backlogs or short windows between storms, so plan with a safety margin in mind.
Coordinate closely with the contractor to ensure the permit paperwork is complete and accurate, including any amendments for changes in materials or scope. Maintain a folder with permit numbers, inspection dates, and contact information for the building department. After each inspection, document the findings and request written notes if anything needs rework. Finally, expect a tight sequence between weather windows and inspection slots, and prepare for potential weather-driven delays that can extend the timeline toward the middle of the season.
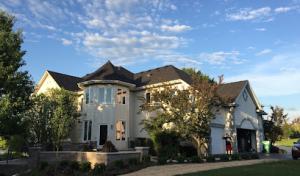
In Lake Villa, the material spread is the anchor of your budget. Asphalt shingles sit in the low-to-mid range, about 320 to 580 USD per square, while clay tile sits at the high end, roughly 900 to 1800 USD per square. You'll also encounter metal between 650 and 1100 USD per square, concrete tile from 800 to 1400 USD per square, synthetic shingles around 700 to 1100 USD per square, and wood shingles/shakes roughly 550 to 900 USD per square. This spread matters because your house type, roof pitch, and existing structure will push you toward one end of the range or the other. In practice, many older or mid-century homes with standard 3/12 to 5/12 slopes lean asphalt, while newer or higher-end estates with distinctive lines may lean tile or metal for durability and curb appeal.
Storm-driven demand spikes after hail or strong winds are common, and Lake County's dry months often see the most intense scheduling pressure. When a major hail event hits nearby, crews can be booked several weeks out, and even more so if you're aiming for a full replacement rather than a repair. If you've experienced a recent storm, expect conversation with contractors about timing windows, prioritization of critical areas (like the attic or ceiling stains), and potential waits for favorable weather to minimize the risk of moisture intrusion during the job.
Weather timing, roof complexity, and the local supply cadence all push total cost beyond raw material pricing. Steeper pitches, multiple chimneys, or skylights require extra setup and safety measures, which can add to labor hours. In Lake Villa, the seasonal lull or surge in crew availability can influence pricing, with prices potentially creeping higher when crews run tight schedules after a major wind or hail event. You'll want a clear, itemized estimate that shows material costs, labor, waste disposal, and any staging needs tied to the forecast and seasonal conditions.
Get a clear picture of your project costs upfront - no commitment required.
KMK Residential
(847) 752-4022 www.kmkrrinc.com
468 Park Ave Unit 6, Lake Villa, Illinois
4.7 from 107 reviews

This part of the Midwest has a reputation for high claim activity after hail and strong winds, and carriers often respond by reevaluating risk after a roof replacement. After a full or partial replacement, premiums can shift upward and coverage rules may tighten for older roofs or certain materials. If your roof is approaching or past a typical service life, expect more scrutiny and clearer demonstrations of what caused the damage. Being prepared helps you stand on solid ground when discussions start.
Homeowners should anticipate that carriers or adjusters will ask for photos, storm-date evidence, and a detailed scope of work before approving or narrowing a claim. Take clear, timestamped images of hail impact patterns, missing granules, wind-stripped edges, and any interior signs of leaks. Keep a diary of weather events and repair attempts, noting dates and contractor observations. A precise scope-listing materials, dimensions, and targeted repairs-helps prevent disputes about what was damaged by a storm versus what is wear and aging.
Because hail and wind claims are common regionally, the quality of your documentation can directly affect whether damage is treated as a covered storm loss or categorized as age-related wear. Insurers may compare new photos to old records, assess the roof's current condition, and consider the degree of recent storm impact versus long-term deterioration. If the roof has mixed conditions, prepare to show which areas failed due to a recognized storm event and which areas show typical aging. In practice, a thorough, organized file can tip the balance toward coverage rather than a partial denial, but the outcome depends on the documentation and the policy language.
Connect with contractors who help homeowners navigate the claims process from damage assessment to final approval.
KMK Residential
(847) 752-4022 www.kmkrrinc.com
468 Park Ave Unit 6, Lake Villa, Illinois
4.7 from 107 reviews
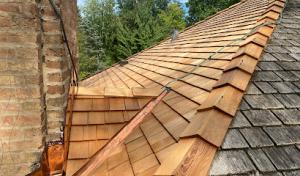
In this market, skylight work shows meaningful contractor prevalence, meaning homeowners regularly need roofers who can address leak-prone penetrations rather than shingles alone. Skylights sit at a natural weak point where the roof deck meets vertical fixtures, and leakage often travels along trim or flashing rather than dripping straight down. That makes spotting trouble early essential, since a small weep can become a larger stain with freeze-thaw cycles.
In a freeze-thaw climate like this area's, flashing details around penetrations become more vulnerable when moisture enters and then expands during cold snaps. Metal flashings can loosen or bend, sealant zones can crack, and joints where skylight curb, curb flashing, and roof deck meet are especially prone to separation. When a cold snap hits, existing weaknesses can open up, allowing wind-driven rain to push water laterally toward plywood, underlayment, and interior ceilings.
Storm follow-up inspections should pay particular attention to penetrations and transition points because wind-driven rain can expose weaknesses not obvious from ground level. Start with the skylight curb: look for loose screws, compromised sealant, and any staining that runs along the flashing. Check at the transition from skylight curb to deck, and along any transversal joints around chimneys or vent pipes nearby. Inspect soffits and overhangs for signs of moisture tracking toward the skylight, which can indicate hidden damage behind the curb.
Document any new creaks, stains, or damp spots in ceilings, and note how rain patterns change with wind direction. If moisture is detected near a skylight or other penetrations after a storm, schedule a roof assessment promptly. When contacting a roofer, prioritize those with documented skylight and flashing experience, and ask specifically about curb flashing, sealant age, and the condition of transition points around penetrations. Prompt, targeted repairs save broader interior damage in this climate.
Find contractors experienced in skylight installation, flashing, and leak repairs to bring natural light into your home.
KMK Residential
(847) 752-4022 www.kmkrrinc.com
468 Park Ave Unit 6, Lake Villa, Illinois
4.7 from 107 reviews
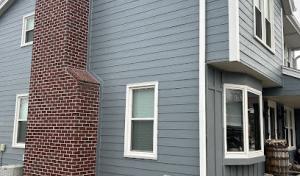
In this area, flat-roof work remains a common specialty among local contractors, even though Lake Villa is primarily a residential re-roof market. Low-slope sections show up on garages, porches, and some modern home additions, and those spaces demand attention to details that steeper shingle roofs simply don't require. The balance between durability and maintenance is different here, since the roof must endure freeze-thaw cycles and seasonal moisture.
Snow accumulates and spring rains arrive with vigor, so drainage on low-slope roofs matters more in practice than on steeper pitches. Water sits longer, increasing the risk of ponding, ice formation at edges, and slow drainage through scuppers or internal drains. Elevation changes around the pool of standing water can drive capillary action and edge dampness, so ensure the drainage plan directs water away from walls and into established downspouts.
Inspection attention to underlayment is especially relevant on these surfaces because freeze-thaw exposure punishes trapped water. Use a high-quality, compatible underlayment system designed for cold climates and potential ice dam scenarios. Consider additional vapor retarders in wall interfaces that tie into the garage or porch roof, and ensure seams are well sealed to prevent water intrusion during rapid thaw cycles.
Regular inspections after heavy snow events or hail-typical in this market-are essential. Look for subtle signs of moisture infiltration around penetrations, once-rare efflorescence along parapets, or edge deterioration where water tends to back up. Maintenance should be proactive: clear debris from edge channels, verify sealant integrity around vents, and confirm that any penetrations have proper flashing and drainage connections to keep low-slope roofs dry through Lake Villa's wet seasons.
Find specialists in TPO, EPDM, and built-up flat roofing systems for residential and commercial properties.
Mighty Dog Roofing of Northwest Chicago
(847) 649-6732 www.mightydogroofing.com
Serving
4.9 from 38 reviews
The local market signals show re-roofing, cleanup included, quick response, residential focus, and affordability as the strongest homeowner priorities. When a storm hits, crews who can both tarp and strip quickly, clear debris, and coordinate a streamlined cleanup become the most valuable partners. Expect tight scheduling after a major event.
Long-established and family-owned firms are common, but the market is also highly response-driven because storm events create urgency. A contractor that can be onsite within 24 to 48 hours after a claim is filed often saves homeowners from weather exposure and further damage. Don't assume size equals reliability in this climate.
Manufacturer-certified, licensed, and insured signals exist locally but are less prevalent than speedy cleanup and on-site coordination. If credentials are present, verify them directly: confirm active licenses, current insurance, and any manufacturer certifications. Do not rely on a glossy brochure or a quick verbal assurance-get copies and call the issuer if needed.
Ask specifically about experience handling hail and wind damage in residential settings with typical Lake County shingle and siding packages. Require a written plan that covers storm assessment, temporary protection, debris removal, and a staged replacement timeline aligned with favorable weather windows. A practical plan reduces surprises during winter thaw cycles.
A contractor should provide clear milestones: roof deck accessibility, ventilation checkpoints, and a staged replacement cadence that minimizes disruption to your home. After the initial walkthrough, you should receive a concise, written scope with roles, expectations, and a single point of contact for storm-related scheduling.
The inland Lake County climate introduces a distinct set of challenges for roofs. Freeze-thaw cycles push shingles and underlayment to expand and contract, which can accelerate wear at valleys, penetrations, and edge details. Hail storms and strong winds are common enough to leave fastener and surface damage that looks minor at first but can lead to leaks after a few cycles of moisture. A homeowner should expect that most roof assessments in this area focus on residual impact, shingle lifting, and proper attic ventilation to manage moisture and temperature swings.
Roofing work in this market is tightly tied to the calendar. Winter brings safety constraints and potential ice dam scenarios, while spring rains test newly installed barriers and flashings. Summer heat can affect installation pace and material handling, and autumn winds spike the risk of shingle blow-off during daytime highs and sudden gusts. Timing a replacement or major repair around these seasonal limits helps maintain warranty integrity and minimizes weather-related delays. Clear planning also helps synchronize inspections with typical storm claim windows.
After a major hail or wind event, immediate documentation matters. Take high-resolution photos of the roof, gutters, and any interior discoloration or water intrusion, and log dates of storms and subsequent checks. A thorough record supports insurance claims and can influence the scope of work when a contractor reviews damage with you. When discussing the claim, request a detailed scope that includes decking, underlayment, ventilation adjustments, and any necessary trim or flashing replacements to prevent hidden leaks.
Local roofing professionals stay busy after large storms, which can create competing timelines and varying interpretations of required work. It helps to interview several reputable contractors who can articulate a clear scope, evidence-based findings, and a phased plan that aligns with weather windows. Prioritize those who emphasize meticulous attic ventilation, proper underlayment choices, and a written, itemized assessment. A careful, documented review reduces the risk of scope creep and ensures that the replacement or repair addresses the season-specific needs.
Boarding up and patching might offer a short-term fix, but the goal in this market is a durable solution that withstands freeze-thaw cycles, hail exposure, and wind-driven debris. A well-sequenced replacement that includes proper ventilation, ice dam mitigation, and durable flashing reduces future storm risk. Understanding how the local climate interacts with material choices-shingles, metal, or tile-helps homeowners select a system that performs reliably through Lake County's seasonal rhythm.