Last updated: Apr 19, 2026
In Macomb, roofs face a brutal cycle: cold winters with snow followed by warm, sometimes humid summers. That seesaw drives repeated freeze-thaw movement in shingles, flashing, and roof penetrations, slowly cracking seals and loosening fasteners. When you combine that with spring hail and high winds, the risk of sudden, costly damage climbs fast. Pay attention now, because timing decisions can mean the difference between a routine repair and a full replacement covered by insurance.
As temperatures swing above and below freezing, water that penetrates the roof system freezes, expands, and pushes apart shingles, tabs, and edging. In a suburban East Michigan stock with older layouts, those micro-movements add up. Look for hairline cracks along shingle edges, lifted tabs, and granule loss that leaves a glittery coating on driveways after a thaw. Flashing around chimneys, vents, and skylights can develop micro-movement-induced gaps. If you see these issues after a winter, expect that any exposed fasteners or underlayment are under additional stress. The upshot: a single winter can prime the system for spring and summer damage if not addressed promptly.
Spring in this region is notorious for its hail and high winds, and those events act as a local trigger for urgent replacement activity. Hail dents, cracked shingles, punctured underlayment, or displaced flashing are common catalysts for insurance-driven repairs. After a heavy spring storm, a quick roof check is essential: lift a few shingles at the edge to gauge whether the underlayment shows through, inspect flashing seams for new gaps, and note any blown-off granules in gutters or flowerbeds. If damage is present, prompt assessment can prevent additional interior risk from leaks during the late-spring rain season. Waiting can allow minor issues to escalate into widespread roof failure, especially where multiple penetrations exist or the attic cooler-venting balance has been compromised.
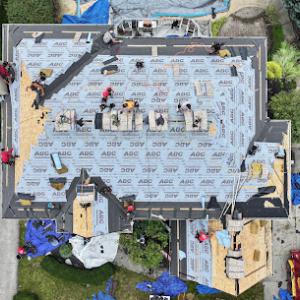
Most full replacement work in this area concentrates from spring through early fall because winter access and material sealing conditions are less favorable. Cold, frozen substrates make installation slower and can compromise seal integrity. If your roof shows chronic age-related failures, or if multiple storms have created repeated, cumulative damage, the window for a smooth, uninterrupted replacement narrows as winter approaches. Planning ahead for a spring or early-summer project, while weather remains dry and temperatures are moderate, reduces the risk of delays caused by snow or freezing rains and supports better adhesive and sealant performance.
Begin with a straightforward roof sweep for damaged shingles, lifted edges, or obvious granule loss after a winter. If possible, safely inspect a small section of the roof or arrange a professional assessment to confirm the integrity of flashing around chimneys and vents. After a spring hail event, don't delay: a quick, non-invasive roof check can reveal whether a repair is feasible or if a full replacement is warranted. In the meantime, ensure interior signs of trouble aren't hiding behind walls or ceilings-stains or musty odors can indicate slow leaks creeping from imperfect penetrations.
Your goal is to minimize unpredictable failure. Schedule proactive inspections in late winter or early spring to catch freeze-thaw damage before storms deliver the knockout punch. Maintain clear, accessible attic ventilation to reduce condensation that compounds freeze-thaw stress. Keep gutters clean so water shed won't overflow onto vulnerable eaves and flashing. And plan for a storm-prone season by knowing who to call for a swift inspection after hail or high-wind events-early detection makes the difference between a targeted repair and a full, disruptive replacement.
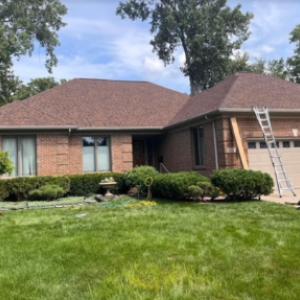
Asphalt shingles are the dominant roof covering in Macomb, matching the area's large volume of suburban re-roof projects. When you're replacing a roof on an older house, asphalt shingles offer a familiar install process, compatibility with common attic layouts, and straightforward repair paths after winter storms. In practice, the asphalt option aligns with the typical roof pitch and eave detail found on many southeast Michigan homes. The practical approach is to treat asphalt as the baseline, then confirm that the chosen product line carries the expected granule hardness and color stability for snow and sun exposure. Expect installers to focus on a solid nailing pattern, joint sealing at transitions, and a dependable underlayment sequence that resists moisture ingress during the Michigan freeze-thaw cycle.
Metal roofing is present in the market but far less common than asphalt, while tile and wood systems exist more as niche installations than the local default. If a homeowner is considering metal, it's worth weighing how wind-driven hail and heavy snow will interact with flashing and panel seams in the attic-to-roof transition. Tile and wood bring distinctive aesthetic and performance characteristics, but they require careful attention to roof deck condition, span, and edge details to prevent localized freeze-thaw damage. In practice, these options are most sensible on homes with appropriate roof geometry and on projects where long-term durability and specific visual goals justify the added complexity. When considering any non-asphalt system, ensure the installer has experience with Michigan's seasonal cycles and that flashing width, fastener type, and edge treatments are designed to resist repetitive freeze-thaw stress.
Macomb's freeze-thaw pattern makes underlayment selection a high-priority step, regardless of roof type. A robust underlayment helps shed meltwater quickly and provides a secondary barrier during rapid temperature swings. Flashing at valleys, chimneys, and stack penetrations needs meticulous sealing and high-quality materials that tolerate repeated cycles of freezing and thawing. Ventilation becomes a practical safeguard against ice dam risk and attic condensation, with soffit intakes, ridge vents, or balanced systems chosen to fit the attic space and roof design. The goal is a continuous, well-sealed envelope that keeps moisture out of the decking and sheathing, especially in corners and transitions where snow can accumulate.
Owners planning a roof replacement with winter and spring weather in mind should prioritize a detailed install plan that emphasizes proper nail spacing, adequate attic ventilation, and a careful frost-season setback for any long lead-time components. For asphalt, ensure an aligned starter course and consistent shingle alignment to reduce edge lift during wind events. For non-asphalt options, verify compatibility with existing roof geometry and the ability to maintain a sealed, ventilated roof system through the cold months. In all cases, insist on a capable crew with experience managing Michigan's climate, pace the project to weather windows, and confirm that flashing and edge details are reinforced to withstand the region's freeze-thaw and storm cycles.
When a hail or wind event rocks the area, insurers expect solid documentation before moving a claim forward. In this market, Michigan insurers commonly expect homeowners to provide photos, documentation of preexisting conditions, and a detailed contractor estimate when filing a roof claim. Your best move is to gather close-up photos of damaged shingles, missing granules, dented flashings, and any interior signs of moisture. Do this as soon as safely possible after the event, then organize the images chronologically-before and after the storm. A clear trail of what existed prior to the damage helps prevent disputes about preexisting conditions and supports the scope of repair your insurer will authorize.
Adjusters in this market may reference contractor estimates or ask for structural observations from an approved roofing contractor before authorizing replacement scope. If your insurer questions the extent of damage, an independent structural assessment from a contractor with local experience can be a decisive factor. Choose a roofer who understands common Southeast Michigan framing and decking layouts, as well as the way freeze-thaw cycles influence plywood and sheathing in this climate. Having a trusted contractor present during the adjuster's visit can help translate what's visible on the roof into an appropriate replacement plan, reducing the risk of under-scoped or delayed repairs.
Several carriers in Michigan have tightened certain roof-coverages after storm activity, making early documentation especially important after hail or wind events. After a significant weather event, carriers may scrutinize the contrast between pre-storm condition and post-storm claims more closely. This means punctual file submission, comprehensive photos, and an estimate from a qualified roofing professional do more than ease the process-they can protect the integrity of the settlement. If documentation reveals preexisting wear or aging components, be prepared to discuss how new materials will address those vulnerabilities and how the replacement plan mitigates future risk. In practice, this translates to a careful, methodical approach: file promptly, document thoroughly, and rely on an estimate from a contractor who can substantiate both the damaged scope and the necessary upgrades to withstand future Macomb winters.
Connect with contractors who help homeowners navigate the claims process from damage assessment to final approval.

Leading Edge Roofing
(586) 843-6579 www.leadingedgeroofinginc.com
52259 Melody Dr, Macomb, Michigan
5.0 from 71 reviews
All Pro Home Improvement
(248) 881-9245 www.allprosinc.com
48550 North Ave, Macomb, Michigan
4.6 from 27 reviews

Leading Edge Roofing
(586) 843-6579 www.leadingedgeroofinginc.com
52259 Melody Dr, Macomb, Michigan
5.0 from 71 reviews
we are a family-owned and operated roofing company serving Macomb County and the surrounding areas for over 20 years. We specialize in residential roofing services, providing expert installation, repairs, and replacements. Our experienced team is dedicated to delivering high-quality workmanship and exceptional customer service.
Tri-County Roofers
(586) 489-7663 tricountyroofers.com
46108 Allentown Drive, Macomb, Michigan
4.8 from 24 reviews
We have been providing high quality roofing services for both residential and commercial areas since 1987. Whether you need roof repairs or a complete new roof, we can do it all!
All Pro Home Improvement
(248) 881-9245 www.allprosinc.com
48550 North Ave, Macomb, Michigan
4.6 from 27 reviews
We are an old-school company with high moral values, driven by our number one objective: to be valuable to you. Owner John Williams has overseen tens of thousands of completed jobs for 50 years, and his commitment has never changed. We hold an A+ rating with the Better Business Bureau for those same 50 years. With John's son working alongside him, the family legacy ensures all warranties and quality service will be honored for generations to come. #detroitroofer , #michiganroofer, #southeastmichiganroofer #getaroofquote

Quality Over Quantity Everytime
(800) 364-2642 www.qualityoq.com
Serving
4.9 from 69 reviews
We are a family that cares! Whether you need a full roof replacement or just a repair, we have a team of professionals that's been installing roofing systems for over 18 years ready to service you as your preferred Macomb and Oakland county roofer! Quality Over Quantity Everytime is a Michigan family-based roofing company. Our place of business, where the magic happens. We are a driven, motivated, and educated team, with over 150 years of combined experience, focusing on roofing, siding, and gutters, and storm restoration. This is our passion, this is our dream, to be able to do what we love. To ensure quality to all of our projects and bring happiness to all our customers! Fully licensed and insured.
Exterior Renovations
(586) 249-6146 exteriorrenovationsroofing.com
Serving
4.9 from 141 reviews
Renovating Metro Detroit and building relationships with our customers, combined with weather protection against the four seasons of unpredictable weather here in Michigan. One of the secrets to any business's success is for its brand, products and services to stand out from the crowd. A lot of construction companies (and companies in general) settle for being just good enough. Here at Exterior Renovations we commit to being the best company we can be, striving to produce satisfied customers. Our company has grown so much from positive testimonials and referrals from our happy clients. We use top of the line products, while keeping close relations with our Certified Vendors, always able to provide Superior Home and Business solutions.
BarrWood Services
(586) 488-4002 www.barrwoodservices.com
Serving
4.9 from 111 reviews
Detroit Gonano offers roof protection, restoration, and rejuvenation services to homeowners and commercial property owners in Macomb, Wayne, Oakland and St. Clair Counties. We are fully licensed and insured with references to back it up! We are now the exclusive dealer for Gonano products including Cement saver, Wood Saver, Revive, and Shingle Saver treatment in St Clair, Macomb, Oakland, Wayne and Washtenaw counties. Our partner Barr-Wood Services is a fantastic compliment to our services. With over 20 years experience in the industry, look no further for your repair needs! Underbelly, heat tapes, roofing, skirting, entry doors and subfloor repairs, window and door replacements are just a few of the services we offer.

Clean Roof Today
(586) 221-2558 www.cleanrooftoday.com
Serving
5.0 from 36 reviews
Clean Roof Today is a Michigan based roof cleaning company committed to quality, efficiency, and affordability. If you're a homeowner, realtor, or investor then give us a call and find out why our customers love our services. From asphalt shingle roofing to tile or slate roofs, our experienced contractors have you covered. We offer free quotes!

J&J Roofing Michigan
(586) 445-6455 www.jjroofing.com
Serving
4.8 from 175 reviews
Family-owned and operated for over 30 years, J&J Roofing is Macomb County’s go-to roofing company for high-quality, reliable service. Based in Roseville, Michigan, our experienced team proudly serves homeowners across Warren, Sterling Heights, Clinton Township, Shelby Township, and all surrounding areas. Whether you need new roof replacement, roof repair, or gutter installation, we’re here to protect your home with craftsmanship you can trust. From minor roof repairs to major storm damage restoration, no project is too big or small. When you choose J&J Roofing, you’re choosing local expertise, affordable pricing, and a reputation built on integrity and customer satisfaction. Call today for estimate.

Acs Roofing
(586) 800-3558 www.acsroofers.com
Serving
5.0 from 114 reviews
ACS Roofing is a family-owned and operated roofing company that has been servicing Michigan's Southeastern Tri-County area for more than 20 years. We specialize in both residential and commercial roofing, and our professionally trained installers complete 90% of installs the same day. We take pride in our work, and one of our core values is to always leave your property cleaner than when we arrived. If you're looking for a reliable, experienced, and affordable roofing company, ACS Roofing is here for you.
Roofing Above All | Ridgecon Construction
(586) 803-3626 roofingaboveall.com
Serving
4.9 from 262 reviews
We go above and beyond because we care about more than your roof. We care about the people living under it. That’s why our licensed builders and authorized installers ensure that your home is protected by an integrated roof system. Our roof company also offers gutter installation and gutter guards, vinyl siding, attic insulation, and skylights. The expert team of roof installers has dedicated their lives to making families happy. We offer various roofing services and we excel at all of them. Years of experience and satisfied customers testify to this.
Henson Building Company
(586) 301-7888 hensonbuildingcompany.com
Serving
4.8 from 18 reviews
Henson Building Company is more than just your average roofing contractor. Our experienced team of professionals treat every project as if it were their own. Combining over 20 years of experience with a commitment to delivering the highest quality materials at competitive prices, Henson Building Company is trusted to get any job done right the first time. We offer roofing, siding, and gutter installation services throughout southeastern Michigan, ensuring exceptional customer service each step of the way.

RooFit
Serving
5.0 from 15 reviews
RooFit is a roofing service provider in Southeast Michigan. Our team is dedicated to offering high quality, efficient, and affordable roofing solutions to residential and commercial properties.
Typical Macomb pricing runs about $350-$700 per square for asphalt shingles, $600-$1100 for metal, $1000-$2000 for clay tile, $900-$1600 for concrete tile, $600-$1100 for wood shingles or shakes, and $500-$900 for synthetic or composite shingles. This range reflects the aging Southeast Michigan housing stock that dominates the area, where many roofs were installed years ago and are now due for re-roofing under winter freeze-thaw cycles and spring weather. The numbers above are useful benchmarks when you start talking with contractors, because they map to the common material options you'll see offered locally.
Storm-driven demand spikes in Macomb can push scheduling pressure and pricing, especially after spring hail and wind events when many homeowners seek estimates at once. If a hail event leaves insurance-adjusted work piling up, you'll notice shorter windows for decision-making and potentially premium scheduling fees or expedited arrival windows. In those weeks, material availability can tighten and crews may charge a premium for rush projects. Planning ahead, when possible, helps you avoid post-storm price spikes and aligns your insurance timeline with contractor scheduling.
Asphalt shingles remain the baseline choice for many homes, with pricing in the low to mid range. Metal roofing sits higher, reflecting longer service life and installation complexity. Clay and concrete tiles push the cost substantially higher, especially on homes with steeper pitches or complex layouts common in older Macomb subdivisions. Wood shingles or shakes skew toward the upper mid-range, while synthetic or composite options sit in a mid-to-lower mid range. Understanding these bands helps you weigh long-term value against upfront cost, particularly when spring storms are on the horizon and you're balancing insurance timelines with your roof's remaining life.
Get a clear picture of your project costs upfront - no commitment required.
Tri-County Roofers
(586) 489-7663 tricountyroofers.com
46108 Allentown Drive, Macomb, Michigan
4.8 from 24 reviews


In Macomb County municipalities, a full re-roof generally requires a building permit rather than being handled informally. The permit process is a practical step that aligns with how winter freeze-thaw cycles, spring storms, and older housing stock stress the roof system here. The roofing contractor typically takes on the permit application on the homeowner's behalf, coordinating with the building department to ensure the project scope, materials, and venting plans meet local code expectations. Expect a quick planning note from the contractor about required documentation, such as a permit application, project plans or roof layout, and any necessary notices for neighboring properties. Timelines can vary by township or city, but the key is to start early so weather-driven work windows aren't missed.
Final inspections serve as the closing checkpoint that confirms the roof replacement was installed to code and is weather-ready for Michigan winters. In this market, inspections commonly verify ventilation, underlayment, and flashing as critical components of a durable roof system. Ventilation checks ensure attic air is moving properly, which helps manage condensation and ice dam risk during cold spells. Underlayment verification confirms the roof deck is properly protected against moisture, a crucial factor when rapid temperature swings occur after heavy snows. Flashing inspections focus on spots where the roof meets walls, chimneys, vents, and skylights to prevent water intrusion.
Some municipalities may add wind-related checks or insulation-related requirements as part of the final inspection. Knowing this ahead of time helps align the project plan with local expectations. If existing insulation conditions are suboptimal, the contractor may propose improvements as part of the reroof project or coordinate with the homeowner to address these during the same visit. Weather patterns in this area-frequent freeze-thaw cycles followed by spring hail and wind-mean inspectors may pay close attention to how the roof edge, valley flashings, and step-flashings are sealed and sealed again during the final walkthrough.
Coordinate with the contractor to ensure the permit application is completed promptly and accurately, including any required plans or notes about attic ventilation and roof penetrations. Schedule the final inspection promptly after the roof installation is finished, ideally within the same weather window to avoid rustling weather delays. Have any manufacturer installation certificates or warranty documents on hand for the inspector, as this can streamline the final review and help preserve coverage for the new roof in the coming years.
Winter snow load and freeze-thaw conditions in Macomb can both stress roofs and limit safe access for full tear-offs. Snow accumulation adds weight and can conceal damage, making inspection and accurate assessment harder. Freeze-thaw cycles push shingles and underlayment through daily stress, which accelerates wear even before a roof is scheduled for replacement. When temperatures dip, ladders, ice, and slick surfaces create safety concerns for you and any crews. In practice, winter work often forces postponement of complete tear-offs until conditions improve, or it prompts a staged approach that prioritizes securing the interior against leaks first. If a leak is active, a temporary patch may be necessary, but it should be treated as a stopgap rather than a long-term solution.
Fall temperature swings in Macomb can affect shingle installation conditions and adhesive performance late in the season. Cooler mornings followed by warmer afternoons can cause shingle materials to behave differently on the roof, and some adhesives or sealants may not cure as intended when odds of freezing nights rise. Proper ventilation and careful sequencing become more important as days shorten and weather windows shrink. The window for a full, properly executed replacement contracts toward late fall when conditions are consistently mild, dry, and above freezing, reducing the risk of wind uplift or rushed installations. When a full replacement isn't feasible, preparation steps like flashing checks, underlayment integrity, and roof-to-wall details can still help protect the structure until a planned, warmer installation window.
Because of these seasonal constraints, Macomb homeowners often need to decide between temporary repair and full replacement timing rather than assuming immediate year-round replacement is practical. Evaluate the severity and location of leaks, the existing roof's structural condition, and the likelihood of a persistent freeze-thaw cycle or winter storm impact before committing to a plan. If a full replacement must wait, ensure temporary measures limit interior damage and preserve insulation and ventilation. For most homes, aligning the main replacement with a snug weather window in spring or early fall yields the best balance of safety and long-term performance.
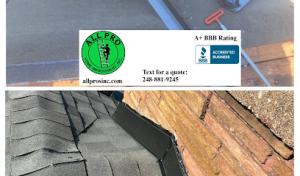
In Macomb's freeze-thaw climate, flashing around skylights and chimneys is a recurring vulnerability because expansion, contraction, and ice can open leak paths. These areas see more stress than the surrounding roof and can start with a single hairline seam that widens after a winter storm. If a leak develops, it often travels along the flashing and into the attic before a homeowner notices any seepage on ceilings or walls.
Look for damp staining around skylight edges, peeling interior paint near chimneys, or frost on flashing after a cold night. Even dry-looking roofs can harbor hidden leaks where two different materials meet. Ice dams can push against flashing and force water inward, especially where shingles butt up to a skylight curb or a chimney chase. In this market, those indicators tend to appear after a spring thaw or following a windy hail event.
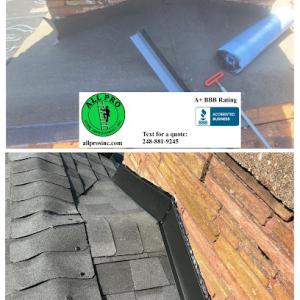
Local contractor signals show meaningful demand for both skylight-related roofing work and chimney-adjacent roof work in this market. Final inspection attention to flashing in Macomb municipalities makes these penetrations more than a cosmetic issue during re-roof projects. During replacement, verify that flashing is continuous, properly sealed, and integrated with the new roof surface. Have all skylight and chimney flashings reviewed or upgraded as part of the project to prevent repeat problems in future winters.
Practical mitigations for a region with freeze-thaw cycles start with proactive flashing checks before the snow flies and again after any winter storm. Have ridge and valley flashes around skylights re-seated and resealed, and insist on continuous counter-flashing that channels water up and away from the curb. Chimney chase terms should be tied into the roof system with sealant and backing. During re-roof work, request a flashings survey, focusing on transitions where metal meets asphalt or tile. A targeted approach here saves interior damage and avoids repeated visits after spring thaws.
Find contractors experienced in skylight installation, flashing, and leak repairs to bring natural light into your home.
Leading Edge Roofing
(586) 843-6579 www.leadingedgeroofinginc.com
52259 Melody Dr, Macomb, Michigan
5.0 from 71 reviews

Roofing Above All | Ridgecon Construction
(586) 803-3626 roofingaboveall.com
Serving
4.9 from 262 reviews