Last updated: Apr 19, 2026
Lake St. Clair shoreline exposure means meltwater repeatedly refreezes at eaves, building thick ice along the gutter line. Freeze-thaw cycles in cold, snowy winters punish roofs that are not prepared for edge stress. Wind-driven snow and moisture exposure along canals can push moister air and drifting snow toward the roof edges, accelerating ice dam formation and edge leaks. When an ice dam backs up meltwater behind it, that water finds any crack or flashing weakness and forces leaks into ceilings, walls, and insulation. The local pattern is a ticking clock: every thaw raises the risk, and every new round of cold snaps compounds the damage. Without urgent attention, small drips can become rapid interior water intrusion during the next storm.
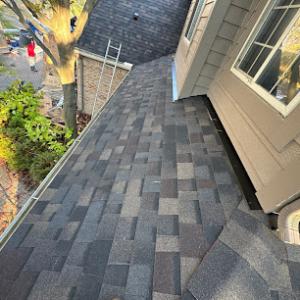
Edge leaks in this climate are not cosmetic concerns; they signal flashing and drip edge stress from ice dams and wind-driven moisture. The most vulnerable areas are along the eaves, parapet walls, skylight flashing, and chimney-to-roof transitions. In canal-adjacent neighborhoods, gusts can slam moisture into roof penetrations with more force, pushing water under shingles and behind flashing where it can travel unseen. Seasonal snow piles up on horizontal decks and overhangs, then melts and refreezes, widening small gaps into big leaks. If winter snow and ice are a stated local seasonal risk, then the roof must be treated as a dynamic system that responds to temperature swings, wind, and constant moisture exposure-not a static shield.
Start by inspecting around the perimeter for lifted shingles or missing granules along the eaves, which are early warning signs of ice dam stress. Look for white ice ridges or blue ice along gutters after a storm-these indicate dam formation and possible gutter or drip-edge failures. Check attic ventilation and insulation gaps; cold attic spaces under the roof deck invite more warm roof heat into the eaves, feeding dams. If there are existing stains or curling drywall near the ceiling, treat them as urgent indicators of hidden leaks that may worsen with the next thaw. For roofs with skylights or complex flashing, pay close attention to flashing joints and sealant lines, which often crack first when winter winds howl off the lake.
Coordinate a proactive plan that targets edge protection and rapid leak response. Install or upgrade ice barriers or heat tape at critical eaves and along valleys where meltwater concentrates, ensuring the system is designed for wind-driven exposure. Seal gaps around penetrations and ensure drip edges extend past fascia to direct water into gutters. Create a rapid-response leak kit with a waterproof tarp, utility knife, and roofing tape for a quick containment of active leaks during a storm cycle. Schedule seasonal inspections before the peak freeze-thaw period, and plan for fast access to temporary temporary fixes that buy time until a full repair can be scheduled after the worst winter passes. In areas near the lake or canals, treat every severe runoff event as a signal to reassess edge protections and flashing efficiency, because repeated storms will stress the same weak points year after year.
Spring storms slide in quickly along the Lake St. Clair shoreline, bringing heavy rainfall and gusty winds that test weak points on aging roofs. In this area, underlayment and decking can become exposed if work is timed poorly, leaving attic spaces vulnerable to rapid water intrusion. The canal-adjacent neighborhoods feel the impact first, with wind-driven debris and saturated eaves that push moisture toward vulnerable seams. Plan ahead for rapid response if a storm hits: you need to be ready to check for new leaks, shingle curling, or soft spots in the roof deck as soon as the rain stops.
After a storm event, you must treat every drip as a potential sign of more than a simple fix. Begin on the ground, looking for novelties like shattered shingles, granule loss, or dented fascia. Go into the attic only if you have safe access and light; look for water trails, dark staining, or compressed insulation near rafters. If you see daylight from the attic, feel for air leaks around vent stacks and chimney flashing. In this climate, fast leak response matters because repeated freeze-thaw cycles can magnify minor breaches into larger headaches, especially where ice dams could form once temperatures dip again.
Michigan homeowner policies typically cover hail and wind damage, so documenting the storm's impact becomes part of a practical recovery plan. Gather photos and notes soon after the event: dates of the storm, visible damage, and any interior signs of leakage. Keep a log of roof-related concerns you notice over the weeks that follow, because insurers often request a timeline of events. This region experiences recurring weather-driven losses, and solid documentation can streamline claims when the data is freshest.
The local contractor market shows a strong prevalence of storm-damage and insurance-claims specialization, indicating that weather-related roof loss is a common homeowner concern here. Seek a crew with verified experience handling lakeshore exposure, including wind-driven moisture and rapid repair turnarounds. Look for references from neighbors who faced spring interruptions and can attest to a contractor's responsiveness, documentation quality, and ability to work with insurance adjusters. Clear communication about sequencing-covering vulnerable sections first, then addressing flashing and underlayment-helps prevent staging delays that let rain creep back in.
Prepare for the season by prioritizing flashing integrity around chimneys, vents, and edge metal, especially where canal winds push spray onto roof edges. Trim back overhanging branches that could shear during a storm, reducing the risk of shingle damage and accelerated granule loss. Install or upgrade ice and water shield along eaves and valleys where runoff from higher gutters can pool, a common weak point after a long winter. Finally, keep gutters clear and downspouts aimed away from the home's foundation to reduce pooling near roof lines, which otherwise compounds leakage risks during heavy rain events.
Find local contractors experienced in assessing and restoring roofs after hail, wind, and severe weather events.


Leach Construction
(586) 822-1981 leachconstruction-mi.com
Serving
5.0 from 73 reviews
Welcome to Leach Construction, LLC Your Trusted Partner for Quality Roofing Solutions Serving Wayne, Oakland, Macomb, St. Clair, and Washtenaw counties, Leach Construction, LLC is a family-owned company with roots dating back to the 1960s. Based in St. Clair Shores, we specialize in residential and commercial roofing systems, as well as siding, gutters, and deck installations and renovations. Whether you need a new roof for your home or a reliable commercial system for your business in Metro Detroit, our experienced team is committed to delivering durable, efficient solutions tailored to your needs. At Leach Construction, we take pride in craftsmanship, precision, and customer satisfaction—building with care, every step of the way.

Bach Roofing Company
(586) 244-2086 www.bachroofingcompany.com
Serving
5.0 from 105 reviews
Your local family-owned, quality St. Clair Shores roofing company. Bach Roofing Company can handle all your residential & commercial roofing needs. From minor repairs to full roof replacement. While we're based out of St. Clair Shores, we service homes and businesses in cities all over Metro Detroit, including Grosse Pointe, Grosse Pointe Farms, Grosse Pointe Park, Harrison Township, Chesterfield, New Baltimore, Macomb, Clinton Township, and Shelby Township.
BCD Roofing
(313) 707-4747 www.bcdroofing.com
Serving
4.9 from 113 reviews
Roofing, Siding, Gutters Installation Experts; Licensed and Insured; Serving Macomb, Oakland, and Wayne counties

J&J Roofing
(586) 445-6455 www.jjroofing.com
Serving
4.6 from 10 reviews
Family-owned and operated for over 30 years, J&J Roofing is Macomb County’s go-to roofing company for high-quality, reliable service. Based in Roseville, Michigan, our experienced team proudly serves homeowners across Warren, Sterling Heights, Clinton Township, Shelby Township, and all surrounding areas. Whether you need new roof replacement, roof repair, or gutter installation, we’re here to protect your home with craftsmanship you can trust. From minor roof repairs to major storm damage restoration, no project is too big or small. When you choose J&J Roofing, you’re choosing local expertise, affordable pricing, and a reputation built on integrity and customer satisfaction. Call today for estimate.
5 Star
Serving
4.8 from 38 reviews
We are well aware most people don't want to think about replacing their roof or windows. Maybe you have storm damage or maybe your roof is old and needs to be replaced either way we all have to do it eventually. At 5 Star we want to make your next home improvement a pleasant memory, we will get your project finished and cleaned up in a timely manor. We know the key to impressing you is simple, fix the problem quickly for a good price. I will be the first to tell you that we can definitely make that happen! Give 5 Star the chance to shine and I am certain we can leave you satisfied.

Shelby Construction Services Roofing Siding Windows
(833) 674-3529 www.shelbyconstructionservices.com
Serving
4.8 from 167 reviews
Shelby Construction Services is a trusted exterior remodeling and roofing contractor based in Clinton Township, MI, proudly serving all of Macomb County. Voted the #1 Roofing Contractor in the area, we specialize in roof replacement, siding installation, window replacement, and seamless gutters. Whether you need a full exterior upgrade, or roofing, siding or window replacement our licensed and insured team delivers quality craftsmanship with honest pricing. Financing options are available to make your project affordable. Call today for a free estimate on roofing, siding, or window replacement in Macomb County and surrounding Michigan communities.
Michigan Home Restoration
Serving
4.9 from 71 reviews
Michigan Home Restoration is the leading Roofing Company in the Tri-County area. We’re a team of fully-certified professionals who tackle everything from large, complex projects to smaller scale jobs. Fueled by our commitment to excellence, we go the extra mile to make sure clients are completely satisfied with our work. Call us today to schedule a FREE Inspection.
Covered Construction
(586) 630-0814 www.coveredconstructioncompany.com
Serving
5.0 from 62 reviews
Covered Construction is a licensed and insured roofing contractor serving Macomb, Oakland, and Wayne County. We provide expert roof replacement, siding replacement, gutter replacement, skylight repair, window replacement, roof repair, storm and hail damage inspections, emergency leak detection, and flat roofing systems including EPDM, TPO, and tile. Our certified team (GAF, CertainTeed, Velux, Lomanco, HAG) delivers high-quality roofing for residential and commercial properties acrossChesterfield • Macomb • Shelby Twp • Clinton Twp • St. Clair Shores • Grosse Pointe • Troy • Royal Oak • Novi • Sterling Heights • Bloomfield • Birmingham • West Bloomfield • Bloomfield Hills • Madison Heights • Utica • New Baltimore, Metro Detroit areas.
L&S Home Improvements
(586) 879-7006 www.lnshomeimprovements.com
Serving
4.9 from 305 reviews
L&S Home Improvements, located in Warren, MI, is your premier roofing company serving Southeast Michigan, including Macomb, Oakland, and Wayne counties. With a specialization in roofing installation, siding, and gutters, our experienced team of roofers is dedicated to delivering top-quality craftsmanship and exceptional service. Having completed over 1,600 roofs in the area, we take pride in our reputation for reliability and excellence. Whether you need a new roof, roof repairs, or a complete roofing system overhaul, trust L&S Home Improvements to protect and enhance your home. Contact us today for a free inspection and no-obligation quote. L&S Home Improvements will take care of all your roofing, siding, and gutter needs!
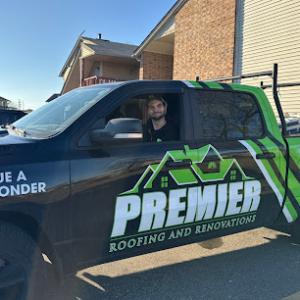
Premier Roofing & Renovations
(888) 770-4245 premierenovations.com
Serving
4.6 from 180 reviews
Established in 2015, Premier Roofing & Renovations serves Southeast Michigan with residential and commercial roof replacement, repair, siding, and gutters. We are an Owens Corning Platinum Preferred installer, storm-damage experts, and provide detailed inspections for aging or damaged roofs. Our Fraser office is staffed Monday–Friday, 9 AM–5 PM, and visits are available by appointment. After hours our call center schedules next-day service. Manufacturer-backed warranties, licensed and insured, and trusted by Michigan homeowners for dependable craftsmanship and honest service.
Monarch Roofing Company
(248) 238-8322 www.monarchroofco.com
Serving
5.0 from 15 reviews
Roof Repairs and Replacements

Select Renovations
(586) 541-8821 selectrenovations.build
Serving
4.9 from 60 reviews
With over 30 years of combined experience, Select Renovations provides top-notch roofing services in Fraser, Michigan. We specialize in Residential Roofing Installation, Residential Roofing Repair, Roof Leak Repair, Commercial Roofing Installation, Metal Roofing, Commercial Roofing Repair, Roofing Inspections, and Emergency Roofing Repair. As certified Duro-Last contractors with Elite Contractor status, we ensure quality, professionalism, and integrity in every project. Contact us today to experience the Select Renovations difference! Fully Licensed & Insured SELECT THE BEST, WE'LL DO THE REST!
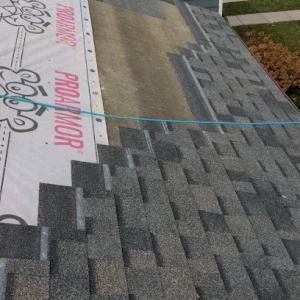
Asphalt shingles are the dominant local material and are well matched to the large re-roofing market here. In winter, the key to long life is adequate attic ventilation and effective ice protection along eaves and valleys. When the attic breathes properly, freeze-thaw cycles won't trap moisture against the decking, and your shingles won't be forced to bear extra stress from hidden frost. In windy lake-influenced neighborhoods, ensure the shingles are fully secured at edges and around penetrations, since lifting can begin at the most exposed corners first. If your home uses a vented or cathedral roof, consider upgraded underlayment and a ridge vent strategy that keeps the roof deck dry through rapid temperature swings.
Metal roofing is present in the market and can appeal for snow shedding and overall durability. Its reflective surface and rapid shedding help keep ice from building up on the roof surface, which is a practical advantage during heavy lake winds. However, detailing at edges, penetrations, and transitions matters in windy lake-influenced conditions. Pay particular attention to ridge and eave closures, as wind-driven moisture can find pathways under improper seals. If choosing metal, select a profile that minimizes panel overlaps at corners and consult a professional about flashings around chimneys, skylights, and vent pipes to prevent ice dams and leaks caused by wind-driven meltwater.
Clay tile, concrete tile, synthetic/composite, and slate are available locally but require attention to structural load, specialized installation, and building-department review when unusual materials are proposed. These materials carry significant weight, so the supporting structure must be evaluated for the added load, especially on older or smaller homes. Installation complexity rises with wind exposure and the need for integrated ice and water shield details at parapets and valleys. If choosing any of these options, work with a roofer who has specific experience with coastal climates and with the local crews who understand how these products behave under freeze-thaw stress and snow loads in lake-adjacent settings.
In winter, prioritize robust ventilation, a continuous ice barrier along eaves, and high-quality underlayment that remains pliable in cold temperatures. Take a long view of edge treatments where wind and water meet the roof; this is where leaks often begin after a heavy thaw or a sudden freeze. For any non-standard material, insist on a detailed installation plan that covers fastener patterns, flashing methods, and drainage path continuity. This approach helps ensure your roof resists the combined forces of ice, wind, and surface runoff common to Lake St. Clair shoreline exposure.
When you price a roof here, you'll notice local averages align with climate-driven needs. Asphalt shingles run about $350 to $800 per square, metal roofs typically $600 to $1100, clay tile $900 to $1500, concrete tile $800 to $1400, synthetic/composite $650 to $1100, and slate $1400 to $2500 per square. These ranges reflect the Lake St. Clair shoreline exposure, where wind, freeze-thaw cycles, and rapid winter leaks push project scope a bit higher than inland climates. In Saint Clair Shores, you'll often encounter crews that tier pricing for the most common residential layouts, plus travel time and access on canal-adjacent lots.
Costs in Saint Clair Shores can rise when winter damage creates surge demand for quick-response crews or when spring rain compresses installation calendars. If a storm exposes more water intrusion or ice-dam risk, you may experience premium scheduling, expedited material procurement, and higher labor rates. The same pattern shows up after heavy snows melt, as crews juggle projects to meet short windows before the next freeze. Plan for potential cost bumps if you need immediate replacement or mitigation work during peak season.
Homes with skylights, chimneys, low-slope sections, or heavier premium materials can cost more because these conditions are common enough locally to support dedicated specialty contractors. Skylight flashing, chimney step details, and valley complexity add complexity and materials. A low-slope section requires different underlayment and drainage planning, which can shift the overall price. If you're weighing premium materials, the added weight or structural adjustments may demand higher contractor expertise and equipment.
Start by obtaining multiple written bids with clear scope: exact materials, ice-dam prevention measures, underlayment, ventilation, and insulation considerations. If you're replacing during winter or early spring, ask about crew availability and lead times to reduce the risk of weather-driven delays. For homes with multiple special features, request a dedicated line item for each element to avoid surprise charges later. Keep in mind the stated cost ranges as a guide, and discuss preferred installation sequences that minimize exposure to lake-facing winds and freeze-thaw stress.
Get a clear picture of your project costs upfront - no commitment required.

Shelby Construction Services Roofing Siding Windows
(833) 674-3529 www.shelbyconstructionservices.com
Serving
4.8 from 167 reviews
Pankow n Sons Roofing & repair
(586) 216-6141 www.pankowandsonsroofing.com
Serving
4.9 from 38 reviews
The City generally requires a building permit for a full roof replacement, so you should plan this step early in the project. Permit review looks at the scope of work, materials chosen, and structural considerations to ensure the roof can withstand Lake St. Clair's winter winds and the freeze-thaw cycles that are common here. Submitting clear details-type of roofing material, underlayment, fasteners, and any ventilation upgrades-helps move the review along. Inspections are not a one-and-done moment; they begin with rough-in checks and continue through the project, finishing with a final inspection to confirm everything meets code and local standards.
Minor variations or unusual roofing materials may trigger added review by the building department before approval. In practice, that means if you choose alternatives to standard asphalt shingles-such as metal, tile, or composites-be prepared for a closer look at how those choices interact with attic ventilation, drainage, and chimney or vent penetrations. The department will want to see details that demonstrate safe installation under the specific weather patterns this area experiences, including wind exposure from canal-adjacent neighborhoods and potential snow load considerations on flatter, lower-slope roofs.
Inspections are scheduled during and after work. Start with the rough-in inspection to verify roof structure, substrate integrity, venting, and proper flashing details before coverings proceed. Mid-project checks help catch issues early, such as improper underlayment or misaligned drip edges-mistakes that can worsen leaks during freeze-thaw cycles. The final inspection verifies that all elements are completed to code and that the roof is properly sealed against moisture intrusion. To avoid delays, keep permit-related documents on site, including approved plan sets, product data for the chosen roofing systems, and any manufacturer installation requirements that affect ventilation and drainage.
Note that added review time can occur if the project involves property line concerns, historical details, or neighborhood-specific rules tied to canal-adjacent parcels. Given the climate realities here, accurate documentation of attic ventilation, insulation upgrades, and proper drainage convergence is especially important, as these factors influence long-term performance against ice dam formation and winter leaks. In Saint Clair Shores, permits are issued after submission and review of project details, and inspections are scheduled during and after work, including rough-in and final inspection stages.
In Michigan, homeowner policies typically cover hail and wind damage, but coverage can be limited for older roofs or where maintenance history is weak. When a storm wheelhouses through Lake St. Clair shoreline properties, that distinction matters more than ever, because repeated freeze-thaw cycles quietly stress shingles, underlayment, and flashing. If a roof shows its age, insurers may apply depreciation or partial-denial tactics, leaving a homeowner facing unexpected out-of-pocket repair decisions. Being aware of how age and wear influence claim outcomes helps you set realistic expectations after a severe wind event or hail hit.
Insurers may request detailed estimates and photos, and adjusters often evaluate roof age and material when deciding claim outcomes. Collect clear, dated images of all affected areas, especially cross-slope leaks, ice dam remnants, and any visible shingle failures along roof edges. Maintain records of past repairs, contractor notes, and any signs of prior water intrusion inside the attic or ceiling. When a storm arrives, document progression of leaks over days or weeks, not just the immediate aftermath, since the local climate can create both sudden and cumulative damage patterns.
For homeowners in this canal-led, lakeside community, winter leak progression can mirror shifting lake winds and drifting ice, so post-storm conditions should be scrutinized before filing. Be prepared to explain how in-season weather events align with observed roof performance, including ice dam formation, wind-driven moisture, and the timing of any interior leaks. A neighborly reminder: insurers value precise, neighborhood-specific context, and documenting scene-by-scene changes helps translate weather into policy realities.
Eaves and gutters are the first line of defense against meltwater that refreezes along the roof edge. In Saint Clair Shores, repeated freeze-thaw cycles form ice at the perimeter, and that ice can push under shingles or create ice dams that back up water into soffits and down walls. Inspect gutters after heavy snows and thaws, looking for loose hangers, sagging runs, or debris that blocks drainage. If you see ice buildup at the eaves, clear the gutter path carefully from the edge inward on dry days, and consider installing stronger hangers or larger downspouts to improve runoff. Add a clear ice shield over the vulnerable eave line during replacement projects where practical, and seal any gaps where water can ingress at the fascia. Regularly check roof-to-wall transitions at this edge, especially where soffit vents meet attic spaces, because small gaps become leak paths once ice forms.
Skylights and chimneys matter locally because enough contractors advertise these specialties to indicate recurring leak and flashing work in the city. Inspect flashing and seals around skylights during seasonal checks, paying attention to any cracking or lifting where metal flashing meets plastic lenses. For chimneys, examine step flashing and counter-flashing where the brick meets the roofline; look for mortar deterioration and signs of moisture inside attic corners beneath the flue. In areas with windy lake exposure, flashing often needs attention after storms. When hiring, verify experience with this combination of roof edge and vertical penetrations, and request a thorough inspection of all flashing around these features during routine maintenance or after heavy weather.
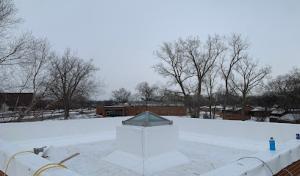
Low-slope roof sections are relevant in this market because flat-roof specialists are active, suggesting many homeowners need help with transitions, drainage, or membrane details in addition to steep-slope roofing. Check for ponding water or slow drainage on flat areas, and verify that edge drains, scuppers, and drip edges are clear. Inspect membrane seams for signs of splitting, bubbling, or punctures, especially around transitions to steeper sections or at roof-to-wall interfaces. Pay attention to poor parapet capping or wind-driven moisture that can lifted edges. If you notice moisture staining inside the attic or ceiling directly beneath a flat roof, prioritize a professional assessment of the membrane and flashing at those high-risk joints.