Last updated: Apr 19, 2026
Eatontown sits in Monmouth County close enough to the Jersey Shore that coastal storm systems and nor'easters can still drive wind-blown rain into vulnerable roof areas even though the borough is not directly oceanfront. That means even a routine autumn shower or a late-winter wind gust can push moisture into seams, vents, and flashing where other towns might see slower, more predictable leaks. The combination of humid summers, freeze-thaw cycles in winter, and regular precipitation year-round creates a rhythm of small, persistent failures that can escalate quickly if left untreated. The single most important thing you can do is treat every physical sign of moisture as a problem that needs immediate attention rather than waiting for a full replacement to be necessary.
The local contractor signal mix shows emergency repair and storm damage as the two strongest specialties in this market, indicating homeowners here commonly need rapid leak response after wind and rain events. That means you should expect nearby contractors to respond with urgency, provide temporary protection to keep water out, and quickly assess which pieces failed and why. Storm-driven leaks often come from wind-driven rain that finds microcracks around flashing, chimney rims, vent boots, or edge metal-areas that may look minor at first but can unleash interior damage within hours of a heavy shower. When a storm hits, the ability to mobilize, tarp exposed sections, and schedule a follow-up inspection becomes nearly as valuable as the initial fix itself.
Because of the climate pattern, small flashing or shingle failures often become interior leak problems before homeowners plan a full replacement. Watch for damp ceilings near vents or bathrooms, musty attic smells after a rain, or staining along chimney lines and roof-to-wall transitions. In Eatontown's mix of roofing styles-shingles, metal, and occasional tile-every material has its own failure fingerprints. Metal roofing may show loose fasteners or lifted edges after a storm; asphalt shingles can reveal lifted tabs or granule loss; tiles may crack or shift when driven by wind or freezing cycles. If you notice any moisture intrusion, treat it as an urgent matter. Quick temporary measures-covering openings with a tarp, directing water away from the interior, and scheduling an inspection-can prevent a small leak from becoming a costly interior repair.
Timing matters because the average year in this area brings rain and freezing days in close succession. A small flashing repair now can avert a bigger, more invasive roof replacement later. Prioritize inspections after any significant windstorm or heavy rain, especially if you observed a lack of routine maintenance or signs of wear around flashing, roof penetrations, or edge details. When arranging a repair, seek a contractor who can deliver both a rapid emergency fix and a comprehensive assessment within a short window. The goal is to restore integrity quickly and then design a targeted plan for the next steps, whether that means reinforcing flashing, resealing seams, or scheduling a controlled replacement before subsequent colder snaps or storms stress the structure further.
A proactive homeowner approach reduces the chance that a storm will create interior water problems. Schedule seasonal inspections that focus on the most vulnerable zones: roof-to-wall joints, chimney and skylight flashings, vent penetrations, and the eave line. Keep gutters clear to prevent backflow or ice dam formation during winter months, and address any recurring signs of moisture before they worsen. In this market, a fast, documented follow-up plan-cover, confirm, and repair-can keep a roof from becoming a cascade of leaks after the next coastal storm or Nor'easter. The better you are at catching issues early, the less time water has to travel from the roof into living spaces.
Spring offers a practical window for roof work because it bypasses the borough's harsh winter freeze and the peak heat of summer. In Eatontown, that means you can schedule tear-offs and replacements when temperatures are mild, humidity is manageable, and crews aren't battling icy eaves or saturated underlayment. Start by coordinating with a contractor as soon as the threat of frost subsides and morning dew is thinning. This helps ensure structural materials settle properly and flashing seals take hold before the heat of July. If spring rain lingers, pick a stretch with a dry streak of several days to minimize moisture intrusion during the early stages of tear-off and installation.
Fall presents another solid window, with cooler days and less intense humidity than peak summer. Plan the project so the bulk of installation and sealing is completed before the first hard frost. In practice, that means aiming to finish by late October or early November, giving shingles, underlayment, and sealants enough time to cure in stable temperatures. Fall scheduling also aligns with the typical slowdown in seasonal storms, reducing the risk of weather-driven delays that push work into winter. Have gutters and any necessary exterior touch-ups addressed beforehand, so the crew can focus on the roof without interruptions from loose debris or ice-prone eaves.
When summer humidity peaks, asphalt shingle installation conditions become more challenging. Underlayment can cure unevenly, and adhesive products may perform differently in damp air. If a roof project is unavoidable in July or August, plan for longer, staged sessions with the crew and allow for extra ventilation and drying time between steps. Clear access pathways to the roof and shade-providing areas for crews can help maintain consistent pacing. Consider postponing the most heat-sensitive tasks to cooler morning hours or late afternoons, and ensure your contractor uses breathable, properly vented setups to minimize moisture buildup behind the scenes.
Winter ice dam formation and freezing temperatures in this part of Monmouth County can delay tear-offs and create extra stress on eaves, gutters, and lower roof edges. If winter work is necessary, prepare by pruning nearby branches to reduce weight and runoff, and confirm that gutters are clear to prevent ice back-up. Expect potential stage delays during strong freezes, and plan related interior work (like attic insulation checks or soffit repairs) around the roof schedule to keep the project moving. A practical approach is to target a dry, cold-but-not-freezing period for critical sealing and flashing work to minimize the risk of buckling or subpar adhesion.
Get a clear picture of your project costs upfront - no commitment required.


Jar Roofing Repair
(848) 298-2710 jarroofingrepair.com
2 Industrial Wy W Suite 301, Eatontown, New Jersey
5.0 from 4 reviews
Jar Roofing Repair, a trusted roofing contractor in Eatontown, NJ, offers exceptional solutions for all your roofing needs. Skillfully navigating the intricate world of roof repair, their dedicated team ensures impeccable results, ensuring your property remains guarded against the elements. With a profound understanding of roofing materials and techniques, Jar Roofing Repair is committed to excellence, delivering unparalleled craftsmanship that stands the test of time.

AA & B Builder
(609) 847-7231 aabbuilders.com
Serving
5.0 from 12 reviews
AA & B Builder is a family-operated construction and roofing company dedicated to excellence in the field. Based in West Long Branch, NJ, we specialize in residential roofing and offer a comprehensive range of services, including roof repair, roof replacement, roof maintenance, and more. Beyond roofing, our expertise extends to siding, metal roofing, and hardwood floor installations. Trust in our legacy of quality and craftsmanship for all your construction needs.
All Covered Roofing & Exteriors
(732) 963-5312 www.allcoveredroofing.com
Serving
5.0 from 80 reviews
Specializing in roofing, siding, and gutters, All Covered Roofing is a trusted company. Our dedicated team delivers exceptional craftsmanship and uses top-notch materials to protect and enhance residential and commercial properties. Whether you need roof replacement, siding work, or gutter services, we prioritize reliability, efficiency, and transparent communication. Trust us for durable, weather-resistant solutions that ensure your property remains aesthetically appealing. Contact us today for the highest standard of service in the industry.
Smith Builders Roofing & Siding
(732) 779-5273 smithbuildersnj.com
Serving
5.0 from 12 reviews
Smith Builders can repair, replace, and install roofs on residential homes or commercial buildings in Monmouth and Ocean County NJ. In addition we can install your siding and gutters. We will provide you with a full consultation to explain all of your available options so that you can choose the roofing plan that’s right for your home or business. We will work with you and adhere to your personal needs. Contact us today for an estimate. 732-779-5273

United Exteriors
(732) 403-4496 unitedexteriorsinc.com
Serving
5.0 from 41 reviews
Our great crew has been with us for many years and have worked on everything from residential to large and complex projects. Our crew is honest, loyal and has proven ability to self-perform produce quality work within budget.
Heritage Builders
(732) 813-0298 www.heritagebuildersnj.com
Serving
4.8 from 329 reviews
Heritage Builders is a high-end family-owned contractor specializing in roofing (all types), siding (all types), custom home building, additions, decks, windows, & renovations. We do both residential & commercial work and we are fully insured. We offer a wide range of construction services throughout New Jersey and Pennsylvania. We can help whether you need roofing, siding, gutters, a new deck, or an entire home. When you work with Heritage Builders, you can expect competitive pricing, along with quick & reliable service; all while keeping a clean, safe work environment.

American Dream Contractors
(732) 693-3281 americandreamsbuilt.com
Serving
5.0 from 14 reviews
American Dream Contractors is New Jersey’s trusted roofing company with over 40 years experience proudly serving homeowners across the state from our home base in Long Branch, Monmouth County. We specialize in standing seam metal roofing, asphalt shingle roofing, and custom gutter systems — delivering lasting protection, curb appeal, and value. Our team uses industry-leading products, backed by top-tier warranties and proven craftsmanship built on decades of experience. Whether you’re upgrading your home or repairing storm damage, we offer 100% financing and friendly, professional service every step of the way. Choose American Dream Contractors — where quality, reliability, and experience come together to protect your American dream.
Miller & Sons Roofing & Remodeling
(848) 360-3220 millersonsroofingremodeling.com
Serving
4.8 from 52 reviews
We specialize in both residential and commercial projects, ensuring top-notch results.

More Core Construction
(732) 531-5500 www.justroofit.com
Serving
4.9 from 115 reviews
We are NJ's exterior experts. We specialize in roofing, siding, gutters and windows. Call us for a free estimate today We also offer financing Just roof it!

mj lyons corporation
(732) 693-7150 www.mjlyonscorp.com
Serving
4.8 from 15 reviews
roof siding floors
Neighborhood Roofing
(609) 276-9557 www.neighborhoodroofingnj.com
Serving
5.0 from 23 reviews
Serves All of NJ, Monmouth, Ocean, Middlesex, Essex, Hudson, Bergen, Morris, and Passaic. At Neighborhood Roofing, we take pride in being one of NJ's most trusted roofing contractors. With years of experience and a team of skilled professionals, we are dedicated to delivering top-notch roofing services to our clients in all of NJ, Monmouth, Ocean, Middlesex, Essex, Hudson, Bergen, Morris, and Passaic.
Superior Siding & Roofing
(732) 229-1890 www.superiorsiding.com
Serving
4.4 from 27 reviews
Established by John J. Stillings, our company has had continued ownership and operated under the same familiar name of Superior Siding & Roofing since 1983. Our office and showroom is located in Ocean Township, New Jersey. We service all areas in central and southern New Jersey from points within Monmouth, Ocean, and Middlesex Counties.
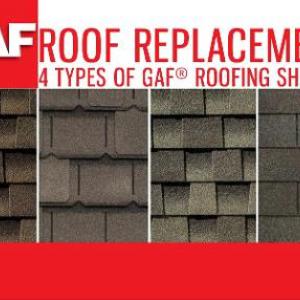
In this area, the dominant roof materials are asphalt shingles, metal roofing, clay tile, concrete tile, wood shingles or shakes, and synthetic or composite shingles. Local pricing reflects both material cost and the labor needed to handle penetrations from chimneys, skylights, and ventilation stacks common on many borough homes. Storm-driven demand spikes in Monmouth County can push scheduling and labor costs upward after major wind and rain events, especially for fast-turn re-roofing work. When planning, expect fewer price breaks during the peak season and more variability after a severe event, even if the material itself is familiar.
Asphalt shingles are the most common and usually the most cost-effective option in Eatontown, with a typical range of about 350 to 700 USD per square (one roofing square equals 100 square feet). In a storm-prone climate, asphalt can be a solid balance of cost and performance, provided underlayment and proper sealing around penetrations are prioritized. When the roof has multiple chimneys or skylights, or an irregular plane, installation time increases and so can the overall bill, even if the material remains affordable. For storm readiness, consider architectural or laminated shingles with better wind resistance and a thicker, more durable nailing zone.
Metal roofing runs from roughly 800 to 1,600 USD per square. The durability and fast installation make it appealing for storm-prone seasons, but the upfront investment is higher. In Eatontown, metal panels can pay off over the long term where frequent wind-driven debris or salt exposure from coastal spillover influences the area. The complexity of the roof plane matters here too: many homes have hips, valleys, and layered penetrations that require careful detailing, which can nudge the final price upward beyond the base ranges.
Clay tile typically ranges from 1,000 to 2,000 USD per square, while concrete tile sits around 900 to 1,900 USD per square. These materials offer strong resistance to wind uplift and can perform well in freeze-thaw cycles when correctly installed. However, they are heavier and require a robust structural assessment before installation, especially if existing framing is older or marginal. In Eatontown, the cost impact from roof penetrations and accessory work tends to be pronounced with tile, so expect higher totals where chimneys, skylights, or vent stacks are present.
Wood shingles or shakes clock in roughly 800 to 1,400 USD per square. They deliver a classic look but demand careful maintenance in humid summers and freezing winters to prevent rot and moisture issues. Local labor costs rise when crews need to address delicate edge work around dormers or skylights, and storm-driven work may require extra precautions to protect exposed fasteners and sealants. If a roof has several penetrations, costs escalate quickly due to the extra detailing and potential for more complicated flashing installs.
Synthetic or composite shingles run about 550 to 1,000 USD per square. They often balance favorable aesthetics with good performance against wind and moisture, making them a practical option in this borough. As with other materials, the final price hinges on roof complexity. Penetrations, vents, and skylight geometry can push labor time and associated costs higher, particularly after a storm when crews are in high demand.
In practice, storm-driven demand spikes can affect every material class. When a major wind and rain event hits, scheduling becomes tighter and labor costs can rise due to expedited timelines and the need for quick, reliable leak patching. Homeowners should plan for potential short-notice assessments and weather-driven delays if replacements are staged in the wake of a storm. A well-structured plan that prioritizes critical leak areas and targets the most exposed roof planes can help keep costs predictable while maintaining storm readiness.
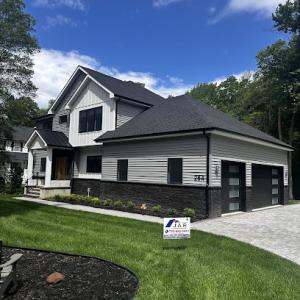
Asphalt shingles are a logical fit for Eatontown's dominant replacement market, but summer heat and humidity make correct ventilation and installation timing especially important. In this inland Monmouth County setting, attic airflow helps prevent premature curling and moisture buildup after long, damp summers. A properly vented roof deck also supports shingle longevity through the freeze-thaw cycles that arrive with winter. When you plan a re-roof, pair a quality underlayment with a breathable roof vent strategy and align it with your contractor's schedule for the warm months. The goal is to avoid heat-soaked installs that can trap moisture, and to keep attic temperatures from pushing the shingles to fail early.
Metal roofing has local relevance here because it handles regular precipitation well and is one of the borough's most commonly offered upgrade materials. Metal responds well to Atlantic humidity and coastal storms, and it often provides a longer service life with proper underlayment and fastener sealing. For a house with modest roof pitch, ensure the panels are sized for wind resistance and that the seals around chimneys and vents are detailed rather than rushed. In areas of frequent summer downpours, metal can shed water quickly, but attention to ridge closures and ventilation remains critical to prevent condensation indoors and within the roof deck.
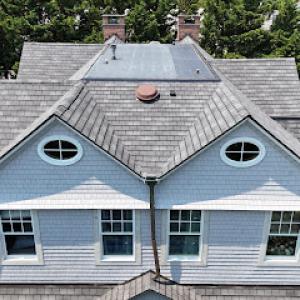
Clay tile, concrete tile, wood shake, and synthetic products appear in the market but require more careful matching to structure, slope, and maintenance expectations than standard asphalt re-roofing. These materials are more sensitive to roof pitch and to freeze-thaw exposure, which means slope thresholds and attic ventilation must be assessed before choosing them. Tile and shake can be attractive on certain houses, yet heavier weights demand structural confirmation and potentially upgrades to framing or trusses. Synthetic options can offer a balanced mix of weight, durability, and ease of installation, but still benefit from a thoughtful system design that anticipates Eatontown's humid summers and chilly winters. Before choosing any non-asphalt option, have a structural assessment done and ask for manufacturer-approved fastener patterns and underlayment choices. In this borough, a careful evaluation of seasonal moisture, coastal drift, and attic ventilation will influence material compatibility and long-term performance. Also verify warranty coverage for climate exposure and ensure bring-downs of heat during installation. Choose a local contractor with proven Eatontown experience.
In this inland Monmouth County town, a full roof replacement is not just a checkmark on a to-do list; it typically requires a permit through the borough's Building Department. That means you cannot treat the project as purely no-paperwork maintenance. If the work proceeds without proper paperwork, you risk stop-work orders, fines, and delays that ripple through timeline and warranty validity.
The local review process centers on three pillars before any shingle starts turning: project scope, contractor licensing, and code compliance. You will need a clear scope that outlines materials, components, and methods, because vague plans invite questions and setbacks. Ensure your chosen contractor holds the appropriate licenses and registrations, and that they are prepared to align the project with current code requirements for roof assemblies, ventilation, fire ratings, and anchor points. This is not the place to cut corners out of haste or to rely on informal assurances.
Inspections are not a one-and-done step; they are threaded into the work as it progresses. At each milestone-starting a roof removal, deck work, underlayment, and final placement-an inspector checks that what is being installed matches the approved plan and code standards. Missed or rushed inspections can trigger rework, additional permits, or even a halt to the job, especially during wind-up and storm seasons when repairs might collide with weather-driven priorities.
A final inspection is necessary to close out the permit. This last check confirms that the roof replacement complies with all applicable codes, that ventilation and drainage paths are correctly installed, and that any required drainage or flashing details meet local expectations. Without a successful final inspection, the permit remains open, and subassemblies can be deemed noncompliant, affecting warranties and future inspections on nearby projects.
Practical steps to keep the process smooth: start early by discussing the scope in detail with the Building Department and your contractor, and request a written plan and a permit timeline. Maintain open lines of communication with inspectors and address any deficiencies promptly. In a climate with humid summers and freeze-thaw cycles, timely permit handling helps ensure the project proceeds with proper weather protection and code-compliant installation, reducing the risk of leaks and subsequent rework. A careful, documented permit path protects both your home and your investment when storm readiness matters most.
Eatontown homeowners are affected by a coastal insurance environment even though the borough is inland, with wind and storm exposure influencing documentation expectations after loss events. When a claim arises after a coastal wind or a strong storm, the insurer will look for signs that paired up with wear-and-tear or storm-driven damage. Being prepared with clear records can prevent disputes that stall a repair or replacement.
Photo documentation and post-installation warranty records matter in this market because storm-related claims often receive closer scrutiny than routine wear-and-tear replacements. After a loss event, photos taken soon after the storm, showing roof condition and any standing water or debris, help prove the timing and cause of damage. Keep copies of all manufacturer warranties, roof system specifications, and installer notes. A simple file organized by event date can save hours of back-and-forth with an adjuster.
New Jersey has not seen a broad statewide insurer pullback, but properties in shore-influenced Monmouth County may still face higher premiums or coverage conditions after major storm activity. The proximity to windy Nor'easters and occasional coastal spillover means insurers may impose stricter verification standards. In that environment, proactive maintenance records, documented weather events, and clear proof of immediate post-storm condition can influence both approval timing and settlement reliability.
When a storm hits, act quickly to document damage, preserve installers' warranty information, and assemble a concise history of roof-related work. A well-organized claim package reduces ambiguity and helps ensure your roof is treated as a storm-related repair rather than a routine replacement.
In Eatontown, skylight work is a meaningful specialty, and leak-prone flashing and curb details are a recurring homeowner concern. When you study a skylight installation, look closely at the curb or curb-height installation where the skylight meets the roof deck. Flashes should be closely integrated with the roof plane and should extend past the flashing of adjacent vents to prevent moisture tracking during humid summers and winter melt. If you notice staining on ceiling drywall near a skylight or see condensation forming under the glass during cool nights, anticipate flashing replacements or curb rebuilds as likely tasks rather than rare exceptions. Regular checks after heavy rainfall or coastal storm spillover help catch failures early. For a replacement, insist on a continuous, integrated counter-flashing detail that returns to the roof deck, not a patch-and-glue fix. The best result comes from coordinating skylight flashing with the surrounding roof membrane, especially where the roof slope changes or where a dormer meets a skylight opening.
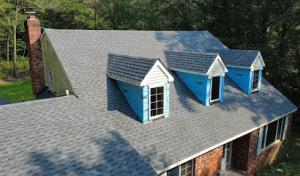
Chimney-related roofing work shows up often enough locally to matter, which points to flashing transitions and masonry intersections as common repair points. Inspect where brick or stonework meets the roof plane, and especially at the protruding sides and chimney cap. Cracked mortar, spalling brick, or shifting masonry can misalign flashing and trap water behind counter-flashing or step-flashing. A tight seal around the chimney saddle and proper termination of chimney flashing into the roof membrane are essential in a climate with freeze-thaw cycles. If you notice damp patches near the chimney interior, plan for both flashing refresh and a careful inspection of the chase area to catch honeycombing or brick decay early.
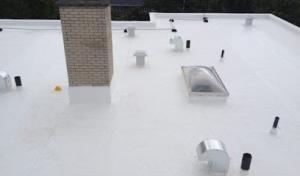
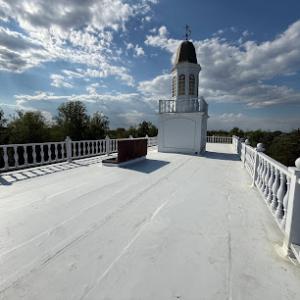
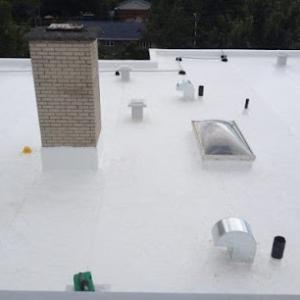
Flat and low-slope roofing is present in the contractor mix, making membrane transitions, drainage, and ponding-related maintenance relevant for portions of the borough's housing and commercial stock. Pay attention to how the membrane transitions from a vertical wall to the roof plane and how curbs and skylight openings intersect the flat surface. Ensure drainage paths are clear, with adequate slope toward scuppers or internal drains. Ponding water for extended periods can accelerate membrane wear and lead to leaks around flashings, penetrations, or transitions. Regular inspections after heavy rainstorms or coastal exposure events help identify soft spots or membrane blisters before they become active leaks.
Find contractors experienced in skylight installation, flashing, and leak repairs to bring natural light into your home.

Miller & Sons Roofing & Remodeling
(848) 360-3220 millersonsroofingremodeling.com
Serving
4.8 from 52 reviews