Last updated: Apr 19, 2026
This barrier island setting places your roof in a perpetual balance between salt-saturated air from the Atlantic and brisk coastal winds that can blow from multiple directions. The salt air accelerates corrosion on metal components, while the hard, abrasive spray from storms can wear away protective coatings on flashing, ridge caps, and fasteners. When a gusty Nor'easter rolls in, those edges and seams become the first targets, and small flaws quickly become costly leaks if left unaddressed. The risk isn't just in a single event; it's the cumulative exposure that eats away at the roof system year after year.
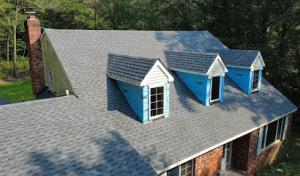
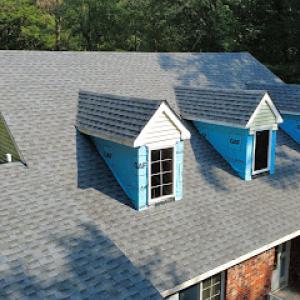
Ridge caps take a beating from salt-laden air and high wind shear, and rake edges are routinely exposed to wind-driven rain that can seep beneath shingles or tiles. Flashing around chimneys, vents, stacks, and along eave lines endures the most direct assault from spray, moisture, and temperature swings. Exposed fasteners-especially with asphalt or metal systems-become vulnerable when coastal humidity and salt accelerate pitch and corrosion. In a densely built neighborhood, even tiny flashing gaps or lifted shingles can channel wind-driven rain straight into attic spaces, sometimes without obvious exterior signs until interior moisture shows up.
Because the borough is densely built with many homes close to the ocean, wind-driven rain can exploit small flashing failures that might go unnoticed in less exposed inland neighborhoods. That means a minor edge lift, a hairline seam crack, or a corroded fastener can become a doorway for water during a spring nor'easter or a summertime squall. The clock runs faster when storms press from multiple directions and your home faces persistent salt exposure. You need to treat every potential weak seam as a risk point, not a cosmetic concern.
Start with a thorough inspection focusing on edges and transitions: ridge caps, rake edges, hips, and the perimeter where wind pressure is highest. Look for loose or corroded fasteners, lifted shingles or tiles, and any flashing that appears bubbled, corroded, or detached. Clean salt residues from metal flashing and replace any sections showing rust or coating failure. If you notice a gradual softening under shingles, a pocked or blistered surface, or localized staining, treat it as a red flag and plan a targeted repair rather than waiting for a full roof replacement to become unavoidable. Address small concerns before the next storm season, because coastal winds can magnify a minor flaw into a serious leak within a single event.
Keep a careful eye on roof edges after each significant storm and after nor'easters pass through. Photograph any suspicious areas and patterns of dampness in the attic so you can compare deterioration over time. Schedule prompt resealing of flashing and fastener replacements in vulnerable zones, especially around penetrations and along the eaves. Consider upgrading edge details with more robust flashing materials or fasteners designed for salt exposure when planning maintenance or a partial roof upgrade. If the roof shows recurring signs of edge or flashing failure, prioritize a targeted repair plan that reinforces the most exposed zones before the next blow comes through. Your vigilance today minimizes interior damage tomorrow.
In the barrier-island setting, the milder spring and fall shoulder seasons are the workable windows for a roof replacement. The crews can work through a day without the peak humidity of summer and without the harsher coastal winds that arrive in late autumn. Those shoulder-season stretches also give you time to schedule underlayment and flashing inspections before the next round of Nor'easters. For Point Pleasant Beach, aligning teardown and tear-off with a window between storms reduces the risk of salt spray interfering with fasteners and roof edge work. Plan accordingly: aim for a stretch with moderate temperatures and minimal storm activity.
Winter freeze-thaw cycles along the coast can make brittle shingles and underlayment more vulnerable during tear-off and can delay scheduling when Nor'easters track up the Jersey coast. If a storm comes through, temporary tarps and protective coverings matter, but so does delaying nonessential work until conditions stabilize. Local crews will tell you that a tight schedule around late-season storms reduces the chance of lingering moisture exposure at the eaves and ridge. When storms threaten, expect the project to shift by a few days to preserve roof integrity and minimize exposure to salt-laden air during critical stages.
Exposed roof edges on shore homes tend to deteriorate quickly as autumn winds rise and winter storms approach. The combination of salt air and high winds can lift flashing and loosen fasteners sooner than inland equivalents. Your best plan is a thorough edge inspection before work begins, with extra attention paid to the drip edge, kickout at fascia, and step flashing along any parapets or wall intersections. In the Point Pleasant Beach climate, crews should pre-cut and seal flashing components to resist salt exposure, then install with corrosion-resistant fasteners suitable for marine air. The goal is a continuous, watertight seal around the perimeter as the elements shift into late fall.
Coastal deterioration tends to stress edges, underlayment, and fastener systems more than inland roofs. Synthetic and composite shingles offer stable performance in salt air and under varying humidity, while metal roofing can provide extended edge protection if installed with coastal-grade fasteners and proper sealant. Concrete or clay tiles demand careful moisture management at overhangs and penetrations to prevent differential movement with seasonal temperature swings. In short, select a system with robust edge detailing, corrosion-resistant components, and a proven coastal installation approach. For the shore, the right combination reduces maintenance and preserves performance through winter transitions.
Get a clear picture of your project costs upfront - no commitment required.


Fortified Roofing - Roofing Contractor in NJ
(732) 201-2019 www.fortifiedroofing.com
Serving
4.9 from 205 reviews
Roof Plus
Serving
5.0 from 161 reviews
At Roof Plus, our goal is to make exterior building renovations easy for homeowners, business owners, and home associations in Ocean and Monmouth County NJ. As a family-owned business we have been setting the standard for quality roofing for decades. We’re dedicated to honesty, dependability, and delivering quality results. Our services include roof replacements, roof repairs, roof cleanings, siding services, skylights, gutters, and window installations. We use industry-leading materials and ensure our installers are highly trained and certified to exceed your expectations. With 24/7 live phone support, great communication is guaranteed. Contact Roof Plus today for your roof analysis and experience the difference!
Green Apple Roofing Brick
(732) 564-4099 greenappleroofing.com
Serving
4.9 from 45 reviews
Green Apple Roofing Brick is a premier commercial and residential roofing company located in Brick, NJ. We offer a wide variety of roofing services to meet all of your roofing needs. We have dozens of options for Energy Star rated tile, flat, shingle, rubber, asphalt, and metal Roofing products to keep your roof and home cool. A Green Apple roof can save you money on energy by reflecting the sun away from your roof and home. We also offer competitively priced shingle, flat and tile roof repair services and roof maintenance. We offer competitive pricing, outstanding customer service, and strive to exceed your every expectation!
Paramount Home Solutions
(732) 365-4588 paramounths.com
Serving
5.0 from 22 reviews
Paramount Home Solutions is proud to offer the best roofing services in Montgomery and Bucks County PA. Paramount also covers Camden, Gloucester, Burlington, Monmouth, Mercer, and Ocean Counties in NJ. Paramount Home Solutions is a fully licensed and insured roofing company located in both Souderton PA and Somerdale NJ. With over 20 years of industry experience, Paramount offers the best solutions for your home to keep it comfortable, clean, safe, and energy-efficient.
Pyramid Roofing & Renovations
(732) 840-6888 pyramidrenovations.com
Serving
5.0 from 75 reviews
Licensed bonded & Insured NJ lic # 13V06828900 30yrs in the ROOFING & SIDING business! Don't be fooled by "NEW" Roofing contractors coming to the market in the past few years who wont be around for long! Pyramid Renovations has been tried & true for decades serving Ocean & Monmouth Counties One stop shop, for all your Exterior Renovation needs! Roofing, Siding, Windows, Doors, Decks, custom Carpentry, Landscaping, Hardscapes, Man & Machine for hire.

Ralphs Construction Company
(732) 475-3424 ralphsconstructioncompany.com
Serving
5.0 from 16 reviews
Ralph's Construction Company is your top choice for full-service construction in New Jersey, specializing in residential and commercial remodeling. Our skilled team handles roof replacements, siding, kitchen and bathroom renovations, electrical work, plumbing installations, and basement finishing. We aim to bring your vision to life with exceptional craftsmanship, timely service, and fair pricing. As a trusted general contractor, we ensure every project is completed with quality materials and attention to detail, guaranteeing customer satisfaction. Contact us for a free consultation and discover why we are highly rated in New Jersey!

Superior Lakewood Roofing Services
(848) 285-1245 superiorlakewoodroofingservices.com
Serving
5.0 from 33 reviews
About Superior Lakewood Roofing With years of experience serving Brick Township and surrounding areas, Superior Lakewood Roofing Services is your trusted partner for all roofing needs. We pride ourselves on quality workmanship, exceptional customer service, and competitive pricing. Our team of certified professionals is available 24/7 to handle any roofing emergency or scheduled service. We use only the highest quality materials and the latest techniques to ensure your roof stands the test of time.
eMgee Contracting
Serving
4.8 from 29 reviews
We are an exterior home contractor With over fifteen years of experience Attention to detail and here to help our customers make an informed decision thats right for them it's that simple!

Fortified Roofing - Roofing Contractor in NJ
(732) 201-2019 www.fortifiedroofing.com
Serving
4.9 from 205 reviews
For quality roofing services and trusted local roofing contractors Farmingdale NJ, call Fortified Roofing today! We will provide you with an honest free estimate for any residential roofing services that you need. Our skilled Farmingdale NJ roofers are true professionals with a reputation for high quality and fast results. Using cutting-edge methods and equipment, we will conduct roof replacement and repairs, roof installation services, roof inspections, solar roof shingles installation as well as gutter and skylight installation and repair to your utmost satisfaction. Call us today!
Right Service Roof Repair & Roofers
(848) 346-2527 rightserviceroofrepairandroofers.com
Serving
5.0 from 31 reviews
Right Service Roof Repair and Roofers is a family-owned company in Toms River known for delivering awesome roof repair services with over 25 years of experience. Our licensed team specializes in roof leak repair, shingle replacement, flashing repair, roof inspections, and storm damage restoration. We use high-quality products to ensure lasting results and offer fair prices with honest estimates. Our dedicated owner and crew focus on excellent customer care, teamwork, and reliable same-day emergency roof repair. Trust us for expert roof maintenance and roof replacement across toms River.
Jar Roofing Repair
(732) 682-5451 jarroofingrepair.com
Serving
5.0 from 100 reviews
At JAR Roofing Repair, we are always ready to serve you! Whether it is an entire roofing restoration or just a single repair, we can do it. We work with top of the line quality brands to bring you the absolute best quality roof for every budget. Each JAR employee is highly trained and skilled to provide the highest level of quality on all of our projects. Call today for your free estimate and see how we can provide you with the best roofing service available!
Five Stars Quality Construction
Serving
4.9 from 141 reviews
Welcome to Five Stars Quality Construction We are a local, family owned business serving central New Jersey. ESTABLISHED ON 2013 We specialize in Roof Installation and Repair. We work with all kinds of roofing SINCE 1996 GIVING TO US 27 years experience, we are licensed and certified in the state of New Jersey. We are available 24/7. Owner Operated, No Subcontractors. Credit Cards Accepted. Call us today for a Free Estimate.
DGM Construction
(732) 231-5321 www.dgmconstructionllc.com
Serving
5.0 from 23 reviews
DGM Construction is a locally owned and operated roofing and siding company based in Neptune City, New Jersey. We serve residential customers within a 50-mile radius and throughout New Jersey. Services include roof installation, repair, inspection, replacement, siding services, and gutter installation. With 15 years of experience, we provide comprehensive roofing and siding solutions for residential properties.
In this barrier-island community, roof performance hinges on how materials deal with salt air, Nor'easters, and rapid seasonal temperature shifts. The combination of constant coastal exposure and frequent wind gusts means you'll want options that resist corrosion, stay securely fastened at edges, and tolerate salt-laden spray without failing prematurely. The choices below reflect what tends to hold up best under these conditions while aligning with typical shore-home construction.
Asphalt shingles are a common sight on modest beach cottages, but coastal wind exposure and rapid temperature swings can shorten their service life compared with more sheltered inland settings. When selecting asphalt in this area, look for upgraded, heavier shingles with impact resistance and a robust sealing shingle design. Pay attention to edge, hip, and valley detailing, since wind-driven rain and salt spray can exploit gaps. In service, you'll notice the need for more frequent inspections of flashing around chimneys, vents, and dormers, where corrosive salt can take a toll on metal components beneath the shingle layer. A reinforced underlayment and properly sealed vent penetrations help prevent moisture intrusion during storm events.
Metal roofing has a strong niche locally because salt air, wind exposure, and shore-home architecture make corrosion resistance, fastening details, and edge treatment especially important. Aluminum and galvalume-steel options offer good longevity if installed with corrosion-resistant fasteners and continuous edge flashing. In this climate, attention to snow guards, valley drip edges, and ridge caps matters, since wind-driven spray can seep under less secure joints. Coastal homes benefit from metal panels with concealed or sealed fasteners, and from a carefully engineered rain channel at eaves to direct salt-laden water away from fastener lines. Regular inspection of spray zones around coastal edges helps catch early signs of micro-corrosion before they progress.
Clay tile, concrete tile, wood shakes, and synthetic products appear in the market, but their performance in this shoreline setting depends heavily on weight, fastening method, and resistance to salt, algae, and freeze-thaw stress. Heavier tiles demand a robust deck and mechanical fastening system to resist uplift in high-wind events. Tile and shake roofs require meticulous edge detailing and movement joints to accommodate thermal expansion and contraction. Wood shakes, while aesthetically fitting for coastal neighborhoods, are particularly vulnerable to fungal growth and salt-induced drying cracks if sealants and untreated wood are not maintained. Synthetic products can offer great resistance to algae and salt but still rely on sound attachment and proper flashing to withstand edge exposure. In all these options, confirm that the fastening method, sealant compatibility, and edge treatments are specifically rated for coastal use and periodic splash zones. Regular cleaning of salt deposits and timely replacement of degraded components will extend their life in this environment.
Local pricing is shaped by the borough's shore location, where storm-driven demand spikes can tighten scheduling and labor availability after coastal weather events. In a dense beach-town setting, crews may be diverted to emergency work or delayed by storm cleanup, and that can push lead times and overall project pacing. You'll sometimes see tighter windows for tear-off and installation, so planning with a slightly longer calendar and a buffer for scheduling is practical.
Tighter lot lines, limited staging space, and cleanup logistics in a dense beach-town setting can affect tear-off and disposal efficiency compared with more spacious suburban sites. Expect maneuvering challenges for dumpsters, material storage, and waste removal, which can add little increments to cost and schedule. Contractors who routinely handle small lots often build in small contingencies for disposal and on-site containment, especially when old roofing includes hazardous or heavy materials. Plan for a modest increase in coordination time when coordinating between neighboring properties.
Material choice matters more here because corrosion resistance, wind detailing, and algae performance are practical coastal cost drivers, not just aesthetic upgrades. The salty air accelerates flashing corrosion and fastener wear, so selecting corrosion-resistant fasteners, corrosion-resistant metals or protective coatings can affect price but extend life. Wind-heavy edges require proper edge detailing and sometimes higher-rated underlayment or venting, all of which contribute to the bottom line beyond the face value of the shingles or panels. For coastal resilience, investing in materials with proven salty-air performance pays off over time.
Asphalt Shingles and Synthetic/Composite Shingles are common, with prices in the lower-to-mid range per square, while Metal Roofing and Tile options carry higher upfront costs but offer longer life in this environment. Concrete and Clay tiles can be more sensitive to weight and require structural checks, which shapes overall cost on tight, storm-prone sites. The borough's shore location and post-storm demand can tighten scheduling, so expect potential premium for quick mobilization, specialized coastal detailing, and enhanced cleanup. Typical cost ranges per square (1 square = 100 square feet) reflect the coastal realities and help you compare value across options. Asphalt Shingles generally run about 350 to 700 USD per square, Metal Roofing 700 to 1200 USD per square, Clay Tile 1200 to 2500 USD per square, Concrete Tile 900 to 1800 USD per square, Wood Shingles/Shakes 800 to 1500 USD per square, and Synthetic/Composite Shingles 500 to 900 USD per square.
Don't let upfront costs delay a critical repair - these contractors offer payment plans to fit your budget.


A full roof replacement in this barrier-island community is not a back-alley job with a simple one-visit fix. Instead, the borough's Construction Office handles the permit through a formal process. It's not something to treat as "no-paperwork" work, even if the crew seems to move quickly. The permit signals that the job will meet local storm-safety standards and that the work adheres to the borough's codes for salt-air exposure, Nor'easter conditions, and coastal wind loads. If the permit is missing or delayed, the project is at risk of stopping mid-shingle, flashing, or underlayment work, and penalties may apply.
Inspections aren't just a formality tucked at the end of the project. In this town, the borough conducts inspections at rough-in and final stages, with the goal of catching flashing details, edge fasteners, and roof-penetration issues before they become costly problems. Homeowners should confirm that the contractor schedules both inspections and pays attention to the inspector's notes. A replacement left to a single end-of-project visit can miss critical coastal-specific vulnerabilities-like proper sealant at gable end vents, vent flashing, or chimney counter-flashing that must endure salt spray and winter gusts. If an inspection is missed or deferred, the job may be paused until compliance is verified, adding time and potential risk to the roof's performance in upcoming storms.
Permit paperwork should be posted visibly on site in this borough, giving homeowners and neighbors an easy way to verify that the job is being handled through the local process. The posted information should include the permit number, the contractor's name, and the approved scope of work. When the paperwork is present, it becomes a practical reference point during the repair-especially after heavy wind events or during seasonal checks. If posting is unclear or missing, speak with the contractor about ensuring the documentation is displayed. It's not just about compliance; it's a tangible safeguard against unpermitted work that could impact insurance coverage or resale value.
Coastal crews often deal with tight access, salt-air corrosion on hardware, and a need for prompt, weather-resilient detailing at edges and penetrations. A responsible contractor will acknowledge the permit timeline as part of the schedule and will coordinate rough-in and final inspections in a way that aligns with the local climate calendar. If the contractor resists the inspection cadence or suggests you can skip posting, consider it a red flag. In a town built on proximity to the water, the permit and inspection rhythm isn't a bureaucratic hurdle-it's a practical guarantee that the roof replacement will endure the harsh shoulder seasons and remain compliant with the borough's standards.
After a Nor'easter or a coastal storm, your roof sits under a lot more scrutiny than a typical interior claim. In this high-scrutiny coastal claims environment, wind-driven storm losses and Nor'easter damage often prompt insurers to ask for age, material type, and condition documentation. The goal is to separate long-term salt-air wear from sudden openings or shingle loss caused by a specific event, and that distinction can steer how the claim is handled. Expect adjusters to push for a clear timeline of when the roof last saw weather-related activity and what standard maintenance was performed.
Because this is a Jersey Shore market with recurring coastal storm exposure, documentation quality can directly affect whether damage is treated as repairable wear or a covered storm event. Gather dated photos that show the roof's condition before and after the incident, plus close-ups of flashing, edges, and fasteners. Keep notes on observed salt-air effects like staining, corrosion, or guardrail-like granule loss on shingles. If possible, assemble purchase receipts, previous inspection reports, and any contractor notes that describe material type and installation quality. Clear, labeled images help avoid questions about whether damage existed prior to the storm.
Homeowners should expect adjusters to want photos and notes that distinguish long-term salt-air wear from sudden storm-created openings or shingle loss. They will assess whether wear is progressive and expected for the roof's age and material, versus a discrete event that aligns with the storm period. Be prepared to explain roof history, maintenance gaps, and any prior repairs that might affect coverage.
Do not rely on vague impressions of wear. Avoid delaying documentation or presenting only scattered images. Missing straight-forward evidence-like a dated photo set, detailed wind exposure notes, and the exact material specification-can delay decisions or shift coverage toward out-of-pocket repair.
Coordinate a coordinated documentation package with a trusted local roofer who understands Point Pleasant Beach's exposure. Have guidance ready for the adjuster on whether the observed damage aligns with storm activity or with long-term salt-air deterioration, and be prepared to request a condition-based assessment if needed.
Connect with contractors who help homeowners navigate the claims process from damage assessment to final approval.
Miller & Sons Roofing & Remodeling
(848) 360-3220 millersonsroofingremodeling.com
Serving
4.8 from 52 reviews
In this shore community, leak calls often center on flashing transitions that are repeatedly hit by wind-driven coastal rain rather than only broad field-shingle failure. That pattern means you should scrutinize roof penetrations for the first signs of exposure damage after nor'easters and high tides. Seasonal storms push salt-saturated air against flashing joints, so deterioration can outpace what a quick visual inspection might reveal. A practical approach is to treat every heavy rain as a test, especially after strong winds, and to inspect the area around any penetration once the weather clears.
Skylights are a meaningful specialty in this market, which matters locally because salt exposure and storm movement can accelerate seal and flashing problems at roof penetrations. When evaluating one, look for micro-cracks at the skylight curb, discolored glazing, and softened edge sealant. In Point Pleasant Beach, seals around skylight flashing can fail where wind-driven spray continuously wets the flashing theming. Maintain a tight seal along the curb and verify that the step flashing integrates with ridge and siding transitions. If moisture is found in the header or around the trim, consider re-flashing or replacing the curb with corrosion-resistant components. In high-wind months, apply a preventive check every season and replace aging sealant promptly to avoid creeping leaks.
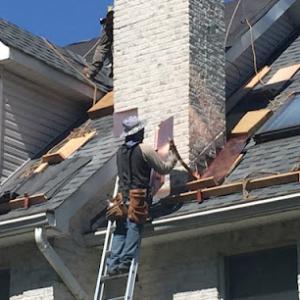
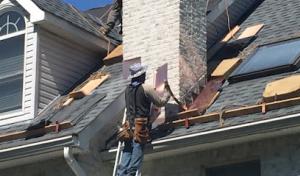
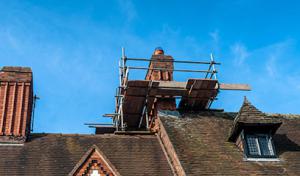
Chimney intersections are also a practical concern in the borough's older housing stock and mixed rooflines, where repeated patching can fail under shore-weather conditions. Priorities include inspecting mortar joints for cracks, ensuring the chase flashing sits flush, and confirming the counter-flashing is properly seated over the base flashing. Look for lawn-level staining or peeling interior paint as signs of slow-water intrusion. When patching, choose durable, salt-tolerant flashing materials and sealants rated for coastal exposure. Regular re-sealing around brick joints and the chimney apron helps prevent bulk water infiltration during spring storms and winter noreasters.
Find contractors experienced in skylight installation, flashing, and leak repairs to bring natural light into your home.

Ralphs Construction Company
(732) 475-3424 ralphsconstructioncompany.com
Serving
5.0 from 16 reviews

Neighborhood Roofing Howell Township
(732) 820-5627 neighborhoodroofingllc.com
Serving
5.0 from 30 reviews
Even where the main roof is pitched, a Point Pleasant Beach home often has low-slope porch, addition, or rear sections that weather differently in humid coastal conditions. Those zones face salt air, sea spray, and higher humidity more than the main field, so you should treat them as separate roof systems that require their own inspection rhythm. The low-slope areas are where you see the first signs of aging when a Nor'easter passes or after a strong coastal storm.
Summer humidity and salt exposure in this shore climate can accelerate algae growth and surface wear on low-slope materials, especially where drainage is imperfect. Because water can linger along the eaves and transitions, algae can green and blacken the surface faster than on steeper sections. Deterioration often starts at the edges where water sheeting meets flashing and at the joints between the main roof and the low-slope patch. On a practical level, keep an eye on mold-like staining, slippery organic growth, and mineral deposits that can hide leaks until they near the interior.
These sections often become the first leak source after wind events because edge details and transitions take more punishment than the main roof field. Leaks typically travel along rafter tails, under-layment overlaps, and around metal flashings at step-down corners. A proactive homeowner approach includes inspecting for loose or degraded sealant at edge metal, checking for kinks or gaps in valley pans, and tracking any pooled water near the parapet or gutter line after a storm. During dry spells, perform a close look at fasteners along the perimeter edges, ensuring screws and nails haven't loosened from vibration or shifting.
Schedule twice-yearly checks focusing on the transitions where the low-slope meets the pitched sections. Clean gutters and downspouts to prevent backing water from saturating the low-slope roof edge. If algae or staining is noticeable, address it with a gentle cleaning and a coating compatible with low-slope materials, followed by a fresh sealant at exposed edge details. When you notice persistent staining, pooling, or damp spots along these areas after rain, treat them as a priority for a professional assessment to prevent interior damage.
Find specialists in TPO, EPDM, and built-up flat roofing systems for residential and commercial properties.
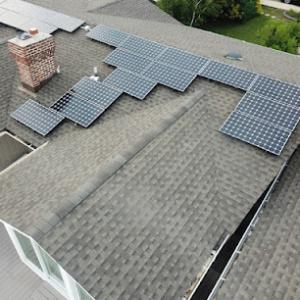
Coastal exposure makes the timing of a re-roof especially critical. Coordinating a re-roof before adding solar matters because coastal exposure can make future removal and reinstallation more disruptive if the roof is already near the end of its life. In a compact barrier-island setting, a sound roof deck supports long-term solar performance and minimizes the risk of leaks during and after equipment installation.
Salt air and wind exposure influence every attachment detail. When solar is added to a shore roof system, the fasteners, flashing, and mounting hardware must be selected with corrosion resistance in mind and installed with meticulous flashing transitions at penetrations. A well-planned layout accounts for salt spray zones and prevailing coastal winds, reducing the chance of corrosion-related failures around mounts and racking.
Edge exposure on a beach roof tends to accelerate wear, so flashing should be scrutinized during any replacement or retrofit. The coastline can push moisture toward hips and ridges, making continuous, properly sealed flashing essential. For a solar retrofit, ensure roofers address seam integrity, exposed fasteners, and backer materials in high-wind areas to maintain long-term performance.
This is a secondary local niche rather than the dominant market, but it is active enough to warrant planning discussion during replacement. If a roof is nearing the end of its service life, scheduling solar installation to accompany or follow a full re-roof reduces the number of penetrations and avoids reworking mounting points later. A unified plan helps ensure the roof remains watertight during and after the installation lifetime.
Coordinate with a roof contractor who understands coastal conditions and the added demands of solar hardware. Prioritize a thorough roof assessment, corrosion-resistant components, and a resilient flashing strategy that accommodates future maintenance. On a barrier island, a thoughtful sequence-re-roof first, then solar-can protect the investment from salt, wind, and seasonal storms.
Find contractors who integrate solar panels or solar shingles into your roof for long-term energy savings.
Fortified Roofing - Roofing Contractor in NJ
(732) 201-2019 www.fortifiedroofing.com
Serving
4.9 from 205 reviews
In this borough, homeowners should expect many contractors to market quick response, affordable re-roofing, and cleanup because those are strong signals in the local hiring pattern. That means you'll often see crews that promise fast turnaround and minimal disruption, but the trade-off can be less emphasis on long-term edge protection and flashing detail. Look for a project plan that prioritizes thorough edge sealing, nail pattern integrity for salty air, and a written sequence for debris removal that won't leave your yard littered after a lingering Nor'easter.
Long-established and family-owned positioning is common in the Point Pleasant Beach market, so reputation and visible follow-through often matter as much as the initial quote. Ask for a short list of recent jobs in nearby neighborhoods with similar coastal exposure. Visit completed projects if possible, and check how clean and secure the job site remained during the work. A contractor that returns after the boss is paid to address a caller's concern or to adjust a loose edge pry bar demonstrates the reliability that minimizes future storm-age issues on a roof facing salt spray.
Because permit posting and inspections are part of the local process, homeowners here have a practical way to screen out crews that are not handling borough paperwork correctly. Before any agreement, confirm that the company will obtain the required permits and schedule the inspections, and request copies of the permit numbers and inspection records. If a crew cannot or will not provide a transparent tracking trail, move on. This step helps ensure that flashings, vent boots, and roof-to-wall transitions are documented and reviewed, reducing the risk of leaks after the first Nor'easter.
Coastal storm and salt-air roof deterioration demands a clear focus on flashing details, corrosion-resistant fasteners, and edge protection. Ask how gutter and drip edge integration will be managed, how attic ventilation will be coordinated with roof venting, and what sealants will be used around vents and chimneys. Favor contractors who explain a simple system for maintaining flashing integrity, and who show you a plan for periodic inspections after heavy storms rather than a one-and-done approach.