Last updated: Apr 19, 2026
West Islip sits on Long Island's South Shore in the Town of Islip, so roofs are exposed to coastal humidity and salt-laden air that can shorten the life of metal flashings and fasteners. That salty environment accelerates corrosion, especially at joints, ridge caps, and pipe penetrations. In practical terms, aging or poorly sealed flashings can fail quietly, then leak suddenly once spring storms arrive or after a winter freeze. The neighborly rule is simple: inspect metal details twice a year, with extra attention after the harshest winter period. Look for dull or discolored spots, any lifting at corners, and any shiny corrosion dots along seams. When you see early signs, treat them as urgent indicators rather than touch-up opportunities.
Winter freeze-thaw cycles on Long Island commonly stress eaves and roof edges, making ice damming a practical concern during colder months. Ice dams force melted water to back up under shingles and into soffits, potentially traveling along rafters to interior ceilings. In practice, that means even minor shingle or flashing gaps can become active leaks once ice forms a dam behind them. Edges and overhangs are the first places to check before temperatures drop: ensure proper attic ventilation, verify drip edge alignment, and confirm that valley and eave flashings are secured against wind-driven spray. When ice starts to form along the edge, any water intrusion should trigger a rapid inspection of the roof deck and underlayment to prevent widespread interior damage.
Spring and fall storm patterns on Long Island bring wind-driven rain that can turn small flashing defects into active leaks. In West Islip, gusty Nor'easters can drive spray up under the roofing system, exploiting any little crack, gap, or misalignment. Attention to the transition zones-where roof deck meets walls, around chimneys, dormers, vents, and skylights-will pay off quickly. During after-storm checks, focus on sealing penetrations and resealing any flashing that shows loose edges or lifting corners. If a wind event exposes repeated leakage around the soffits, consider a targeted reseal or flashing upgrade in those vulnerable areas, rather than waiting for a larger roof failure.
Given the coastal exposure, a proactive cadence matters more than a reactive one. Schedule two comprehensive roof checks each year: once after winter when meltwater refreezes and once after the heavy spring storms subside. After each major wind or snow event, perform a rapid triage: look for loose shingles near edges, cracked sealant joints, and any loosened flashing around vents and chimneys. Replace or reseal flashing promptly if there are signs of movement or corrosion. Invest in quality sealants that resist salt exposure and temperature cycling, and avoid relying on cheap, short-lived fixes at eave lines and around penetrations. A small, timely repair now can prevent a much larger leak later, especially when damp coastal nights meet crisp winter mornings.
Dry, mild periods are preferred for roof replacement on Long Island because winter snow and ice and spring/fall rain can interrupt tear-off and underlayment installation. Coastal humidity and salt exposure mean lingering moisture can slow drywall and attic work once the deck is opened up. When the forecast shows a string of dry days, that window should be treated as a limited resource, not a guess. If a project starts in a damp stretch, drying times lengthen, adhesion can be compromised, and flashing work may have to be redone. In practice, a carefully chosen stretch of clear days becomes the difference between a smooth job and a delayed schedule that drifts into a stormier period.
Aim for late spring or early fall when the weather models in this area tend to deliver longer stretches of dry air and lower humidity. Midweek starts can help avoid weekend wind gusts that are common along the bayside. For a coastal home, a back-to-back sequence of dry days is worth prioritizing, even if it means delaying a project by a few days to secure a solid installation window. If a project must occur during shoulder seasons, plan for extra protection around edges and vents, since moisture lingers near eaves and in attic cavities longer than inland sites expect. The goal is to complete tear-off, roof deck exposure, and underlayment before any significant cold snap or late-season rain.
Winter ice at roof edges is a recurring factor in this area, so the forecast should show settled nights and frost-free mornings when possible. Nor'easter activity can push a project back by several days, so build in buffers for wind-led debris and driving rain. Spring and fall rain can interrupt underlayment installation when the surface isn't fully dry, and lingering coastal humidity slows solvent and adhesive curing times. Hot, bright days in summer test the hands-on aspects of installation, particularly with darker products that absorb heat and expand more quickly, requiring careful sequencing of insulation, fasteners, and shingle alignment.
Coordinate start times to avoid the peak heat of a sunny afternoon, especially for metal or dark composite products that heat up rapidly. When possible, schedule higher elevations and steep pitches for cooler morning hours to reduce heat-related handling challenges. Use a clear, gentle wind day for edge work and ventilated areas to accelerate drying during installation. If a weather window is shorter than needed, stage work to the most moisture-sensitive steps first (tear-off and underlayment) and leave protective measures in place to reduce moisture intrusion during any unavoidable rain delay. In a coastal climate, knowing the timing nuance helps prevent evenings under tarps from becoming extended stays.
Get a clear picture of your project costs upfront - no commitment required.

American Side Home Improvement
(631) 961-0404 www.americansidehomeimprovements.com
Serving
5.0 from 33 reviews
Clearview Roofing & Construction Babylon
(631) 827-7088 longislandroofs.com
Serving
5.0 from 50 reviews
Clearview Roofing in Babylon, NY, offers top-quality roofing services, including installations, roof repairs, and roof inspections for residential and commercial properties. As a trusted "roofer near me," we use premium materials from leading manufacturers like GAF and Owens Corning to ensure durability and reliability. Our services include siding, gutter installations, skylights and emergency roof repairs. With over 60 years of experience, we provide exceptional customer service and fair pricing. Choose Clearview Roofing in Babylon, NY, for professional and reliable roofing solutions. From asphalt shingles to Flat Roofing. TPO and EPDM roofing repair, Clearview Roofing in Babylon, NY, has you covered!
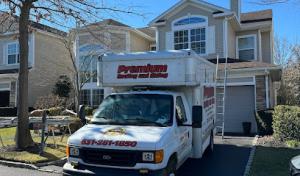
Premium Roofing & Siding
(631) 281-1850 www.premiumroofingandsiding.com
Serving
5.0 from 39 reviews
Welcome to Premium Roofing & Siding, Inc.! We are the experts when it comes to residential roofing & siding repairs. Our reputation for quality work, responsiveness, and competitive pricing has been the primary factor in our success. We are committed to client satisfaction in which we serve the client from the developmental stages of a project to final completion. By early involvement in the conceptual phase of a roofing project, we can explore all installation design possibilities with the client to assist in obtaining the best balance of aesthetics and budget covering all aspects. We bring the latest innovations in roofing products for your consideration to assure you of any current offerings for all of your project needs with our ongoing

Advanced Roofing
(516) 987-7478 advancedroofer.com
Serving
5.0 from 59 reviews
For all your Roofing ,Siding & Gutter needs. From simple repairs to complete installations. Family owned & operated since 1993.
Robert Gerard Contracting
Serving
5.0 from 19 reviews
Whether you need a repair, a complete re-roof of your home or office building, or routine maintenance, we have you covered! Give us a call to schedule a consultation!
J. Great Roofing
(631) 669-6269 www.jgreatroofing.com
Serving
4.9 from 120 reviews
J. Great Roofing & Siding stands behind GAF roofing products, you can count on consistency and the highest quality the industry has to offer. We are a "full service" roofing company and we will handle everything from a new roof installation, restoration and maintenance to re-roofs and repairs. All with the assurance that can solely come with years of experience.
Cover All Solutions
(877) 722-5521 coverallsolutions.com
Serving
4.9 from 18 reviews
Within the contracting industry, there are few companies that truly stand out in the crowd. At Cover All Solutions, we pride ourselves on building customer relationships that will last for generations. We do everything possible to ensure that you will not hesitate to recommend us to your closest friends and family. That means that we consider every detail of every roof we install, bathroom we renovate, siding we install, and we do it properly or not at all. Our long list of satisfied customers is a testament to our work quality and our commitment to quality. You can trust us with your next project, and we look forward to working with you very soon.
Tony the Roofer
(631) 300-7870 www.facebook.com
Serving
5.0 from 34 reviews
Commercial and Residential Affordable Quality Roofing Installation
JEL Home Improvements
(631) 433-3198 jelhomeimprovements.com
Serving
5.0 from 24 reviews
JEL Home Improvement is a family owned and operated business and plans to stay that way as we look to our future in the Home Improvement industry. We take great pride in the quality of our finished products and are confident that our customers will feel the same way about their projects.
Above All Roofing
(631) 665-3158 www.aboveallroofingli.com
Serving
4.8 from 19 reviews
Above All Roofing is a family owned business and has been in business for 35 years with over 40 years of experience. We have an A+ rating with the Better Business Bureau.
All Island Pro Roofing & Chimney
(631) 892-6313 www.allislandprobayshoreny.com
Serving
5.0 from 16 reviews
All Island Pro Roofing and Chimney is a premier contractor serving Long Island with expert roofing, chimney, and gutter services. With years of experience, we specialize in installations, repairs, inspections, and maintenance—ensuring lasting quality and peace of mind for our customers. Our dedicated team uses top-notch materials and craftsmanship to protect your home and enhance its appearance. Count on us for reliable service, honest assessments, and a commitment to keeping your property safe and beautiful.
Quick Roof & Siding
(877) 524-2159 www.quickroofandsiding.com
Serving
5.0 from 28 reviews
Welcome to Quick Roof and Siding, a reputable family-owned home renovation company based in Deer Park, New York. With over 50 years of collective experience in home renovation and contracting, our licensed and insured specialists are dedicated to delivering exceptional results. Our core values of speed, accuracy, and integrity guide us in approaching every project, regardless of its size. Specializing in roofing, siding, windows, and doors, Quick Roof and Siding takes pride in being an Owens Corning Preferred Roofing Contractor and an Anderson Certified Contractor. These esteemed affiliations enable us to offer you the industry's finest warranties, ensuring your peace of mind. Your home is your most valuable asset, and we are here to help
ML Best Construction
(631) 643-1404 mlbestconstruction.com
Serving
5.0 from 309 reviews
With over two decades of experience, ML Best Construction is a trusted name in residential, commercial, and industrial exterior renovations. Since opening in 2000, this family-owned company has provided top-tier craftsmanship for all roofing, siding, and gutter needs. Their skilled professionals also specialize in skylight, window, and door installations, using premium materials to ensure quality and durability. Their commitment to excellence has earned them a reputation for reliable service and superior results.
Asphalt shingles remain the dominant practical choice in this market, offering a balanced blend of durability, ease of installation, and predictable performance across Long Island's winter cold, summer heat, and coastal humidity. You'll often see shaded, algae-resistant options that help maintain curb appeal while standing up to the salty coastal air. When choosing asphalt, pair a robust underlayment with adequate attic ventilation to reduce potential ice damming at the eaves during colder stretches. Regular inspections after winter storms can catch wind-driven shingles or minor edge lift before leaks form.
Metal roofing can be a long-lived option, especially in areas exposed to wind-driven rain and salt spray. In practice, the longevity hinges on corrosion-resistant fasteners and flashing. Salt exposure near the South Shore can wear at unprotected metal over time, so attention to coated or galvanized components, proper sealing at joints, and consistent maintenance is essential. If you opt for metal, choose a profile and coating that suit your home's roof slope and architectural style, and plan for clear pathways for snow and ice to shed without creating ice dam issues at the edges.
Heavy materials such as clay tile, concrete tile, and slate are available in the market but can raise structural and installation complexity compared with the asphalt-heavy housing stock common across suburban Long Island. If a heavier roof is on your radar, a thorough structural assessment is wise to confirm floor joist capacity and load paths. Tile and slate bring distinctive aesthetics and excellent longevity, but they demand high-quality substructures and precise flashing details to manage wind-driven rain and freeze-thaw cycles that are common at coastal edges. In seaside settings, these materials also require careful attention to fastener choices and valley configurations to minimize leaks during winter storms.
Given storm-driven leak risks, prioritize a roof system that provides solid drip edges, well-sealed penetrations, and a continuous underlayment layer beneath the surface material. Coastal humidity and winter ice near roof edges mean periodic inspections after nor'easters and heavy rain events are prudent. When evaluating options, look for systems with proven performance against wind uplift and ice dam tendencies, and consider sequencing maintenance to address moisture intrusion before it compromises sheathing or interior spaces. For any upgrade, ensure the chosen material aligns with your home's existing framing and the typical building practices seen in the local market to optimize long-term resilience.
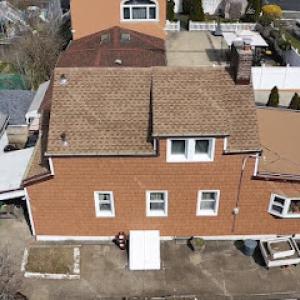
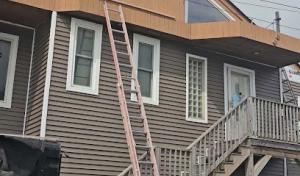
In this coastal south shore setting, wind-driven rain can find its way under even small gaps at roof edges and where shingles meet the eaves. West Islip homes frequently show aging or poorly sealed drip edges, overhangs, and fascia boards that allow moisture to creep inward during nor'easter rains. Pay attention to the transitions where the roof surface ends and the wall begins, especially on homes with mixed materials or where previous repairs created uneven seams. Inspect for lifted shingles or dark stains near the eaves after a storm, and understand that salt-laden air can accelerate edge corrosion in metal flashings. The most reliable prevention is timely sealing and replacement of any lifted or cracked pieces, with careful sheet-metal work that respects prevailing winds from the coast.
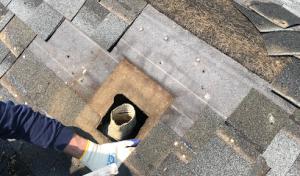
Chimney work is a common adjacent service among local contractors, and those tie-ins are a frequent source of leaks when not properly flashed. The intersection where masonry or siding meets the chimney crown can crack from seasonal freeze-thaw cycles, and improper step flashing can funnel water into the roof deck. In this market, a careful inspection of the chimney cricket, crown, and flue collars matters as much as the surrounding shingles. Look for chipped mortar, loose chase covers, or gaps sealed with caulk that has bulged and pulled away. A dedicated flashing detail around the chimney-properly integrated with counter-flashing and sealed joints-is essential to prevent seepage during heavy coastal rains and winter storms when temperatures swing rapidly.
Skylights are a meaningful specialty among local contractors, and curb flashing around these openings is a recurring homeowner concern. Aging skylight seals can fail, letting moisture travel down the curb into the roof plane. Inspect the perimeter flashing for puckering, rust staining, or silicone that has aged to a brittle state. If the skylight glass shows condensation between panes or the curb shows efflorescence or mineral deposits, moisture is penetrating at the seal or flashing. In this region, curb flashing must be continuous and well-seated, with proper slope away from the sill to shed coastal rain. Don't overlook the interior drip edge where the skylight tray meets the roof; a small drip can save you from larger interior damage after a windy, rainy event.
Winter ice tends to linger at roof edges and along the chimney and skylight lines, creating frozen barriers that widen existing cracks. Ice dams can force water to seek alternate paths, sometimes through small gaps you might dismiss as minor. Regular inspections after storms, focusing on the most exposed edges and penetrations, can catch trouble before water finds your attic. This is a neighborhood where proactive attention to these leak-prone zones saves you more than a reactive repair later.
Find contractors experienced in skylight installation, flashing, and leak repairs to bring natural light into your home.
Clearview Roofing & Construction Babylon
(631) 827-7088 longislandroofs.com
Serving
5.0 from 50 reviews

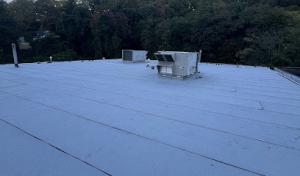
Flat and low-slope roofing is a real local specialty rather than a fringe service, which matters for homes with porches, additions, garages, and rear sections that do not shed water like the main roof. In this coastal area, the substrate and drainage choices you make on those low-slope sections have long-term consequences. Long Island's heavy rain events emphasize the need for reliable drainage paths and properly pitched transitions where the low-slope areas meet steeper main roofs. Coastal humidity can keep surfaces damp longer, increasing the importance of membrane condition and flashing integrity.
When planning a replacement on a low-slope section, map every potential stagnation point: parapet walls, penetrations, skylights, and edge details where water can linger. Your project should include a clearly defined slope, even on small patches, to encourage water movement toward scuppers or drains. If drainage routes run toward a rear extension or porch, ensure the new system explicitly ties into the existing roof drainage network without creating cross-currents that trap moisture. Consider temporary waterproofing techniques during teardown and reassembly to reduce wind-driven water intrusion during storms.
Coastal humidity and salty air mean membranes should be inspected for micro-cracks, punctures, and aging fasteners with extra care. On West Islip homes, pay particular attention to flashing around chimneys, vents, and edge metal where corrosion can begin at the fastener line. The membrane should extend beyond the plan area by at least a few inches and be properly sealed to counter wind-driven spray. Asphalt-based underlayments used beneath flat roofs can fail early if exposed to salt-laden air; where appropriate, specify higher-grade underlayments and wind-rated flashings designed for Long Island conditions.
Create a simple yearly inspection cycle focused on the low-slope zones, ideally after the heaviest rains and before winter freezes. Look for standing water after a moderate rain, blistering or curling of the membrane, and loose flashing where wind gusts often come off the Long Island Sound side. Pay attention to edge details at the gutter line and any transitions to pitched roof sections, where improper terminations are common failure points in this climate. If moisture lingers in the surface beyond a day or two after a storm, treat it as a warning sign and schedule a targeted inspection to verify drainage and flashing integrity.
Find specialists in TPO, EPDM, and built-up flat roofing systems for residential and commercial properties.
Clearview Roofing & Construction Babylon
(631) 827-7088 longislandroofs.com
Serving
5.0 from 50 reviews
Typical material pricing in this market runs about $350 to $700 per square for asphalt shingles, $700 to $1200 for metal, $1000 to $2200 for clay tile, $900 to $1700 for concrete tile, $350 to $650 for synthetic/composite shingles, and $1400 to $3000 for slate. For a homeowner planning a replacement, this spread reflects both material quality and the coastal environment you're facing on the South Shore. In practice, the actual bid intersects with roof complexity, attic ventilation, and the type of underlayment chosen to handle humidity and salt air.
Storm-driven leaks don't wait for a calendar. During active storm periods, demand surges can push prices up, and availability for crews and materials tightens across the South Shore. If a leak appears during winter nor'easters or after a hard wind event, you may see scheduling and pricing shifts as contractors juggle emergency work alongside planned projects. When planning, target shoulder seasons to secure crews and minimize weather-related delays, while keeping a mindful eye on moisture intrusion and edge ice buildup.
Tear-off complexity and corrosion-conscious flashing details are real cost drivers in this coastal market. If your roof includes multiple penetrations, skylights, or vent stacks, expect both material and labor to rise. Ventilation choices matter: better soffit and ridge intake can reduce condensation and ice dam risk, but add upfront cost. In this climate, a thorough assessment should balance affordable shingle options with robust flashing and a durable underlayment to withstand salt air and humidity, aiming for a durable seal that reduces the chance of recurring leaks.
Don't let upfront costs delay a critical repair - these contractors offer payment plans to fit your budget.

A full re-roof in West Islip typically requires a building permit through the Town of Islip. This isn't something a homeowner usually tackles solo; in practice, the contractor handles the permit paperwork and coordination with town inspectors. Knowing that your project is officially recorded helps ensure the work complies with local rules that address coastal humidity, salt exposure, and winter ice buildup.
Before work begins, confirm with the contractor that the permit is pulled in advance and that the project plan includes ventilation, flashing details, and adherence to current code. Ask for a copy of the permit application and the approved plan, and request notification of any town-required amendments. Keeping a paper trail-permit number, dates, and inspection reports-helps minimize delays when weather or wind-driven storms push interior checks or more stringent ventilation requirements.
Inspections commonly occur during tear-off or installation and again at final. In West Islip, inspectors will pay particular attention to ventilation adequacy, proper flashings at eaves, chimneys, dormers, and vents, and overall code compliance given coastal exposure. Expect reviewers to verify that attic ventilation ratios are appropriate, that roof-to-wall transitions are properly flashed to resist wind-driven moisture, and that fasteners and underlayment meet current standards. If any adjustments are required, the contractor should address them before final approval.
Coordinate with the contractor to schedule inspections promptly and be available or designate a trusted representative during critical milestones. Ensure access paths are clear for inspectors to examine eave and ridge details, attic ventilation points, and roof edge assemblies. Since coastal moisture and winter ice stress the roof line, confirm that the permit includes provisions for adequate ventilation upgrades if the existing setup is older or marginal. Finally, keep photos or notes of the roof's vulnerable edge zones to help explain any observed concerns during inspections.
In West Islip, the coastal, storm-prone insurance environment means claims are common enough that adjusters expect thorough roof-age records and photo documentation. When a severe wind or heavy rain hits, the damage can accumulate quickly, and those details matter more than a single, torn shingle image weeks later. Keep a bound log of roof age, prior repairs, and any known hail or wind events, and have a clear set of recent photos on hand. Insurers in New York may scrutinize replacement-cost estimates and price coverage based on roof type, age, and expected service life, so accuracy matters at the outset.
Documenting storm-related damage promptly matters because repeated wind and rain events can blur the line between one loss event and ongoing wear. Start with a careful exterior survey: note loose flashing, lifted shingles, damaged gutters, and visible dents or scraping from debris. Move to the attic if access exists-look for condensation, damp insulation, or roof deck staining. Take dated photos from multiple angles, close-ups of fasteners and flashings, and keep copies of recent maintenance receipts. The goal is a clean, chronological record that tells the full story, not a single snapshot.
When you file, provide the documented history and the timeline of events, so the adjuster understands which issues started after recent storms. If multiple events occur, distinguish between a single storm claim and ongoing wear, yet be transparent about how both contribute to the condition of the roof. Avoid delaying the claim or taking unprofessional temporary fixes that could complicate verification. A steady, well-documented approach helps protect the coverage you rely on when coastal weather tests the roof over time.
Connect with contractors who help homeowners navigate the claims process from damage assessment to final approval.
Clearview Roofing & Construction Babylon
(631) 827-7088 longislandroofs.com
Serving
5.0 from 50 reviews
The local market strongly favors re-roofing over niche new-construction work, so homeowners should expect many contractors to be oriented toward replacement and repair rather than custom builds. In this coastal setting, you'll notice a stable pool of family-owned, residential-focused crews who emphasize practical, durable solutions aimed at two-story suburban homes and modest cape/yielding layouts. Expect some manufacturer-certified or drone-inspection options, but these are less universal than the long-standing local outfits.
Cleanup and quick response are standout hiring priorities in West Islip, reflecting occupied homes and the need for fast triage after storms. When you call, ask for a responder who can be on-site within 24 hours after reports of leaks or wind damage. Confirm a plan for containing interior damage if rain is forecast, and request a clear timeline for debris removal and tarp deployment if needed. A contractor with a dedicated crew for temporary tarping and interior protection helps reduce further moisture intrusion during a storm season.
Look for crews that understand coastal humidity, salt exposure, and winter ice at roof edges. Ask about nail patterns, drip-edge materials, and ice-damming strategies specific to this climate. Long-established, family-owned teams often bring a steady, predictable cadence and a willingness to revisit and reseal problem areas after the first heavy rain. If a contractor offers drone inspections, use them as a preliminary step, but insist on a hands-on follow-up evaluation before any replacement plan is finalized.
For a replacement, prioritize warranties that cover underlayment, flashing, and vents in a salt-rich environment. For repairs, request a written triage plan with a confirmed arrival window and a milder approach for occupied homes. In all cases, insist on clear communication, visible safety measures on-site, and a transparent, step-by-step project progression that keeps living spaces protected during the process.