Last updated: Apr 19, 2026
Amityville sits on Long Island's South Shore in the Town of Babylon, so roofs are exposed to coastal storm patterns tied to Great South Bay weather and regional nor'easters. That exposure means every winter can bring heavier wind gusts, driving rain, and salt spray that accelerates wear on edging, flashing, and seam integrity. When a nor'easter hits, a small defect can become a major leak within days. The goal is to reduce vulnerability before the next storm and respond decisively when damage occurs.
Nor'easter timing and the seasonal wind cycle matter in Amityville. Spring wind events and autumn wind-driven rain are locally relevant because they can lift shingle edges, drive water under flashing, and turn small defects into interior leaks before winter. Coastal air brings higher humidity and salt content, which can corrode metal flashings and degrade sealants. This combination makes proactive inspection and timely reinforcement crucial, especially for homes with older roofing materials or shallow pitches that shed water more slowly.
Documentation and response go hand in hand here. Insurance adjusters in this region commonly evaluate claims against documented wind events and nor'easters, making pre-loss photos and material records especially important after storms. After a storm, you should compare current condition to clear, dated photos showing the entire roof, each elevation, and the attic if accessible. Capture close-ups of shingles, flashing around chimneys and vents, valleys, and any areas where previous repairs show signs of wear. Keep a running file of material types, colors, and installation dates if possible. If reports indicate wind-driven damage, you'll want chronological evidence of when issues started versus when they were addressed.
Post-storm steps are time critical. If moisture is detected, locate the source by inspecting ceilings and walls for staining that follows roof lines, especially near flashing penetrations. Do not assume a brief drip is harmless-water travels, and a small leak can indicate a hidden failure in a seam or underlayment. Temporary protections are essential: cover damaged sections with tarps or heavy plastic, ensure access is cleared for safe inspection, and avoid stepping on weakened roof areas. When you suspect wind uplift or flashing failure, contact a local roofer with storm experience to perform a rapid but thorough assessment. Delaying professional evaluation increases the risk of interior damage after thaw cycles.
Choosing the right local contractor matters. Seek roofers who understand the coastal environment and Nor'easter patterns, who can assess not only the visible surface but also step flashing, roof-to-wall connections, and the integrity of attic insulation and ventilation. A good crew will provide a focused plan for immediate protection, permanent repair, and, if needed, a durable replacement that stands up to Long Island weather. Ask for references from neighbors who faced similar coastal exposure and verify that the contractor's approach accounts for salt air corrosion, wind-driven rain, and the next seasonal load.
Your preparation should include a simple, clear post-storm protocol. If damage is suspected, begin with temporary coverage, document everything, contact a trusted local roofer for an on-site assessment, and preserve material records for the insurance claim. The coastal climate around Great South Bay amplifies risk, but with decisive action and clear documentation, peak Nor'easter seasons can be managed more safely and with fewer surprises inside the home.
Long Island Flat Roof IslandWide Commercial Roofing
(631) 838-9285 www.longislandflatroof.com
166 Broadway Ste 35 Suite 35, Amityville, New York
4.9 from 108 reviews
IslandWide Commercial Roofing is full service commercial roofing company located in Amityville NY and have been proudly serving customers throughout the Greater Long Island Area since over 10 years . From urgent flat roof repairs to complete flat roof replacements, we have become one of the most trusted industrial and commercial flat roofing contractors across the li. We believe that offering quality commercial and industrial roofing systems is simply not enough. We also set out ensure that all of our industrial roofing contractors are highly trained to a standard of excellence, and can offer an unprecedented level of customer service."
NY's Finest Roofing & Siding
(833) 476-6369 nysfinestroofingsiding.com
Serving
4.9 from 114 reviews
Roof Repair & Replacement Experts in Long Island & Queens! Worried about leaky roofs or outdated exteriors? NY's Finest Roofing & Siding, Inc. delivers peace of mind, lasting value, and superior craftsmanship for your home. We specialize in: Roof Repair Roof Replacement Flat Roof Repair & Replacement Siding Installation Why choose us? Nearly 30 years of experience serving Long Island, Queens, Brooklyn, Manhattan & Westchester. Skilled and certified roofing contractors who use the best materials. Fast and thorough appointment setting to job completion. Highly recommended by satisfied clients. Let us help you fix your roof leak with our roof repair or roof replacement solutions. Long Island's best roofing & siding Contractor!
Marvin Construction Services
(631) 639-6419 marvinconstructionservices.com
Serving
4.9 from 250 reviews
If you’re looking for a new roof installation or siding repair for your home, we are the construction company for you! For 15 years Marvin Construction Services has been dedicated to providing superior workmanship that is second to none. We have always been focused on high-quality results, excellent customer service, and reliable work ethic. Customers in Lindenhurst, New York and surrounding areas rely on us for professional roofing, siding, and gutter services. Our team has the experience, skills, and proper equipment to guarantee your home has the best outcome. We ensure all of our customers that we are a trustworthy company and that we always deliver the best results.
Selective Homes Roofing & Siding
(631) 736-5301 www.selectiveremodeling.com
Serving
5.0 from 20 reviews
Selective Homes Roofing & Siding is Long Island’s trusted exterior remodeling contractor, delivering expert roofing, siding, windows, and complete exterior upgrades that protect your home and elevate curb appeal. As a family-driven company rooted in craftsmanship and transparency, we specialize in roof replacement, roof installation, siding replacement, siding installation, and energy-efficient window installations. Our exterior specialists focus on durable materials, clean workmanship, and a homeowner-first experience—from initial inspection to final walkthrough. Whether you need a full roof replacement, new siding, upgraded windows, or a complete exterior renovation, we provide reliable, long-lasting solutions tailored to Long Island h...
Long Island Precision Roofing
(516) 850-5500 liprecisionroofing.com
Serving
5.0 from 199 reviews
Welcome to Long Island Precision Roofing where our staff is committed to providing our customers with the highest level of service, quality, and reliability in the roofing industry. We believe that every home and business deserves a roof they can trust, and we operate with a steadfast dedication to integrity, transparency, and excellence in all we do. Our mission is simple: to always do right by our customers, delivering honest, straightforward solutions, and maintaining open communication every step of the way. With us, you can count on a job well done, with no surprises—just dependable, top-quality craftsmanship you can trust!
Four Seasons Roofing & Exteriors
(631) 249-3377 fourseasonsroofingny.com
Serving
4.9 from 683 reviews
A Division of Four Seasons Enterprises, Inc.

Advanced Roofing
(516) 987-7478 advancedroofer.com
Serving
5.0 from 59 reviews
For all your Roofing ,Siding & Gutter needs. From simple repairs to complete installations. Family owned & operated since 1993.
Marcor Construction
(631) 321-0593 www.marcorny.com
Serving
4.9 from 381 reviews
Marcor Construction Roofing & More has been providing high-quality home improvement services to Long Island for over 30 years. We provide expert roof repair, roof replacement, siding installation, and more, and we can give you the perfect solution for your home's exterior improvement needs. We have installed thousands of roofs over the years, and we service a variety of roofing materials for both residential and commercial properties. We always put customer service first, and we will work with you to ensure that you are completely satisfied.
J. Great Roofing
(631) 669-6269 www.jgreatroofing.com
Serving
4.9 from 120 reviews
J. Great Roofing & Siding stands behind GAF roofing products, you can count on consistency and the highest quality the industry has to offer. We are a "full service" roofing company and we will handle everything from a new roof installation, restoration and maintenance to re-roofs and repairs. All with the assurance that can solely come with years of experience.
The Way Renovations
(516) 751-4002 thewayrenovationsinc.com
Serving
5.0 from 94 reviews
Are you looking for a reliable and experienced roofer to protect your home from the elements? Welcome to The Way Renovations, your premier roofing contractor in North Bellmore, NY. Licensed and insured with over 40 years of roofing experience, we pride ourselves on transforming homes with precision and a keen eye for detail. Established in 2020, our family-owned and locally operated business has dedicated itself to delivering exceptional craftsmanship with every project. Whether you need reliable asphalt shingle roofing, resilient flat roofing, or stylish metal roof installations, our skilled team is equipped to handle your needs.
Clearview Roofing & Construction Babylon
(631) 827-7088 longislandroofs.com
Serving
5.0 from 50 reviews
Clearview Roofing in Babylon, NY, offers top-quality roofing services, including installations, roof repairs, and roof inspections for residential and commercial properties. As a trusted "roofer near me," we use premium materials from leading manufacturers like GAF and Owens Corning to ensure durability and reliability. Our services include siding, gutter installations, skylights and emergency roof repairs. With over 60 years of experience, we provide exceptional customer service and fair pricing. Choose Clearview Roofing in Babylon, NY, for professional and reliable roofing solutions. From asphalt shingles to Flat Roofing. TPO and EPDM roofing repair, Clearview Roofing in Babylon, NY, has you covered!
JEL Home Improvements
(631) 433-3198 jelhomeimprovements.com
Serving
5.0 from 24 reviews
JEL Home Improvement is a family owned and operated business and plans to stay that way as we look to our future in the Home Improvement industry. We take great pride in the quality of our finished products and are confident that our customers will feel the same way about their projects.
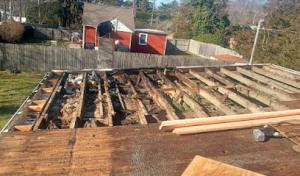
In this coastal pocket, the winter season brings repeated freeze-thaw stress that is hard on eaves, flashing transitions, and older shingle roofs. Snow accumulates on roof surfaces and then softens during steady sun or daytime heating, only to refreeze when a nightly chill returns. That cycle can drive water up against the underside of shingles and into vulnerable edges where flashing meets walls. The result is not just a few attic drips, but a pattern of staining, mold growth along wall edges, and concealed water damage that quietly undermines roof longevity. The contrast of salt-tinged air and dry winter winds can also accelerate the brittleness of older components, making every thaw a potential risk event.
Ice damming is a key local risk because snow accumulation followed by thawing and refreezing can back water up under roof coverings during Long Island winter swings. When heat escapes from the attic, the roof above the living space warms enough to melt the bottom layer of snow. The meltwater runs toward the cooler eaves, refreezes, and creates an ice barrier that blocks drainage. That trapped water can then work its way under shingles, through gaps in flashing, and along joints where the roof meets siding or vents. In homes with lower slope roofs or older materials, the damming effect tends to be more pronounced, and the damage may appear only after several cycles. The consequence is not mere surface staining; it can reach structural roof decking and create recurring leaks that complicate subsequent repairs.
Homes with older attic ventilation or insulation imbalances are more vulnerable to winter leak patterns that often first show up along exterior walls and ceiling edges. When attic spaces lack sufficient intake and exhaust airflow, heat builds up near the roof deck, promoting uneven melt patterns. Insulation gaps allow heat to leak through the ceiling joists, further drying or warping vulnerable areas. Look for telltale signs such as staining along eaves and ceiling edges, slight bubbling or peeling paint near corners, and a persistent musty odor after a thaw cycle. If soffit or ridge vents are blocked by insulation or debris, the risk compounds, and the interior may feel drafty or uneven in temperature, especially in rooms directly beneath the attic.
Begin with a careful attic assessment focused on ventilation balance and insulation level. Ensure soffit vents are open and unobstructed, ridge vents are clear, and there is a clear path for air to move from soffits to the roof peak. Add insulation where it is thin, aiming for a continuous layer that limits warm air reaching the roof deck. For eaves and flashing, seal small gaps with the right exterior sealants and check that shingle overhangs extend properly to shed meltwater rather than channel it toward the fascia. Keep roof debris like leaves and needles away from the edge where they can trap moisture and obstruct drainage. When winter storms arrive, clear snow from critical zones with a plastic shovel or roof rake from ground level, being careful not to damage shingles or flashing. If ice begins to form at the eaves, avoid chiseling it aggressively; instead, consider professional heat cable solutions installed by a licensed contractor, observed and maintained over time.
During a thaw, monitor for damp spots on ceilings, especially along exterior walls and near light fixtures in upper floors. If a leak appears, address it promptly to minimize interior damage. Persistent dampness or recurrent staining at the edges after multiple cycles signals that a more thorough inspection is needed-one that includes the roof decking, flashing transitions, and attic insulation plan. In Amityville's climate, proactive maintenance aligned with the winter cycle can save extensive interior repairs later and sustain the roof's performance through the toughest part of the season.
When you can't wait, these contractors offer fast response times to stop leaks and prevent further damage.
Clearview Roofing & Construction Babylon
(631) 827-7088 longislandroofs.com
Serving
5.0 from 50 reviews
Built Right Commercial Roofing Long Island
(631) 646-2681 www.builtrightcommercialroofing.com
Serving
4.9 from 55 reviews
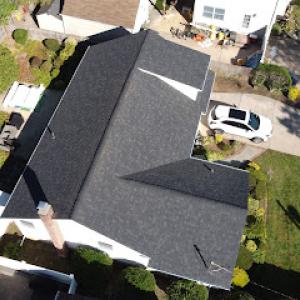
In this area, asphalt shingles are the workhorse for steep-slope residential roofs, and they fit the typical attic heights and roof pitches found on Amityville-style homes. They're familiar to local roofers, predictable to install, and respond well to the seasonal freeze-thaw cycles common along the South Shore. When choosing a shingle, look for a high wind rating and good algae resistance to help with coastal humidity and salt exposure. A practical approach is to match the color and shingle profile to the home's existing look while prioritizing durability against Nor'easter-driven rain and wind gusts. This keeps replacement cycles reasonable and aligns with the most common re-roofing jobs in this market.
Metal remains a strong option when wind resistance and minimal ongoing upkeep are priorities. In a humid coastal environment, metal sheds moisture and resists wind-driven damage well, which matters during Nor'easter events. The practical path is to choose a profile and coating that minimizes thermal expansion effects and corrosion under coastal salt spray. Pay special attention to penetrations, edges, and flashing, because those are the trouble spots that storm-prone South Shore conditions tend to stress. A well-sealed setup around vent stacks, chimney interfaces, and skylights reduces the chance of leaks after a heavy coastal storm.
Clay tile, concrete tile, and slate offer long life and distinctive curb appeal, but they require closer review when the home's structure isn't already prepared for the load. In Amityville, many older houses have roof framing sized for lighter coverings, so adding heavy materials can trigger structural checks and potential plan considerations during the project. The practical move is to measure existing framing capability, verify attic joist spacing, and confirm the supporting walls can bear the added weight without a retrofit. If a retrofit is needed, anticipate stiffer design and longer installation timelines, and coordinate carefully with the contractor to ensure a secure, weather-tight result that will withstand coastal exposure.
Regardless of material choice, the coastal climate demands meticulous detailing at edges, ridges, and penetrations. Nor'easters bring sharp wind shifts and driving rain, so prioritize continuous underlayment, properly seated fasteners, and durable sealants at all joints. For Amityville homes, this means inspecting for salt-air corrosion at metal flashings and ensuring asphalt shingle laminated layers are properly overlapped to reduce wind uplift. A thoughtful installation plan that accounts for the local wind patterns and humidity will help any material choice perform well through multiple seasons.
As you plan a replacement, expect local replacement costs to reflect Long Island labor pricing, disposal logistics, and a higher share of full tear-off work rather than simple patch jobs. In Amityville, crews often need extra time for debris removal, staging, and specialized coastal-friendly waste handling, which can nudge the bottom line upward compared to inland areas. When you receive bids, ask for a detailed breakdown that separates pickup and disposal, load charges, and any fees tied to coastal hauling. This helps you compare apples to apples and avoid surprise line items after work begins.
Base material ranges provide a starting point, but the actual price in this market is shaped by storm-driven demand and scheduling realities. Asphalt shingles typically fall in the low-to-mid range, while metal, concrete, or slate options can stretch higher during peak season or after a major nor'easter. The numbers shown reflect per-square costs, so a 1,000-square-foot roof will be quoted in hundreds of dollars per square, not thousands. In coastal communities, fast-turn replacements and dry-in work can push these figures upward if a storm event has just decreased availability.
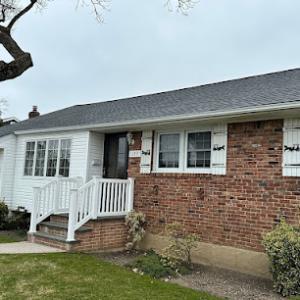
Older South Shore homes frequently feature chimneys, skylights, dormers, and multiple flashing points. Each of these adds labor hours for careful flashing integration, venting, and seam work, which can materially affect pricing beyond the base per-square material ranges. If your roof includes a chimney cricket, adjacent gutters, or a large dormer, you should expect a premium for precision sealing and weatherproof detailing. Ask for itemized estimates that show additional costs for flashing, step and counter flashing, and leak-prone transitions.
Storm-driven demand spikes after regional wind events can tighten scheduling and push pricing upward, especially for emergency dry-in work and fast-turn replacements. If you anticipate a need to move fast after a winter storm, discuss lead times, crew availability, and potential surge charges with the contractor ahead of time. For budgeting, assume a cautious margin above the base material range to account for tear-off complexities and coastal logistics. Keeping a clear line of communication with your roofer helps you lock in a realistic timeline and price while minimizing last-minute changes.
Get a clear picture of your project costs upfront - no commitment required.
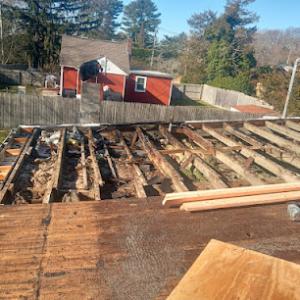
A full roof replacement in Amityville requires a permit through the Town of Babylon Building Department rather than a village-only roofing process. That means submitting plans, working with a licensed professional when needed, and following the town's inspection cadence. The town's rules reflect coastal exposure and the local home stock, so permit officers expect filings to show durable framing, proper underlayment, and correct flashing details to withstand Nor'easter winds and salt air. Scheduling with the Building Department early helps align the project with seasonal weather windows and ensures compliance with Town of Babylon safety standards.
The local process includes inspections at rough-in and final completion stages, so homeowners should confirm that the contractor schedules both rather than treating roofing as permit-free maintenance. Rough-in inspections verify structural integrity, ventilation, and the integrity of any sheathing or underlayment work before shingles or other coverings go on. Final inspections confirm that the roof installation matches approved plans and that drainage, venting, and flashing meet code. In coastal climates, inspectors will scrutinize fascia, drip edge, exhaust terminations, and dormer or skylight penetrations more carefully due to wind exposure and moisture intrusion risks.
Contractor licensing checks are part of the local permitting environment, and certain materials or structural changes may trigger additional plan review before work starts. If the project involves structural alterations, reconfiguring roof lines, or using alternative materials, anticipate a review period where the town may require stamped plans or engineering calculations. Verify your contractor's license status with Babylon's Building Department and confirm that any specialty components-like rated underlayment, coastal-grade fasteners, or hurricane clips-are reflected in the approved plan. Timely submission and accurate detailing reduce the chance of delays once work is ready to begin.
Before signing, confirm with the contractor that both rough-in and final inspections are on the schedule and that the permit package includes all required documentation (drawings, product specs, and engineering notes if applicable). Keep a copy of the permit and approved plans on-site during work. If a change is needed mid-project, obtain an amendment from the Building Department rather than proceeding under an informal modification. This approach protects both the home and neighbors during coastal storm season.
In this market, insurers commonly weigh roof age and material type heavily when deciding depreciation and claim value after wind or winter weather losses. A roof with mature asphalt shingles or metal that has endured several Nor'easters may face stiffer adjustment than a newer, more resilient installation. If the roof has a known weakness-loss of granules, loose fasteners, or signs of old hail impact-that can tilt the settlement toward reduction, even when fresh damage is present. Understanding how your roof type ages under coastal exposure helps temper expectations when filing a claim after a nor'easter.
Regional claim handling often references state-level weather events such as nor'easters, so homeowners benefit from keeping date-stamped photos and installation records before damage occurs. A clear trail of every inspection, repair, or replacement, with dates and contractor notes, reduces disputes about when damage started and whether it was sudden storm loss or slow deterioration. In a storm season with salt air and freeze-thaw cycles, timely documentation becomes a protective layer against post-event questions.
Material specifications and proof of prior condition are especially useful in Amityville because coastal storm claims can involve disputes over whether damage was sudden storm loss or long-term wear. If a claim hinges on a single tempest, having evidence of pre-event condition-shingle granule counts, layer thickness, and visible fasteners-can support the claim that the damage was storm-driven rather than degradation from aging. Having those records ready helps insurers process the claim with less ambiguity.
Connect with contractors who help homeowners navigate the claims process from damage assessment to final approval.
Clearview Roofing & Construction Babylon
(631) 827-7088 longislandroofs.com
Serving
5.0 from 50 reviews
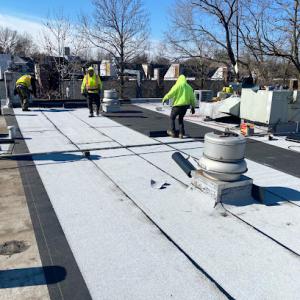
Although steep-slope roofs are common locally, low-slope sections over porches, additions, and mixed-use buildings need separate drainage and membrane attention. In Amityville, where coastal exposure and frequent storms meet, those transitions can trap standing water if drainage paths aren't kept clear. Inspect scuppers, gutters, and interior drains regularly after heavy rainfall or Nor'easters. Ensure membrane laps are fully sealed at transitions and that edge detailing aligns with the roof's expected water load. If a low-slope area looks flat even after a rain, revisit the layout and flashing details rather than assuming the system will self-correct.
Summer humidity and heat can stress adhesives and underlayments on low-slope assemblies, while autumn storms can expose drainage weaknesses quickly. Choose a system with a compatible, heat-tolerant adhesive and a durable drip edge that resists curling under prolonged sun exposure. Verify that underlayment seams are secured in a way that prevents blowing dust or salt spray from penetrating the layers. In porches or additions, line up the underlayment with the wall termination so water doesn't wick toward interior joints during a heavy shower.
Localized ponding and flashing failures on low-slope transitions are a recurring concern in a market where flat-roof specialists are meaningfully present. Pay close attention to the upper edge of the transition where the wall meets the roof deck; improper flashing here invites slow leaks that mask themselves during dry spells. Use compatible flashing materials that resist salt air corrosion and confirm that fasteners are corrosion resistant. During seasonal checks, test any drainage outlet near these transitions by pouring water to simulate rain, and look for slow seepage or edge curling that indicates a failed seal.
Find specialists in TPO, EPDM, and built-up flat roofing systems for residential and commercial properties.
Long Island Flat Roof IslandWide Commercial Roofing
(631) 838-9285 www.longislandflatroof.com
166 Broadway Ste 35 Suite 35, Amityville, New York
4.9 from 108 reviews
The local market shows a strong emphasis on re-roofing, quick response, and cleanup included, which reflects what Amityville homeowners are actually prioritizing when comparing contractors. When a nor'easter drops sizeable wind and rain, the right roofer is the one who can be onsite fast, secure vulnerable areas, and leave the property in broom-clean condition. Ask for a realistic timeline that aligns with inland and coastal storm patterns typical for the South Shore.
Long-established and family-owned firms are common signals in this area, suggesting homeowners often value local tenure and service continuity over one-off storm chasers. Look for a company with clear local references, a physical shop or office in the area, and a track record of completed re-roofs on homes similar to yours. A steady crew that knows the seasonal salt air and freeze-thaw cycles will tend to pick materials and flashing details that withstand Amityville's coastal exposure.
Ask for fully insured crews and a written plan for site protection during work, especially near coastal landscaping and driveways. Confirm the contractor routinely pulls final inspections and closes out work with the Town of Babylon, and that the team has a method to manage debris and daily cleanup. Request a detailed scope of work, including temporary protections for siding, gutters, and vents, plus a phased approach if your roof needs multiple days in poor weather.
A dependable local roofer should offer a defined post-storm follow-up, including inspection for wind-lifted shingles, chimney and vent flashing checks, and a clear communication line for any damages found after the crew departs. Practical, neighborhood-facing crews often provide straightforward warranty terms and a single point of contact for future maintenance needs.
Get a clear picture of your project costs upfront - no commitment required.